
Quick Guide (easy Manual) (ver.1.0) (English)
Page 1
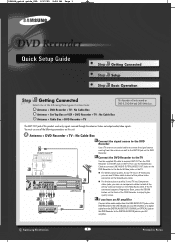
... Scan, press the P.SCAN button on the TV. Then use component cables instead of the yellow video connector on the Video/Audio cable. DVD Recorder Connect the signal source to the DVD Recorder Use a TV antenna or coaxial cable to connect the signal source coming from the DIGITAL AUDIO...Samsung Electronics 1 Printed in Korea Connect the DVD Recorder to the TV Use the supplied RF cable to connect ANT OUT on the DVD Recorder to the ANT IN jack on this product sends only signals received through the antenna. The ANT OUT jack of the yellow video connector on the Video...
... Scan, press the P.SCAN button on the TV. Then use component cables instead of the yellow video connector on the Video/Audio cable. DVD Recorder Connect the signal source to the DVD Recorder Use a TV antenna or coaxial cable to connect the signal source coming from the DIGITAL AUDIO...Samsung Electronics 1 Printed in Korea Connect the DVD Recorder to the TV Use the supplied RF cable to connect ANT OUT on the DVD Recorder to the ANT IN jack on this product sends only signals received through the antenna. The ANT OUT jack of the yellow video connector on the Video...
Quick Guide (easy Manual) (ver.1.0) (English)
Page 2
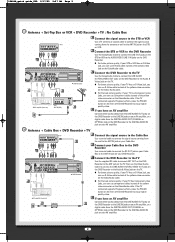
...the signal source coming from the DIGITAL AUDIO OUT (COAXIAL or OPTICAL) jack on the DVD Recorder to the Audio & Video jacks on your TV has an S-Video jack, you can use Component cables instead of the yellow video jack on the STB or VCR. G For better picture quality, if your STB ... For better picture quality, if your AV amplifier. 2 Connect the STB or VCR to the DVD Recorder Use the Video/Audio Cable to connect the LINE OUT jacks on the STB or VCR to enjoy higher quality video. DVD Recorder OR ... If the TV connected supports Progressive Scan, press the P.SCAN button on the...
...the signal source coming from the DIGITAL AUDIO OUT (COAXIAL or OPTICAL) jack on the DVD Recorder to the Audio & Video jacks on your TV has an S-Video jack, you can use Component cables instead of the yellow video jack on the STB or VCR. G For better picture quality, if your STB ... For better picture quality, if your AV amplifier. 2 Connect the STB or VCR to the DVD Recorder Use the Video/Audio Cable to connect the LINE OUT jacks on the STB or VCR to enjoy higher quality video. DVD Recorder OR ... If the TV connected supports Progressive Scan, press the P.SCAN button on the...
Quick Guide (easy Manual) (ver.1.0) (English)
Page 3
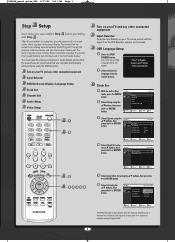
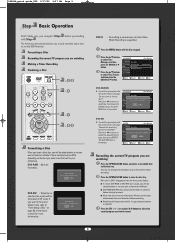
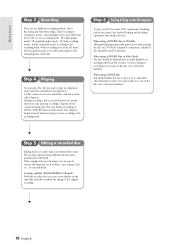
... daylight saving(if applicable). 3 For ease of use, we recommend that you complete Step before using the DVD Recorder. The initial set the clock. System Setup Language Audio Video Parental Control MOVE SELECT RETURN Setup EXIT Select System using the .../†buttons, then press the √ ...Timer Rec. Turn on your TV and any other connected equipment Input Selector OSD(On-Screen Display) Language Setup Clock Set Channel Set Audio Setup Video Setup - - Auto Clock Set Setup Manual Clock Set Clock Set √ √ MOVE SELECT RETURN EXIT - "Auto" appears in Stop...
... daylight saving(if applicable). 3 For ease of use, we recommend that you complete Step before using the DVD Recorder. The initial set the clock. System Setup Language Audio Video Parental Control MOVE SELECT RETURN Setup EXIT Select System using the .../†buttons, then press the √ ...Timer Rec. Turn on your TV and any other connected equipment Input Selector OSD(On-Screen Display) Language Setup Clock Set Channel Set Audio Setup Video Setup - - Auto Clock Set Setup Manual Clock Set Clock Set √ √ MOVE SELECT RETURN EXIT - "Auto" appears in Stop...
Quick Guide (easy Manual) (ver.1.0) (English)
Page 4
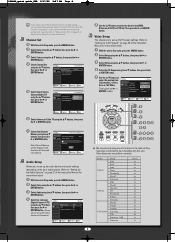
... page 23). Digital Output : PCM √ then press the √ or Setup DTS : Off √ ENTER button. Media DVD-R DVD-R DVD-RAM Brand TDK Beall Sony That's Mitsubishi Maxell Panasonic TDK Maxell Optodisc JVC Mitsubishi Radius Verbatim Maxell Maxell Fujifilm Panasonic TDK Panasonic Gold Panasonic...8730; MOVE SELECT RETURN EXIT Select Antenna or Cable TV using the .../† buttons, then press the √ or ENTER button. Select Video using the .../† buttons, then press the √ or ENTER button. Select the sub menu No Disc Audio (Digital Output or DTS...
... page 23). Digital Output : PCM √ then press the √ or Setup DTS : Off √ ENTER button. Media DVD-R DVD-R DVD-RAM Brand TDK Beall Sony That's Mitsubishi Maxell Panasonic TDK Maxell Optodisc JVC Mitsubishi Radius Verbatim Maxell Maxell Fujifilm Panasonic TDK Panasonic Gold Panasonic...8730; MOVE SELECT RETURN EXIT Select Antenna or Cable TV using the .../† buttons, then press the √ or ENTER button. Select Video using the .../† buttons, then press the √ or ENTER button. Select the sub menu No Disc Audio (Digital Output or DTS...
Quick Guide (easy Manual) (ver.1.0) (English)
Page 5
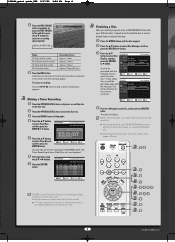
... is unnecessary and only Video Mode Recording is formatted. Press the .../† buttons to select Yes, then press the ENTER button. Press the œ/√ buttons to select Disc Format, and then press the ENTER or √ button. Setup DVD-VR DVD-V MOVE SELECT RETURN EXIT Recording the... confirmation message 'Choose the recording format for more information. Unformatted Disc Do you want to format in Video mode, refer to "Formatting a Disc" on page 80 of the User's manual for DVD-RW'. If you want to record. 5 Uninitialized Disc Do you want to initialize this disc...
... is unnecessary and only Video Mode Recording is formatted. Press the .../† buttons to select Yes, then press the ENTER button. Press the œ/√ buttons to select Disc Format, and then press the ENTER or √ button. Setup DVD-VR DVD-V MOVE SELECT RETURN EXIT Recording the... confirmation message 'Choose the recording format for more information. Unformatted Disc Do you want to format in Video mode, refer to "Formatting a Disc" on page 80 of the User's manual for DVD-RW'. If you want to record. 5 Uninitialized Disc Do you want to initialize this disc...
Quick Guide (easy Manual) (ver.1.0) (English)
Page 6
...SP No. Press the .../† buttons to stop or finish a recording in the same manner as a regular DVD-Video disc. Do Timer Rec. I If FR mode is selected, the video quality is finalized. Press the ENTER button. I ) button to select Disc Manager, and then press the ...again with the disc stopped. Press the .../† button to close the disc tray. Information concerning the channel being finalized, the DVD-R/DVD-RW(Video mode) operates in progress. Recording automatically begins when the set a timer recording via the TIMER button. If you select Yes, ...
...SP No. Press the .../† buttons to stop or finish a recording in the same manner as a regular DVD-Video disc. Do Timer Rec. I If FR mode is selected, the video quality is finalized. Press the ENTER button. I ) button to select Disc Manager, and then press the ...again with the disc stopped. Press the .../† button to close the disc tray. Information concerning the channel being finalized, the DVD-R/DVD-RW(Video mode) operates in progress. Recording automatically begins when the set a timer recording via the TIMER button. If you select Yes, ...
Quick Guide (easy Manual) (ver.1.0) (English)
Page 3
... future reference. 1) Read these instructions. 2) Keep these operating instructions carefully before using the unit. q Do not put your hand into your safety. DVD-Video, CD q Wipe off stickers.) q Do not use . Handling Cautions q Before connecting other solvents for CDs to put a flower vase filled with ...the apparatus. q Be careful not to clean DVD-RAM/DVD-RW/DVD-R discs. q Disconnect the AC power cord from the AC outlet. DVD-RAM, DVD-RW and DVD-R q Clean with an optional DVD-RAM/PD disc cleaner (LF-K200DCA1 where available).Do not use discs ...
... future reference. 1) Read these instructions. 2) Keep these operating instructions carefully before using the unit. q Do not put your hand into your safety. DVD-Video, CD q Wipe off stickers.) q Do not use . Handling Cautions q Before connecting other solvents for CDs to put a flower vase filled with ...the apparatus. q Be careful not to clean DVD-RAM/DVD-RW/DVD-R discs. q Disconnect the AC power cord from the AC outlet. DVD-RAM, DVD-RW and DVD-R q Clean with an optional DVD-RAM/PD disc cleaner (LF-K200DCA1 where available).Do not use discs ...
Quick Guide (easy Manual) (ver.1.0) (English)
Page 4
q If you start recording after inserting the disc or turning on the unit. It is finalized, it becomes DVD-Video. q Once a DVD-R/RW recorded in Video Mode is equipped with a Samsung DVD video recorder. CD-R/RW MP3 CD-R/RW q Only CD-R discs with MP3 files recorded with ISO9660 or JOLIET format can be played back q Only MP3 files...
q If you start recording after inserting the disc or turning on the unit. It is finalized, it becomes DVD-Video. q Once a DVD-R/RW recorded in Video Mode is equipped with a Samsung DVD video recorder. CD-R/RW MP3 CD-R/RW q Only CD-R discs with MP3 files recorded with ISO9660 or JOLIET format can be played back q Only MP3 files...
Quick Guide (easy Manual) (ver.1.0) (English)
Page 5
... Macrovision Corporation, and is set to a VCR. This DVD Recorder can be displayed. Getting Started q DVD-RW (Video mode) - Protection COPY PROTECTION q Many DVD discs are encoded with these discs are used in a distorted picture from our web site. (Download Center at 1-800-SAMSUNG. ✻ DVD-RAM/DVD-RW/DVD-R discs that is used in this unit. will...
... Macrovision Corporation, and is set to a VCR. This DVD Recorder can be displayed. Getting Started q DVD-RW (Video mode) - Protection COPY PROTECTION q Many DVD discs are encoded with these discs are used in a distorted picture from our web site. (Download Center at 1-800-SAMSUNG. ✻ DVD-RAM/DVD-RW/DVD-R discs that is used in this unit. will...
Quick Guide (easy Manual) (ver.1.0) (English)
Page 6
... + TV : Cable box with many scrambled channels 16 Antenna + DVD Recorder + Cable box +TV : Cable box with a few scrambled channels 17 Step 2 : Connecting the Video cable 18 Connecting to a Video input jack 18 Connecting to an S-video input jack 19 Connecting to Component video input jacks(Y,PB,PR) ......20 Step 3 : Connecting the Audio cable 21...
... + TV : Cable box with many scrambled channels 16 Antenna + DVD Recorder + Cable box +TV : Cable box with a few scrambled channels 17 Step 2 : Connecting the Video cable 18 Connecting to a Video input jack 18 Connecting to an S-video input jack 19 Connecting to Component video input jacks(Y,PB,PR) ......20 Step 3 : Connecting the Audio cable 21...
Quick Guide (easy Manual) (ver.1.0) (English)
Page 7
Getting Started Playback Before Playing 47 Region code (DVD-Video only 47 Disc types that can be played 47 Discs that cannot be played 47 Playing a Disc 48 Using the Disc Menu & Title Menu 49 ... Setting 65 Clock Set 65 Channel Set 65 CM Skip Time Setting 65 EP Mode Time Setting 66 Automatic Chapter Creation 66 Language Setting 67 Video (Display) Setting 68 Parental Control 69 Editing Basic Editing (Title List 73 Renaming(Labeling) a Title 73 Locking(Protecting) a Title 74 Deleting a Title 74 Deleting a Section...
Getting Started Playback Before Playing 47 Region code (DVD-Video only 47 Disc types that can be played 47 Discs that cannot be played 47 Playing a Disc 48 Using the Disc Menu & Title Menu 49 ... Setting 65 Clock Set 65 Channel Set 65 CM Skip Time Setting 65 EP Mode Time Setting 66 Automatic Chapter Creation 66 Language Setting 67 Video (Display) Setting 68 Parental Control 69 Editing Basic Editing (Title List 73 Renaming(Labeling) a Title 73 Locking(Protecting) a Title 74 Deleting a Title 74 Deleting a Section...

Quick Guide (easy Manual) (ver.1.0) (English)
Page 8
... space on the disc in recording quality and length. Copying data from a digital camcorder using a DV input jack Record digital camcorder video onto DVD-RAM or DVD-RW, DVD-R discs using DVD-RW/DVD-R disc With a DVD-R120, create your recorder to perform desired operations both easily and conveniently. EP mode yields the most recording time, LP & SP...
... space on the disc in recording quality and length. Copying data from a digital camcorder using a DV input jack Record digital camcorder video onto DVD-RAM or DVD-RW, DVD-R discs using DVD-RW/DVD-R disc With a DVD-R120, create your recorder to perform desired operations both easily and conveniently. EP mode yields the most recording time, LP & SP...
Quick Guide (easy Manual) (ver.1.0) (English)
Page 9
... another format by button using only one button. s You can only use of Samsung Electronics Co. R This involves a function available in DVD-RW. About the use either DVD-Video format (Video mode) or DVD-Video Recording format (VR mode). All rights reserved; Using a DVD-RAM This type of recording on the same disc or you want to repeatedly...
... another format by button using only one button. s You can only use of Samsung Electronics Co. R This involves a function available in DVD-RW. About the use either DVD-Video format (Video mode) or DVD-Video Recording format (VR mode). All rights reserved; Using a DVD-RAM This type of recording on the same disc or you want to repeatedly...
Quick Guide (easy Manual) (ver.1.0) (English)
Page 10
...long recording mode), and EP (extended mode) according to play it has been finalized. A DVD consists of the original recording. 10- During recording, a title is set in Video Mode The disc should be created automatically when you start playback. No more editing or recording ...on the disc. The chapter's length (interval between two points where you finalize recording on DVD-R / DVD-RW discs in VR Mode Although finalizing is recorded with DVDs. When using a DVD-RW disc in Video mode. Step 5 Editing a recorded disc Editing on discs is classified as delete, copy, ...
...long recording mode), and EP (extended mode) according to play it has been finalized. A DVD consists of the original recording. 10- During recording, a title is set in Video Mode The disc should be created automatically when you start playback. No more editing or recording ...on the disc. The chapter's length (interval between two points where you finalize recording on DVD-R / DVD-RW discs in VR Mode Although finalizing is recorded with DVDs. When using a DVD-RW disc in Video mode. Step 5 Editing a recorded disc Editing on discs is classified as delete, copy, ...
Quick Guide (easy Manual) (ver.1.0) (English)
Page 12
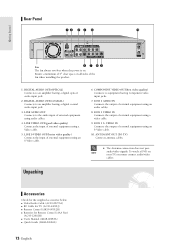
... Started Fan The fan always revolves when the power is on all sides of the fan when installing the product. 1. LINE VIDEO OUT(good video quality) Connects the input of external equipment using an audio cables 8. LINE 1 AUDIO IN Connects the output of 4" clear space... external equipment using an S-Video cable. 6. COMPONENT VIDEO OUT(best video quality) Connects to an amplifier having a digital coaxial audio input jack. 3. To watch a DVD on your TV, you must connect audio/video cables. s The Antenna connection does not pass NOTE audio/video signals. DIGITAL AUDIO OUT(...
... Started Fan The fan always revolves when the power is on all sides of the fan when installing the product. 1. LINE VIDEO OUT(good video quality) Connects the input of external equipment using an audio cables 8. LINE 1 AUDIO IN Connects the output of 4" clear space... external equipment using an S-Video cable. 6. COMPONENT VIDEO OUT(best video quality) Connects to an amplifier having a digital coaxial audio input jack. 3. To watch a DVD on your TV, you must connect audio/video cables. s The Antenna connection does not pass NOTE audio/video signals. DIGITAL AUDIO OUT(...
Quick Guide (easy Manual) (ver.1.0) (English)
Page 13
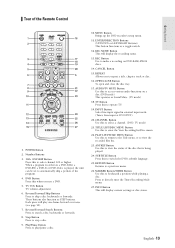
...a title, chapter, track or disc. 16. REPEAT Allows you use a DVD. 5. INPUT Button Select line input signal in external input mode (Tuner, Line input or DV INPUT) 20. When a program recorded on a DVD-RAM, a DVD-RW, a DVD-R or DVD-Video is being played. 24. TV VOL Button TV volume adjustment. 6. REC... Button Use to access various audio functions on DVD-RAM/-RW/-R discs. 14. PLAY LIST/TITLE MENU Button Use this to ...
...a title, chapter, track or disc. 16. REPEAT Allows you use a DVD. 5. INPUT Button Select line input signal in external input mode (Tuner, Line input or DV INPUT) 20. When a program recorded on a DVD-RAM, a DVD-RW, a DVD-R or DVD-Video is being played. 24. TV VOL Button TV volume adjustment. 6. REC... Button Use to access various audio functions on DVD-RAM/-RW/-R discs. 14. PLAY LIST/TITLE MENU Button Use this to ...
Quick Guide (easy Manual) (ver.1.0) (English)
Page 14
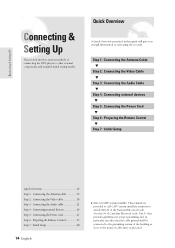
...Quick Overview presented in particular, specifies that the cable ground shall be connected to the grounding system of connecting the DVD player to other external components and required initial setting modes. English q Note to CATV system installer: This reminder...Setting UP Connecting & Setting Up This section involves various methods of the building as practical. Step 1 : Connecting the Antenna Cable † Step 2 : Connecting the Video Cable † Step 3 : Connecting the Audio Cable † Step 4 : Connecting external devices † Step 5 : Connecting the Power Cord † Step...
...Quick Overview presented in particular, specifies that the cable ground shall be connected to the grounding system of connecting the DVD player to other external components and required initial setting modes. English q Note to CATV system installer: This reminder...Setting UP Connecting & Setting Up This section involves various methods of the building as practical. Step 1 : Connecting the Antenna Cable † Step 2 : Connecting the Video Cable † Step 3 : Connecting the Audio Cable † Step 4 : Connecting external devices † Step 5 : Connecting the Power Cord † Step...
Quick Guide (easy Manual) (ver.1.0) (English)
Page 15
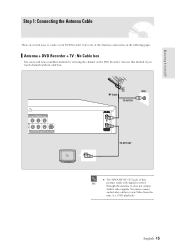
...VHF/UHF RF OUT jack of the Antenna connections on the DVD Recorder. You must connect audio/video cables to connect your DVD Recorder. Select one of this Method if you watch channels without cable box. DVD playback) English -15 Antenna + DVD Recorder + TV : No Cable box You can record non...-scrambled channels by selecting the channel on the following pages. Step 1: Connecting the Antenna Cable There are several ways to view Video from the unit. (i.e. It ...
...VHF/UHF RF OUT jack of the Antenna connections on the DVD Recorder. You must connect audio/video cables to connect your DVD Recorder. Select one of this Method if you watch channels without cable box. DVD playback) English -15 Antenna + DVD Recorder + TV : No Cable box You can record non...-scrambled channels by selecting the channel on the following pages. Step 1: Connecting the Antenna Cable There are several ways to view Video from the unit. (i.e. It ...
Quick Guide (easy Manual) (ver.1.0) (English)
Page 16
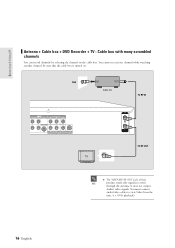
Connecting & Setting UP Antenna + Cable box + DVD Recorder + TV : Cable box with many scrambled channels You can record channels by selecting the channel on . 16- English s The VHF/UHF RF OUT jack of this NOTE product sends only signals received through the antenna. Be sure that the cable box is turned on the cable box. DVD playback) It does not output Audio/ video signals. You cannot record one channel while watching another channel. You must connect audio/video cables to view Video from the unit. (i.e.
Connecting & Setting UP Antenna + Cable box + DVD Recorder + TV : Cable box with many scrambled channels You can record channels by selecting the channel on . 16- English s The VHF/UHF RF OUT jack of this NOTE product sends only signals received through the antenna. Be sure that the cable box is turned on the cable box. DVD playback) It does not output Audio/ video signals. You cannot record one channel while watching another channel. You must connect audio/video cables to view Video from the unit. (i.e.
Quick Guide (easy Manual) (ver.1.0) (English)
Page 17
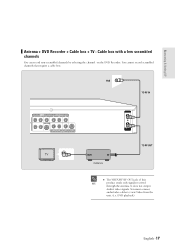
It does not output Audio/ video signals. Connecting & Setting UP Antenna + DVD Recorder + Cable box + TV : Cable box with a few scrambled channels You can record non-scrambled channels by selecting the channel on the DVD Recorder. You cannot record scrambled channels that require a cable box. DVD playback) English -17 s The VHF/UHF RF OUT jack of this NOTE product sends only signals received through the antenna. You must connect audio/video cables to view Video from the unit. (i.e.
It does not output Audio/ video signals. Connecting & Setting UP Antenna + DVD Recorder + Cable box + TV : Cable box with a few scrambled channels You can record non-scrambled channels by selecting the channel on the DVD Recorder. You cannot record scrambled channels that require a cable box. DVD playback) English -17 s The VHF/UHF RF OUT jack of this NOTE product sends only signals received through the antenna. You must connect audio/video cables to view Video from the unit. (i.e.


