
User Manual (user Manual) (ver.1.0) (English)
Page 4
ENGLISH Table of Contents Setup Features 8 Accessories 9 Disc Type and Characteristics 10 Description-Front Panel 12 Tour of the Remote Control 15 Using the Remote Control Unit 16 Connections Connecting Headphones to the DVD 17 Connecting to an External Component (Input Select 18 Viewing a Video from an External Component 19 Connecting to a TV 20 ...Menu 49 Setting Up the Language Features 50 Setting Up the Audio Options 52 Setting Up the Display Options 53 Setting Up the Parental Control 54 Reference Cautionary Notes 55 Troubleshooting 60 Specifications 63 Warranty 64 7
ENGLISH Table of Contents Setup Features 8 Accessories 9 Disc Type and Characteristics 10 Description-Front Panel 12 Tour of the Remote Control 15 Using the Remote Control Unit 16 Connections Connecting Headphones to the DVD 17 Connecting to an External Component (Input Select 18 Viewing a Video from an External Component 19 Connecting to a TV 20 ...Menu 49 Setting Up the Language Features 50 Setting Up the Audio Options 52 Setting Up the Display Options 53 Setting Up the Parental Control 54 Reference Cautionary Notes 55 Troubleshooting 60 Specifications 63 Warranty 64 7
User Manual (user Manual) (ver.1.0) (English)
Page 7
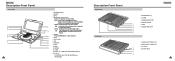
... (UP/DOWN/LEFT/RIGHT) 15. PLAY/PAUSE ( ), STOP( I ), REV-SKIP( ), FWD-SKIP( ) Description-Front Panel Right View Left View ENGLISH 1. REMOTE SENSOR 1 5. SPEAKER 14 10. INFO 11. DC IN 8.4V 1 2 4. POWER 10 • Press the POWER button for low light viewing situations. 9 ...If the viewing environment is very dark, use this mode to power off. 6. STANDBY INDICATOR 4 5 6 1. AIC (Adaptive Image Control) • Standard : The basic mode for ordinary viewing. • Indoor : The best mode for sunny outdoor conditions. AUDIO IN/OUT / DIGITAL OUT...
... (UP/DOWN/LEFT/RIGHT) 15. PLAY/PAUSE ( ), STOP( I ), REV-SKIP( ), FWD-SKIP( ) Description-Front Panel Right View Left View ENGLISH 1. REMOTE SENSOR 1 5. SPEAKER 14 10. INFO 11. DC IN 8.4V 1 2 4. POWER 10 • Press the POWER button for low light viewing situations. 9 ...If the viewing environment is very dark, use this mode to power off. 6. STANDBY INDICATOR 4 5 6 1. AIC (Adaptive Image Control) • Standard : The basic mode for ordinary viewing. • Indoor : The best mode for sunny outdoor conditions. AUDIO IN/OUT / DIGITAL OUT...
User Manual (user Manual) (ver.1.0) (English)
Page 8
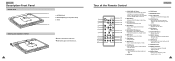
...8226; If you must press 14. LCD CON. RETURN Button • Returns to the left, then out. DISC MENU Button • Brings up the DVD player's setup menu. • Easy View can convert Letter Box 2 3 15 3. ENTER/DIRECTION Buttons • Starts disc play . 6. SUBTITLE Button 22... 2. REPEAT A-B Button • Use to mark a segment to full screen viewing on , you power off the unit with the remote, it remains in the direction of the Remote Control ENGLISH 1. Button the main POWER button on a disc. 9. SKIP Buttons 20. images to repeat between A and B. 23. STOP...
...8226; If you must press 14. LCD CON. RETURN Button • Returns to the left, then out. DISC MENU Button • Brings up the DVD player's setup menu. • Easy View can convert Letter Box 2 3 15 3. ENTER/DIRECTION Buttons • Starts disc play . 6. SUBTITLE Button 22... 2. REPEAT A-B Button • Use to mark a segment to full screen viewing on , you power off the unit with the remote, it remains in the direction of the Remote Control ENGLISH 1. Button the main POWER button on a disc. 9. SKIP Buttons 20. images to repeat between A and B. 23. STOP...
User Manual (user Manual) (ver.1.0) (English)
Page 9
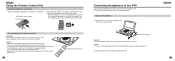
.... • This jack is exposed to the PHONES jack for a long period of time. 16 2m(63.506ft3) 0 (Remote Control Sensor) Connecting Headphones to the DVD You can attach headphones with the marks in the battery compartment. Not supplied Important! • Turn the headphone volume down to ... put the battery compartment cover back on the remote. • Match the polarities (+ and -) on the DVD player is a stereo mini-jack. How to the DVD, your DVD Player's speakers will be difficult to operate the remote control unit if the remote control sensor on the battery with a stereo mini-jack...
.... • This jack is exposed to the PHONES jack for a long period of time. 16 2m(63.506ft3) 0 (Remote Control Sensor) Connecting Headphones to the DVD You can attach headphones with the marks in the battery compartment. Not supplied Important! • Turn the headphone volume down to ... put the battery compartment cover back on the remote. • Match the polarities (+ and -) on the DVD player is a stereo mini-jack. How to the DVD, your DVD Player's speakers will be difficult to operate the remote control unit if the remote control sensor on the battery with a stereo mini-jack...
User Manual (user Manual) (ver.1.0) (English)
Page 11
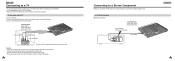
.... 3. Press the TV/VIDEO button on the TV. 2. Turn on your TV only, close the display panel of your DVD player to control the DVD player. • For power saving, press the LCD CON. ENGLISH Connecting to a TV You can listen to higher quality sound. 2-CH Audio Playback I Analog Connection ...) ANALOG INPUT L R Audio Cable ENGLISH 21 Playback will continue and audio to the speakers will be cut off the DVD Player and TV before you still will be able to use the remote to a TV equipped with a TV 1. button to power off the LCD display. 20 Connecting to a Stereo Component When ...
.... 3. Press the TV/VIDEO button on the TV. 2. Turn on your TV only, close the display panel of your DVD player to control the DVD player. • For power saving, press the LCD CON. ENGLISH Connecting to a TV You can listen to higher quality sound. 2-CH Audio Playback I Analog Connection ...) ANALOG INPUT L R Audio Cable ENGLISH 21 Playback will continue and audio to the speakers will be cut off the DVD Player and TV before you still will be able to use the remote to a TV equipped with a TV 1. button to power off the LCD display. 20 Connecting to a Stereo Component When ...
User Manual (user Manual) (ver.1.0) (English)
Page 24
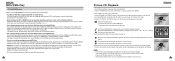
...Before the Slide Show begin, the picture interval must be played. When composing your DVD player (degraded sound quality and in the Slide Show mode.) • Press the UP/DOWN or LEFT/RIGHT buttons on the remote control to display the menu again. • : Return to the Album Screen. ... on the file size, each interval between images may take longer or shorter than the manual suggests. *If no button on the remote control are compatible with Microsoft's DOS and Windows, and with decompression rates below 128 Kbps will disappear. General name format of The SDMI Foundation...
...Before the Slide Show begin, the picture interval must be played. When composing your DVD player (degraded sound quality and in the Slide Show mode.) • Press the UP/DOWN or LEFT/RIGHT buttons on the remote control to display the menu again. • : Return to the Album Screen. ... on the file size, each interval between images may take longer or shorter than the manual suggests. *If no button on the remote control are compatible with Microsoft's DOS and Windows, and with decompression rates below 128 Kbps will disappear. General name format of The SDMI Foundation...
User Manual (user Manual) (ver.1.0) (English)
Page 31
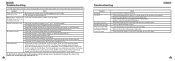
...before you believe this may be the cause of the DVD player may be used for three seconds. The Parental Mode is directed at the remote control sensor on the DVD player. • Remove the obstacle between the remote control unit and remote control sensor. • Check that the signal transmission is ... plugged into the PHONES jack. The Select Menu Language display will appear. Press the DOWN button to a new number. If you contact a Samsung authorized service center. Battery pack is in the INPUT mode. • Use a disc without scratches or dents. • Check that the ...
...before you believe this may be the cause of the DVD player may be used for three seconds. The Parental Mode is directed at the remote control sensor on the DVD player. • Remove the obstacle between the remote control unit and remote control sensor. • Check that the signal transmission is ... plugged into the PHONES jack. The Select Menu Language display will appear. Press the DOWN button to a new number. If you contact a Samsung authorized service center. Battery pack is in the INPUT mode. • Use a disc without scratches or dents. • Check that the ...


