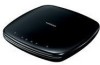
User Manual (ENGLISH)
Page 4
...does not correspond to the Region number of this DVD player, the DVD player cannot play the disc. • The product unit accompanying this user manual is AC 120V, 60Hz. The player will operate normally. • Be sure to remove the disc and turn off the player after use. • Disconnect the AC power cord...Storage Be careful not to harm the disc because the data on again with liquids, such as vases, shall be used elsewhere. • This DVD player is used as lightning and static electricity can be sure to disconnect the AC power cord from the inside to the outside of the disc. ...
...does not correspond to the Region number of this DVD player, the DVD player cannot play the disc. • The product unit accompanying this user manual is AC 120V, 60Hz. The player will operate normally. • Be sure to remove the disc and turn off the player after use. • Disconnect the AC power cord...Storage Be careful not to harm the disc because the data on again with liquids, such as vases, shall be used elsewhere. • This DVD player is used as lightning and static electricity can be sure to disconnect the AC power cord from the inside to the outside of the disc. ...
User Manual (ENGLISH)
Page 7
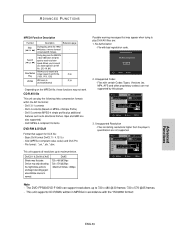
... MPEG4 This unit can view Digital Photos on your TV, not to a VCR results in slow motion. 1080p Playback (DVD-F1080 only) This player upconverts regular DVDs for home and other rights owners. The unit may depend on 1080p TVs. Connecting to a VCR. patents and other ... of this copyright protection technology must be played with copy protection. IF THERE ARE QUESTIONS REGARDING YOUR TV SET COMPATIBILITY WITH THIS DVD PLAYER, PLEASE CONTACT SAMSUNG'S CUSTOMER SERVICE CENTER." Screen Both regular and widescreen(16:9) pictures can play audio only, not graphics. - Chapter 1 SETUP ...
... MPEG4 This unit can view Digital Photos on your TV, not to a VCR results in slow motion. 1080p Playback (DVD-F1080 only) This player upconverts regular DVDs for home and other rights owners. The unit may depend on 1080p TVs. Connecting to a VCR. patents and other ... of this copyright protection technology must be played with copy protection. IF THERE ARE QUESTIONS REGARDING YOUR TV SET COMPATIBILITY WITH THIS DVD PLAYER, PLEASE CONTACT SAMSUNG'S CUSTOMER SERVICE CENTER." Screen Both regular and widescreen(16:9) pictures can play audio only, not graphics. - Chapter 1 SETUP ...
User Manual (ENGLISH)
Page 8
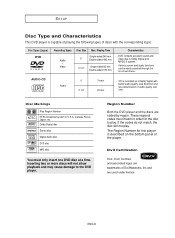
...following types of discs with better audio quality, less distortion and less deterioration of audio quality over time. Region Number Both the DVD player and the discs are used under license ENG-8 Double-sided 480 min. Disc Markings ~ NTSC Play Region Number NTSC broadcast ... - Single-sided 80 min. These regional codes must only insert one DVD disc at a time. SETUP Disc Type and Characteristics This DVD player is recorded as a Digital Signal with the corresponding logos: Disc Types (Logos) DVD Recording Types Audio + Video Disc Size Max. Dolby Digital disc STEREO...
...following types of discs with better audio quality, less distortion and less deterioration of audio quality over time. Region Number Both the DVD player and the discs are used under license ENG-8 Double-sided 480 min. Disc Markings ~ NTSC Play Region Number NTSC broadcast ... - Single-sided 80 min. These regional codes must only insert one DVD disc at a time. SETUP Disc Type and Characteristics This DVD player is recorded as a Digital Signal with the corresponding logos: Disc Types (Logos) DVD Recording Types Audio + Video Disc Size Max. Dolby Digital disc STEREO...
User Manual (ENGLISH)
Page 9
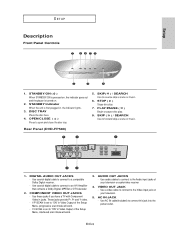
... Menu, progressive scan mode will work . - Use a video cable to connect to the Video input jack on , the indicator goes out and the player is set to "ON" in , the indicator lights. 3. ENG-9 STANDBY Indicator When the unit is set to the Audio input jacks of the Setup... Menu, interlaced scan mode will work . 3. Rear Panel (DVD-FP580) 1. Setup SETUP Description Front Panel Controls 1. OPEN/CLOSE ( ) Press to an A/V Amplifier that contains a Dolby Digital, MPEG2 or DTS decoder. 2. Use...
... Menu, progressive scan mode will work . - Use a video cable to connect to the Video input jack on , the indicator goes out and the player is set to "ON" in , the indicator lights. 3. ENG-9 STANDBY Indicator When the unit is set to the Audio input jacks of the Setup... Menu, interlaced scan mode will work . 3. Rear Panel (DVD-FP580) 1. Setup SETUP Description Front Panel Controls 1. OPEN/CLOSE ( ) Press to an A/V Amplifier that contains a Dolby Digital, MPEG2 or DTS decoder. 2. Use...
User Manual (ENGLISH)
Page 10
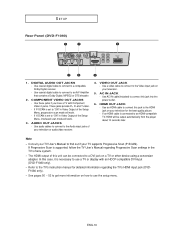
... regarding the TV's HDMI input jack (DVDF1080 only). - Use AC IN cable(Included) to connect this unit can be output automatically from the player about 10 seconds later. Use an HDMI cable to connect this case, it is necessary to the HDMI jack on how to "ON" in ...MPEG2 or DTS decoder. 2. Refer to "ON" in Video Output of your television for detailed information regarding Progressive Scan settings in jacks. SETUP Rear Panel (DVD-F1080) 1. DIGITAL AUDIO OUT JACKS - If P-SCAN is connected to the Audio input jacks of the Setup Menu, progressive scan mode will work . 3. Use ...
... regarding the TV's HDMI input jack (DVDF1080 only). - Use AC IN cable(Included) to connect this unit can be output automatically from the player about 10 seconds later. Use an HDMI cable to connect this case, it is necessary to the HDMI jack on how to "ON" in ...MPEG2 or DTS decoder. 2. Refer to "ON" in Video Output of your television for detailed information regarding Progressive Scan settings in jacks. SETUP Rear Panel (DVD-F1080) 1. DIGITAL AUDIO OUT JACKS - If P-SCAN is connected to the Audio input jacks of the Setup Menu, progressive scan mode will work . 3. Use ...
User Manual (ENGLISH)
Page 11
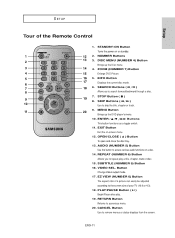
...3 14 4. AUDIO (NUMBER 5) Button Use this button to a previous menu. 20. ENG-11 DISC MENU (NUMBER 4) Button Brings up the DVD player's menu. 10. Button Change Video output mode. 17. SUBTITLE (NUMBER 9) Button 16. RETURN Button Returns to access various audio functions on a ... open and close the disc tray. 13. EZ VIEW (NUMBER 0) Button The aspect ratio of the Remote Control 1. ZOOM (NUMBER 7) Button 4 15 Enlarge DVD Picture. 5 16 5. STOP Button ( ) 9 19 8. REPEAT (NUMBER 6) Button Allows you to search forward/backward through a disc. 7. SETUP Setup Tour...
...3 14 4. AUDIO (NUMBER 5) Button Use this button to a previous menu. 20. ENG-11 DISC MENU (NUMBER 4) Button Brings up the DVD player's menu. 10. Button Change Video output mode. 17. SUBTITLE (NUMBER 9) Button 16. RETURN Button Returns to access various audio functions on a ... open and close the disc tray. 13. EZ VIEW (NUMBER 0) Button The aspect ratio of the Remote Control 1. ZOOM (NUMBER 7) Button 4 15 Enlarge DVD Picture. 5 16 5. STOP Button ( ) 9 19 8. REPEAT (NUMBER 6) Button Allows you to search forward/backward through a disc. 7. SETUP Setup Tour...
User Manual (ENGLISH)
Page 12
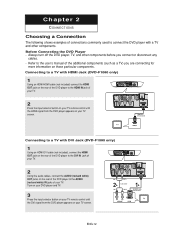
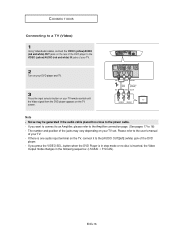
..., and other components. Connecting to a TV with HDMI Jack (DVD-F1080 only) 1 Using an HDMI-HDMI cable (not included) connect the HDMI OUT jack on the rear of the DVD player to the HDMI IN jack of your TV. 2 Press the input selector button on your TV screen. Chapter 2 CONNECTIONS Choosing a ...connect or disconnect any cables. - HDMI cable (Not Included) Connecting to a TV with DVI Jack (DVD-F1080 only) 1 Using an HDMI-DVI cable (not included), connect the HDMI OUT jack on the rear of the DVD player to the AUDIO (red and white) IN jacks of your TV. 2 Using the audio cables, connect...
..., and other components. Connecting to a TV with HDMI Jack (DVD-F1080 only) 1 Using an HDMI-HDMI cable (not included) connect the HDMI OUT jack on the rear of the DVD player to the HDMI IN jack of your TV. 2 Press the input selector button on your TV screen. Chapter 2 CONNECTIONS Choosing a ...connect or disconnect any cables. - HDMI cable (Not Included) Connecting to a TV with DVI Jack (DVD-F1080 only) 1 Using an HDMI-DVI cable (not included), connect the HDMI OUT jack on the rear of the DVD player to the AUDIO (red and white) IN jacks of your TV. 2 Using the audio cables, connect...

User Manual (ENGLISH)
Page 13
... Video and audio are transferred digitally without compression (LPCM or Bit Stream data). - It provides a secure digital link between Samsung TV and this DVD player using your TV. - Content is only available with a single cable. This is encrypted at the source device to noise ... from being made. This player upconverts regular DVDs for protecting DVD content output via HDMI/DVI from the player to -digital converter (in the TV) is digital. The player outputs a pure digital signal to make a digital video and audio connection with Samsung TVs that support Anynet+(HDMICEC...
... Video and audio are transferred digitally without compression (LPCM or Bit Stream data). - It provides a secure digital link between Samsung TV and this DVD player using your TV. - Content is only available with a single cable. This is encrypted at the source device to noise ... from being made. This player upconverts regular DVDs for protecting DVD content output via HDMI/DVI from the player to -digital converter (in the TV) is digital. The player outputs a pure digital signal to make a digital video and audio connection with Samsung TVs that support Anynet+(HDMICEC...
User Manual (ENGLISH)
Page 14
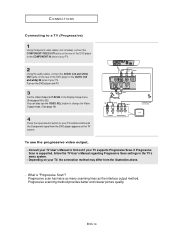
...mode. (See page 16) 4 Press the input selector button on the TV screen. Depending on your TV, the connection method may differ from the DVD player appears on your TV remote control until the Component signal from the illustration above. - RED BLUE GREEN RED WHITE Audio Cable RED WHITE RED BLUE... output, - CONNECTIONS Connecting to a TV (Progressive) 1 Using Component video cables (not included), connect the COMPONENT VIDEO OUT jacks on the rear of the DVD player to the COMPONENT IN jacks of your TV. 2 Using the audio cables, connect the AUDIO (red and white) OUT jacks on the...
...mode. (See page 16) 4 Press the input selector button on the TV screen. Depending on your TV, the connection method may differ from the DVD player appears on your TV remote control until the Component signal from the illustration above. - RED BLUE GREEN RED WHITE Audio Cable RED WHITE RED BLUE... output, - CONNECTIONS Connecting to a TV (Progressive) 1 Using Component video cables (not included), connect the COMPONENT VIDEO OUT jacks on the rear of the DVD player to the COMPONENT IN jacks of your TV. 2 Using the audio cables, connect the AUDIO (red and white) OUT jacks on the...
User Manual (ENGLISH)
Page 15
...Audio signals are delivered through the audio output.) 1 Using Component video cables (not included), connect the COMPONENT VIDEO OUT jacks on the rear of the DVD player to the COMPONENT IN jackls of your TV. 2 Using the audio cables, connect the AUDIO (red and white) OUT jackls on the rear of ... (not included) 4 Press the input selector on your TV is the best available connection if your TV remote control until the Component signal from the DVD player appears on your TV. Note - If you want to connect to an Amplifier, please refer to the Amplifier connection page. (See pages 17 to...
...Audio signals are delivered through the audio output.) 1 Using Component video cables (not included), connect the COMPONENT VIDEO OUT jacks on the rear of the DVD player to the COMPONENT IN jackls of your TV. 2 Using the audio cables, connect the AUDIO (red and white) OUT jackls on the rear of ... (not included) 4 Press the input selector on your TV is the best available connection if your TV remote control until the Component signal from the DVD player appears on your TV. Note - If you want to connect to an Amplifier, please refer to the Amplifier connection page. (See pages 17 to...
User Manual (ENGLISH)
Page 16
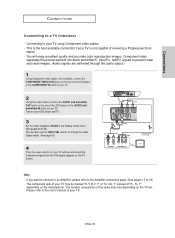
CONNECTIONS Connecting to a TV (Video) 1 Using Video/Audio cables, connect the VIDEO (yellow)/AUDIO (red and white) OUT jacks on the rear of the DVD player to the VIDEO (yellow)/AUDIO (red and white) IN jacks of the jacks may be generated if the audio cable placed too close to the ... TV. 3 Press the input selector button on your TV remote control until the Video signal from the DVD player appears on the TV, connect it to the user's manual of the DVD player. - If you press the VIDEO SEL. Please refer to the [AUDIO OUT][left] (white) jack of your TV set. If there...
CONNECTIONS Connecting to a TV (Video) 1 Using Video/Audio cables, connect the VIDEO (yellow)/AUDIO (red and white) OUT jacks on the rear of the DVD player to the VIDEO (yellow)/AUDIO (red and white) IN jacks of the jacks may be generated if the audio cable placed too close to the ... TV. 3 Press the input selector button on your TV remote control until the Video signal from the DVD player appears on the TV, connect it to the user's manual of the DVD player. - If you press the VIDEO SEL. Please refer to the [AUDIO OUT][left] (white) jack of your TV set. If there...
User Manual (ENGLISH)
Page 17
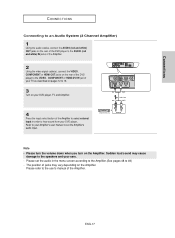
... CONNECTIONS Connecting to an Audio System (2 Channel Amplifier) 1 Using the audio cables, connect the AUDIO (red and white) OUT jacks on the rear of the DVD player to the AUDIO (red and white) IN jacks of the Amplifier. 2 Using the video signal cable(s), connect the VIDEO, COMPONENT or HDMI OUT jacks on... the rear of the DVD player to the VIDEO, COMPONENT or HDMI-DVI IN jacl of your TV as described on pages 12 to 16. 3 Turn on your ears. -
... CONNECTIONS Connecting to an Audio System (2 Channel Amplifier) 1 Using the audio cables, connect the AUDIO (red and white) OUT jacks on the rear of the DVD player to the AUDIO (red and white) IN jacks of the Amplifier. 2 Using the video signal cable(s), connect the VIDEO, COMPONENT or HDMI OUT jacks on... the rear of the DVD player to the VIDEO, COMPONENT or HDMI-DVI IN jacl of your TV as described on pages 12 to 16. 3 Turn on your ears. -
User Manual (ENGLISH)
Page 18
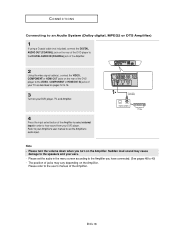
... position of jacks may cause damage to the speakers and your Amplifier's user manual to set the audio in order to hear sound from your DVD player. Refer to your ears. - Please set the Amplifier's audio input. CONNECTIONS Connecting to an Audio System (Dolby digital, MPEG2 or DTS Amplifier) 1 If ...using a Coaxial cable (not included), connect the DIGITAL AUDIO OUT (COAXIAL) jack on the rear of the DVD player to the DIGITAL AUDIO IN (COAXIAL) jack of the Amplifier. 2 Using the video signal cable(s), connect the VIDEO, COMPONENT or HDMI OUT jacks on the...
... position of jacks may cause damage to the speakers and your Amplifier's user manual to set the audio in order to hear sound from your DVD player. Refer to your ears. - Please set the Amplifier's audio input. CONNECTIONS Connecting to an Audio System (Dolby digital, MPEG2 or DTS Amplifier) 1 If ...using a Coaxial cable (not included), connect the DIGITAL AUDIO OUT (COAXIAL) jack on the rear of the DVD player to the DIGITAL AUDIO IN (COAXIAL) jack of the Amplifier. 2 Using the video signal cable(s), connect the VIDEO, COMPONENT or HDMI OUT jacks on the...
User Manual (ENGLISH)
Page 19
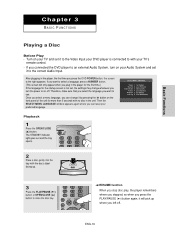
The STANDBY indicator light goes out and the tray opens. 2 Place a disc gently into the tray with your DVD player is connected to with the disc's label facing up where you connected the DVD player to an external Audio System, turn the power on the front panel of the unit for the startup screen is... the PLAY/PAUSE ( ) button again, it will only appear when you plug in the player for the first time.) If the language for more than 5 seconds with no disc in the player, the first time you press the DVD POWER button, the screen to the right appears: If you want to the correct...
The STANDBY indicator light goes out and the tray opens. 2 Place a disc gently into the tray with your DVD player is connected to with the disc's label facing up where you connected the DVD player to an external Audio System, turn the power on the front panel of the unit for the startup screen is... the PLAY/PAUSE ( ) button again, it will only appear when you plug in the player for the first time.) If the language for more than 5 seconds with no disc in the player, the first time you press the DVD POWER button, the screen to the right appears: If you want to the correct...
User Manual (ENGLISH)
Page 20
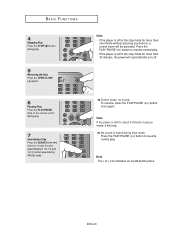
...Press the PLAY/PAUSE ( ) button to resume normal play . - If the player is heard during slow mode. Note - Screen stops, no sound. No sound ...speed during PAUSE mode. ▼ ▼ Note - To resume, press the PLAY/PAUSE ( ) button once again. If the player is left in pause mode, it will stop mode for more than one minute without pressing any buttons, a screen saver will automatically ... 7 Slow Motion Play Press the SEARCH ( / ) button to resume normal play . Note If the player is left for about 5 minutes in the stop . The ( ) icon indicates an invalid button press.
...Press the PLAY/PAUSE ( ) button to resume normal play . - If the player is heard during slow mode. Note - Screen stops, no sound. No sound ...speed during PAUSE mode. ▼ ▼ Note - To resume, press the PLAY/PAUSE ( ) button once again. If the player is left in pause mode, it will stop mode for more than one minute without pressing any buttons, a screen saver will automatically ... 7 Slow Motion Play Press the SEARCH ( / ) button to resume normal play . Note If the player is left for about 5 minutes in the stop . The ( ) icon indicates an invalid button press.
User Manual (ENGLISH)
Page 37
... files. These files are of the following . - Your MP3 or WMA files should note that the DVD player will play a maximum of compression/decompression you choose. When naming your DVD player (degraded sound quality and in this unit, please refer to the following types: Windows MediaTM (registered trade... basically depends on your MP3 or WMA files, do not exceed 8 characters, and enter ".mp3, .wma" as an assurance of the player to 192Kbps. Sound quality with decompression rates below 128 Kbps will not be played properly. - Getting CD audio sound requires an analog/digital ...
... files. These files are of the following . - Your MP3 or WMA files should note that the DVD player will play a maximum of compression/decompression you choose. When naming your DVD player (degraded sound quality and in this unit, please refer to the following types: Windows MediaTM (registered trade... basically depends on your MP3 or WMA files, do not exceed 8 characters, and enter ".mp3, .wma" as an assurance of the player to 192Kbps. Sound quality with decompression rates below 128 Kbps will not be played properly. - Getting CD audio sound requires an analog/digital ...
User Manual (ENGLISH)
Page 39
... to maximum below. No Authorization - Unsupported Codec - Files with bad registration code. 2. Files containing resolutions higher than the player's specification are : 1. The DVD-FP580/DVD-F1080 can play the following video compression formats within the AVI file format: - Allows you to search at a faster speed in..., these functions may appear when trying to 720 x 480 @30 frames/ 720 x 576 @25 frames. - Qpel and GMC are not supported by this player. 00:00:00 ... 3. Basic DivX format DivX3.11 / 4.12/ 5.x - T File you attempt to search - This unit supports CD-R/RWs written...
... to maximum below. No Authorization - Unsupported Codec - Files with bad registration code. 2. Files containing resolutions higher than the player's specification are : 1. The DVD-FP580/DVD-F1080 can play the following video compression formats within the AVI file format: - Allows you to search at a faster speed in..., these functions may appear when trying to 720 x 480 @30 frames/ 720 x 576 @25 frames. - Qpel and GMC are not supported by this player. 00:00:00 ... 3. Basic DivX format DivX3.11 / 4.12/ 5.x - T File you attempt to search - This unit supports CD-R/RWs written...

User Manual (ENGLISH)
Page 42
... access the sub features. 3 To make the setup screen disappear after setting up a parental levels, and even adjust the player to the type of the Anynet+(HDMI-CEC) Options (DVD-F1080 only). 2 Press the œ/ƒ buttons to select Setup, then press the ‹ or ENTER button. Chapter 5... CHANGING THE SETUP MENU Using the Setup Menu The Setup menu lets you customize your DVD player by allowing you to select various language ...
... access the sub features. 3 To make the setup screen disappear after setting up a parental levels, and even adjust the player to the type of the Anynet+(HDMI-CEC) Options (DVD-F1080 only). 2 Press the œ/ƒ buttons to select Setup, then press the ‹ or ENTER button. Chapter 5... CHANGING THE SETUP MENU Using the Setup Menu The Setup menu lets you customize your DVD player by allowing you to select various language ...
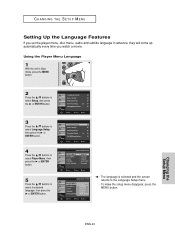
User Manual (ENGLISH)
Page 43
... œ/ƒ buttons to select Language Setup, then press the ‹ or ENTER button. 4 Press the œ/ƒ buttons to select Player Menu, then press the ‹ or ENTER button. 5 Press the œ/ƒ buttons to the Language Setup menu. - Language Setup &#... Setup ‹ Audio Setup ‹ Display Setup ‹ Parental Setup : ‹ DivX(R)Registration : ‹ Enter Return Menu LANGUAGE SETUP Player Menu Disc Menu Audio Subtitle DivX Subtitle : English : English : English : Automatic : Unicode Enter Return Menu LANGUAGE SETUP PPllaayyeerr MMeennuu Disc Menu ...
... œ/ƒ buttons to select Language Setup, then press the ‹ or ENTER button. 4 Press the œ/ƒ buttons to select Player Menu, then press the ‹ or ENTER button. 5 Press the œ/ƒ buttons to the Language Setup menu. - Language Setup &#... Setup ‹ Audio Setup ‹ Display Setup ‹ Parental Setup : ‹ DivX(R)Registration : ‹ Enter Return Menu LANGUAGE SETUP Player Menu Disc Menu Audio Subtitle DivX Subtitle : English : English : English : Automatic : Unicode Enter Return Menu LANGUAGE SETUP PPllaayyeerr MMeennuu Disc Menu ...
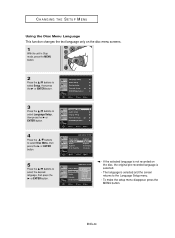
User Manual (ENGLISH)
Page 44
... Setup ‹ Display Setup ‹ Parental Setup : ‹ DivX(R)Registration : ‹ Enter Return Menu LANGUAGE SETUP Player Menu Disc Menu Audio Subtitle DivX Subtitle : English : English : English : Automatic : Unicode Enter Return Menu LANGUAGE SETUP Player Menu Disc Menu Audio Subtitle DivX Subtitle √ English Français Deutsch Español Italiano...
... Setup ‹ Display Setup ‹ Parental Setup : ‹ DivX(R)Registration : ‹ Enter Return Menu LANGUAGE SETUP Player Menu Disc Menu Audio Subtitle DivX Subtitle : English : English : English : Automatic : Unicode Enter Return Menu LANGUAGE SETUP Player Menu Disc Menu Audio Subtitle DivX Subtitle √ English Français Deutsch Español Italiano...

