
User Manual (user Manual) (ver.1.0) (English)
Page 1
To receive more complete service, please register your product at www.samsung.com/register DV5471AE-03022A-01_EN.indd 1 2011-03-28 3:44:01 DV5471A* DV5451A* Gas and Electric Dryer user manual imagine the possibilities Thank you for purchasing this Samsung product.
To receive more complete service, please register your product at www.samsung.com/register DV5471AE-03022A-01_EN.indd 1 2011-03-28 3:44:01 DV5471A* DV5451A* Gas and Electric Dryer user manual imagine the possibilities Thank you for purchasing this Samsung product.
User Manual (user Manual) (ver.1.0) (English)
Page 9
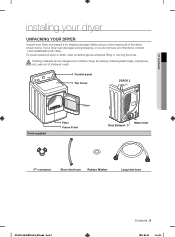
If your Dryer and inspect it for shipping damage. Keep all of childrens' reach Control panel Top Cover [ BACK ] Door Parts supplied Filter Frame Front Duct Exhaust Water ... children. To prevent personal injury or strain, wear protective gloves whenever lifting or carrying the dryer. 01 Contents installing your dryer UNPACKING YOUR DRYER Unpack your Dryer was damaged during shipping, or you have all of the items, contact 1-800-SAMSUNG (726-7864). Make sure you do not have received all packing material (plastic bags, polystyrene...
If your Dryer and inspect it for shipping damage. Keep all of childrens' reach Control panel Top Cover [ BACK ] Door Parts supplied Filter Frame Front Duct Exhaust Water ... children. To prevent personal injury or strain, wear protective gloves whenever lifting or carrying the dryer. 01 Contents installing your dryer UNPACKING YOUR DRYER Unpack your Dryer was damaged during shipping, or you have all of the items, contact 1-800-SAMSUNG (726-7864). Make sure you do not have received all packing material (plastic bags, polystyrene...
User Manual (user Manual) (ver.1.0) (English)
Page 11
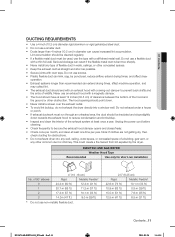
... and slope slightly down . • Never install a screen over the exhaust outlet. • To avoid lint buildup, do not exhaust the dryer directly into any wall, ceiling, crawl space, or concealed space of a building, gas vent, or any type of the hood and the ground...4 inches (10.2 cm) in walls, ceilings, or other common duct or chimney. ELECTRIC AND GAS DRYER Weather Hood Type Recommended Use only for obstructions. • Do not exhaust dryer into a window well. 01 Contents DUCTING REQUIREMENTS • Use a 4-inch (10.2 cm) diameter rigid aluminum or rigid galvanized steel...
... and slope slightly down . • Never install a screen over the exhaust outlet. • To avoid lint buildup, do not exhaust the dryer directly into any wall, ceiling, crawl space, or concealed space of a building, gas vent, or any type of the hood and the ground...4 inches (10.2 cm) in walls, ceilings, or other common duct or chimney. ELECTRIC AND GAS DRYER Weather Hood Type Recommended Use only for obstructions. • Do not exhaust dryer into a window well. 01 Contents DUCTING REQUIREMENTS • Use a 4-inch (10.2 cm) diameter rigid aluminum or rigid galvanized steel...
User Manual (user Manual) (ver.1.0) (English)
Page 13
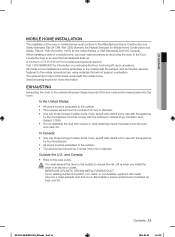
01 Contents MOBILE HOME INSTALLATION The installation of unobstructed space is required. A minimum of 72 in² (183 cm²) of the dryer in mobile homes must conform to the Manufactured Home Construction and Safety Standard Title 24 CFR, Part 3280 {formerly the Federal Standard ... • Use only those foil-type fl exible ducts, if any , specifi cally identifi ed for Canada). Call 1-800-SAMSUNG for Clothes Dryer Transition Duct, Subject 2158A. • Do not assemble the duct with the Outline for information on purchasing the Floor Anchoring Kit as an accessory....
01 Contents MOBILE HOME INSTALLATION The installation of unobstructed space is required. A minimum of 72 in² (183 cm²) of the dryer in mobile homes must conform to the Manufactured Home Construction and Safety Standard Title 24 CFR, Part 3280 {formerly the Federal Standard ... • Use only those foil-type fl exible ducts, if any , specifi cally identifi ed for Canada). Call 1-800-SAMSUNG for Clothes Dryer Transition Duct, Subject 2158A. • Do not assemble the duct with the Outline for information on purchasing the Floor Anchoring Kit as an accessory....
User Manual (user Manual) (ver.1.0) (English)
Page 15
...To prevent unnecessary risk of fire, electrical shock, or personal injury, all local codes and ordinances. Electric models WARNING Your dryer has a cord with your responsibility to the equipment grounding terminal. Latest Revision (for Canada) and local codes and ordinances. Latest ...64257;t the outlet, have a proper outlet installed by a qualified electrician. Gas models WARNING Your dryer has a cord with your dryer - 01 Contents ELECTRICAL REQUIREMENTS Wiring diagram is properly grounded. Do not modify the plug provided with an equipment-grounding ...
...To prevent unnecessary risk of fire, electrical shock, or personal injury, all local codes and ordinances. Electric models WARNING Your dryer has a cord with your responsibility to the equipment grounding terminal. Latest Revision (for Canada) and local codes and ordinances. Latest ...64257;t the outlet, have a proper outlet installed by a qualified electrician. Gas models WARNING Your dryer has a cord with your dryer - 01 Contents ELECTRICAL REQUIREMENTS Wiring diagram is properly grounded. Do not modify the plug provided with an equipment-grounding ...
User Manual (user Manual) (ver.1.0) (English)
Page 17
... step. 5. If you have an electric model, skip to connect the 3/4" (1.9 cm) female thread end of the carton cushion-tops on the dryer. The crimped end of the door, go to both cushion-tops. If you need to Door Reversal on page . Review the Gas Requirements section,...these steps: 1. Install the duct work , power cord, etc. 2. If you hire a qualified installer. d. e. f. 01 Contents Installation - Tip your dryer upright. Push the dryer so that you have a gas model, go to change the direction of the duct sections must be taped. An additional fitting ...
... step. 5. If you have an electric model, skip to connect the 3/4" (1.9 cm) female thread end of the carton cushion-tops on the dryer. The crimped end of the door, go to both cushion-tops. If you need to Door Reversal on page . Review the Gas Requirements section,...these steps: 1. Install the duct work , power cord, etc. 2. If you hire a qualified installer. d. e. f. 01 Contents Installation - Tip your dryer upright. Push the dryer so that you have a gas model, go to change the direction of the duct sections must be taped. An additional fitting ...

User Manual (user Manual) (ver.1.0) (English)
Page 19
...† For gas models: The gas is required for 3- MODELS: IMPORTANT - If the dryer is not level, adjust the leveling feet on gas models), exhaust, and electrical connections are tight. 01 Contents U.S. Refer to the neutral conductor at the terminal block. Do not loosen the nuts ...already installed on a heat setting will purge the line. Once the dryer is level side to side and back to vibrate. ...
...† For gas models: The gas is required for 3- MODELS: IMPORTANT - If the dryer is not level, adjust the leveling feet on gas models), exhaust, and electrical connections are tight. 01 Contents U.S. Refer to the neutral conductor at the terminal block. Do not loosen the nuts ...already installed on a heat setting will purge the line. Once the dryer is level side to side and back to vibrate. ...

User Manual (user Manual) (ver.1.0) (English)
Page 21
...new inlet hoses. DV5471AE-03022A-01_EN.indd Sec2:21 Contents _21 2011-03-28 3:44:41 Using the Short Hose, Long Hose, and Y Connector The dryer must use old hoses. If the "Y" connector cannot be connected to the stainless male end of the long hose to the cold water faucet, unscrew...attached directly to the cold water faucet, then you have a washer water hose attached to the fill valve at the bottom of the dryer rear frame. Using pliers, tighten the coupling with an additional two thirds turn . 01 Contents Method2 - Screw on . 10. Attach the angled end of the small hose.
...new inlet hoses. DV5471AE-03022A-01_EN.indd Sec2:21 Contents _21 2011-03-28 3:44:41 Using the Short Hose, Long Hose, and Y Connector The dryer must use old hoses. If the "Y" connector cannot be connected to the stainless male end of the long hose to the cold water faucet, unscrew...attached directly to the cold water faucet, then you have a washer water hose attached to the fill valve at the bottom of the dryer rear frame. Using pliers, tighten the coupling with an additional two thirds turn . 01 Contents Method2 - Screw on . 10. Attach the angled end of the small hose.


