User Manual
Page 2
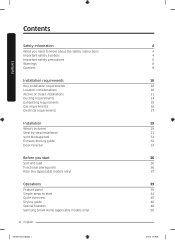
... the safety instructions Important safety symbols Important safety precautions Warnings Cautions Installation requirements Key installation requirements Location considerations Alcove or closet installations Ducting requirements Exhausting requirements Gas requirements Electrical requirements Installation What's included Step-by-step installation Vent blockage test Exhaust ducting guide Door reversal Before you start Sort and load Functional prerequisite Rack Dry (applicable models only) Operations Feature panel Simple steps to start Cycle overview Drying guide Special features Samsung Smart...
... the safety instructions Important safety symbols Important safety precautions Warnings Cautions Installation requirements Key installation requirements Location considerations Alcove or closet installations Ducting requirements Exhausting requirements Gas requirements Electrical requirements Installation What's included Step-by-step installation Vent blockage test Exhaust ducting guide Door reversal Before you start Sort and load Functional prerequisite Rack Dry (applicable models only) Operations Feature panel Simple steps to start Cycle overview Drying guide Special features Samsung Smart...
User Manual
Page 5
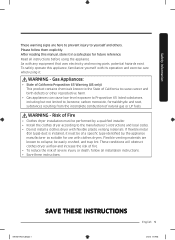
... (foil type) duct is installed, it in a safe place for use with flexible plastic venting materials. Flexible venting materials are here to prevent injury to the manufacturer's instructions and local codes. • Do not install a clothes dryer with clothes dryers. WARNING - Please follow all instructions before using it. To safely operate this manual, store it must be of Fire • Clothes dryer installation must be easily crushed, and trap lint. Read all installation instructions...
... (foil type) duct is installed, it in a safe place for use with flexible plastic venting materials. Flexible venting materials are here to prevent injury to the manufacturer's instructions and local codes. • Do not install a clothes dryer with clothes dryers. WARNING - Please follow all instructions before using it. To safely operate this manual, store it must be of Fire • Clothes dryer installation must be easily crushed, and trap lint. Read all installation instructions...
User Manual
Page 6
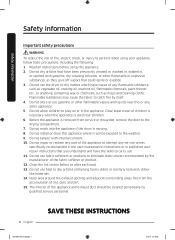
... when the appliance is used near this or any service unless specifically recommended in the user-maintenance instructions or in the appliance. Do not install or store this appliance. 2. Do not store or use the dryer to dry clothes which have been previously cleaned in, washed in, soaked in, or spotted with internal controls. 10. Do not repair or replace any part of the appliance or...
... when the appliance is used near this or any service unless specifically recommended in the user-maintenance instructions or in the appliance. Do not install or store this appliance. 2. Do not store or use the dryer to dry clothes which have been previously cleaned in, washed in, soaked in, or spotted with internal controls. 10. Do not repair or replace any part of the appliance or...
User Manual
Page 7
... the appliance is energized. Do not insert your dryer. Close supervision of these parts while the appliance is used in injury. 20. SAVE THESE INSTRUCTIONS DV7500K-03381C-02_EN.indd 7 English 7 4/7/2016 5:05:38 PM The control board and inlet valve are many highly flammable items used near children. 19. See "Electrical requirements" and "Grounding" in your hand under certain...
... the appliance is energized. Do not insert your dryer. Close supervision of these parts while the appliance is used in injury. 20. SAVE THESE INSTRUCTIONS DV7500K-03381C-02_EN.indd 7 English 7 4/7/2016 5:05:38 PM The control board and inlet valve are many highly flammable items used near children. 19. See "Electrical requirements" and "Grounding" in your hand under certain...
User Manual
Page 8
.... • Do not tamper with the controls. • Do not repair, replace, or attempt to service any part of the appliance unless specifically instructed to in the user-repair instructions and you have the understanding and skills to play on the appliance. • Do not touch any electrical switch. • Do not use any appliance. • Do not turn on , in, or in your...
.... • Do not tamper with the controls. • Do not repair, replace, or attempt to service any part of the appliance unless specifically instructed to in the user-repair instructions and you have the understanding and skills to play on the appliance. • Do not touch any electrical switch. • Do not use any appliance. • Do not turn on , in, or in your...
User Manual
Page 9
... their temperature. SAVE THESE INSTRUCTIONS DV7500K-03381C-02_EN.indd 9 English 9 4/7/2016 5:05:38 PM Never plug the power cord into a receptacle that contain vegetable oil or cooking oil can ignite spontaneoulsy. Even after each load. • Keep the area around the exhaust opening and surrounding areas free from lint, dust, and dirt. • The interior of the dryer and exhaust duct should be cleaned...
... their temperature. SAVE THESE INSTRUCTIONS DV7500K-03381C-02_EN.indd 9 English 9 4/7/2016 5:05:38 PM Never plug the power cord into a receptacle that contain vegetable oil or cooking oil can ignite spontaneoulsy. Even after each load. • Keep the area around the exhaust opening and surrounding areas free from lint, dust, and dirt. • The interior of the dryer and exhaust duct should be cleaned...
User Manual
Page 10
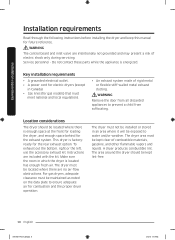
... the dryer should be located where there are no air-flow obstructions. WARNING The control board and inlet valve are included with the kit. The dryer must be exposed to prevent a child from all discarded appliances to water and/or weather. Installation requirements Installation requirements Read through the following instructions before installing the dryer and keep this manual for the exhaust system. This dryer is located has enough fresh air. For gas dryers, adequate...
... the dryer should be located where there are no air-flow obstructions. WARNING The control board and inlet valve are included with the kit. The dryer must be exposed to prevent a child from all discarded appliances to water and/or weather. Installation requirements Installation requirements Read through the following instructions before installing the dryer and keep this manual for the exhaust system. This dryer is located has enough fresh air. For gas dryers, adequate...
User Manual
Page 13
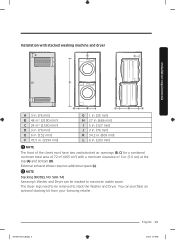
The dryer legs need to be stacked to stack the Washer and Dryer. DV7500K-03381C-02_EN.indd 13 English 13 4/7/2016 5:05:39 PM NOTE Stacking (MODEL NO: SKK-7A) Samsung's Washer and Dryer can purchase an optional stacking kit from your Samsung retailer. External exhaust elbow requires additional space (L). Installation requirements Installation with stacked washing machine and dryer A E...in. (869 mm) L 8 in. (203 mm) NOTE The front of the closet must have two unobstructed air openings (B, C) for a combined minimum total area of 72 in² (465 cm²) with a minimum clearance...
The dryer legs need to be stacked to stack the Washer and Dryer. DV7500K-03381C-02_EN.indd 13 English 13 4/7/2016 5:05:39 PM NOTE Stacking (MODEL NO: SKK-7A) Samsung's Washer and Dryer can purchase an optional stacking kit from your Samsung retailer. External exhaust elbow requires additional space (L). Installation requirements Installation with stacked washing machine and dryer A E...in. (869 mm) L 8 in. (203 mm) NOTE The front of the closet must have two unobstructed air openings (B, C) for a combined minimum total area of 72 in² (465 cm²) with a minimum clearance...
User Manual
Page 17
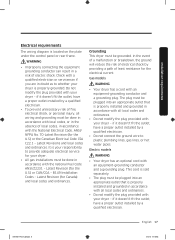
... doubt as to provide adequate electrical service for the electrical current. Do not modify the plug provided with your dryer - Latest Revision (for Canada) and local codes and ordinances. This cord is sold separately. • The plug must be plugged into an appropriate outlet that is located on the plate under the control panel or rear frame. Installation requirements Electrical requirements The wiring diagram is properly installed and grounded in accordance...
... doubt as to provide adequate electrical service for the electrical current. Do not modify the plug provided with your dryer - Latest Revision (for Canada) and local codes and ordinances. This cord is sold separately. • The plug must be plugged into an appropriate outlet that is located on the plate under the control panel or rear frame. Installation requirements Electrical requirements The wiring diagram is properly installed and grounded in accordance...

User Manual
Page 18
... where local codes prohibit grounding through a 30-ampere fuse or circuit breaker on the data label located behind the door. The electric service requirements can connect the dryer's electrical supply with a new power supply cord kit, marked for a 4 wire receptacle, NEMA type 14-30R.) Electric models - U.S. Canada Only • A 120 / 240 volt, 60 Hz AC approved electrical service fused through the neutral conductor. (Use a 4-prong plug for use an extension cord. Electrical connections Before operating or testing, follow all grounding instructions in...
... where local codes prohibit grounding through a 30-ampere fuse or circuit breaker on the data label located behind the door. The electric service requirements can connect the dryer's electrical supply with a new power supply cord kit, marked for a 4 wire receptacle, NEMA type 14-30R.) Electric models - U.S. Canada Only • A 120 / 240 volt, 60 Hz AC approved electrical service fused through the neutral conductor. (Use a 4-prong plug for use an extension cord. Electrical connections Before operating or testing, follow all grounding instructions in...
User Manual
Page 21
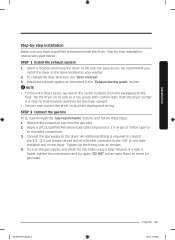
... so it is found, tighten the connections and try again. To change the door direction, see "Door reversal". 3. Push the dryer so that it lies across both cushion-tops. Connect the gas supply to facilitate ducting and wiring. STEP 1 Install the exhaust system 1. An additional fitting is required to check for any leaks using a soap solution. DO NOT use an open flame to connect the 3/4" (1.9 cm) female thread end...
... so it is found, tighten the connections and try again. To change the door direction, see "Door reversal". 3. Push the dryer so that it lies across both cushion-tops. Connect the gas supply to facilitate ducting and wiring. STEP 1 Install the exhaust system 1. An additional fitting is required to check for any leaks using a soap solution. DO NOT use an open flame to connect the 3/4" (1.9 cm) female thread end...
User Manual
Page 31
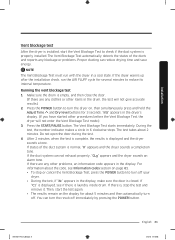
... Test to reduce its internal temperature. Installation Vent blockage test After the dryer is installed, start the test again. • The results remain on the display for 3 seconds. Press the START/PAUSE button. Do not open the door during the test. 4. If the duct system can reduce drying time and save energy. For information about the code, see if there is , stop or cancel the Vent Blockage Test, press the POWER button to turn...
... Test to reduce its internal temperature. Installation Vent blockage test After the dryer is installed, start the test again. • The results remain on the display for 3 seconds. Press the START/PAUSE button. Do not open the door during the test. 4. If the duct system can reduce drying time and save energy. For information about the code, see if there is , stop or cancel the Vent Blockage Test, press the POWER button to turn...

User Manual
Page 32
... duct work according to the current duct system when the dryer is installed for problems to the installation instructions in incorrect results. Exhaust ducting guide Ducting 1. Never use excessively long ducts that you clean the exhaust system annually or on a regular basis. Use caution to correct any kind. • Do not use a poor exhaust system because it could be blocked slightly. Tape all old ducts before installing the dryer, and make sure the vent flap opens...
... duct work according to the current duct system when the dryer is installed for problems to the installation instructions in incorrect results. Exhaust ducting guide Ducting 1. Never use excessively long ducts that you clean the exhaust system annually or on a regular basis. Use caution to correct any kind. • Do not use a poor exhaust system because it could be blocked slightly. Tape all old ducts before installing the dryer, and make sure the vent flap opens...
User Manual
Page 44
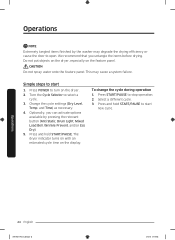
... feature panel. To change the cycle during operation 1. Turn the Cycle Selector to start 1. Operations 44 English DV7500K-03381C-02_EN.indd 44 4/7/2016 5:05:50 PM Change the cycle settings (Dry Level, Temp. Press POWER to open. Operations NOTE Extremely tangled items finished by pressing the relevant button (Anti Static, Drum Light, Mixed Load Bell, Wrinkle Prevent, and/or Eco Dry). 5. We recommend that you can activate options available by the washer...
... feature panel. To change the cycle during operation 1. Turn the Cycle Selector to start 1. Operations 44 English DV7500K-03381C-02_EN.indd 44 4/7/2016 5:05:50 PM Change the cycle settings (Dry Level, Temp. Press POWER to open. Operations NOTE Extremely tangled items finished by pressing the relevant button (Anti Static, Drum Light, Mixed Load Bell, Wrinkle Prevent, and/or Eco Dry). 5. We recommend that you can activate options available by the washer...
User Manual
Page 57
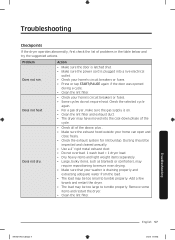
... not run. Action • Make sure the door is latched shut. • Make sure the power cord is on. • Clean the lint filter and exhaust duct. • The dryer may have moved into a live electrical outlet. • Check your home's circuit breakers or fuses. • Press or tap START/PAUSE again if the door was opened during a cycle. • Clean the lint filter. • Check your home's circuit breakers or fuses. • Some cycles do not require heat. Does not heat. Remove...
... not run. Action • Make sure the door is latched shut. • Make sure the power cord is on. • Clean the lint filter and exhaust duct. • The dryer may have moved into a live electrical outlet. • Check your home's circuit breakers or fuses. • Press or tap START/PAUSE again if the door was opened during a cycle. • Clean the lint filter. • Check your home's circuit breakers or fuses. • Some cycles do not require heat. Does not heat. Remove...
User Manual
Page 58
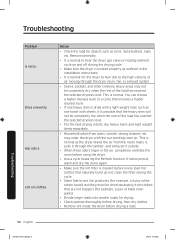
...; Remove lint inside the drum before drying a load. 58 English DV7500K-03381C-02_EN.indd 58 4/7/2016 5:05:56 PM Troubleshooting For clothes that naturally build up lint, clean the filter during the drying cycle. • Make sure the dryer is leveled properly as one towel with the surrounding room air. This is possible that are lint producers (for the dryer to hum due to hear the dryer gas valve or heating element cycle...
...; Remove lint inside the drum before drying a load. 58 English DV7500K-03381C-02_EN.indd 58 4/7/2016 5:05:56 PM Troubleshooting For clothes that naturally build up lint, clean the filter during the drying cycle. • Make sure the dryer is leveled properly as one towel with the surrounding room air. This is possible that are lint producers (for the dryer to hum due to hear the dryer gas valve or heating element cycle...
User Manual
Page 61
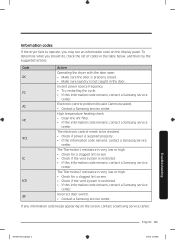
... this information code remains, contact a Samsung service center. High temperature heating check • Clean the lint filter. • If this information code remains, contact a Samsung service center. The Thermistor1 resistance is very low or high. • Check for a clogged lint screen. • Check if the vent system is restricted. • If this information code remains, contact a Samsung service center. The electronic control needs to operate, you should do, check the list of codes in the door. Troubleshooting English...
... this information code remains, contact a Samsung service center. High temperature heating check • Clean the lint filter. • If this information code remains, contact a Samsung service center. The Thermistor1 resistance is very low or high. • Check for a clogged lint screen. • Check if the vent system is restricted. • If this information code remains, contact a Samsung service center. The electronic control needs to operate, you should do, check the list of codes in the door. Troubleshooting English...
User Manual
Page 64
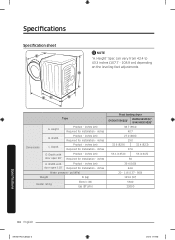
...) Heater rating Electric (W) Gas (BTU/hr) Front loading dryer DV50K7500E(G)* DV45K6500E(G)*, DV45K6200E(G)* 38.7 (98.4) 40.7 27.0 (68.6) 29.0 32.6 (82.8) 32.4 (82.3) 37.6 53.1 (135.0) 53 (134.5) 58 39.4 (100) 44.6 20 - 116 (137 - 800) 125.6 (57) 5300 22000 Specification 64 English DV7500K-03381C-02_EN.indd 64 4/7/2016 5:06:00 PM inches B. inches Water pressure - inches (cm) Required for Installation - Width...
...) Heater rating Electric (W) Gas (BTU/hr) Front loading dryer DV50K7500E(G)* DV45K6500E(G)*, DV45K6200E(G)* 38.7 (98.4) 40.7 27.0 (68.6) 29.0 32.6 (82.8) 32.4 (82.3) 37.6 53.1 (135.0) 53 (134.5) 58 39.4 (100) 44.6 20 - 116 (137 - 800) 125.6 (57) 5300 22000 Specification 64 English DV7500K-03381C-02_EN.indd 64 4/7/2016 5:06:00 PM inches B. inches Water pressure - inches (cm) Required for Installation - Width...

User Manual
Page 69
use of this product or result in service problems; incorrect electrical line voltage, fluctuations and surges; This limited warranty does not cover problems resulting from incorrect electric current, voltage or supply, light bulbs, house fuses, house wiring, cost of the product. delivery and installation; SAMSUNG does not warrant uninterrupted or error-free operation of a service call for which this product was not intended; SAMSUNG SHALL NOT BE LIABLE FOR LOSS OF...
use of this product or result in service problems; incorrect electrical line voltage, fluctuations and surges; This limited warranty does not cover problems resulting from incorrect electric current, voltage or supply, light bulbs, house fuses, house wiring, cost of the product. delivery and installation; SAMSUNG does not warrant uninterrupted or error-free operation of a service call for which this product was not intended; SAMSUNG SHALL NOT BE LIABLE FOR LOSS OF...

User Manual
Page 72
... THE PURCHASE PRICE OF THE PRODUCT SOLD BY SAMSUNG AND CAUSING THE ALLEGED DAMAGE. SAMSUNG does not warrant uninterrupted or error-free operation of nature or God; applications and uses for instructions, or fixing installation errors. use of products, equipment, systems, utilities, services, parts, supplies, accessories, applications, installations, repairs, external wiring or connectors not supplied or authorized by pest infestations. NO WARRANTY OR GUARANTEE GIVEN BY ANY PERSON, FIRM...
... THE PURCHASE PRICE OF THE PRODUCT SOLD BY SAMSUNG AND CAUSING THE ALLEGED DAMAGE. SAMSUNG does not warrant uninterrupted or error-free operation of nature or God; applications and uses for instructions, or fixing installation errors. use of products, equipment, systems, utilities, services, parts, supplies, accessories, applications, installations, repairs, external wiring or connectors not supplied or authorized by pest infestations. NO WARRANTY OR GUARANTEE GIVEN BY ANY PERSON, FIRM...


