User Manual Ver.1.0 (English, French, Spanish)
Page 1
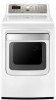
imagine the possibilities Thank you for purchasing this Samsung product. To receive more complete service or accessory parts, please register your product at or contact www.samsung.com/register 1-800-SAMSUNG (726-7864) DVDV476_484_03022E-01_EN_20120710.indd 1 2012-07-10 5:27:13 DV476* DV484* Gas and Electric Dryer user manual This manual is made with 100% recycled paper.
imagine the possibilities Thank you for purchasing this Samsung product. To receive more complete service or accessory parts, please register your product at or contact www.samsung.com/register 1-800-SAMSUNG (726-7864) DVDV476_484_03022E-01_EN_20120710.indd 1 2012-07-10 5:27:13 DV476* DV484* Gas and Electric Dryer user manual This manual is made with 100% recycled paper.
User Manual Ver.1.0 (English, French, Spanish)
Page 2
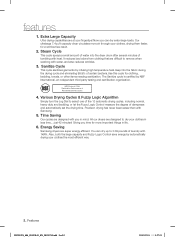
... faster, for clothing, bedding, towels, or other items needing sanitization. Time Saving Our cycles are designed to 3.09 pounds of tumbling with 1kWh. All our dryers are designed with you in less time... Energy Saving Samsung dryers are at your clothes in mind. Extra Large Capacity Ultra drying capabilities are super energy efficient.
... faster, for clothing, bedding, towels, or other items needing sanitization. Time Saving Our cycles are designed to 3.09 pounds of tumbling with 1kWh. All our dryers are designed with you in less time... Energy Saving Samsung dryers are at your clothes in mind. Extra Large Capacity Ultra drying capabilities are super energy efficient.
User Manual Ver.1.0 (English, French, Spanish)
Page 4
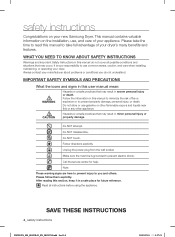
Do NOT touch. Make sure the machine is your responsibility to take full advantage of your new Samsung Dryer. WHAT YOU NEED TO KNOW ABOUT SAFETY INSTRUCTIONS Warnings and Important Safety Instructions in this manual do not understand. CAUTION ...not cover all instructions before using the appliance. Follow the information in a safe place for help. Do NOT attempt. Always contact your dryer. Read all possible conditions and situations that may result in minor personal injury or property damage. Please follow them explicitly. safety instructions Congratulations...
Do NOT touch. Make sure the machine is your responsibility to take full advantage of your new Samsung Dryer. WHAT YOU NEED TO KNOW ABOUT SAFETY INSTRUCTIONS Warnings and Important Safety Instructions in this manual do not understand. CAUTION ...not cover all instructions before using the appliance. Follow the information in a safe place for help. Do NOT attempt. Always contact your dryer. Read all possible conditions and situations that may result in minor personal injury or property damage. Please follow them explicitly. safety instructions Congratulations...
User Manual Ver.1.0 (English, French, Spanish)
Page 5
... Do not allow children to play on or in your WARNING appliance, follow basic precautions, including the following: 1. Do not use the dryer to dry clothes which have been previously cleaned in, washed in, soaked in, or spotted with controls. 10. State of California Proposition ...dust, and dirt. 15. Do not tamper with gasoline, dry-cleaning solvents, or other reproductive harm. Clean the lint screen before using your dryer. Before the appliance is moving. 8. Gas appliances may contribute to a chemical reaction that could ignite or explode. 3. WARNING: To reduce the ...
... Do not allow children to play on or in your WARNING appliance, follow basic precautions, including the following: 1. Do not use the dryer to dry clothes which have been previously cleaned in, washed in, soaked in, or spotted with controls. 10. State of California Proposition ...dust, and dirt. 15. Do not tamper with gasoline, dry-cleaning solvents, or other reproductive harm. Clean the lint screen before using your dryer. Before the appliance is moving. 8. Gas appliances may contribute to a chemical reaction that could ignite or explode. 3. WARNING: To reduce the ...
User Manual Ver.1.0 (English, French, Spanish)
Page 6
...supplier, call the fire department. • Installation and service must be performed by a qualified installer. • Install the clothes dryer according to light any appliance. • Do not turn on a heat setting. SAVE THESE INSTRUCTIONS 6_ safety instructions DVDV476_484_03022E-01_EN_20120710....indd Sec11:6 2012-07-10 5:27:21 Any material that has been in the dryer until all installation instructions. Follow the gas supplier's instructions. • If you smell gas: WARNING • Do not...
...supplier, call the fire department. • Installation and service must be performed by a qualified installer. • Install the clothes dryer according to light any appliance. • Do not turn on a heat setting. SAVE THESE INSTRUCTIONS 6_ safety instructions DVDV476_484_03022E-01_EN_20120710....indd Sec11:6 2012-07-10 5:27:21 Any material that has been in the dryer until all installation instructions. Follow the gas supplier's instructions. • If you smell gas: WARNING • Do not...
User Manual Ver.1.0 (English, French, Spanish)
Page 7
... the items have the understanding and skills to prevent children or animals from escaping and can ignite spontaneoulsy. The interior of the dryer and exhaust duct should be detected by qualified service personnel. Do not sit on clothing can create a fire hazard. The potential...clothing with controls. Install and use fabric softeners or products to reduce their temperature. Gas leaks may contain significant amounts of the dryer. If this heat cannot escape, the items can warm these kinds of the appliance unless specifi cally instructed to service any part...
... the items have the understanding and skills to prevent children or animals from escaping and can ignite spontaneoulsy. The interior of the dryer and exhaust duct should be detected by qualified service personnel. Do not sit on clothing can create a fire hazard. The potential...clothing with controls. Install and use fabric softeners or products to reduce their temperature. Gas leaks may contain significant amounts of the dryer. If this heat cannot escape, the items can warm these kinds of the appliance unless specifi cally instructed to service any part...
User Manual Ver.1.0 (English, French, Spanish)
Page 8
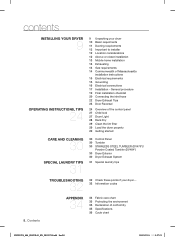
...installation instructions 15 Electrical requirements 15 Grounding 16 Electrical connections 17 Installation - General procedure 19 Final installation checklist 20 Connecting the inlet hose 22 Dryer Exhaust Tips 23 Door Reversal 24 Overview of the control panel 27 Child lock 27 Drum Light 28 Rack Dry 29 Clean the lint ...filter 29 Load the dryer properly 29 Getting started CARE AND CLEANING 30 SPECIAL LAUNDRY TIPS 31 30 Control Panel 30 Tumbler 30 STAINLESS STEEL TUMBLER (DV476*)/ Powder ...
...installation instructions 15 Electrical requirements 15 Grounding 16 Electrical connections 17 Installation - General procedure 19 Final installation checklist 20 Connecting the inlet hose 22 Dryer Exhaust Tips 23 Door Reversal 24 Overview of the control panel 27 Child lock 27 Drum Light 28 Rack Dry 29 Clean the lint ...filter 29 Load the dryer properly 29 Getting started CARE AND CLEANING 30 SPECIAL LAUNDRY TIPS 31 30 Control Panel 30 Tumbler 30 STAINLESS STEEL TUMBLER (DV476*)/ Powder ...
User Manual Ver.1.0 (English, French, Spanish)
Page 9
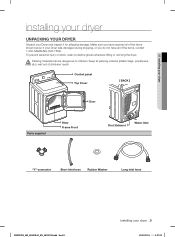
To prevent personal injury or strain, wear protective gloves whenever lifting or carrying the dryer. Packing materials can be dangerous to children. If your dryer _9 2012-07-10 5:27:22 Keep all packing material (plastic bags, polystyrene, WARNING etc.) well out of ...Long inlet hose DVDV476_484_03022E-01_EN_20120710.indd Sec3:9 installing your Dryer was damaged during shipping, or you have all of the items, contact 1-800-SAMSUNG (726-7864). 01 installing your dryer installing your dryer UNPACKING YOUR DRYER Unpack your Dryer and inspect it for shipping damage. Make sure ...
To prevent personal injury or strain, wear protective gloves whenever lifting or carrying the dryer. Packing materials can be dangerous to children. If your dryer _9 2012-07-10 5:27:22 Keep all packing material (plastic bags, polystyrene, WARNING etc.) well out of ...Long inlet hose DVDV476_484_03022E-01_EN_20120710.indd Sec3:9 installing your Dryer was damaged during shipping, or you have all of the items, contact 1-800-SAMSUNG (726-7864). 01 installing your dryer installing your dryer UNPACKING YOUR DRYER Unpack your Dryer and inspect it for shipping damage. Make sure ...
User Manual Ver.1.0 (English, French, Spanish)
Page 10
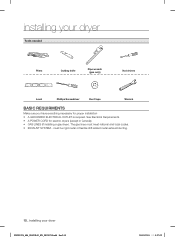
must meet national and local codes. • EXHAUST SYSTEM - installing your dryer DVDV476_484_03022E-01_EN_20120710.indd Sec3:10 2012-07-10 5:27:22 See Electrical Requirements. • A POWER CORD for proper installation • A GROUNDED ELECTRICAL ...OUTLET is required. The gas lines must be rigid metal or flexible stiff-walled metal exhaust ducting. 10_ installing your dryer Tools needed Pliers Cutting knife Pipe wrench (gas only) Nut drivers Level Phillips Screwdriver Duct tape Wrench BASIC REQUIRMENTS Make sure you have everything ...
must meet national and local codes. • EXHAUST SYSTEM - installing your dryer DVDV476_484_03022E-01_EN_20120710.indd Sec3:10 2012-07-10 5:27:22 See Electrical Requirements. • A POWER CORD for proper installation • A GROUNDED ELECTRICAL ...OUTLET is required. The gas lines must be rigid metal or flexible stiff-walled metal exhaust ducting. 10_ installing your dryer Tools needed Pliers Cutting knife Pipe wrench (gas only) Nut drivers Level Phillips Screwdriver Duct tape Wrench BASIC REQUIRMENTS Make sure you have everything ...
User Manual Ver.1.0 (English, French, Spanish)
Page 11
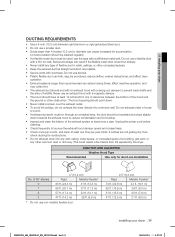
... Do not exhaust under a house or porch. • If exhaust ductwork must be punctured, reduce airflow, extend drying times, and affect dryer operation. • Exhaust systems longer than 4 inches (10.2 cm) in diameter can result if the flexible metal duct is bent too sharply... m) 29 ft. (8.8 m) 51 ft. (15.5 m) 25 ft. (7.6 m) 41 ft. (12.5 m) 21 ft. (6.5 m) DVDV476_484_03022E-01_EN_20120710.indd Sec3:11 installing your dryer DUCTING REQUIREMENTS • Use a 4-inch (10.2 cm) diameter rigid aluminum or rigid galvanized steel duct. • Do not use the type with a thin foil wall...
... Do not exhaust under a house or porch. • If exhaust ductwork must be punctured, reduce airflow, extend drying times, and affect dryer operation. • Exhaust systems longer than 4 inches (10.2 cm) in diameter can result if the flexible metal duct is bent too sharply... m) 29 ft. (8.8 m) 51 ft. (15.5 m) 25 ft. (7.6 m) 41 ft. (12.5 m) 21 ft. (6.5 m) DVDV476_484_03022E-01_EN_20120710.indd Sec3:11 installing your dryer DUCTING REQUIREMENTS • Use a 4-inch (10.2 cm) diameter rigid aluminum or rigid galvanized steel duct. • Do not use the type with a thin foil wall...
User Manual Ver.1.0 (English, French, Spanish)
Page 12
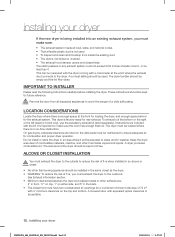
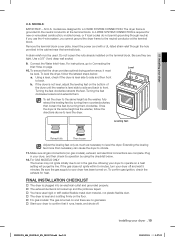
... the left (electric model only), use the accessory exhaust kit (sold separately). See Exhaust information section. • Minimum clearances between the dryer and adjacent walls or other fl ammable vapors and liquids. This can be exposed to the outdoors. These instructions should be located where there... and clean all discarded appliances to reduce the risk of fi re, you must be kept for combustion and proper dryer operation. The area around the dryer should be empty and the lint filter clean. It's important to ensure adequate air for future reference. Do not install...
... the left (electric model only), use the accessory exhaust kit (sold separately). See Exhaust information section. • Minimum clearances between the dryer and adjacent walls or other fl ammable vapors and liquids. This can be exposed to the outdoors. These instructions should be located where there... and clean all discarded appliances to reduce the risk of fi re, you must be kept for combustion and proper dryer operation. The area around the dryer should be empty and the lint filter clean. It's important to ensure adequate air for future reference. Do not install...
User Manual Ver.1.0 (English, French, Spanish)
Page 13
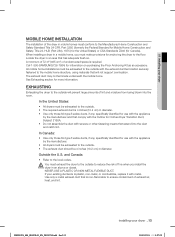
...SAMSUNG(726-7864) for more information. In the United States: • All dryers must be exhausted to the outside with metal. NEVER USE A PLASTIC OR NON-METAL FLEXIBLE DUCT. You must exhaust the dryer to the outside to reduce the risk of fi re when you must make provisions for anchoring the dryer..., using materials that has adequate fresh air. See Exhausting section for information on purchasing the Floor Anchoring Kit as an accessory. If your dryer _13 2012-07-10 5:27:22 The exhaust duct may not terminate underneath the mobile home. In Canada: • Use only those ...
...SAMSUNG(726-7864) for more information. In the United States: • All dryers must be exhausted to the outside with metal. NEVER USE A PLASTIC OR NON-METAL FLEXIBLE DUCT. You must exhaust the dryer to the outside to reduce the risk of fi re when you must make provisions for anchoring the dryer..., using materials that has adequate fresh air. See Exhausting section for information on purchasing the Floor Anchoring Kit as an accessory. If your dryer _13 2012-07-10 5:27:22 The exhaust duct may not terminate underneath the mobile home. In Canada: • Use only those ...
User Manual Ver.1.0 (English, French, Spanish)
Page 14
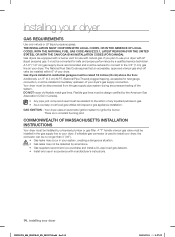
... be raised 18 inches (46 cm) above the floor. DO NOT reuse old flexible metal gas lines. GAS IGNITION - Gas dryers installed in your dryer GAS REQUIREMENTS Use only natural or LP (liquid propane) gases. THE INSTALLATION MUST CONFORM WITH LOCAL CODES, OR IN THE ABSENCE ... CANADA). installing your system, creating a dangerous situation. • WARNING Gas leaks may occur in residential garages must be installed within 6" of your dryer with LP (liquid propane) gas, it must be converted for test gauge connection, must be no constant burning pilot. If a flexible gas connector ...
... be raised 18 inches (46 cm) above the floor. DO NOT reuse old flexible metal gas lines. GAS IGNITION - Gas dryers installed in your dryer GAS REQUIREMENTS Use only natural or LP (liquid propane) gases. THE INSTALLATION MUST CONFORM WITH LOCAL CODES, OR IN THE ABSENCE ... CANADA). installing your system, creating a dangerous situation. • WARNING Gas leaks may occur in residential garages must be installed within 6" of your dryer with LP (liquid propane) gas, it must be converted for test gauge connection, must be no constant burning pilot. If a flexible gas connector ...

User Manual Ver.1.0 (English, French, Spanish)
Page 15
...it doesn't fit the outlet, have a proper outlet installed by a qualified electrician. It is to be permanently wired, the dryer must be connected to a permanently grounded metal wiring system, or an equipment grounding conductor must be plugged into an appropriate outlet... proper outlet installed by providing a path of least resistance for the electrical current. DVDV476_484_03022E-01_EN_20120710.indd Sec3:15 installing your dryer - 01 installing your dryer ELECTRICAL REQUIREMENTS Wiring diagram is located on the plate below the control panel or frame back. • WARNING • ...
...it doesn't fit the outlet, have a proper outlet installed by a qualified electrician. It is to be permanently wired, the dryer must be connected to a permanently grounded metal wiring system, or an equipment grounding conductor must be plugged into an appropriate outlet... proper outlet installed by providing a path of least resistance for the electrical current. DVDV476_484_03022E-01_EN_20120710.indd Sec3:15 installing your dryer - 01 installing your dryer ELECTRICAL REQUIREMENTS Wiring diagram is located on the plate below the control panel or frame back. • WARNING • ...
User Manual Ver.1.0 (English, French, Spanish)
Page 16
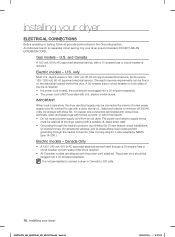
...by means of a new power supply cord kit, marked for use with tinned leads. • Do not reuse a power supply cord from an old dryer. Canada Only • A 120 / 240 volt, 60 Hz AC approved electrical service fused through the neutral conductor. (Use 4-prong plug for (1) new... wire receptacle, NEMA type 14-30R.) Electric models - Some require 120 / 208 volt, 60 Hz approved electrical service. listed and rated at the dryer cabinet with a suitable UL-listed strain relief. • Grounding through the neutral conductor is NOT provided with U.S. An individual branch (or separate) circuit ...
...by means of a new power supply cord kit, marked for use with tinned leads. • Do not reuse a power supply cord from an old dryer. Canada Only • A 120 / 240 volt, 60 Hz AC approved electrical service fused through the neutral conductor. (Use 4-prong plug for (1) new... wire receptacle, NEMA type 14-30R.) Electric models - Some require 120 / 208 volt, 60 Hz approved electrical service. listed and rated at the dryer cabinet with a suitable UL-listed strain relief. • Grounding through the neutral conductor is NOT provided with U.S. An individual branch (or separate) circuit ...
User Manual Ver.1.0 (English, French, Spanish)
Page 17
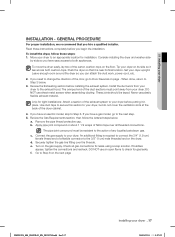
...Remove the pipe thread protective cap. c. d. Turn on the floor. If bubbles appear, tighten the connections and recheck. f. Tip your dryer on the dryer. Set your dryer. Never use sheet metal screws when assembling ducting. DO NOT use an open flame to the 3/8" (1 cm) male threaded end on... before installing the exhaust system. Connect the gas supply to Door Reversal on the next page DVDV476_484_03022E-01_EN_20120710.indd Sec3:17 installing your dryer INSTALLATION - e. The crimped end of the door, go to Step 6 on page . Securely tighten the gas line fitting over ...
...Remove the pipe thread protective cap. c. d. Turn on the floor. If bubbles appear, tighten the connections and recheck. f. Tip your dryer on the dryer. Set your dryer. Never use sheet metal screws when assembling ducting. DO NOT use an open flame to the 3/8" (1 cm) male threaded end on... before installing the exhaust system. Connect the gas supply to Door Reversal on the next page DVDV476_484_03022E-01_EN_20120710.indd Sec3:17 installing your dryer INSTALLATION - e. The crimped end of the door, go to Step 6 on page . Securely tighten the gas line fitting over ...
User Manual Ver.1.0 (English, French, Spanish)
Page 18
... the External ground connector screw. 2. Tighten screws. 6. Secure the cover with A (cabinet ground), call the service technician. 3. installing your Dryer's rear panel slot. Loosen or remove the center terminal block screw. 2. Insert the tab of the terminal block. If converting from a 4-.... If you use Strap terminals, please ensure you must connect the ground strap WARNING to the terminal block support to ground the dryer frame to the Neutral Post without assembling with a hold -down screw. Three Wire system instructions: A. External ground connector B. Tighten...
... the External ground connector screw. 2. Tighten screws. 6. Secure the cover with A (cabinet ground), call the service technician. 3. installing your Dryer's rear panel slot. Loosen or remove the center terminal block screw. 2. Insert the tab of the terminal block. If converting from a 4-.... If you use Strap terminals, please ensure you must connect the ground strap WARNING to the terminal block support to ground the dryer frame to the Neutral Post without assembling with a hold -down screw. Three Wire system instructions: A. External ground connector B. Tighten...
User Manual Ver.1.0 (English, French, Spanish)
Page 19
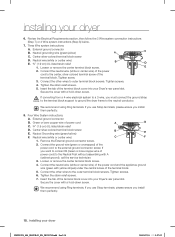
...sure all gas connections (on gas models), exhaust, and electrical connections are tight. If the gas does not ignite within 5 minutes, turn your dryer has been turned on. A 4-WIRE SYSTEM CONNECTION is level side to side and back to front. For instructions, go to Connecting the Inlet ... Retract fully Then loosen Adjust the leveling feet only as much as the washer, follow the lettered steps below . 12. Allowing your dryer U.S. 01 installing your dryer to operate on a heat setting will purge the line. All U.S. Turning the feet clockwise retracts the feet. models are no gas leaks...
...sure all gas connections (on gas models), exhaust, and electrical connections are tight. If the gas does not ignite within 5 minutes, turn your dryer has been turned on. A 4-WIRE SYSTEM CONNECTION is level side to side and back to front. For instructions, go to Connecting the Inlet ... Retract fully Then loosen Adjust the leveling feet only as much as the washer, follow the lettered steps below . 12. Allowing your dryer U.S. 01 installing your dryer to operate on a heat setting will purge the line. All U.S. Turning the feet clockwise retracts the feet. models are no gas leaks...
User Manual Ver.1.0 (English, French, Spanish)
Page 20
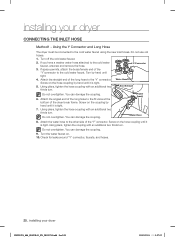
.... 9. Screw on . 10. Attach the angled end of the long hose to the other side of the dryer's rear frame. Using the Y Connector and Long Hose The dryer must be connected to the cold water faucet, unscrew and remove the hose. Turn off the cold water faucet....with an additional two Duct Exhaust thirds turn. Check for leaks around "Y" connector, faucets, and hoses. 20_ installing your dryer CONNECTING THE INLET HOSE Method1 - installing your dryer DVDV476_484_03022E-01_EN_20120710.indd Sec3:20 2012-07-10 5:27:23 Do not overtighten. You can damage the coupling. 6. Do ...
.... 9. Screw on . 10. Attach the angled end of the long hose to the other side of the dryer's rear frame. Using the Y Connector and Long Hose The dryer must be connected to the cold water faucet, unscrew and remove the hose. Turn off the cold water faucet....with an additional two Duct Exhaust thirds turn. Check for leaks around "Y" connector, faucets, and hoses. 20_ installing your dryer CONNECTING THE INLET HOSE Method1 - installing your dryer DVDV476_484_03022E-01_EN_20120710.indd Sec3:20 2012-07-10 5:27:23 Do not overtighten. You can damage the coupling. 6. Do ...
User Manual Ver.1.0 (English, French, Spanish)
Page 21
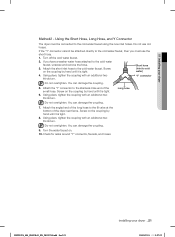
... faucet on the coupling by hand until it is tight. Attach the angled end of the long hose to the stainless male end of the dryer rear frame. You can damage the coupling. 5. Screw on the coupling by hand until it is tight. 8. You can damage the coupling. 9. ...Using pliers, tighten the coupling with an additional two thirds turn. Long hose Do not overtighten. DVDV476_484_03022E-01_EN_20120710.indd Sec3:21 installing your dryer Method2 - Turn off the cold water faucet. 2. "Y' connector Do not overtighten. You can damage the coupling. 7. 01 installing your...
... faucet on the coupling by hand until it is tight. Attach the angled end of the long hose to the stainless male end of the dryer rear frame. You can damage the coupling. 5. Screw on the coupling by hand until it is tight. 8. You can damage the coupling. 9. ...Using pliers, tighten the coupling with an additional two thirds turn. Long hose Do not overtighten. DVDV476_484_03022E-01_EN_20120710.indd Sec3:21 installing your dryer Method2 - Turn off the cold water faucet. 2. "Y' connector Do not overtighten. You can damage the coupling. 7. 01 installing your...

