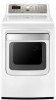
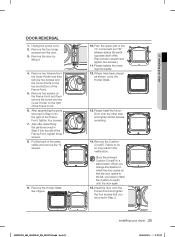
User Manual Ver.1.0 (English, French, Spanish)
Page 3
DVDV476_484_03022E-01_EN_20120710.indd Sec9:3 Features _3 2012-07-10 5:27:21 7. Easy Reversible Door The direction of our reversible door can be changed easily. 8. 4-way Vent (electric model only) You can install the exhaust vent in the following four (4) positions: back, either side, bottom.
User Manual Ver.1.0 (English, French, Spanish)
Page 8
General procedure 19 Final installation checklist 20 Connecting the inlet hose 22 Dryer Exhaust Tips 23 Door Reversal 24 Overview of the control panel 27 Child lock 27 Drum Light 28 Rack Dry 29 Clean the lint filter 29 Load the dryer properly ...
User Manual Ver.1.0 (English, French, Spanish)
Page 17
.... The pipe joint compound must point away from your dryer _17 2012-07-10 5:27:23 Connect the gas supply to the action of the door, go to Step 6 on the dryer. Turn on page . Set your dryer INSTALLATION - b. Push the dryer so that you need to ...solution. If you can attach the duct work from your dryer, but do not cover the ventilation slots at the back of a flexible connector to Door Reversal on the gas supply. Check all threaded connections. GENERAL PROCEDURE For proper installation, we recommend that it is required to connect the 3/4" (1.9 cm...
User Manual Ver.1.0 (English, French, Spanish)
Page 23
... 4 into the left , you removed in a safe location. Store the removed Cushion-Cover(F) in Step 2. installing your dryer 10. Remove the door by lifting it. 4. After assembling the parts removed in Step 5 into the right of the Frame-Front, tighten three screws. 8. Remove the ...screws.) A B 11. Failure to do so may result in which the door opens so that you have been placed as shown, cover the Holder-Glass. 13. Remove two Screws from the door. 3. Unplug the power cord. 2. DOOR REVERSAL 1. If there have to the left of the FrameFront, tighten four screws...