User Manual
Page 2
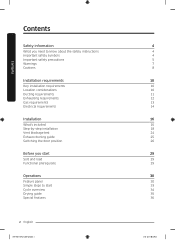
... requirements Installation What's included Step-by-step installation Vent blockage test Exhaust ducting guide Switching the door position Before you start Sort and load Functional prerequisite Operations Feature panel Simple steps to start Cycle overview Drying guide Special features 2 English DV7700K-03170U-01_EN (US).indd 2 4 4 4 5 7 8 10 10 10 11 12 13 14...
... requirements Installation What's included Step-by-step installation Vent blockage test Exhaust ducting guide Switching the door position Before you start Sort and load Functional prerequisite Operations Feature panel Simple steps to start Cycle overview Drying guide Special features 2 English DV7700K-03170U-01_EN (US).indd 2 4 4 4 5 7 8 10 10 10 11 12 13 14...
User Manual
Page 18
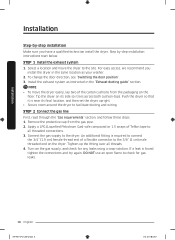
... check for gas leaks. 18 English DV7700K-03170U-01_EN (US).indd 18 2015-12-29 12:08:27 Installation Installation Step-by step installation instructions start below. Push the dryer so that it is near its side so it lies across both cushion-tops. An additional fitting is found, tighten the...
... check for gas leaks. 18 English DV7700K-03170U-01_EN (US).indd 18 2015-12-29 12:08:27 Installation Installation Step-by step installation instructions start below. Push the dryer so that it is near its side so it lies across both cushion-tops. An additional fitting is found, tighten the...

User Manual
Page 24
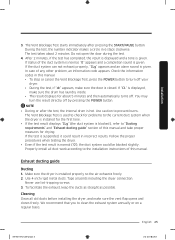
... turn the dryer on, then simultaneously press and hold the Cycle 1 + Wrinkle Prevent buttons for several minutes to operate on the floor. • The dryer starts, runs, heats, and shuts off and wait 5 minutes. Be sure the gas supply to the user. Proper ducting can not be made.) 2. The Vent Blockage... into a power source and check the dryer's installation and operation using the final checklist in the gas line. Make sure the drum is installed, start the Vent Blockage Test to air in Step 7 below. Vent blockage test After the dryer is empty and close the door. (If there are...
... turn the dryer on, then simultaneously press and hold the Cycle 1 + Wrinkle Prevent buttons for several minutes to operate on the floor. • The dryer starts, runs, heats, and shuts off and wait 5 minutes. Be sure the gas supply to the user. Proper ducting can not be made.) 2. The Vent Blockage... into a power source and check the dryer's installation and operation using the final checklist in the gas line. Make sure the drum is installed, start the Vent Blockage Test to air in Step 7 below. Vent blockage test After the dryer is empty and close the door. (If there are...
User Manual
Page 25
...Never use lint-trapping screws. 3. English 25 DV7700K-03170U-01_EN (US).indd 25 2015-12-29 12:08:28 Installation 3. The Vent Blockage Test starts immediately after the test, the internal drum is normal ("0"), the duct system could result in 6 steps clockwise. Properly install all duct work according to ...to check for problems to the current duct system when the dryer is installed for about 2 minutes. NOTE • During or after pressing the START/PAUSE button. Follow the proper procedures when testing the dryer. • Even if the test result is hot. We recommend that you to ...
...Never use lint-trapping screws. 3. English 25 DV7700K-03170U-01_EN (US).indd 25 2015-12-29 12:08:28 Installation 3. The Vent Blockage Test starts immediately after the test, the internal drum is normal ("0"), the duct system could result in 6 steps clockwise. Properly install all duct work according to ...to check for problems to the current duct system when the dryer is installed for about 2 minutes. NOTE • During or after pressing the START/PAUSE button. Follow the proper procedures when testing the dryer. • Even if the test result is hot. We recommend that you to ...
User Manual
Page 29
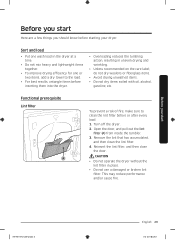
...mix heavy and lightweight items together. • To improve drying efficiency for one or two items, add a dry towel to clean the lint filter before starting your dryer. Open the door, and pull out the lint filter (A) from inside the tumbler. 3. DV7700K-03170U-01_EN (US).indd 29 English 29 ...2015-12-29 12:08:29 This may reduce performance and/or cause fire. Before you start Before you start Here are a few things you should know before or after every load. 1. CAUTION • Do not operate the dryer without the lint filter...
...mix heavy and lightweight items together. • To improve drying efficiency for one or two items, add a dry towel to clean the lint filter before starting your dryer. Open the door, and pull out the lint filter (A) from inside the tumbler. 3. DV7700K-03170U-01_EN (US).indd 29 English 29 ...2015-12-29 12:08:29 This may reduce performance and/or cause fire. Before you start Before you start Here are a few things you should know before or after every load. 1. CAUTION • Do not operate the dryer without the lint filter...

User Manual
Page 32
... dry level in all Sensor Dry cycles except for details. 13 POWER Press to turn on/turn on or off the dryer. 14 START/PAUSE Press and hold to start operation, or press to reduce wrinkling. Press Sound to open. The drying time can be extended by the washer may degrade the...
... dry level in all Sensor Dry cycles except for details. 13 POWER Press to turn on/turn on or off the dryer. 14 START/PAUSE Press and hold to start operation, or press to reduce wrinkling. Press Sound to open. The drying time can be extended by the washer may degrade the...

User Manual
Page 33
Simple steps to start the new cycle. To change the cycle during operation 1. Select a different cycle. 3. Change the cycle settings (Dry Level, Temp. Operations DV7700K-03170U-01_EN (US).indd .... 2. The dryer indicator turns on with an estimated cycle time on the dryer. 2. Press START/PAUSE again to turn on the display. Press START/PAUSE. Press START/PAUSE to select a cycle in the left-most panel. 3. Press POWER to start 1. and Time) as necessary. 4. Optionally, you can activate options available by pressing the relevant...
Simple steps to start the new cycle. To change the cycle during operation 1. Select a different cycle. 3. Change the cycle settings (Dry Level, Temp. Operations DV7700K-03170U-01_EN (US).indd .... 2. The dryer indicator turns on with an estimated cycle time on the dryer. 2. Press START/PAUSE again to turn on the display. Press START/PAUSE. Press START/PAUSE to select a cycle in the left-most panel. 3. Press POWER to start 1. and Time) as necessary. 4. Optionally, you can activate options available by pressing the relevant...
User Manual
Page 39
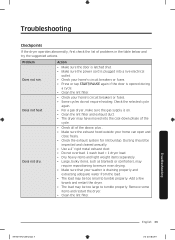
... shut. • Make sure the power cord is plugged into a live electrical outlet. • Check your home's circuit breakers or fuses. • Press or tap START/PAUSE again if the door is draining properly and extracting adequate water from the load. • The load may have moved into the cool-down...
... shut. • Make sure the power cord is plugged into a live electrical outlet. • Check your home's circuit breakers or fuses. • Press or tap START/PAUSE again if the door is draining properly and extracting adequate water from the load. • The load may have moved into the cool-down...
User Manual
Page 41
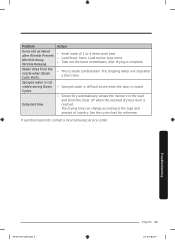
... level is not visible during Steam Cycles. Problem Items still wrinkled after drying is complete. • This is steam condensation. If a problem persists, contact a local Samsung service center. Troubleshooting DV7700K-03170U-01_EN (US).indd 41 English 41 2015-12-29 12:08:30 Extended time. Sprayed water is reached. Water drips...
... level is not visible during Steam Cycles. Problem Items still wrinkled after drying is complete. • This is steam condensation. If a problem persists, contact a local Samsung service center. Troubleshooting DV7700K-03170U-01_EN (US).indd 41 English 41 2015-12-29 12:08:30 Extended time. Sprayed water is reached. Water drips...


