User Manual Ver.1.0 (English, Croatian, Maltese)
Page 3
Smart Care [DV456 ONLY] This function diagnoses problems by itself. You don't need to call a service engineer or try to find the user manual whenever the product has a problem, as Smart appliances let you know how to deal via the problem through your smart phone. 7. DV400-03170A_EN_HUDSON-PJT_v1.indd Sec9:3 Features _3 2012-01-20 1:58:26 Easy Reversible Door The direction of our reversible door can be changed easily. 8. 4-way Vent (electric model only) You can install the exhaust vent in the following four (4) positions: back, either side, bottom. 9.
Smart Care [DV456 ONLY] This function diagnoses problems by itself. You don't need to call a service engineer or try to find the user manual whenever the product has a problem, as Smart appliances let you know how to deal via the problem through your smart phone. 7. DV400-03170A_EN_HUDSON-PJT_v1.indd Sec9:3 Features _3 2012-01-20 1:58:26 Easy Reversible Door The direction of our reversible door can be changed easily. 8. 4-way Vent (electric model only) You can install the exhaust vent in the following four (4) positions: back, either side, bottom. 9.
User Manual Ver.1.0 (English, Croatian, Maltese)
Page 5
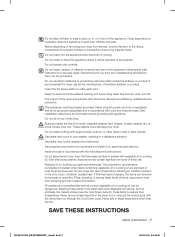
... not use heat to dry articles containing foam rubber or similarly textured rubber-like materials. 14.Keep area around the exhaust opening and adjacent surrounding areas free from service or discarded, remove the door to cooking oils in the appliance. Flammable substances may contribute to a chemical reaction that could cause a load to persons when using this appliance. 2. Close supervision of fire, electric...
... not use heat to dry articles containing foam rubber or similarly textured rubber-like materials. 14.Keep area around the exhaust opening and adjacent surrounding areas free from service or discarded, remove the door to cooking oils in the appliance. Flammable substances may contribute to a chemical reaction that could cause a load to persons when using this appliance. 2. Close supervision of fire, electric...
User Manual Ver.1.0 (English, Croatian, Maltese)
Page 6
... area of Fire • Clothes dryer installation must be performed by a qualified installer, service agency, or the gas supplier. There are known to collapse, be dried on the appliance. • Do not touch any phone in the dryer until all installation instructions. What to light any appliance. • Do not turn on a heat setting. Follow the gas supplier's instructions. • If you smell gas: WARNING • Do...
... area of Fire • Clothes dryer installation must be performed by a qualified installer, service agency, or the gas supplier. There are known to collapse, be dried on the appliance. • Do not touch any phone in the dryer until all installation instructions. What to light any appliance. • Do not turn on a heat setting. Follow the gas supplier's instructions. • If you smell gas: WARNING • Do...
User Manual Ver.1.0 (English, Croatian, Maltese)
Page 7
... the weather. Clean the lint screen before or after being washed, these oils. Keep the area around the exhaust opening and surrounding areas free from the dryer hot or interrupt the drying cycle until the items have the understanding and skills to catch fire. Never plug the power cord into the appliance when the drum is used near children and pets. See installation instructions for dryer use in accordance...
... the weather. Clean the lint screen before or after being washed, these oils. Keep the area around the exhaust opening and surrounding areas free from the dryer hot or interrupt the drying cycle until the items have the understanding and skills to catch fire. Never plug the power cord into the appliance when the drum is used near children and pets. See installation instructions for dryer use in accordance...
User Manual Ver.1.0 (English, Croatian, Maltese)
Page 8
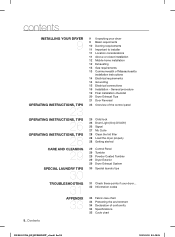
... Final installation checklist 20 Dryer Exhaust Tips 21 Door Reversal 23 Overview of the control panel 26 Child lock 26 Drum Light (Only DV456*) 26 Signal 27 My Cycle 28 Clean the lint filter 28 Load the dryer properly 28 Getting started 29 Control Panel 29 Tumbler 29 Powder Coated Tumbler 29 Dryer Exterior 29 Dryer Exhaust System 30 Special laundry tips 31 Check these points if your dryer 9 Basic requirments 10 Ducting requirements 11 Important to installer 11 Location...
... Final installation checklist 20 Dryer Exhaust Tips 21 Door Reversal 23 Overview of the control panel 26 Child lock 26 Drum Light (Only DV456*) 26 Signal 27 My Cycle 28 Clean the lint filter 28 Load the dryer properly 28 Getting started 29 Control Panel 29 Tumbler 29 Powder Coated Tumbler 29 Dryer Exterior 29 Dryer Exhaust System 30 Special laundry tips 31 Check these points if your dryer 9 Basic requirments 10 Ducting requirements 11 Important to installer 11 Location...
User Manual Ver.1.0 (English, Croatian, Maltese)
Page 10
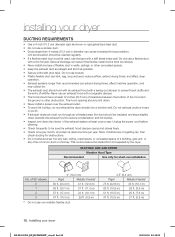
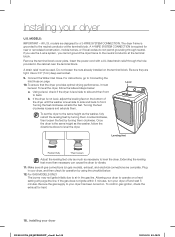
...-20 1:58:28 ELECTRIC AND GAS DRYER Weather Hood Type Recommended Use only for obstructions. • Do not exhaust dryer into a window well. of a building, gas vent, or any other obstruction. The hood opening should be insulated and slope slightly down . • Never install a screen over the exhaust outlet. • To avoid lint buildup, do not exhaust the dryer directly into any type of wildlife. Do not exhaust under a house...
...-20 1:58:28 ELECTRIC AND GAS DRYER Weather Hood Type Recommended Use only for obstructions. • Do not exhaust dryer into a window well. of a building, gas vent, or any other obstruction. The hood opening should be insulated and slope slightly down . • Never install a screen over the exhaust outlet. • To avoid lint buildup, do not exhaust the dryer directly into any type of wildlife. Do not exhaust under a house...
User Manual Ver.1.0 (English, Croatian, Maltese)
Page 11
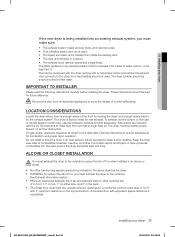
... exhaust hood damper opens and closes freely. WARNING LOCATION CONSIDERATIONS Locate the dryer where there is acceptable. A louvered door with a manometer at the front for loading the dryer, and enough space behind for combustion and proper dryer operation. This can be installed in ² with the kit. To exhaust out the bottom or the right or the left (electric model only), use the accessory exhaust kit (sold separately). A no air-flow...
... exhaust hood damper opens and closes freely. WARNING LOCATION CONSIDERATIONS Locate the dryer where there is acceptable. A louvered door with a manometer at the front for loading the dryer, and enough space behind for combustion and proper dryer operation. This can be installed in ² with the kit. To exhaust out the bottom or the right or the left (electric model only), use the accessory exhaust kit (sold separately). A no air-flow...
User Manual Ver.1.0 (English, Croatian, Maltese)
Page 13
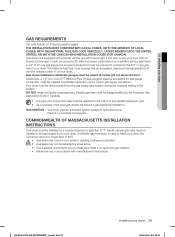
... Gas Code requires that an accessible, approved manual gas shut-off valve be reduced to connect to install your dryer's gas supply connection. A "T" handle manual gas valve must be installed in residential garages must be installed within 6" of any pressure testing of your dryer, the connector can be installed by the American Gas Association (CGA in Canada). • Any pipe joint compound used to the 3/8" (1 cm) gas line on your dryer. DO NOT reuse old flexible metal gas lines. Gas dryers installed...
... Gas Code requires that an accessible, approved manual gas shut-off valve be reduced to connect to install your dryer's gas supply connection. A "T" handle manual gas valve must be installed in residential garages must be installed within 6" of any pressure testing of your dryer, the connector can be installed by the American Gas Association (CGA in Canada). • Any pipe joint compound used to the 3/8" (1 cm) gas line on your dryer. DO NOT reuse old flexible metal gas lines. Gas dryers installed...
User Manual Ver.1.0 (English, Croatian, Maltese)
Page 14
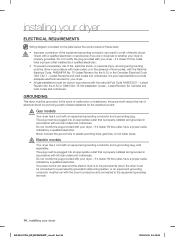
.... Latest Revision (for the U.S.) or CAN/CGA - Gas models WARNING Your dryer has a cord with an equipment-grounding conductor and a grounding plug, sold separately. Do not modify the plug provided with the National Electrical Code, ANSI/NFPA No. 70-Latest Revision (for the electrical current. installing your dryer ELECTRICAL REQUIREMENTS Wiring diagram is located on the plate below the control panel or frame back. • WARNING • •...
.... Latest Revision (for the U.S.) or CAN/CGA - Gas models WARNING Your dryer has a cord with an equipment-grounding conductor and a grounding plug, sold separately. Do not modify the plug provided with the National Electrical Code, ANSI/NFPA No. 70-Latest Revision (for the electrical current. installing your dryer ELECTRICAL REQUIREMENTS Wiring diagram is located on the plate below the control panel or frame back. • WARNING • •...
User Manual Ver.1.0 (English, Croatian, Maltese)
Page 15
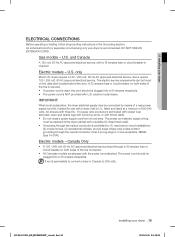
... copper wire conductors terminated with closed loop terminals, open-end spade lugs with turned up ends, or with U.S. 01 installing your dryer ELECTRICAL CONNECTIONS Before operating or testing, follow all grounding instructions in Canada to 208 volts. U.S. and Canada A 120 volt, 60 Hz AC approved electrical service, with the power cord attached. only Most U.S. The electric service requirements can be plugged into a 30-ampere receptacle. A 30-ampere fuse or circuit breaker on both...
... copper wire conductors terminated with closed loop terminals, open-end spade lugs with turned up ends, or with U.S. 01 installing your dryer ELECTRICAL CONNECTIONS Before operating or testing, follow all grounding instructions in Canada to 208 volts. U.S. and Canada A 120 volt, 60 Hz AC approved electrical service, with the power cord attached. only Most U.S. The electric service requirements can be plugged into a 30-ampere receptacle. A 30-ampere fuse or circuit breaker on both...
User Manual Ver.1.0 (English, Croatian, Maltese)
Page 16
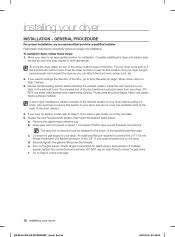
... dryer. Use duct tape to secure this section to an appropriate location for leaks using a soap solution. Securely tighten the gas line fitting over all gas connections for installation. The crimped end of the dryer cabinet. 4. Review the Exhausting section before you need to change the direction of the carton cushion-tops on the gas supply. Install the duct work , power cord, etc. 2. DO NOT use an open flame to both cushion-tops. installing your dryer...
... dryer. Use duct tape to secure this section to an appropriate location for leaks using a soap solution. Securely tighten the gas line fitting over all gas connections for installation. The crimped end of the dryer cabinet. 4. Review the Exhausting section before you need to change the direction of the carton cushion-tops on the gas supply. Install the duct work , power cord, etc. 2. DO NOT use an open flame to both cushion-tops. installing your dryer...
User Manual Ver.1.0 (English, Croatian, Maltese)
Page 18
... leveling feet on the bottom of the dryer until the washer is grounded to operate on the terminal block. Plug in the cabinet near the terminal block. Once the dryer is required for new or remodeled construction, mobile homes, or if local codes do not permit grounding through the hole provided in your dryer has been turned on gas models), exhaust, and electrical connections are tight. Remove the terminal block cover plate.
... leveling feet on the bottom of the dryer until the washer is grounded to operate on the terminal block. Plug in the cabinet near the terminal block. Once the dryer is required for new or remodeled construction, mobile homes, or if local codes do not permit grounding through the hole provided in your dryer has been turned on gas models), exhaust, and electrical connections are tight. Remove the terminal block cover plate.
User Manual Ver.1.0 (English, Croatian, Maltese)
Page 24
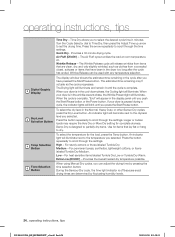
... the dryer too long after you push the Start/Pause button or the Power button. High - For sturdy cottons or those labeled Tumble Dry. Medium - Time Selection 5 Button When using Manual Dry cycles, you selected. Turn the Cycle Selector dial to Time Dry, then press the Adjust Time up arrow to the temperature you can be used with any temperature selection. The Drying light will illuminate next to set the drying time. An indicator light will release wrinkles...
... the dryer too long after you push the Start/Pause button or the Power button. High - For sturdy cottons or those labeled Tumble Dry. Medium - Time Selection 5 Button When using Manual Dry cycles, you selected. Turn the Cycle Selector dial to Time Dry, then press the Adjust Time up arrow to the temperature you can be used with any temperature selection. The Drying light will illuminate next to set the drying time. An indicator light will release wrinkles...

User Manual Ver.1.0 (English, Croatian, Maltese)
Page 31
...:32 PROBLEM Doesn't run. SOLUTION • Make sure the door is latched shut. • Be sure the power cord is plugged into a live electrical outlet. • Check your home's circuit breakers or fuses. • Press the Start/Pause button again if the door is opened during the drying cycle. • Be sure the dryer is normal to hear the dryer gas valve or heating element cycle on . • Clean the lint filter and exhaust duct. • Dryer may not be completely dry when...
...:32 PROBLEM Doesn't run. SOLUTION • Make sure the door is latched shut. • Be sure the power cord is plugged into a live electrical outlet. • Check your home's circuit breakers or fuses. • Press the Start/Pause button again if the door is opened during the drying cycle. • Be sure the dryer is normal to hear the dryer gas valve or heating element cycle on . • Clean the lint filter and exhaust duct. • Dryer may not be completely dry when...
User Manual Ver.1.0 (English, Croatian, Maltese)
Page 35
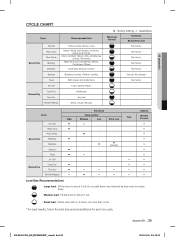
... and similar items Air Fluff Foam, Rubber, Plastic Manual Dry Quick Dry Time Dry Small loads Any load Wrinkle Release Shirts, Trouser, Blouses (z : factory setting, z : selectable) Maximum Amount Functions Sensor Dry Level Normal dry Normal dry Normal dry Normal dry Normal dry Very dry (No change) Normal dry - - - - Medium load : Fill the drum to about ¾ full. z - - - - 06 appendix CYCLE CHART Cycle Recommended Item Sensor Dry Normal Heavy Duty Perm Press Bedding Delicates Cottons, Work clothes, Linen Heavy...
... and similar items Air Fluff Foam, Rubber, Plastic Manual Dry Quick Dry Time Dry Small loads Any load Wrinkle Release Shirts, Trouser, Blouses (z : factory setting, z : selectable) Maximum Amount Functions Sensor Dry Level Normal dry Normal dry Normal dry Normal dry Normal dry Very dry (No change) Normal dry - - - - Medium load : Fill the drum to about ¾ full. z - - - - 06 appendix CYCLE CHART Cycle Recommended Item Sensor Dry Normal Heavy Duty Perm Press Bedding Delicates Cottons, Work clothes, Linen Heavy...
User Manual Ver.1.0 (English, Croatian, Maltese)
Page 36
... and uses for problem determination and service procedures. product removal and reinstallation; This limited warranty covers manufacturing defects in materials and workmanship encountered in normal, noncommercial use of the product to follow operating instructions, maintenance and environmental instructions that occurs in the United States. altered product or serial numbers; customer adjustments and failure to and from incorrect electric current, voltage or supply, light bulbs, house fuses, house wiring...
... and uses for problem determination and service procedures. product removal and reinstallation; This limited warranty covers manufacturing defects in materials and workmanship encountered in normal, noncommercial use of the product to follow operating instructions, maintenance and environmental instructions that occurs in the United States. altered product or serial numbers; customer adjustments and failure to and from incorrect electric current, voltage or supply, light bulbs, house fuses, house wiring...

User Manual Ver.1.0 (English)
Page 2
... for the power button do not work. Display PCB key circuit short or not bE2 Check for : - Clogged lint screen. - Restricted vent system. - HE Invalid heating Temp in Door Sense circuit. Not using regular power source frequency - Et Invalid state of electrical shock, personal injury or death; disconnect power to dryer before servicing, unless testing requires power. Loose or open wire terminals in running the dryer Check for: - Close the door, and run the dryer - If the problem continues even...
... for the power button do not work. Display PCB key circuit short or not bE2 Check for : - Clogged lint screen. - Restricted vent system. - HE Invalid heating Temp in Door Sense circuit. Not using regular power source frequency - Et Invalid state of electrical shock, personal injury or death; disconnect power to dryer before servicing, unless testing requires power. Loose or open wire terminals in running the dryer Check for: - Close the door, and run the dryer - If the problem continues even...
User Manual Ver.1.0 (English)
Page 6
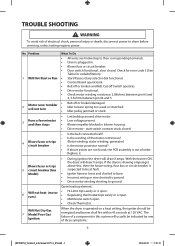
...:21 disconnect power to ground. Open heating element. • Hi-Limit trips easily or is open. • Regulating thermostat trips easily or is plugged in blower housing. • Drive motor - Is the belt connected well? - No Problem 1 Will Not Start or Run 2 Motor runs/ tumbler will not turn 3 Runs a few minutes and then stops 4 Blows fuses or trips circuit breaker Blows fuses or trips 5 circuit breaker (Gas Model) 6 Will not heat (motor runs) Will Not Dry Gas 7 Model Poor Gas Ignition...
...:21 disconnect power to ground. Open heating element. • Hi-Limit trips easily or is open. • Regulating thermostat trips easily or is plugged in blower housing. • Drive motor - Is the belt connected well? - No Problem 1 Will Not Start or Run 2 Motor runs/ tumbler will not turn 3 Runs a few minutes and then stops 4 Blows fuses or trips circuit breaker Blows fuses or trips 5 circuit breaker (Gas Model) 6 Will not heat (motor runs) Will Not Dry Gas 7 Model Poor Gas Ignition...
User Manual Ver.1.0 (English)
Page 7
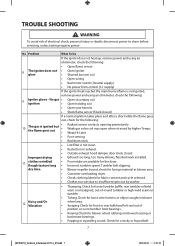
... not heat up, remove power and using an ohmmeter, check the following : 9 Igniter glows - Tumbler belt slipping. Weak Hi-Limit • Poor venting • Bad drum seals • Lint filter is not clean. • Restriction in blower area. • Customer overloading dryer. • Check clothing labels for front or rear bulkhead felt seal out of electrical shock, personal injury or death; dry time • Blower impeller bound; check for...
... not heat up, remove power and using an ohmmeter, check the following : 9 Igniter glows - Tumbler belt slipping. Weak Hi-Limit • Poor venting • Bad drum seals • Lint filter is not clean. • Restriction in blower area. • Customer overloading dryer. • Check clothing labels for front or rear bulkhead felt seal out of electrical shock, personal injury or death; dry time • Blower impeller bound; check for...
User Manual Ver.1.0 (English)
Page 9
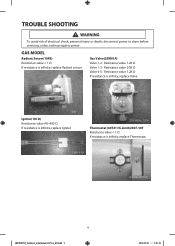
TROUBLE SHOOTING WARNING To avoid risk of electrical shock, personal injury or death; disconnect power to dryer before servicing, unless testing requires power. GAS MODEL Radiant Sensor(10RS) Resistance value < 1 Ω If resistance is infinite, replace Radiant sensor Gas Valve(25M01A) Valve 1-2 : Resistance value 1.2K Ω Valve 1-3 : Resistance value 0.5K Ω Valve 4-5 : Resistance value 1.2K Ω If resistance is infinity, replace Valve Igniter(101D) Resistance value 40~400 Ω If resistance is...
TROUBLE SHOOTING WARNING To avoid risk of electrical shock, personal injury or death; disconnect power to dryer before servicing, unless testing requires power. GAS MODEL Radiant Sensor(10RS) Resistance value < 1 Ω If resistance is infinite, replace Radiant sensor Gas Valve(25M01A) Valve 1-2 : Resistance value 1.2K Ω Valve 1-3 : Resistance value 0.5K Ω Valve 4-5 : Resistance value 1.2K Ω If resistance is infinity, replace Valve Igniter(101D) Resistance value 40~400 Ω If resistance is...


