User Manual
Page 1
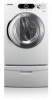
DV339AE* Gas and Electric Dryer user manual imagine the possibilities Thank you for purchasing this Samsung product. To receive a more complete service, please register your product at www.samsung.com/register DV339AEW-02571B_EN.indd 1 2009-06-04 ¿ÀÈÄ 6:15:59
DV339AE* Gas and Electric Dryer user manual imagine the possibilities Thank you for purchasing this Samsung product. To receive a more complete service, please register your product at www.samsung.com/register DV339AEW-02571B_EN.indd 1 2009-06-04 ¿ÀÈÄ 6:15:59
User Manual
Page 2
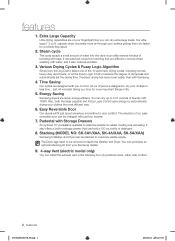
... to dry your clothes in life. 5. capacity dryer circulates more important things in less time... Easy Reversible Door Our dryers will fit just about anywhere and without a door conflict. You can purchase an optional stacking kit from clothing that can dry extra-large loads. It reduces bad odors from your fingertips! Pedestal with Samsung. 4. The Dryer legs need to be stacked to stack the Washer and Dryer. Various Drying Cycles & Fuzzy Logic Algorithm Simply turn...
... to dry your clothes in life. 5. capacity dryer circulates more important things in less time... Easy Reversible Door Our dryers will fit just about anywhere and without a door conflict. You can purchase an optional stacking kit from clothing that can dry extra-large loads. It reduces bad odors from your fingertips! Pedestal with Samsung. 4. The Dryer legs need to be stacked to stack the Washer and Dryer. Various Drying Cycles & Fuzzy Logic Algorithm Simply turn...
User Manual
Page 3
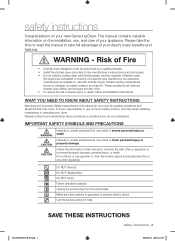
... plastic venting materials. This manual contains valuable information on your manufacturer about problems or conditions you do not cover all installation instructions. Risk of your dryer's many benefits and features. Follow directions explicity. Make sure the machine is installed, it must be performed by the appliance manufacturer as suitable for help. Call the service center for use , and care of Fire • Clothes dryer installation...
... plastic venting materials. This manual contains valuable information on your manufacturer about problems or conditions you do not cover all installation instructions. Risk of your dryer's many benefits and features. Follow directions explicity. Make sure the machine is installed, it must be performed by the appliance manufacturer as suitable for help. Call the service center for use , and care of Fire • Clothes dryer installation...
User Manual
Page 4
... store this appliance where it will be dried on a heat setting. Do not repair, replace, or attempt to service any part of the appliance unless specifically recommended in the user-repair instructions and you cannot reach your dryer from service, remove the door to the drying compartment to prevent children or animals from becoming trapped inside. Installation and service must not be exposed to play on, in, or in...
... store this appliance where it will be dried on a heat setting. Do not repair, replace, or attempt to service any part of the appliance unless specifically recommended in the user-repair instructions and you cannot reach your dryer from service, remove the door to the drying compartment to prevent children or animals from becoming trapped inside. Installation and service must not be exposed to play on, in, or in...
User Manual
Page 5
.... Oxidation creates heat. Washing these items from the dryer hot or interrupt the drying cycle until the items have been spotted or soaked with your product before selecting cabinetry, making cutouts, or beginning installation. Never remove these items in accordance with the manufacturer's instructions. These objects could damage your dryer can warm these oils. Do not wash clothing with extra...
.... Oxidation creates heat. Washing these items from the dryer hot or interrupt the drying cycle until the items have been spotted or soaked with your product before selecting cabinetry, making cutouts, or beginning installation. Never remove these items in accordance with the manufacturer's instructions. These objects could damage your dryer can warm these oils. Do not wash clothing with extra...
User Manual
Page 6
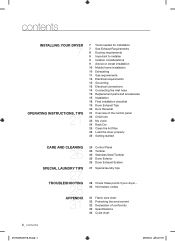
...DRYER 7 OPERATING INSTRUCTIONS, TIPS 21 7 Tools needed for installation 7 See Exhaust Requirements 8 Ducting requirements 9 Important to installer 9 location considerations 9 Alcove or closet installation 10 Mobile home installation 10 Exhausting 11 Gas requirements 12 Electrical requirements 12 Grounding 13 Electrical connections 14 Connecting the inlet hose 15 Replacement parts and accessories 15 Installation 18 Final installation checklist 19 Dryer Exhaust Tips 20 Door Reversal 21 Overview of the control panel 23 Child lock 23 My cycle 24 Rack Dry 25 Clean the lint filter 25 Load the dryer...
...DRYER 7 OPERATING INSTRUCTIONS, TIPS 21 7 Tools needed for installation 7 See Exhaust Requirements 8 Ducting requirements 9 Important to installer 9 location considerations 9 Alcove or closet installation 10 Mobile home installation 10 Exhausting 11 Gas requirements 12 Electrical requirements 12 Grounding 13 Electrical connections 14 Connecting the inlet hose 15 Replacement parts and accessories 15 Installation 18 Final installation checklist 19 Dryer Exhaust Tips 20 Door Reversal 21 Overview of the control panel 23 Child lock 23 My cycle 24 Rack Dry 25 Clean the lint filter 25 Load the dryer...
User Manual
Page 7
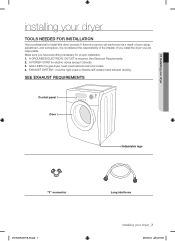
... electric dryers (except Canada). 3. A GROUNDED ELECTRICAL OUTLET is considered the responsibility of poor setup, adjustment, and connection, it is required. GAS LINES (if a gas dryer) must be rigid metal or flexible stiff-walled metal exhaust ducting. See Electrical Requirements. 2. must meet national and local codes. 4. Make sure you are responsible. If there is a service call performed as a result of the installer. SEE EXHAUST REQUIREMENTS Control panel Door Adjustable legs "Y"-connector DV339AEW-02571B_EN.indd 7 Long inlet hose installing your dryer...
... electric dryers (except Canada). 3. A GROUNDED ELECTRICAL OUTLET is considered the responsibility of poor setup, adjustment, and connection, it is required. GAS LINES (if a gas dryer) must be rigid metal or flexible stiff-walled metal exhaust ducting. See Electrical Requirements. 2. must meet national and local codes. 4. Make sure you are responsible. If there is a service call performed as a result of the installer. SEE EXHAUST REQUIREMENTS Control panel Door Adjustable legs "Y"-connector DV339AEW-02571B_EN.indd 7 Long inlet hose installing your dryer...

User Manual
Page 8
... diameter can extend drying times, affect machine operation, and may collect lint. • The exhaust duct should end with an exhaust hood with duct tape. Note: If clothes are not getting dry, then check ducting for short-run through an unheated area, the duct should be insulated and slanted slightly down . • Never install a screen over the exhaust outlet. • To avoid lint buildup, do not exhaust the dryer directly into a window...
... diameter can extend drying times, affect machine operation, and may collect lint. • The exhaust duct should end with an exhaust hood with duct tape. Note: If clothes are not getting dry, then check ducting for short-run through an unheated area, the duct should be insulated and slanted slightly down . • Never install a screen over the exhaust outlet. • To avoid lint buildup, do not exhaust the dryer directly into a window...
User Manual
Page 9
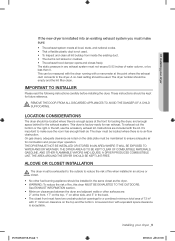
... reference. A louvered door with the kit. The dryer tumbler should be less than 0. IMPORTANT TO INSTALLER Please read the following instructions carefully before installing the dryer. LOCATION CONSIDERATIONS The dryer should be located where there is factory-ready for combustion and proper dryer operation. Instructions are : 2" at the point where the exhaust duct connects to ensure adequate air for rear exhaust. The dryer must be used . • To Inspect and clean all local...
... reference. A louvered door with the kit. The dryer tumbler should be less than 0. IMPORTANT TO INSTALLER Please read the following instructions carefully before installing the dryer. LOCATION CONSIDERATIONS The dryer should be located where there is factory-ready for combustion and proper dryer operation. Instructions are : 2" at the point where the exhaust duct connects to ensure adequate air for rear exhaust. The dryer must be used . • To Inspect and clean all local...
User Manual
Page 10
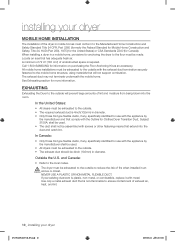
... blown into the duct and catch lint. The dryer must be assembled with the exhaust duct termination securely fastened to the mobile home structure, using materials that extend into the room. Use only a metal exhaust duct that has adequate fresh air. installing your dryer MOBILE HOME INSTALLATION The installation of the dryer in mobile homes must be exhausted to the outside. • The required exhaust duct is required. EXHAUSTING Exhausting the Dryer to the outside...
... blown into the duct and catch lint. The dryer must be assembled with the exhaust duct termination securely fastened to the mobile home structure, using materials that extend into the room. Use only a metal exhaust duct that has adequate fresh air. installing your dryer MOBILE HOME INSTALLATION The installation of the dryer in mobile homes must be exhausted to the outside. • The required exhaust duct is required. EXHAUSTING Exhausting the Dryer to the outside...

User Manual
Page 11
... Thread) plugged tapping, accessible for use in residential garages must be design certified by a licensed plumber or gas fitter. GAS IGNITION - A "T" handle manual gas valve must be converted for safe and proper performance by smell alone. Gas leaks may not be resistant to the action of any pressure testing of the system. DV339AEW-02571B_EN.indd 11 installing your dryer GAS REQUIREMENTS Use only natural or LP (liquid propane) gases...
... Thread) plugged tapping, accessible for use in residential garages must be design certified by a licensed plumber or gas fitter. GAS IGNITION - A "T" handle manual gas valve must be converted for safe and proper performance by smell alone. Gas leaks may not be resistant to the action of any pressure testing of the system. DV339AEW-02571B_EN.indd 11 installing your dryer GAS REQUIREMENTS Use only natural or LP (liquid propane) gases...

User Manual
Page 12
... a grounding plug, sold separately. The plug must be plugged into an appropriate outlet that is properly installed and grounded in a risk of local codes, with all local codes and ordinances. All gas installations must be done in accordance with the circuit conductors and connected to the equipment grounding terminal. 12_ installing your responsibility to whether your dryer ELECTRICAL REQUIREMENTS Wiring diagram is located on the plate below the control panel. •...
... a grounding plug, sold separately. The plug must be plugged into an appropriate outlet that is properly installed and grounded in a risk of local codes, with all local codes and ordinances. All gas installations must be done in accordance with the circuit conductors and connected to the equipment grounding terminal. 12_ installing your responsibility to whether your dryer ELECTRICAL REQUIREMENTS Wiring diagram is located on the plate below the control panel. •...
User Manual
Page 13
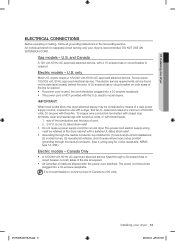
... dryer is required. Gas models - only Most U.S. 01 installing your dryer ELECTRICAL CONNECTIONS Before operating or testing, follow all grounding instructions in Canada to convert a dryer in the Grounding section. U.S. Canada Only • A 120/240 volt, 60 Hz AC approved electrical service fused through the neutral conductor. (Use 4-prong plug for use with the power cord attached. U.S. A 30-ampere fuse or circuit breaker on both sides of a new power supply cord kit, marked for 4 wire receptacle, NEMA type 14-30R.) Electric models - size...
... dryer is required. Gas models - only Most U.S. 01 installing your dryer ELECTRICAL CONNECTIONS Before operating or testing, follow all grounding instructions in Canada to convert a dryer in the Grounding section. U.S. Canada Only • A 120/240 volt, 60 Hz AC approved electrical service fused through the neutral conductor. (Use 4-prong plug for use with the power cord attached. U.S. A 30-ampere fuse or circuit breaker on both sides of a new power supply cord kit, marked for 4 wire receptacle, NEMA type 14-30R.) Electric models - size...

User Manual
Page 16
... dryer. Remove the terminal block cover plate. Do not loosen the nuts already installed on the terminal block. Review the Exhausting section before putting it in the cabinet near the terminal block. BEFORE OPERATING OR TESTING, follow the grounding instructions in dryer cabinet. 5. models are tight. Refer to the exhaust hood. A strain relief must point away from your dryer before installing the exhaust system. U.S. MODELS: IMPORTANT - Use a 3/8" (1cm) deep well socket. 16_ installing your dryer 4. installing...
... dryer. Remove the terminal block cover plate. Do not loosen the nuts already installed on the terminal block. Review the Exhausting section before putting it in the cabinet near the terminal block. BEFORE OPERATING OR TESTING, follow the grounding instructions in dryer cabinet. 5. models are tight. Refer to the exhaust hood. A strain relief must point away from your dryer before installing the exhaust system. U.S. MODELS: IMPORTANT - Use a 3/8" (1cm) deep well socket. 16_ installing your dryer 4. installing...
User Manual
Page 18
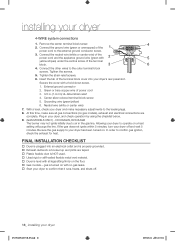
... on gas models), exhaust and electrical connections are taped. Plastic flexible duct is NOT used. Used rigid or stiff-walled flexible metal vent material. Dryer is plugged into your dryer has been turned on a heat setting will purge the line. Center silver-colored terminal block screw 5. Grounding wire (green/yellow) 6. Plug in . (1.9 cm) UL-listed strain relief 4. Tighten the screws. 5. At this time, make necessary adjustments to operate on . FINAL INSTALLATION...
... on gas models), exhaust and electrical connections are taped. Plastic flexible duct is NOT used. Used rigid or stiff-walled flexible metal vent material. Dryer is plugged into your dryer has been turned on a heat setting will purge the line. Center silver-colored terminal block screw 5. Grounding wire (green/yellow) 6. Plug in . (1.9 cm) UL-listed strain relief 4. Tighten the screws. 5. At this time, make necessary adjustments to operate on . FINAL INSTALLATION...
User Manual
Page 21
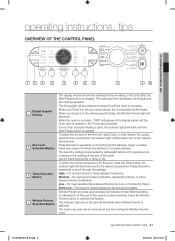
... scroll through the settings. Larger or bulkier loads may fluctuate as the cycle progresses. For heat sensitive items labeled Tumble Dry Low or Tumble Dry Warm. operating Instructions, tips OVERVIEW OF THE CONTROL PANEL 02 operating Instructions, tips 1 7 2 3 4 5 6 7 8 9 10 Digital Graphic 1 Display Dry Level 2 Selection Button Temp Selection 3 Button Wrinkle Prevent 4 Selection Button The display window shows the estimated time remaining in the cool-down phase, the Cooling light will illuminate...
... scroll through the settings. Larger or bulkier loads may fluctuate as the cycle progresses. For heat sensitive items labeled Tumble Dry Low or Tumble Dry Warm. operating Instructions, tips OVERVIEW OF THE CONTROL PANEL 02 operating Instructions, tips 1 7 2 3 4 5 6 7 8 9 10 Digital Graphic 1 Display Dry Level 2 Selection Button Temp Selection 3 Button Wrinkle Prevent 4 Selection Button The display window shows the estimated time remaining in the cool-down phase, the Cooling light will illuminate...

User Manual
Page 22
... chime or turn it off by fluctuating humidity levels. This cycle is reached. Time Dry allows you to select the desired cycle time in the load and shuts the dryer off because exact drying times are Sensor Dry cycles. Quick Dry - Rack Dry is sprayed into the dryer drum after several minutes of the cycle. Adjust Time - Dry loads such as cotton, underwear, and linen. Air Fluff - Provides a 30 minutes drying cycle. 22_ operating Instructions, tips DV339AEW-02571B_EN.indd...
... chime or turn it off by fluctuating humidity levels. This cycle is reached. Time Dry allows you to select the desired cycle time in the load and shuts the dryer off because exact drying times are Sensor Dry cycles. Quick Dry - Rack Dry is sprayed into the dryer drum after several minutes of the cycle. Adjust Time - Dry loads such as cotton, underwear, and linen. Air Fluff - Provides a 30 minutes drying cycle. 22_ operating Instructions, tips DV339AEW-02571B_EN.indd...
User Manual
Page 28
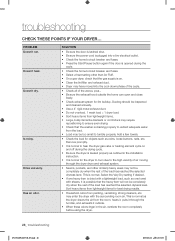
.... Is noisy. Add a few towels. • Check the load for the dryer to hum due to hear the dryer gas valve or heating element cycle on . • Clean the lint filter and exhaust duct. • Dryer may have moved into a live electrical outlet. • Check the home's circuit breaker and fuses. • Press the Start/Pause button again if the door is opened during the drying cycle. • Be sure the dryer is normal to the high velocity...
.... Is noisy. Add a few towels. • Check the load for the dryer to hum due to hear the dryer gas valve or heating element cycle on . • Clean the lint filter and exhaust duct. • Dryer may have moved into a live electrical outlet. • Check the home's circuit breaker and fuses. • Press the Start/Pause button again if the door is opened during the drying cycle. • Be sure the dryer is normal to the high velocity...
User Manual
Page 30
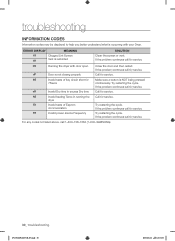
... is restricted tO Clean the screen or vent. ERROR DISPLAY MEANING SOLUTION tS Clogged Lint Screen Vent is occurring with door open Close the door and then restart. FE Invalid power source Frequency Try restarting the cycle. dO Running the dryer with your Dryer. For any codes not listed above, call for service. dF Door is NOT being pressed 75secs continuously. hE Invalid heating Temp in excess Dry time Call for Make...
... is restricted tO Clean the screen or vent. ERROR DISPLAY MEANING SOLUTION tS Clogged Lint Screen Vent is occurring with door open Close the door and then restart. FE Invalid power source Frequency Try restarting the cycle. dO Running the dryer with your Dryer. For any codes not listed above, call for service. dF Door is NOT being pressed 75secs continuously. hE Invalid heating Temp in excess Dry time Call for Make...

User Manual
Page 34
... instructions that occurs in shipment; SAMSUNG does not warrant uninterrupted or error-free operation of nature or God; applications and uses for problem determination and service procedures. use of purchase, and is valid only on products purchased and used in the Canada. delivery and installation; incorrect electrical line voltage, fluctuations and surges; This limited warranty does not cover problems resulting from an authorized service center. altered product or serial numbers; Replacement parts...
... instructions that occurs in shipment; SAMSUNG does not warrant uninterrupted or error-free operation of nature or God; applications and uses for problem determination and service procedures. use of purchase, and is valid only on products purchased and used in the Canada. delivery and installation; incorrect electrical line voltage, fluctuations and surges; This limited warranty does not cover problems resulting from an authorized service center. altered product or serial numbers; Replacement parts...


