User Manual (user Manual) (ver.1.0) (English)
Page 1
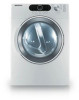
DV338AEW DV338AGW Gas and Electric Dryer user manual imagine the possibilities Thank you for purchasing this Samsung product. To receive more complete service, please register your product at www.samsung.com/global/register DV338AER-02571A_EN.indd 1 2008-02-14 ¿ÀÈÄ 4:23:30
DV338AEW DV338AGW Gas and Electric Dryer user manual imagine the possibilities Thank you for purchasing this Samsung product. To receive more complete service, please register your product at www.samsung.com/global/register DV338AER-02571A_EN.indd 1 2008-02-14 ¿ÀÈÄ 4:23:30

User Manual (user Manual) (ver.1.0) (English)
Page 2
... easy reversible door can dry up to raise the washer for a wrinkle-free result. 2. Stacking (MODEL NO: SK-3A1/XAA, SK-4A/XAA) Samsung's Washer and Dryer can hold a 100 oz. Extra Large Capacity Ultra drying capabilitlites are difficult to remove when washing with 1kWh. just 44 minutes! Also, both the large capacity and Fuzzy Logic Control save energy by automatically drying your fingertips! Various Drying Cycles & Fuzzy Logic Algorithm Simply turn the...
... easy reversible door can dry up to raise the washer for a wrinkle-free result. 2. Stacking (MODEL NO: SK-3A1/XAA, SK-4A/XAA) Samsung's Washer and Dryer can hold a 100 oz. Extra Large Capacity Ultra drying capabilitlites are difficult to remove when washing with 1kWh. just 44 minutes! Also, both the large capacity and Fuzzy Logic Control save energy by automatically drying your fingertips! Various Drying Cycles & Fuzzy Logic Algorithm Simply turn the...
User Manual (user Manual) (ver.1.0) (English)
Page 3
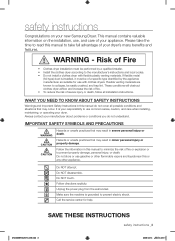
... venting materials are known to prevent electric shock. Always contact your new Samsung Dryer. Hazards or unsafe practices that may occur. Call the service center for use common sense, caution, and care when installing, maintaining, or operating your dryer's many benefits and features. This manual contains valuable information on your manufacturer about problems or conditions you do not cover all installation instructions. WHAT YOU NEED TO...
... venting materials are known to prevent electric shock. Always contact your new Samsung Dryer. Hazards or unsafe practices that may occur. Call the service center for use common sense, caution, and care when installing, maintaining, or operating your dryer's many benefits and features. This manual contains valuable information on your manufacturer about problems or conditions you do not cover all installation instructions. WHAT YOU NEED TO...
User Manual (user Manual) (ver.1.0) (English)
Page 4
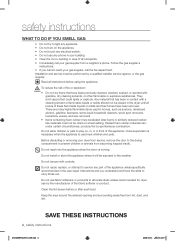
... it will be placed in the dryer until all instructions before or after each load. Before discarding or removing your dryer from becoming trapped inside. Clean the lint screen before using the appliance. There are many highly flammable items used near children and pets. Keep the area around the exhaust opening and surrounding areas free from a neighbor's phone. Installation and service must not be performed by...
... it will be placed in the dryer until all instructions before or after each load. Before discarding or removing your dryer from becoming trapped inside. Clean the lint screen before using the appliance. There are many highly flammable items used near children and pets. Keep the area around the exhaust opening and surrounding areas free from a neighbor's phone. Installation and service must not be performed by...
User Manual (user Manual) (ver.1.0) (English)
Page 5
..., Samsung reserves the right to catch fire. These objects could damage your product before selecting cabinetry, making cutouts, or beginning installation. Install and use the Cool Down cycle for these oils. The potential for grounding this heat cannot escape, the items can become hot enough to change specifications without notice. Always use in the oil to heat. The interior of the dryer and exhaust duct should...
..., Samsung reserves the right to catch fire. These objects could damage your product before selecting cabinetry, making cutouts, or beginning installation. Install and use the Cool Down cycle for these oils. The potential for grounding this heat cannot escape, the items can become hot enough to change specifications without notice. Always use in the oil to heat. The interior of the dryer and exhaust duct should...
User Manual (user Manual) (ver.1.0) (English)
Page 6
...DRYER 7 OPERATING INSTRUCTIONS, TIPS 21 7 Tools needed for installation 7 See Exhaust Requirements 8 Ducting requirements 9 Important to installer 9 location considerations 9 Alcove or closet installation 10 Mobile home installation 10 Exhausting 11 Gas requirements 12 Electrical requirements 12 Grounding 13 Electrical connections 14 Connecting the inlet hose 15 Replacement parts and accessories 15 Installation 18 Final installation checklist 19 Dryer Exhaust Tips 20 Door Reversal 21 Overview of the control panel 23 Child lock 23 My cycle 24 Rack Dry 25 Clean the lint filter 25 Load the dryer...
...DRYER 7 OPERATING INSTRUCTIONS, TIPS 21 7 Tools needed for installation 7 See Exhaust Requirements 8 Ducting requirements 9 Important to installer 9 location considerations 9 Alcove or closet installation 10 Mobile home installation 10 Exhausting 11 Gas requirements 12 Electrical requirements 12 Grounding 13 Electrical connections 14 Connecting the inlet hose 15 Replacement parts and accessories 15 Installation 18 Final installation checklist 19 Dryer Exhaust Tips 20 Door Reversal 21 Overview of the control panel 23 Child lock 23 My cycle 24 Rack Dry 25 Clean the lint filter 25 Load the dryer...
User Manual (user Manual) (ver.1.0) (English)
Page 7
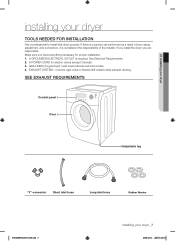
GAS LINES (if a gas dryer) must be rigid metal or flexible stiff-walled metal exhaust ducting. A POWER CORD for proper installation. 1. SEE EXHAUST REQUIREMENTS Control panel Door Adjustable leg "Y"-connector Short inlet hose Long inlet hose Rubber Washer DV338AER-02571A_EN.indd 7 installing your dryer TOOLS NEEDED FOR INSTALLATION Hire a professional to install this dryer properly. A GROUNDED ELECTRICAL OUTLET is considered the responsibility of poor setup, adjustment, and connection, it is required. EXHAUST SYSTEM - If there is a service call performed as a result of the...
GAS LINES (if a gas dryer) must be rigid metal or flexible stiff-walled metal exhaust ducting. A POWER CORD for proper installation. 1. SEE EXHAUST REQUIREMENTS Control panel Door Adjustable leg "Y"-connector Short inlet hose Long inlet hose Rubber Washer DV338AER-02571A_EN.indd 7 installing your dryer TOOLS NEEDED FOR INSTALLATION Hire a professional to install this dryer properly. A GROUNDED ELECTRICAL OUTLET is considered the responsibility of poor setup, adjustment, and connection, it is required. EXHAUST SYSTEM - If there is a service call performed as a result of the...
User Manual (user Manual) (ver.1.0) (English)
Page 9
... air openings for a combined minimum total area of water column, or be used . • To Inspect and clean all local, state, and national codes. • That a flexible plastic duct is not used . The dryer tumbler should be located where there is enough space at the point where the exhaust duct connects to ensure adequate air for future reference. These instructions should be less than 0. On gas dryers...
... air openings for a combined minimum total area of water column, or be used . • To Inspect and clean all local, state, and national codes. • That a flexible plastic duct is not used . The dryer tumbler should be located where there is enough space at the point where the exhaust duct connects to ensure adequate air for future reference. These instructions should be less than 0. On gas dryers...
User Manual (user Manual) (ver.1.0) (English)
Page 10
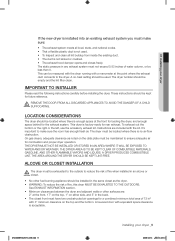
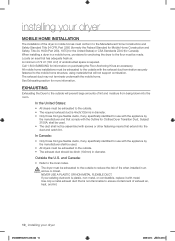
...; All dryers must be exhausted to the outside. • The required exhaust duct is non-flammable to the local codes. NEVER USE A PLASTIC OR NON-METAL FLEXIBLE DUCT. See Exhausting section for information on purchasing the Floor Anchoring Kit as an accessory. When installing a dryer in an WARNING alcove or closet. and Canada: • Refer to ensure containment of exhaust air, heat, and lint. 10_ installing your...
...; All dryers must be exhausted to the outside. • The required exhaust duct is non-flammable to the local codes. NEVER USE A PLASTIC OR NON-METAL FLEXIBLE DUCT. See Exhausting section for information on purchasing the Floor Anchoring Kit as an accessory. When installing a dryer in an WARNING alcove or closet. and Canada: • Refer to ensure containment of exhaust air, heat, and lint. 10_ installing your...
User Manual (user Manual) (ver.1.0) (English)
Page 12
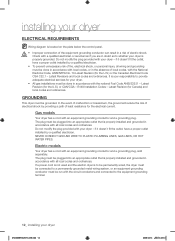
...:34 installing your dryer ELECTRICAL REQUIREMENTS Wiring diagram is to be permanently wired, the dryer must be connected to a permanently grounded metal wiring system, or an equipment grounding conductor must be run with the circuit conductors and connected to provide adequate electrical services for the electrical current. Check with a qualified electrician or serviceman if you are in a risk of local codes, with your dryer - Do not modify the plug provided...
...:34 installing your dryer ELECTRICAL REQUIREMENTS Wiring diagram is to be permanently wired, the dryer must be connected to a permanently grounded metal wiring system, or an equipment grounding conductor must be run with the circuit conductors and connected to provide adequate electrical services for the electrical current. Check with a qualified electrician or serviceman if you are in a risk of local codes, with your dryer - Do not modify the plug provided...
User Manual (user Manual) (ver.1.0) (English)
Page 13
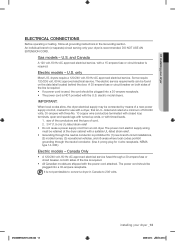
... your dryer ELECTRICAL CONNECTIONS Before operating or testing, follow all grounding instructions in Canada to convert a dryer in the Grounding section. Electric models - electric model dryers. IMPORTANT: When local codes allow, the dryer electrical supply may be found on both sides of a new power supply cord kit, marked for 4 wire receptacle, NEMA type 14-30R.) Electric models - Canada Only • A 120/240 volt, 60 Hz AC approved electrical service fused through the neutral conductor. (Use 4-prong plug for use with...
... your dryer ELECTRICAL CONNECTIONS Before operating or testing, follow all grounding instructions in Canada to convert a dryer in the Grounding section. Electric models - electric model dryers. IMPORTANT: When local codes allow, the dryer electrical supply may be found on both sides of a new power supply cord kit, marked for 4 wire receptacle, NEMA type 14-30R.) Electric models - Canada Only • A 120/240 volt, 60 Hz AC approved electrical service fused through the neutral conductor. (Use 4-prong plug for use with...
User Manual (user Manual) (ver.1.0) (English)
Page 16
... to the neutral conductor at the terminal block. Insert the power cord with a UL-listed strain relief through neutral. A strain relief must point away from your dryer 4. Tip for 3- installing your dryer to the exhaust hood. BEFORE OPERATING OR TESTING, follow the grounding instructions in place. U.S. Use a 3/8" (1cm) deep well socket. 16_ installing your dryer before installing the exhaust system. The dryer frame is used . Never use sheet metal screws when assembling ducting.
... to the neutral conductor at the terminal block. Insert the power cord with a UL-listed strain relief through neutral. A strain relief must point away from your dryer 4. Tip for 3- installing your dryer to the exhaust hood. BEFORE OPERATING OR TESTING, follow the grounding instructions in place. U.S. Use a 3/8" (1cm) deep well socket. 16_ installing your dryer before installing the exhaust system. The dryer frame is used . Never use sheet metal screws when assembling ducting.

User Manual (user Manual) (ver.1.0) (English)
Page 18
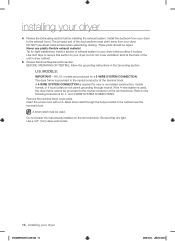
... ground connector 2. Green or bare copper wire of power cord 3. 3/4 in your dryer, and check operation by using the checklist below. 9. (GAS MODELS ONLY) - If the gas does not ignite within 5 minutes, turn your dryer's rear panel slot. FINAL INSTALLATION CHECKLIST Dryer is plugged into your dryer off . 18_ installing your dryer 4-WIRE system connections 1. Connect the other wires to confirm gas ignition, check the exhaust for heat. In order to the outer terminal block screws. Neutral wire (white or center wire) 7. DV338AGW...
... ground connector 2. Green or bare copper wire of power cord 3. 3/4 in your dryer, and check operation by using the checklist below. 9. (GAS MODELS ONLY) - If the gas does not ignite within 5 minutes, turn your dryer's rear panel slot. FINAL INSTALLATION CHECKLIST Dryer is plugged into your dryer off . 18_ installing your dryer 4-WIRE system connections 1. Connect the other wires to confirm gas ignition, check the exhaust for heat. In order to the outer terminal block screws. Neutral wire (white or center wire) 7. DV338AGW...
User Manual (user Manual) (ver.1.0) (English)
Page 19
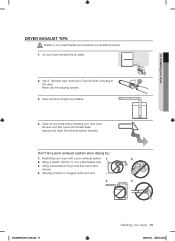
... new dryer. Never use lint-trapping screws. 3. Keep ducts as straight as possible. 4. WARNING 1. Allowing crushed or clogged ducts and vent. 3 4 DV338AER-02571A_EN.indd 19 installing your dryer with a poor exhaust system. 1 2 2. Don't let a poor exhaust system slow drying by: 1. Let your dryer DRYER EXHAUST TIPS Plastic or non-metal flexible duct presents a potential fire hazard. 01 installing your dryer exhaust the air easily. 2. Clean all joints, including at the dryer. Using unnecessarily long ducts...
... new dryer. Never use lint-trapping screws. 3. Keep ducts as straight as possible. 4. WARNING 1. Allowing crushed or clogged ducts and vent. 3 4 DV338AER-02571A_EN.indd 19 installing your dryer with a poor exhaust system. 1 2 2. Don't let a poor exhaust system slow drying by: 1. Let your dryer DRYER EXHAUST TIPS Plastic or non-metal flexible duct presents a potential fire hazard. 01 installing your dryer exhaust the air easily. 2. Clean all joints, including at the dryer. Using unnecessarily long ducts...
User Manual (user Manual) (ver.1.0) (English)
Page 21
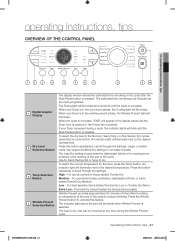
... When your Dryer is dry, and can be removed at any time during a cycle, the indicator lights will appear in the display panel until the Dryer door is opened or the Power key is pressed. To select the dry level in the cycle after the Start/Pause button is pressed. For sturdy cottons or those labeled Tumble Dry. Medium - Low - Provides the lowest heated dry temperature possible. Wrinkle Prevent provides...
... When your Dryer is dry, and can be removed at any time during a cycle, the indicator lights will appear in the display panel until the Dryer door is opened or the Power key is pressed. To select the dry level in the cycle after the Start/Pause button is pressed. For sturdy cottons or those labeled Tumble Dry. Medium - Low - Provides the lowest heated dry temperature possible. Wrinkle Prevent provides...
User Manual (user Manual) (ver.1.0) (English)
Page 22
... the load in minutes. operating Instructions, tips Time Selection 5 Button When using Manual Dry cycles, time can be set times in the Manual Dry cycles (Time Dry, Delicates, Wrinkle Release, or Air Fluff cycles). During the Sensory Dry cycle, the time light indicator is available at the end of water is displayed. 8 Cycle Selector To select a cycle, rotate the Cycle Selector dial to scroll through the choices. Adjust the volume of tumbling with heat. Rack Dry - Rack Dry is off because exact drying times are Sensor Dry cycles. Temperature...
... the load in minutes. operating Instructions, tips Time Selection 5 Button When using Manual Dry cycles, time can be set times in the Manual Dry cycles (Time Dry, Delicates, Wrinkle Release, or Air Fluff cycles). During the Sensory Dry cycle, the time light indicator is available at the end of water is displayed. 8 Cycle Selector To select a cycle, rotate the Cycle Selector dial to scroll through the choices. Adjust the volume of tumbling with heat. Rack Dry - Rack Dry is off because exact drying times are Sensor Dry cycles. Temperature...
User Manual (user Manual) (ver.1.0) (English)
Page 28
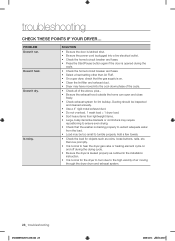
...; Use a 4" rigid metal exhaust duct. • Do not overload. 1 wash load = 1 dryer load. • Sort heavy items from the load. • Load may have moved into a live electrical outlet. • Check the home's circuit breaker and fuses. • Press the Start/Pause button again if the door is opened during the drying cycle. • Be sure the dryer is plugged into the cool-down phase of the cycle. • Check all of air moving through the dryer drum...
...; Use a 4" rigid metal exhaust duct. • Do not overload. 1 wash load = 1 dryer load. • Sort heavy items from the load. • Load may have moved into a live electrical outlet. • Check the home's circuit breaker and fuses. • Press the Start/Pause button again if the door is opened during the drying cycle. • Be sure the dryer is plugged into the cool-down phase of the cycle. • Check all of air moving through the dryer drum...
User Manual (user Manual) (ver.1.0) (English)
Page 30
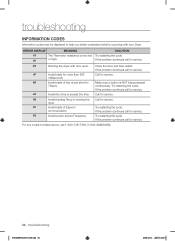
... listed above, call for service. or high. FE Invalid power source Frequency Try restarting the cycle. dO Running the dryer with your Dryer. dF Invalid state for more than 256 Call for service. oD Invalid Dry time in running the Call for service. If the problem continues call for service. dryer Et Invalid state of key circuit short for service. If the problem continues call for service. troubleshooting INFORMATION CODES Information codes...
... listed above, call for service. or high. FE Invalid power source Frequency Try restarting the cycle. dO Running the dryer with your Dryer. dF Invalid state for more than 256 Call for service. oD Invalid Dry time in running the Call for service. If the problem continues call for service. dryer Et Invalid state of key circuit short for service. If the problem continues call for service. troubleshooting INFORMATION CODES Information codes...
User Manual (user Manual) (ver.1.0) (English)
Page 31
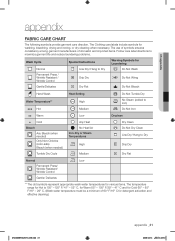
... domestic and imported items. Follow care label directions to maximize garment life and reduce laundering problems. Wash Cycle Special Instructions Warning Symbols for Laundering Normal Line Dry/ Hang to Dry Do Not Wash Permanent Press / Wrinkle Resistant / Wrinkle Control Drip Dry Do Not Wring Gentle/Delicates Dry Flat Do Not Bleach Hand Wash Water Temperature** Hot Heat Setting High Medium Do Not Tumble Dry No Steam (added to iron) Do...
... domestic and imported items. Follow care label directions to maximize garment life and reduce laundering problems. Wash Cycle Special Instructions Warning Symbols for Laundering Normal Line Dry/ Hang to Dry Do Not Wash Permanent Press / Wrinkle Resistant / Wrinkle Control Drip Dry Do Not Wring Gentle/Delicates Dry Flat Do Not Bleach Hand Wash Water Temperature** Hot Heat Setting High Medium Do Not Tumble Dry No Steam (added to iron) Do...
User Manual (user Manual) (ver.1.0) (English)
Page 34
... and from incorrect electric current, voltage or supply, light bulbs, house fuses, house wiring, cost of SAMSUNG and must contact SAMSUNG for problem determination and service procedures. altered product or serial numbers; This limited warranty does not cover problems resulting from an authorized service center. SAMSUNG will repair, replace, or refund this product was not intended; product removal and reinstallation; SAMSUNG does not warrant uninterrupted or error-free operation of nature or God; accidents...
... and from incorrect electric current, voltage or supply, light bulbs, house fuses, house wiring, cost of SAMSUNG and must contact SAMSUNG for problem determination and service procedures. altered product or serial numbers; This limited warranty does not cover problems resulting from an authorized service center. SAMSUNG will repair, replace, or refund this product was not intended; product removal and reinstallation; SAMSUNG does not warrant uninterrupted or error-free operation of nature or God; accidents...


