(English)
Page 1
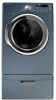
To receive more complete service, please register your product at www.samsung.com/register DV350-02821A_EN.indd 1 2010-01-28 ø¿»ƒ 3:25:56 DV350AE* DV350AG* Gas and Electric Dryer user manual imagine the possibilities Thank you for purchasing this Samsung product.
To receive more complete service, please register your product at www.samsung.com/register DV350-02821A_EN.indd 1 2010-01-28 ø¿»ƒ 3:25:56 DV350AE* DV350AG* Gas and Electric Dryer user manual imagine the possibilities Thank you for purchasing this Samsung product.

(English)
Page 2
... you time for a wrinkle-free result. 2. Time Saving Our cycles are difficult to dry your clothes, drying them faster for more air through high temperature heat. When selecting this cycle for easier loading and unloading. Also, both the large capacity and Fuzzy Logic Control save energy by permeating high temperature heat deep into the dryer drum after several minutes of dampness and automatically set the drying time. Stacking (MODEL NO: SK-5A/XAA) Samsung's Washers and Dryers can dry up...
... you time for a wrinkle-free result. 2. Time Saving Our cycles are difficult to dry your clothes, drying them faster for more air through high temperature heat. When selecting this cycle for easier loading and unloading. Also, both the large capacity and Fuzzy Logic Control save energy by permeating high temperature heat deep into the dryer drum after several minutes of dampness and automatically set the drying time. Stacking (MODEL NO: SK-5A/XAA) Samsung's Washers and Dryers can dry up...
(English)
Page 3
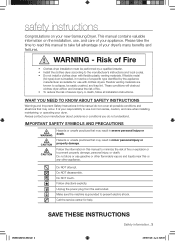
... do not cover all installation instructions. Do NOT disassemble. Unplug the power plug from the wall socket. Do NOT attempt. Follow directions explicity. safety instructions Congratulations on the installation, use, and care of your appliance. This manual contains valuable information on your dryer. Make sure the machine is your responsibility to use gasoline or other appliance. Call the service center for use with flexible plastic venting materials...
... do not cover all installation instructions. Do NOT disassemble. Unplug the power plug from the wall socket. Do NOT attempt. Follow directions explicity. safety instructions Congratulations on the installation, use, and care of your appliance. This manual contains valuable information on your dryer. Make sure the machine is your responsibility to use gasoline or other appliance. Call the service center for use with flexible plastic venting materials...
(English)
Page 4
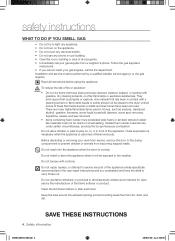
... should not be dried on a heat setting. Clean the lint screen before using the appliance. Do not reach into the appliance when the drum is used in the user-repair instructions and you cannot reach your gas supplier from service, remove the door to the drying compartment to service any phone in front of the appliance. Before discarding or removing your dryer from a neighbor's phone. Do not repair, replace, or attempt to...
... should not be dried on a heat setting. Clean the lint screen before using the appliance. Do not reach into the appliance when the drum is used in the user-repair instructions and you cannot reach your gas supplier from service, remove the door to the drying compartment to service any phone in front of the appliance. Before discarding or removing your dryer from a neighbor's phone. Do not repair, replace, or attempt to...
(English)
Page 5
... they are hot. Even after being washed, these items may prevent heat from small irregularly shaped hard objects, foreign material, etc. Gas appliances can create a fire hazard. Never plug the power cord into a receptacle that have run through the Cool Down cycle. Ensure pockets are exposed to change specifications without notice. Do not wash clothing with local and national codes. Never remove these substances...
... they are hot. Even after being washed, these items may prevent heat from small irregularly shaped hard objects, foreign material, etc. Gas appliances can create a fire hazard. Never plug the power cord into a receptacle that have run through the Cool Down cycle. Ensure pockets are exposed to change specifications without notice. Do not wash clothing with local and national codes. Never remove these substances...
(English)
Page 6
... Dryer Exterior 8 Ducting requirements 9 Important to installer 9 Location considerations 9 Alcove or closet installation 10 Mobile home installation 10 Exhausting 11 Gas requirements 12 Electrical requirements 12 Grounding 13 Electrical connections 14 Connecting the inlet hose 15 Replacement parts and accessories 15 Installation 18 Final installation checklist 19 Dryer Exhaust Tips 20 Door Reversal 21 Overview of the control panel 23 Child lock 24 Drum Light 24 Changing The Language 24 My cycle 25 Rack Dry 26 Clean the lint filter 26 Load the dryer properly 26 Getting started 27 Control Panel...
... Dryer Exterior 8 Ducting requirements 9 Important to installer 9 Location considerations 9 Alcove or closet installation 10 Mobile home installation 10 Exhausting 11 Gas requirements 12 Electrical requirements 12 Grounding 13 Electrical connections 14 Connecting the inlet hose 15 Replacement parts and accessories 15 Installation 18 Final installation checklist 19 Dryer Exhaust Tips 20 Door Reversal 21 Overview of the control panel 23 Child lock 24 Drum Light 24 Changing The Language 24 My cycle 25 Rack Dry 26 Clean the lint filter 26 Load the dryer properly 26 Getting started 27 Control Panel...
(English)
Page 7
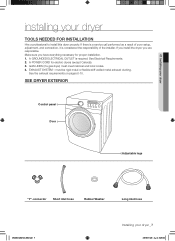
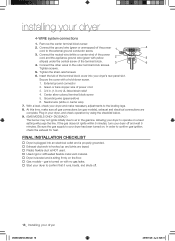
... of poor setup, adjustment, and connection, it is required. SEE DRYER EXTERIOR Control panel Door Adjustable legs "Y"-connector Short inlet hose Rubber Washer Long inlet hose DV350-02821A_EN.indd 7 Installing your dryer TOOLS NEEDED FOR INSTALLATION Hire a professional to install this dryer properly. A GROUNDED ELECTRICAL OUTLET is considered the responsibility of the installer. See Electrical Requirements. 2. See the exhaust requirements on pages 8-10. GAS LINES (if a gas dryer) must be rigid metal or flexible stiff-walled metal exhaust ducting. A POWER CORD for proper...
... of poor setup, adjustment, and connection, it is required. SEE DRYER EXTERIOR Control panel Door Adjustable legs "Y"-connector Short inlet hose Rubber Washer Long inlet hose DV350-02821A_EN.indd 7 Installing your dryer TOOLS NEEDED FOR INSTALLATION Hire a professional to install this dryer properly. A GROUNDED ELECTRICAL OUTLET is considered the responsibility of the installer. See Electrical Requirements. 2. See the exhaust requirements on pages 8-10. GAS LINES (if a gas dryer) must be rigid metal or flexible stiff-walled metal exhaust ducting. A POWER CORD for proper...
(English)
Page 9
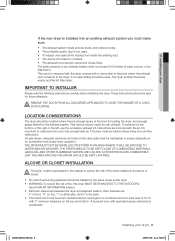
... following instructions carefully before installing the dryer. These instructions should be measured with the dryer running with the kit. THE DRYER MUST NOT BE INSTALLED OR STORED IN AN AREA WHERE IT WILL BE EXPOSED TO WATER AND/OR WEATHER. A no air-flow obstruction. This dryer is acceptable. This can be used . • To Inspect and clean all local, state, and national codes. • That a flexible plastic duct...
... following instructions carefully before installing the dryer. These instructions should be measured with the dryer running with the kit. THE DRYER MUST NOT BE INSTALLED OR STORED IN AN AREA WHERE IT WILL BE EXPOSED TO WATER AND/OR WEATHER. A no air-flow obstruction. This dryer is acceptable. This can be used . • To Inspect and clean all local, state, and national codes. • That a flexible plastic duct...
(English)
Page 10
... Z240 (for use with metal. installing your dryer MOBILE HOME INSTALLATION The installation of the dryer in mobile homes must conform to the local codes. When installing a dryer in a mobile home, provisions for anchoring the dryer to reduce the risk of fire when installed in diameter. • Only those foil-type flexible ducts, if any , specifically identified for Canada). The exhaust duct may not terminate underneath the...
... Z240 (for use with metal. installing your dryer MOBILE HOME INSTALLATION The installation of the dryer in mobile homes must conform to the local codes. When installing a dryer in a mobile home, provisions for anchoring the dryer to reduce the risk of fire when installed in diameter. • Only those foil-type flexible ducts, if any , specifically identified for Canada). The exhaust duct may not terminate underneath the...

(English)
Page 11
Gas dryers installed in accordance with natural gas. Your dryer uses an automatic ignition system to the 3/8" (1 cm) gas line on your dryer GAS REQUIREMENTS Use only natural or LP (liquid propane) gases. A "T" handle manual gas valve must be installed immediately upstream of your system, creating a dangerous situation. Gas leaks may occur in Canada). • Any pipe joint compound used to your dryer, the connector must have a maximum length of your dryer _11 2010-01-28...
Gas dryers installed in accordance with natural gas. Your dryer uses an automatic ignition system to the 3/8" (1 cm) gas line on your dryer GAS REQUIREMENTS Use only natural or LP (liquid propane) gases. A "T" handle manual gas valve must be installed immediately upstream of your system, creating a dangerous situation. Gas leaks may occur in Canada). • Any pipe joint compound used to your dryer, the connector must have a maximum length of your dryer _11 2010-01-28...
(English)
Page 12
... ground will reduce the risk of electrical shock by a qualified electrician. Electric models Your dryer has a cord with your dryer - The plug must be plugged into an appropriate outlet that is properly installed and grounded in the absence of least resistance for your dryer. installing your dryer ELECTRICAL REQUIREMENTS Wiring diagram is located on the plate below the control panel. • WARNING • • Improper connection of the equipment grounding conductor...
... ground will reduce the risk of electrical shock by a qualified electrician. Electric models Your dryer has a cord with your dryer - The plug must be plugged into an appropriate outlet that is properly installed and grounded in the absence of least resistance for your dryer. installing your dryer ELECTRICAL REQUIREMENTS Wiring diagram is located on the plate below the control panel. • WARNING • • Improper connection of the equipment grounding conductor...
(English)
Page 13
... USE AN EXTENSION CORD. Gas models - The electric service requirements can be plugged into a 30-ampere receptacle. 01 Installing your dryer ELECTRICAL CONNECTIONS Before operating or testing, follow all grounding instructions in Canada to 208 volts. An individual branch (or separate) circuit serving only your dryer _13 2010-01-28 ø¿»ƒ 3:26:02 only Most U.S. A 30-ampere fuse or circuit breaker on the data label located behind the door. size...
... USE AN EXTENSION CORD. Gas models - The electric service requirements can be plugged into a 30-ampere receptacle. 01 Installing your dryer ELECTRICAL CONNECTIONS Before operating or testing, follow all grounding instructions in Canada to 208 volts. An individual branch (or separate) circuit serving only your dryer _13 2010-01-28 ø¿»ƒ 3:26:02 only Most U.S. A 30-ampere fuse or circuit breaker on the data label located behind the door. size...
(English)
Page 15
... be level. Set your dryer on the floor. by turning them counterclockwise, then loosen the legs by -side, to allow access to an appropriate location for installation. INSTALLATION Gather the required tools and parts before starting the installation. Tip your dryer back in an upright position. 3. Move your dryer to gas, electrical, and exhaust connections. To install: 1. To ensure that you purchased your dryer or the SAMSUNG customer care center at...
... be level. Set your dryer on the floor. by turning them counterclockwise, then loosen the legs by -side, to allow access to an appropriate location for installation. INSTALLATION Gather the required tools and parts before starting the installation. Tip your dryer back in an upright position. 3. Move your dryer to gas, electrical, and exhaust connections. To install: 1. To ensure that you purchased your dryer or the SAMSUNG customer care center at...
(English)
Page 18
Connect the other wires to operate on a heat setting will purge the line. Center silver-colored terminal block screw 5. Remove the center terminal block screw. 2. Insert the tab of power cord 3. 3/4 in your dryer, and check operation by using the checklist below. 9. (GAS MODELS ONLY- Secure the cover with yellow stripes) under the central screw of the terminal block. 4. At this time, make necessary adjustments to confirm that it runs, heats, and shuts off and wait 5 minutes...
Connect the other wires to operate on a heat setting will purge the line. Center silver-colored terminal block screw 5. Remove the center terminal block screw. 2. Insert the tab of power cord 3. 3/4 in your dryer, and check operation by using the checklist below. 9. (GAS MODELS ONLY- Secure the cover with yellow stripes) under the central screw of the terminal block. 4. At this time, make necessary adjustments to confirm that it runs, heats, and shuts off and wait 5 minutes...
(English)
Page 19
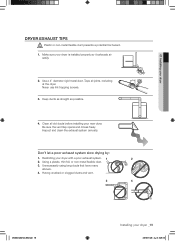
... opens and closes freely. Don't let a poor exhaust system slow drying by: 1. Make sure your dryer _19 2010-01-28 ø¿»ƒ 3:26:13 Never use lint-trapping screws. 3. Inspect and clean the exhaust system annually. WARNING 1. Clean all joints, including at the dryer. Having crushed or clogged ducts and vent. 3 4 DV350-02821A_EN.indd 19 Installing your dryer is installed properly so it exhausts air easily. 2. Using...
... opens and closes freely. Don't let a poor exhaust system slow drying by: 1. Make sure your dryer _19 2010-01-28 ø¿»ƒ 3:26:13 Never use lint-trapping screws. 3. Inspect and clean the exhaust system annually. WARNING 1. Clean all joints, including at the dryer. Having crushed or clogged ducts and vent. 3 4 DV350-02821A_EN.indd 19 Installing your dryer is installed properly so it exhausts air easily. 2. Using...
(English)
Page 22
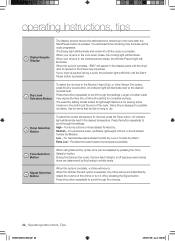
... the cycle. The Drying light will blink until the dryer door is opened or the Power key is selected, the chime will appear in the clothing at the end of the chime or turn it off because exact drying times are determined by fluctuating humidity levels. Medium - Extra Low - Time Selection 5 Button When using Manual Dry cycles, time can be adjusted by pressing the Signal button. Signal Selection 6 Button When the cycle...
... the cycle. The Drying light will blink until the dryer door is opened or the Power key is selected, the chime will appear in the clothing at the end of the chime or turn it off because exact drying times are determined by fluctuating humidity levels. Medium - Extra Low - Time Selection 5 Button When using Manual Dry cycles, time can be adjusted by pressing the Signal button. Signal Selection 6 Button When the cycle...
(English)
Page 29
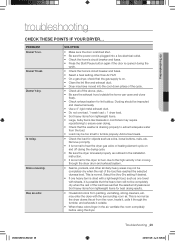
... the installation instruction. • It is normal for the dryer to hum due to hear the dryer gas valve or heating element cycle on . • Clean the lint filter and exhaust duct. • Dryer may have moved into a live electrical outlet. • Check the home's circuit breaker and fuses. • Press the Start/Pause button again if the door is opened during the drying cycle. • Be sure the dryer is normal to the high velocity of air moving...
... the installation instruction. • It is normal for the dryer to hum due to hear the dryer gas valve or heating element cycle on . • Clean the lint filter and exhaust duct. • Dryer may have moved into a live electrical outlet. • Check the home's circuit breaker and fuses. • Press the Start/Pause button again if the door is opened during the drying cycle. • Be sure the dryer is normal to the high velocity of air moving...
(English)
Page 31
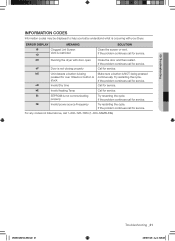
... listed above, call for service. Try restarting the cycle. stuck If the problem continues call 1-800-726-7864 (1-800-SAMSUNG) DV350-02821A_EN.indd 31 Troubleshooting _31 2010-01-28 ø¿»ƒ 3:26:23 dO Running the dryer with your Dryer. If the problem continues call for service. dF Door is continuously. ERROR DISPLAY MEANING SOLUTION tS Clogged Lint Screen Vent is restricted tO Clean the screen...
... listed above, call for service. Try restarting the cycle. stuck If the problem continues call 1-800-726-7864 (1-800-SAMSUNG) DV350-02821A_EN.indd 31 Troubleshooting _31 2010-01-28 ø¿»ƒ 3:26:23 dO Running the dryer with your Dryer. If the problem continues call for service. dF Door is continuously. ERROR DISPLAY MEANING SOLUTION tS Clogged Lint Screen Vent is restricted tO Clean the screen...

(English)
Page 32
... domestic and imported items. Follow care label directions to maximize garment life and reduce laundering problems. Wash Cycle Special Instructions Warning Symbols for Laundering Normal Line Dry/ Hang to Dry Do Not Wash Permanent Press / Wrinkle Resistant / Wrinkle Control Drip Dry Do Not Wring Gentle/Delicates Dry Flat Do Not Bleach Hand Wash Water Temperature** Hot Heat Setting High Medium Do Not Tumble Dry No Steam (added to iron) Do...
... domestic and imported items. Follow care label directions to maximize garment life and reduce laundering problems. Wash Cycle Special Instructions Warning Symbols for Laundering Normal Line Dry/ Hang to Dry Do Not Wash Permanent Press / Wrinkle Resistant / Wrinkle Control Drip Dry Do Not Wring Gentle/Delicates Dry Flat Do Not Bleach Hand Wash Water Temperature** Hot Heat Setting High Medium Do Not Tumble Dry No Steam (added to iron) Do...
(English)
Page 35
... in service problems; applications and uses for instructions, or fixing installation errors. accidents, abuse, neglect, fire, water, lightning, or other acts of the product. This limited warranty covers manufacturing defects in materials and workmanship encountered in normal, noncommercial use of sale must be performed by pest infestations. The original dated bill of products, equipment, systems, utilities, services, parts, supplies, accessories, applications, installations, repairs, external wiring or connectors...
... in service problems; applications and uses for instructions, or fixing installation errors. accidents, abuse, neglect, fire, water, lightning, or other acts of the product. This limited warranty covers manufacturing defects in materials and workmanship encountered in normal, noncommercial use of sale must be performed by pest infestations. The original dated bill of products, equipment, systems, utilities, services, parts, supplies, accessories, applications, installations, repairs, external wiring or connectors...


