User Manual (ENGLISH)
Page 1
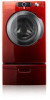
To receive a more complete service, please register your product at www.samsung.com/global/register DV337AEW-02453A-04_EN.indd 1 2007-07-23 ¿ÀÈÄ 1:47:14 DV337 DV328 Gas and Electric Dryer user manual imagine the possibilities Thank you for purchasing a Samsung product.
To receive a more complete service, please register your product at www.samsung.com/global/register DV337AEW-02453A-04_EN.indd 1 2007-07-23 ¿ÀÈÄ 1:47:14 DV337 DV328 Gas and Electric Dryer user manual imagine the possibilities Thank you for purchasing a Samsung product.

User Manual (ENGLISH)
Page 2
... our easy reversible door can be changed with Samsung. 3. Now you time for a wrinkle-free result. 2. capacity dryer circulates more important things in less time... Various Drying Cycles & Fuzzy Logic Algorithm Simply turn the Jog Dial to maximize usable space. Also, both the large capacity and Fuzzy Logic Control save energy by automatically drying your clothes. 4. The direction of laundry. Stacking (MODEL NO: SK-3A1/XAA, SK-4A/XAA) Samsung's Washer and Dryer can be stacked to...
... our easy reversible door can be changed with Samsung. 3. Now you time for a wrinkle-free result. 2. capacity dryer circulates more important things in less time... Various Drying Cycles & Fuzzy Logic Algorithm Simply turn the Jog Dial to maximize usable space. Also, both the large capacity and Fuzzy Logic Control save energy by automatically drying your clothes. 4. The direction of laundry. Stacking (MODEL NO: SK-3A1/XAA, SK-4A/XAA) Samsung's Washer and Dryer can be stacked to...
User Manual (ENGLISH)
Page 3
... risk of your gas supplier, call your dryer. Hazards or unsafe practices that may result in this manual to light any appliance. • Do not turn on the appliance. • Do not touch any electrical switch. • Do not use any other appliance. Do NOT disassemble. Do NOT touch. Unplug the pwer plug from a neighbor's phone. Call the service center for...
... risk of your gas supplier, call your dryer. Hazards or unsafe practices that may result in this manual to light any appliance. • Do not turn on the appliance. • Do not touch any electrical switch. • Do not use any other appliance. Do NOT disassemble. Do NOT touch. Unplug the pwer plug from a neighbor's phone. Call the service center for...
User Manual (ENGLISH)
Page 4
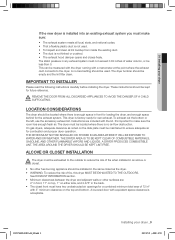
... the Installation Instructions packed with controls. See installation instructions for dryer use by spontaneous combustion. Do not allow children or pets to service any part of the appliance. Do not repair, replace, or attempt to play on a heat setting. The interior of the dryer and exhaust duct should not be dried on , in, or in front of the appliance unless specifically recommended in the dryer until all instructions before using the...
... the Installation Instructions packed with controls. See installation instructions for dryer use by spontaneous combustion. Do not allow children or pets to service any part of the appliance. Do not repair, replace, or attempt to play on a heat setting. The interior of the dryer and exhaust duct should not be dried on , in, or in front of the appliance unless specifically recommended in the dryer until all instructions before using the...
User Manual (ENGLISH)
Page 6
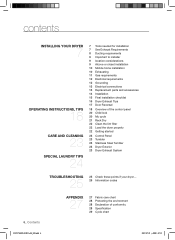
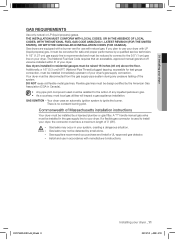
...7 OPERATING INSTRUCTIONS, TIPS 18 CARE AND CLEANING 23 SPECIAL LAUNDRY TIPS 24 7 Tools needed for installation 7 See Exhaust Requirements 8 Ducting requirements 9 Important to installer 9 location considerations 9 Alcove or closet installation 10 Mobile home installation 10 Exhausting 11 Gas requirements 12 Electrical requirements 12 Grounding 13 Electrical connections 13 Replacement parts and accessories 14 Installation 15 Final installation checklist 16 Dryer Exhaust Tips 17 Door Reversal 18 Overview of the control panel 20 Child lock 20 My cycle 21 Rack Dry 22 Clean the lint filter 22 Load...
...7 OPERATING INSTRUCTIONS, TIPS 18 CARE AND CLEANING 23 SPECIAL LAUNDRY TIPS 24 7 Tools needed for installation 7 See Exhaust Requirements 8 Ducting requirements 9 Important to installer 9 location considerations 9 Alcove or closet installation 10 Mobile home installation 10 Exhausting 11 Gas requirements 12 Electrical requirements 12 Grounding 13 Electrical connections 13 Replacement parts and accessories 14 Installation 15 Final installation checklist 16 Dryer Exhaust Tips 17 Door Reversal 18 Overview of the control panel 20 Child lock 20 My cycle 21 Rack Dry 22 Clean the lint filter 22 Load...
User Manual (ENGLISH)
Page 7
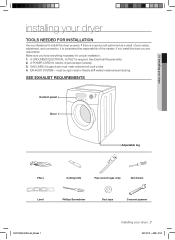
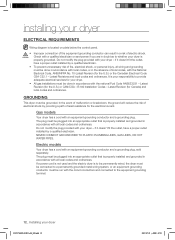
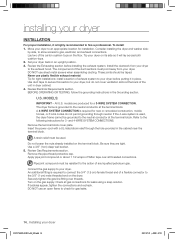
A GROUNDED ELECTRICAL OUTLET is considered the responsibility of the installer. A POWER CORD for proper installation. 1. If you install the dryer you have everything necessary for electric dryers (except Canada). 3. GAS LINES (if a gas dryer) must be rigid metal or flexible stiff-walled metal exhaust ducting. EXHAUST SYSTEM - Make sure you are responsible. See Electrical Requirements. 2. SEE EXHAUST REQUIREMENTS Control panel Door Adjustable leg Pliers Cutting knife Pipe wrench (gas only) Nut drivers Level Phillips Screwdriver Duct tape Crescent...
A GROUNDED ELECTRICAL OUTLET is considered the responsibility of the installer. A POWER CORD for proper installation. 1. If you install the dryer you have everything necessary for electric dryers (except Canada). 3. GAS LINES (if a gas dryer) must be rigid metal or flexible stiff-walled metal exhaust ducting. EXHAUST SYSTEM - Make sure you are responsible. See Electrical Requirements. 2. SEE EXHAUST REQUIREMENTS Control panel Door Adjustable leg Pliers Cutting knife Pipe wrench (gas only) Nut drivers Level Phillips Screwdriver Duct tape Crescent...
User Manual (ENGLISH)
Page 8
... DRYER. • Plastic flexible duct can extend drying times, affect machine operation, and may collect lint. • The exhaust duct should be cleaned regularly. • If a flexible metal duct must run installation No. The hood opening should be sure the exhaust hood damper opens and closes freely. • Check once per year. Lint accumulation should end with an exhaust hood with a stiff sheet metal wall. Do not use a flexible duct with duct...
... DRYER. • Plastic flexible duct can extend drying times, affect machine operation, and may collect lint. • The exhaust duct should be cleaned regularly. • If a flexible metal duct must run installation No. The hood opening should be sure the exhaust hood damper opens and closes freely. • Check once per year. Lint accumulation should end with an exhaust hood with a stiff sheet metal wall. Do not use a flexible duct with duct...
User Manual (ENGLISH)
Page 9
... air openings for rear exhaust. A DRYER PRODUCES COMBUSTIBLE LINT. These instructions should be located where there is acceptable. On gas dryers, adequate clearance as the dryer. • WARNING: To reduce the risk of water column, or be empty and the lint filter clean. DV337AEW-02453A-04_EN.indd 9 Installing your dryer If the new dryer is not kinked or crushed. • The exhaust hood damper opens and closes freely. 01 Installing your dryer...
... air openings for rear exhaust. A DRYER PRODUCES COMBUSTIBLE LINT. These instructions should be located where there is acceptable. On gas dryers, adequate clearance as the dryer. • WARNING: To reduce the risk of water column, or be empty and the lint filter clean. DV337AEW-02453A-04_EN.indd 9 Installing your dryer If the new dryer is not kinked or crushed. • The exhaust hood damper opens and closes freely. 01 Installing your dryer...
User Manual (ENGLISH)
Page 11
...) gas line on your dryer's gas supply connection. The National Fuel Gas Code requires that an accessible, approved manual gas shut-off valve be reduced to connect to the action of any pressure testing of your dryer. Gas leaks may occur in residential garages must have a maximum length of your dryer. DV337AEW-02453A-04_EN.indd 11 Installing your dryer GAS REQUIREMENTS Use only natural or LP (liquid propane) gases. Gas dryers are equipped with manufacturer's instructions. Gas dryers installed in your dryer, the connector...
...) gas line on your dryer's gas supply connection. The National Fuel Gas Code requires that an accessible, approved manual gas shut-off valve be reduced to connect to the action of any pressure testing of your dryer. Gas leaks may occur in residential garages must have a maximum length of your dryer. DV337AEW-02453A-04_EN.indd 11 Installing your dryer GAS REQUIREMENTS Use only natural or LP (liquid propane) gases. Gas dryers are equipped with manufacturer's instructions. Gas dryers installed in your dryer, the connector...
User Manual (ENGLISH)
Page 12
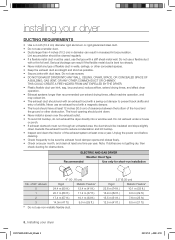
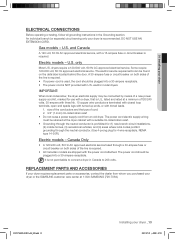
... be run with the circuit conductors and connected to a permanently grounded metal wiring system, or an equipment grounding conductor must be grounded. NEVER CONNECT GROUND WIRE TO PLASTIC PLUMBING LINES, GAS LINES, OR HOT WATER PIPES. Electric models Your dryer has a cord with an equipment-grounding conductor and a grounding plug. The plug must be plugged into an appropriate outlet that is properly installed and grounded in accordance with all local codes...
... be run with the circuit conductors and connected to a permanently grounded metal wiring system, or an equipment grounding conductor must be grounded. NEVER CONNECT GROUND WIRE TO PLASTIC PLUMBING LINES, GAS LINES, OR HOT WATER PIPES. Electric models Your dryer has a cord with an equipment-grounding conductor and a grounding plug. The plug must be plugged into an appropriate outlet that is properly installed and grounded in accordance with all local codes...
User Manual (ENGLISH)
Page 13
... No. 10 copper wire conductors terminated with closed loop terminals, open-end spade lugs with turned up ends, or with a 15-ampere fuse or circuit breaker is prohibited for 4 wire receptacle, NEMA type 14-30R.) Electric models - electric model dryers. The power cord electric supply wiring must be found on the data label located behind the door. The electric service requirements can be retained at 1-800-SAMSUNG (726-7864). Gas models - Electric models - 01 Installing your dryer _13 2007-07-23...
... No. 10 copper wire conductors terminated with closed loop terminals, open-end spade lugs with turned up ends, or with a 15-ampere fuse or circuit breaker is prohibited for 4 wire receptacle, NEMA type 14-30R.) Electric models - electric model dryers. The power cord electric supply wiring must be found on the data label located behind the door. The electric service requirements can be retained at 1-800-SAMSUNG (726-7864). Gas models - Electric models - 01 Installing your dryer _13 2007-07-23...
User Manual (ENGLISH)
Page 14
... use sheet metal screws when assembling ducting. Remove the terminal block cover plate. Be sure they are produced for gas leaks. 14_ Installing your dryer DV337AEW-02453A-04_EN.indd 14 2007-07-23 ¿ÀÈÄ 1:47:21 An additional fitting is highly recommended to hire a professional. To install: 1. Move your dryer to an appropriate location for 3- BEFORE OPERATING OR TESTING, follow the grounding instructions in...
... use sheet metal screws when assembling ducting. Remove the terminal block cover plate. Be sure they are produced for gas leaks. 14_ Installing your dryer DV337AEW-02453A-04_EN.indd 14 2007-07-23 ¿ÀÈÄ 1:47:21 An additional fitting is highly recommended to hire a professional. To install: 1. Move your dryer to an appropriate location for 3- BEFORE OPERATING OR TESTING, follow the grounding instructions in...
User Manual (ENGLISH)
Page 15
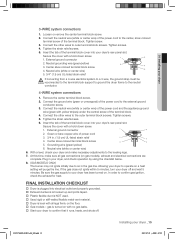
... all gas connections (on gas models), exhaust and electrical connections are complete. Tighten the strain relief screws. 6. Secure the cover with no gas leaks. Start your dryer has been turned on a heat setting will purge the line. Grounding wire (green/yellow) 6. Plug in your dryer and make sure all legs firmly on with a hold -down screw. 1. In order to outer terminal block screws. Installing your dryer's rear panel slot. Loosen or remove the center terminal block...
... all gas connections (on gas models), exhaust and electrical connections are complete. Tighten the strain relief screws. 6. Secure the cover with no gas leaks. Start your dryer has been turned on a heat setting will purge the line. Grounding wire (green/yellow) 6. Plug in your dryer and make sure all legs firmly on with a hold -down screw. 1. In order to outer terminal block screws. Installing your dryer's rear panel slot. Loosen or remove the center terminal block...

User Manual (ENGLISH)
Page 16
Use 4" diameter rigid metal duct. Never use lint-trapping screws. 3. Using a plastic, thin foil, or non-metal flexible duct. 3. Allowing crushed or clogged ducts and vent. 3 4 16_ Installing your dryer exhaust the air easily. 2. WARNING 1. Be sure vent flap opens and closes freely. Tape all old ducts before installing your new dryer. Using unnecessarily long duct runs with a poor exhaust system. 1 2 2. Keep ducts as straight as possible. 4. Let your dryer DV337AEW-02453A-04_EN.indd 16 2007...
Use 4" diameter rigid metal duct. Never use lint-trapping screws. 3. Using a plastic, thin foil, or non-metal flexible duct. 3. Allowing crushed or clogged ducts and vent. 3 4 16_ Installing your dryer exhaust the air easily. 2. WARNING 1. Be sure vent flap opens and closes freely. Tape all old ducts before installing your new dryer. Using unnecessarily long duct runs with a poor exhaust system. 1 2 2. Keep ducts as straight as possible. 4. Let your dryer DV337AEW-02453A-04_EN.indd 16 2007...
User Manual (ENGLISH)
Page 18
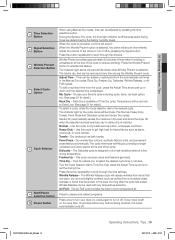
... the cycle after the Start/Pause button is pushed. The estimated time remaining may require the Very Dry or More Dry setting for items that lay flat or hang to scroll through the settings. The Drying light will illuminate and remain lit until the Start/ Pause button is in the cool-down phase, the Cooling light will appear in the display panel until the dryer door is opened or Power key...
... the cycle after the Start/Pause button is pushed. The estimated time remaining may require the Very Dry or More Dry setting for items that lay flat or hang to scroll through the settings. The Drying light will illuminate and remain lit until the Start/ Pause button is in the cool-down phase, the Cooling light will appear in the display panel until the dryer door is opened or Power key...
User Manual (ENGLISH)
Page 19
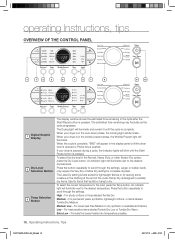
... the Wrinkle Prevent button to turn your dryer on for heavy fabrics such as cotton, underwear, and linen. This cycle removes odors and freshens garments. 02 Operating Instructions, Tips Time Selection 4 Button Signal Selection 5 Button Wrinkle Prevent 6 Selection Button Select Cycle 7 Option 8 Cycle Selector Start/Pause 9 selection button 10 Power button When using Manual Dry cycles, time can be used with any temperature selection. Wrinkle Prevent provides approximately 90 minutes of intermittent tumbling in minutes. Adjust Time - Rack Dry is...
... the Wrinkle Prevent button to turn your dryer on for heavy fabrics such as cotton, underwear, and linen. This cycle removes odors and freshens garments. 02 Operating Instructions, Tips Time Selection 4 Button Signal Selection 5 Button Wrinkle Prevent 6 Selection Button Select Cycle 7 Option 8 Cycle Selector Start/Pause 9 selection button 10 Power button When using Manual Dry cycles, time can be used with any temperature selection. Wrinkle Prevent provides approximately 90 minutes of intermittent tumbling in minutes. Adjust Time - Rack Dry is...
User Manual (ENGLISH)
Page 25
... Remove promptly. • It is normal to hear the dryer gas valve or heating element cycle on and off during the drying cycle. • Be sure the dryer is leveled properly as coins, loose buttons, nails, etc. SOLUTION • Be sure the door is latched shut. • Be sure the power cord is plugged into the cool-down phase of the cycle. • Check all of air moving through the dryer drum...
... Remove promptly. • It is normal to hear the dryer gas valve or heating element cycle on and off during the drying cycle. • Be sure the dryer is leveled properly as coins, loose buttons, nails, etc. SOLUTION • Be sure the door is latched shut. • Be sure the power cord is plugged into the cool-down phase of the cycle. • Check all of air moving through the dryer drum...
User Manual (ENGLISH)
Page 26
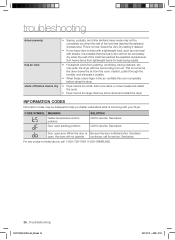
... room air. See below . Remove some items and restart the dryer. CODE SYMBOL MEANING Heater temperature control problem. See below. For any codes not listed above, call for best drying results. • Household odors from lightweight items for service. may not be completely dry when the rest of the load has reached the selected dryness level. continues, call 1-800-726-7864 (1-800-SAMSUNG) 26_ Troubleshooting DV337AEW...
... room air. See below . Remove some items and restart the dryer. CODE SYMBOL MEANING Heater temperature control problem. See below. For any codes not listed above, call for best drying results. • Household odors from lightweight items for service. may not be completely dry when the rest of the load has reached the selected dryness level. continues, call 1-800-726-7864 (1-800-SAMSUNG) 26_ Troubleshooting DV337AEW...
User Manual (ENGLISH)
Page 27
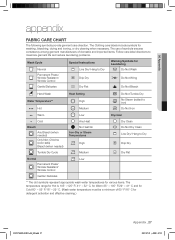
... domestic and imported items. Follow care label directions to maximize garment life and reduce laundering problems. Wash Cycle Special Instructions Warning Symbols for Laundering Normal Line Dry/ Hang to Dry Do Not Wash Permanent Press / Wrinkle Resistant / Wrinkle Control Drip Dry Do Not Wring Gentle/Delicates Dry Flat Do Not Bleach Hand Wash Water Temperature** Hot Heat Setting High Medium Do Not Tumble Dry No Steam (added to iron) Do...
... domestic and imported items. Follow care label directions to maximize garment life and reduce laundering problems. Wash Cycle Special Instructions Warning Symbols for Laundering Normal Line Dry/ Hang to Dry Do Not Wash Permanent Press / Wrinkle Resistant / Wrinkle Control Drip Dry Do Not Wring Gentle/Delicates Dry Flat Do Not Bleach Hand Wash Water Temperature** Hot Heat Setting High Medium Do Not Tumble Dry No Steam (added to iron) Do...
User Manual (ENGLISH)
Page 30
... of sale must contact SAMSUNG for problem determination and service procedures. Replacement parts and products assume the remaining original warranty, or ninety (90) days, whichever is not available, SAMSUNG may elect to provide transportation of the product to and from incorrect electric current, voltage or supply, light bulbs, house fuses, house wiring, cost of a service call for instructions, or fixing installation errors. In-home service is valid only...
... of sale must contact SAMSUNG for problem determination and service procedures. Replacement parts and products assume the remaining original warranty, or ninety (90) days, whichever is not available, SAMSUNG may elect to provide transportation of the product to and from incorrect electric current, voltage or supply, light bulbs, house fuses, house wiring, cost of a service call for instructions, or fixing installation errors. In-home service is valid only...


