User Manual (user Manual) (ver.1.0) (English)
Page 8
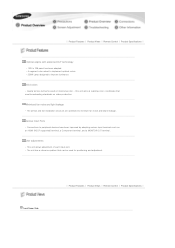
... - Front/Upper Side | Product Features | Product Views | Remote Control | Product Specifications | | Product Features | Product Views | Remote Control | Product Specifications | Optical engine with advanced DLP technology - 1024 x 768 panel has been adapted. - 4 segment color wheel to implement optimal colors. - 220W Lamp designed to minimize fan noise and beam leakage. Minimized... User adjustments - Connections to peripheral devices have been improved by adopting various input terminals such as an HDMI (HDCP supported) terminal, a Component terminal, and a MONITOR OUT terminal.
... - Front/Upper Side | Product Features | Product Views | Remote Control | Product Specifications | | Product Features | Product Views | Remote Control | Product Specifications | Optical engine with advanced DLP technology - 1024 x 768 panel has been adapted. - 4 segment color wheel to implement optimal colors. - 220W Lamp designed to minimize fan noise and beam leakage. Minimized... User adjustments - Connections to peripheral devices have been improved by adopting various input terminals such as an HDMI (HDCP supported) terminal, a Component terminal, and a MONITOR OUT terminal.
User Manual (user Manual) (ver.1.0) (English)
Page 11
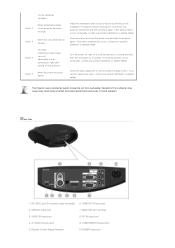
...Display screen. Operation of the cooling fan may cause noise, which does not affect the product performance and is part of the projector becomes too high. SERVICE Input port 7. COMPONENT IN Input port 5. Remote Control Signal Receiver 10.POWER Input port The lamp...amount of your product distributor or service center. If you need to operate. RS-232C port (For service input terminals) 6. MONITOR OUT terminal 3. PC IN Input port 4. This Projector uses a cooling fan system to operate. HDMI/DVI IN Input port 2. Action 3 Action 4 Action 5 Action 6 normal ...
...Display screen. Operation of the cooling fan may cause noise, which does not affect the product performance and is part of the projector becomes too high. SERVICE Input port 7. COMPONENT IN Input port 5. Remote Control Signal Receiver 10.POWER Input port The lamp...amount of your product distributor or service center. If you need to operate. RS-232C port (For service input terminals) 6. MONITOR OUT terminal 3. PC IN Input port 4. This Projector uses a cooling fan system to operate. HDMI/DVI IN Input port 2. Action 3 Action 4 Action 5 Action 6 normal ...

User Manual (user Manual) (ver.1.0) (English)
Page 19
Click on [Monitor] tab and set the by referring to described in the display mode table supported by referring to described in the Supported Resolution/Size Modes table. You do not have to your projector. 1. Another property window will appear. 2. Check the following items before connecting ...click on a 80 ~ 120 inch sized screen. Press the [Advanced] button. Click on [Settings] tab and set the by this projector. This projector is designed to show images optimally on [Properties]. Screen Z: Throw Distance Y': Distance from Lens Center to Image Bottom Setting up both ...
Click on [Monitor] tab and set the by referring to described in the display mode table supported by referring to described in the Supported Resolution/Size Modes table. You do not have to your projector. 1. Another property window will appear. 2. Check the following items before connecting ...click on a 80 ~ 120 inch sized screen. Press the [Advanced] button. Click on [Settings] tab and set the by this projector. This projector is designed to show images optimally on [Properties]. Screen Z: Throw Distance Y': Distance from Lens Center to Image Bottom Setting up both ...
User Manual (user Manual) (ver.1.0) (English)
Page 20
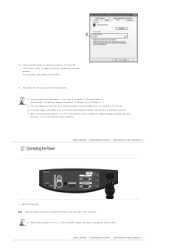
... | Basic Settings | Connecting the Power | Connecting to close the window, and click the [OK] button of Projector Plug the power cord into the power terminal on monitor manufacture or Windows versions. When used outside of the U.S., HAR cord with fittings of an approved agency may differ ...from the monitor depending on the rear side of [Properties (R)] as a PC monitor. When connecting the projector to a PC, check that PC setup complies to the projector. Process might vary depending on your type of computer or Windows versions....
... | Basic Settings | Connecting the Power | Connecting to close the window, and click the [OK] button of Projector Plug the power cord into the power terminal on monitor manufacture or Windows versions. When used outside of the U.S., HAR cord with fittings of an approved agency may differ ...from the monitor depending on the rear side of [Properties (R)] as a PC monitor. When connecting the projector to a PC, check that PC setup complies to the projector. Process might vary depending on your type of computer or Windows versions....

User Manual (user Manual) (ver.1.0) (English)
Page 23
... play, therefore you do not need to an external device through another video device (monitor, TV, etc.). Connecting Video Devices (Monitor, TV, etc.) - Connect the MONITOR OUT terminal of the projector and the D-sub terminal of the projector and the PC. Connect [PC IN] port on the rear side of the...them, turn on your PC. If PC Mode is not available, check PC video cable is connected to install a driver on your projector and the video device (monitor, TV, etc.). When connections are all completed, connect both power cords of the video device using the D-sub (analog) output ...
... play, therefore you do not need to an external device through another video device (monitor, TV, etc.). Connecting Video Devices (Monitor, TV, etc.) - Connect the MONITOR OUT terminal of the projector and the D-sub terminal of the projector and the PC. Connect [PC IN] port on the rear side of the...them, turn on your PC. If PC Mode is not available, check PC video cable is connected to install a driver on your projector and the video device (monitor, TV, etc.). When connections are all completed, connect both power cords of the video device using the D-sub (analog) output ...

User Manual (user Manual) (ver.1.0) (English)
Page 26
...Temperature : You can change the screen mode as a normal monitor. - Screen Adjustment Mode Description Select a screen state which is the default setting for Movie1, and may deliver the most video productions. Dynamic Select this if your projector or change tint of the entire screen to view the video ...enhancement. ▶ You can comfortably view the projection screen if the surrounding is set this when to view the screen in your monitor as required. Monitor Select this if you want to enjoy a more vivid gaming experience. - Game Select this in Mode-Save. ▶ The ...
...Temperature : You can change the screen mode as a normal monitor. - Screen Adjustment Mode Description Select a screen state which is the default setting for Movie1, and may deliver the most video productions. Dynamic Select this if your projector or change tint of the entire screen to view the video ...enhancement. ▶ You can comfortably view the projection screen if the surrounding is set this when to view the screen in your monitor as required. Monitor Select this if you want to enjoy a more vivid gaming experience. - Game Select this in Mode-Save. ▶ The ...