

Owner Instructions
Page 2
... Instructions CAUTION: TO REDUCE THE RISK OF ELECTRIC SHOCK, DO NOT REMOVE COVER (OR BACK). Important: One Federal Court has held that the cable ground shall be a violation of cable entry as practical. This symbol indicates high voltage is present inside part of this equipment may be connected to the grounding system of the building as close...
... Instructions CAUTION: TO REDUCE THE RISK OF ELECTRIC SHOCK, DO NOT REMOVE COVER (OR BACK). Important: One Federal Court has held that the cable ground shall be a violation of cable entry as practical. This symbol indicates high voltage is present inside part of this equipment may be connected to the grounding system of the building as close...

Owner Instructions
Page 3
... cart with easy-to-use programming features and closed captioning capabilities, making this unit one of the most desirable products in the risk of power supply to the appliance. Move the TV/VCR and its class. l Unplug the TV/VCR from the type of power source indicated on an unstable cart, stand, tripod, bracket, or table. l Do not use a mounting accessory recommended by the...
... cart with easy-to-use programming features and closed captioning capabilities, making this unit one of the most desirable products in the risk of power supply to the appliance. Move the TV/VCR and its class. l Unplug the TV/VCR from the type of power source indicated on an unstable cart, stand, tripod, bracket, or table. l Do not use a mounting accessory recommended by the...
Owner Instructions
Page 4
... substitutions may touch dangerous voltage points or damage parts. An outside antenna or cable system is in a safe operating condition. if the TV/VCR has been exposed to service the TV/VCR yourself. Power supply cords should not be sure the service technician uses replacement parts specified by the manufacturer or those controls that the TV/VCR is connected to determine that are required, be placed m the...
... substitutions may touch dangerous voltage points or damage parts. An outside antenna or cable system is in a safe operating condition. if the TV/VCR has been exposed to service the TV/VCR yourself. Power supply cords should not be sure the service technician uses replacement parts specified by the manufacturer or those controls that the TV/VCR is connected to determine that are required, be placed m the...

Owner Instructions
Page 5
... Antennas Connecting Cable TV Systems to the TV/VCR Cable without a Converter Box Cable with a Converter Box Installing Batteries in the Remote Control Chapter 3: TV Operation Viewing the On-Screen Display Viewing the Main Menu Selecting the On-Screen Language Selecting the Signal Source Programming the Channels Storing Channels in Memory Adding and Erasing Channels in Memory Setting the Clock and Calendar Choosing Picture Settings Customizing Picture Settings Using Standard Picture Settings Setting the Sleep Timer Using the On/Off Timer Chapter 4: VCR Operation Inserting and Ejecting a Video...
... Antennas Connecting Cable TV Systems to the TV/VCR Cable without a Converter Box Cable with a Converter Box Installing Batteries in the Remote Control Chapter 3: TV Operation Viewing the On-Screen Display Viewing the Main Menu Selecting the On-Screen Language Selecting the Signal Source Programming the Channels Storing Channels in Memory Adding and Erasing Channels in Memory Setting the Clock and Calendar Choosing Picture Settings Customizing Picture Settings Using Standard Picture Settings Setting the Sleep Timer Using the On/Off Timer Chapter 4: VCR Operation Inserting and Ejecting a Video...

Owner Instructions
Page 6
... Chapter 4: VCR Operation (cont.) Recording TV Programs as You Watch Recording Editing While Recording Using Advanced Recording Features Using One-Touch Recording Recording at a Later Time Using Program Review Chapter 5: Special Features Viewing the Demonstration Mode Using True Repeat Using Block Repeat Viewing Closed Captions Using Special Playback Features Frame Advance Skip Search Slow Motion Video Dubbing Making the Connections Video Dubbing Chapter 6: Troubleshooting Identifying TV Problems Identifying VCR Problems Getting Help Spanish Quick Reference Guide Appendix...
... Chapter 4: VCR Operation (cont.) Recording TV Programs as You Watch Recording Editing While Recording Using Advanced Recording Features Using One-Touch Recording Recording at a Later Time Using Program Review Chapter 5: Special Features Viewing the Demonstration Mode Using True Repeat Using Block Repeat Viewing Closed Captions Using Special Playback Features Frame Advance Skip Search Slow Motion Video Dubbing Making the Connections Video Dubbing Chapter 6: Troubleshooting Identifying TV Problems Identifying VCR Problems Getting Help Spanish Quick Reference Guide Appendix...
Owner Instructions
Page 7
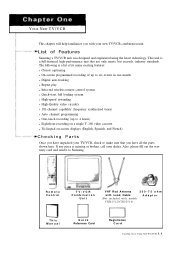
... unit. The following is a list of its many exciting features: l Closed captioning l On-screen programmed recording of Features Samsung's TV/VCR unit was designed and engineered using the latest technology. Also, please fill out the warranty card and send it to Samsung. If any piece is a full-featured, high-performance unit that you with models CXD2512/CXD2514) This Manual Quick Reference Card Registration Card...
... unit. The following is a list of its many exciting features: l Closed captioning l On-screen programmed recording of Features Samsung's TV/VCR unit was designed and engineered using the latest technology. Also, please fill out the warranty card and send it to Samsung. If any piece is a full-featured, high-performance unit that you with models CXD2512/CXD2514) This Manual Quick Reference Card Registration Card...
Owner Instructions
Page 8
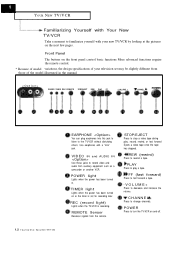
... volume. Use earphones with your television set for recording later. FF (fast forward) Press to fast forward a tape. -VOLUME+ Press to turn the TV/VCR on the front panel control basic functions More advanced functions require the remote control. * Because of model variations, the design specifications of your new TV/VCR by looking at the pictures on the next few pages. CHANNEL Press to rewind a tape. POWER light Lights...
... volume. Use earphones with your television set for recording later. FF (fast forward) Press to fast forward a tape. -VOLUME+ Press to turn the TV/VCR on the front panel control basic functions More advanced functions require the remote control. * Because of model variations, the design specifications of your new TV/VCR by looking at the pictures on the next few pages. CHANNEL Press to rewind a tape. POWER light Lights...

Owner Instructions
Page 10
... T V / V C R Remote Control The remote control can be used for one-touch recording. LINE IN Press to selectthe line sources connected to the Audio /Video jacks on the back of the TV/VCR SPEED Press to selectthe desired tape speed MUTE Press to silence (mute) the volume P-STD (picture-standard) Press to select memory or standard picture settings CH , CH Press o r to change channels on the TV/VCR PRE...
... T V / V C R Remote Control The remote control can be used for one-touch recording. LINE IN Press to selectthe line sources connected to the Audio /Video jacks on the back of the TV/VCR SPEED Press to selectthe desired tape speed MUTE Press to silence (mute) the volume P-STD (picture-standard) Press to select memory or standard picture settings CH , CH Press o r to change channels on the TV/VCR PRE...
Owner Instructions
Page 11
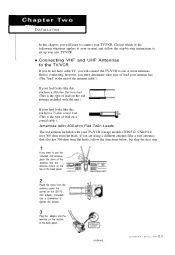
... TV/VCR (except models CXD2512, CXD2514) uses 300-ohm twin flat leads. If you are using a different antenna (like this. Antennas with 300-ohm Flat Twin Leads The rod antenna included with the unit ). continued... 2 . 1 C H A P T E R T W O: IN S T A L L A T I O N If your TV/VCR. Connecting VHF and UHF Antennas to the TV/VCR If you do not have cable TV, you want to tighten the screws. 3 Plug the adaptor into the antenna mount...
... TV/VCR (except models CXD2512, CXD2514) uses 300-ohm twin flat leads. If you are using a different antenna (like this. Antennas with 300-ohm Flat Twin Leads The rod antenna included with the unit ). continued... 2 . 1 C H A P T E R T W O: IN S T A L L A T I O N If your TV/VCR. Connecting VHF and UHF Antennas to the TV/VCR If you do not have cable TV, you want to tighten the screws. 3 Plug the adaptor into the antenna mount...

Owner Instructions
Page 13
... converter box. 3 Connect a 3 second coaxial cable between the out terminal of the rear panel. INSTALLATION Connecting Cable TV Systems to the TV/VCR Your cable-ready TV/VCR has a built-in 181-channel tuner that can find these accessories at most electronics supply stores. You will need a cable box converter for only those channels, use these instructions to connect cable to your TV. Cable without an external cable converter box. Because your new TV/VCR is cable-ready...
... converter box. 3 Connect a 3 second coaxial cable between the out terminal of the rear panel. INSTALLATION Connecting Cable TV Systems to the TV/VCR Your cable-ready TV/VCR has a built-in 181-channel tuner that can find these accessories at most electronics supply stores. You will need a cable box converter for only those channels, use these instructions to connect cable to your TV. Cable without an external cable converter box. Because your new TV/VCR is cable-ready...
Owner Instructions
Page 15
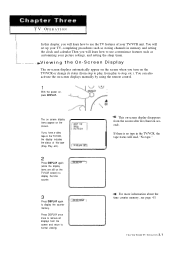
... on-screen displays manually by using the remote control. 1 With the power on the TV/VCR screen) to display the time counter. 3 Press DISPLAY again to display the counter memory. For more to remove all displays from play , from the screen and return to normal viewing. If you have a video tape in the TV/VCR, the display includes the status of your picture settings, and setting the sleep timer. Press DISPLAY once more information about the time counter...
... on-screen displays manually by using the remote control. 1 With the power on the TV/VCR screen) to display the time counter. 3 Press DISPLAY again to display the counter memory. For more to remove all displays from play , from the screen and return to normal viewing. If you have a video tape in the TV/VCR, the display includes the status of your picture settings, and setting the sleep timer. Press DISPLAY once more information about the time counter...

Owner Instructions
Page 21
... change these settings This section explains how to adjust picture settings and store these settings in memory, and how to switch back to the standard settings Customizing Picture Settings 1 With the main menu on the screen, press CH or C H until "Video" is highlighted. For information on the screen. 2 Press CH or CH t o select contrast, brightness, sharpness, color, or tint. 3 Press VOL + or VOL- The Video menu appears on viewing...
... change these settings This section explains how to adjust picture settings and store these settings in memory, and how to switch back to the standard settings Customizing Picture Settings 1 With the main menu on the screen, press CH or C H until "Video" is highlighted. For information on the screen. 2 Press CH or CH t o select contrast, brightness, sharpness, color, or tint. 3 Press VOL + or VOL- The Video menu appears on viewing...
Owner Instructions
Page 23
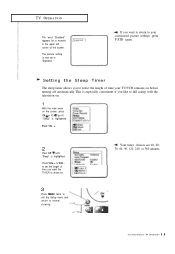
..., 240, or 360 minutes. 3 . 9 C H A P T E R TH R E E: TV OPERATION Setting the Sleep Timer The sleep timer allows you want the TV/VCR to remain on the screen, press CH or C H until "Setup" is highlighted Press VOL +. 2 Press CH until "Sleep" is now set the length of the screen. TV OPERATION The word "Standard" appears for a moment in the upper left corner of time you to normal viewing.
..., 240, or 360 minutes. 3 . 9 C H A P T E R TH R E E: TV OPERATION Setting the Sleep Timer The sleep timer allows you want the TV/VCR to remain on the screen, press CH or C H until "Setup" is highlighted Press VOL +. 2 Press CH until "Sleep" is now set the length of the screen. TV OPERATION The word "Standard" appears for a moment in the upper left corner of time you to normal viewing.

Owner Instructions
Page 32
... want to record. 1 lnsert a video cassette tape, Set the tape speed, and select the channel you want to resume recording Using Advanced Recording Features Using One-Touch Recording One-touch recording (OTR) lets you record television programs with the touch of a button. Press the REC button on the tape has been removed. For information, see page A.2. VCR OPERATION 2 Press P./STILL to temporarily stop...
... want to record. 1 lnsert a video cassette tape, Set the tape speed, and select the channel you want to resume recording Using Advanced Recording Features Using One-Touch Recording One-touch recording (OTR) lets you record television programs with the touch of a button. Press the REC button on the tape has been removed. For information, see page A.2. VCR OPERATION 2 Press P./STILL to temporarily stop...

Owner Instructions
Page 42
... choose "captions" or "text". 4 It you change the channel or held. Check for the hearing impaired or translations into another language All VCRS record the closed caption signal from television programs, so home-recorded video tapes also provide closed captions. Misspellings and unusual characters sometimes occur in Spanish. Different channels display different information. The second field contains additional information that are usually subtitles for this closed caption symbol...
... choose "captions" or "text". 4 It you change the channel or held. Check for the hearing impaired or translations into another language All VCRS record the closed caption signal from television programs, so home-recorded video tapes also provide closed captions. Misspellings and unusual characters sometimes occur in Spanish. Different channels display different information. The second field contains additional information that are usually subtitles for this closed caption symbol...

Owner Instructions
Page 47
... was turned off. Clean the video heads. Identifying TV Problems Problem Poor picture, no other tape in the compartment. Make sure the unit is noise or streaks in color. Press the POWER button. Adjust the tracking. There is no picture, the picture is distorted during video tape playback, or there is plugged into a working wall outlet. No color, wrong colors or tints. Try another channel. Unit didn't record a timer program...
... was turned off. Clean the video heads. Identifying TV Problems Problem Poor picture, no other tape in the compartment. Make sure the unit is noise or streaks in color. Press the POWER button. Adjust the tracking. There is no picture, the picture is distorted during video tape playback, or there is plugged into a working wall outlet. No color, wrong colors or tints. Try another channel. Unit didn't record a timer program...

Owner Instructions
Page 55
APPENDIX Specifications Format Recording System Television System Audio Track Tape Width Record Speed SP LP SLP Record/Playback Time FF/Rew Time Heads VIDEO Input Signal-to-Noise Ratio Horizontal Resolution VHS Standard Rotary, azimuth two-head helical scanning system Luminance FM azimuth recording Color signal converted subcarrier phase shift recording NTSC-type color signal EIA Standard (525 lines, 60 fields) 1 track 12.7 mm (l/2 inch) 33.35 mm/s (1.31...
APPENDIX Specifications Format Recording System Television System Audio Track Tape Width Record Speed SP LP SLP Record/Playback Time FF/Rew Time Heads VIDEO Input Signal-to-Noise Ratio Horizontal Resolution VHS Standard Rotary, azimuth two-head helical scanning system Luminance FM azimuth recording Color signal converted subcarrier phase shift recording NTSC-type color signal EIA Standard (525 lines, 60 fields) 1 track 12.7 mm (l/2 inch) 33.35 mm/s (1.31...

Owner Instructions
Page 57
... channels adding and erasing 3.4 changing 1.4, 3.3-4 storing 3.3-4 choosing picture settings 3.7 choosing recording speed 4.6-7, A.2 choosing video cassette tapes 4.1, A.1 cleaning A.1 CLEAR 1.4, 4.4-5 Clock 3.5 closed captions 5.4 coaxial cable 2.1, 2.3 Color 3.7 combiner 2.2 connections antennas to TV/VCR 2.1 cable TV system to TV/VCR 2.3 VCR to VCR for re-recording 5.6 connectors 5.6 Contrast 3.7 converter box 2.3 copyright laws 5.7 Custom 3.8 customizing picture settings 3.7 D date 3.6 Dally Program 4.10 dally recording 4.9-12 demonstration mode 5.1 DISPLAY 1.4, 4.4-5 display, on -screen...
... channels adding and erasing 3.4 changing 1.4, 3.3-4 storing 3.3-4 choosing picture settings 3.7 choosing recording speed 4.6-7, A.2 choosing video cassette tapes 4.1, A.1 cleaning A.1 CLEAR 1.4, 4.4-5 Clock 3.5 closed captions 5.4 coaxial cable 2.1, 2.3 Color 3.7 combiner 2.2 connections antennas to TV/VCR 2.1 cable TV system to TV/VCR 2.3 VCR to VCR for re-recording 5.6 connectors 5.6 Contrast 3.7 converter box 2.3 copyright laws 5.7 Custom 3.8 customizing picture settings 3.7 D date 3.6 Dally Program 4.10 dally recording 4.9-12 demonstration mode 5.1 DISPLAY 1.4, 4.4-5 display, on -screen...

Owner Instructions
Page 58
... 4.2 pause/still 1.4, 4.2 picture 3.7 picture search 4.3 picture settings 3.7 customizing 3.7 using standard 3.8 PLAY 1.2, 1.4, 4.2 playing a video cassette tape 4.2 plugs Safety.2 polarization Safety.2 POWER 1.2, 1.4 power consumption A.3 power cord Safety.2 power requirement A.3 power sources Safety.1 power/timer 4.12 PRE-CH 1.4 problems, fixing 6.1-2 program number 3.4 program overlap 4.12 Program Review 4.13 programming channels 3.3 Q quick reference, Spanish 7.1 quick reference card 1.1 R re-recording 4.13 rear panel 1.3 REC 1.2, 1.4, 4.7 record 4.6 record light 1.2, 4.7 record safety tab...
... 4.2 pause/still 1.4, 4.2 picture 3.7 picture search 4.3 picture settings 3.7 customizing 3.7 using standard 3.8 PLAY 1.2, 1.4, 4.2 playing a video cassette tape 4.2 plugs Safety.2 polarization Safety.2 POWER 1.2, 1.4 power consumption A.3 power cord Safety.2 power requirement A.3 power sources Safety.1 power/timer 4.12 PRE-CH 1.4 problems, fixing 6.1-2 program number 3.4 program overlap 4.12 Program Review 4.13 programming channels 3.3 Q quick reference, Spanish 7.1 quick reference card 1.1 R re-recording 4.13 rear panel 1.3 REC 1.2, 1.4, 4.7 record 4.6 record light 1.2, 4.7 record safety tab...

Owner Instructions
Page 59
... finish, lamps, glass, and temperature probes, if supplied, are not covered under this product fails to operate properly within the specified warranty period and the failure is due to improper workmanship or defective material, SEA will repair or replace the product at the time the service is requested. Warranty Information Limited Warranty Samsung Electronics America, Inc, (hereafter referred to as...
... finish, lamps, glass, and temperature probes, if supplied, are not covered under this product fails to operate properly within the specified warranty period and the failure is due to improper workmanship or defective material, SEA will repair or replace the product at the time the service is requested. Warranty Information Limited Warranty Samsung Electronics America, Inc, (hereafter referred to as...


