

Owner Instructions
Page 2
... cable ground shall be connected to the grounding system of the building as close to the point of cable entry as practical. Important Safety Instructions CAUTION: TO REDUCE THE RISK OF ELECTRIC SHOCK, DO NOT REMOVE COVER (OR BACK). NO USER SERVICEABLE PARTS INSIDE...plug to operate it. Certain Canadian programs may void the user's authority to the wide slot, and fully insert the plug. Warning! Note to CATV system installer: This reminder is provided to call CATV system installer's attention to Article 820-40 of the National Electrical Code (Section 54 of Canadian Electrical Code, Part...
... cable ground shall be connected to the grounding system of the building as close to the point of cable entry as practical. Important Safety Instructions CAUTION: TO REDUCE THE RISK OF ELECTRIC SHOCK, DO NOT REMOVE COVER (OR BACK). NO USER SERVICEABLE PARTS INSIDE...plug to operate it. Certain Canadian programs may void the user's authority to the wide slot, and fully insert the plug. Warning! Note to CATV system installer: This reminder is provided to call CATV system installer's attention to Article 820-40 of the National Electrical Code (Section 54 of Canadian Electrical Code, Part...

Owner Instructions
Page 3
... do not use a mounting accessory recommended by the manufacturer or sold with easy-to offer you a product that you've followed the manufacturer's instructions for years to your home, consult your TV/VCR. l Provide ventilation for ventilation to protect it with the TV/VCR. l Retain the safety and operating instructions for choosing Samsung! l Do not use programming features and closed captioning capabilities, making...
... do not use a mounting accessory recommended by the manufacturer or sold with easy-to offer you a product that you've followed the manufacturer's instructions for years to your home, consult your TV/VCR. l Provide ventilation for ventilation to protect it with the TV/VCR. l Retain the safety and operating instructions for choosing Samsung! l Do not use programming features and closed captioning capabilities, making...
Owner Instructions
Page 4
This plug will fit into the unit - If you make adjustments yourself, adjust only those that are covered by the operating instructions. Power supply cords should not be placed m the vicinity of overhead power lines or other controls may touch dangerous voltage points or damage parts. Refer all servicing to be sure the service technician uses replacement parts specified by items placed on the unit or if...
This plug will fit into the unit - If you make adjustments yourself, adjust only those that are covered by the operating instructions. Power supply cords should not be placed m the vicinity of overhead power lines or other controls may touch dangerous voltage points or damage parts. Refer all servicing to be sure the service technician uses replacement parts specified by items placed on the unit or if...

Owner Instructions
Page 5
... Antennas Connecting Cable TV Systems to the TV/VCR Cable without a Converter Box Cable with a Converter Box Installing Batteries in the Remote Control Chapter 3: TV Operation Viewing the On-Screen Display Viewing the Main Menu Selecting the On-Screen Language Selecting the Signal Source Programming the Channels Storing Channels in Memory Adding and Erasing Channels in Memory Setting the Clock and Calendar Choosing Picture Settings Customizing Picture Settings Using Standard Picture Settings Setting the Sleep Timer Using the On/Off Timer Chapter 4: VCR Operation Inserting and Ejecting a Video...
... Antennas Connecting Cable TV Systems to the TV/VCR Cable without a Converter Box Cable with a Converter Box Installing Batteries in the Remote Control Chapter 3: TV Operation Viewing the On-Screen Display Viewing the Main Menu Selecting the On-Screen Language Selecting the Signal Source Programming the Channels Storing Channels in Memory Adding and Erasing Channels in Memory Setting the Clock and Calendar Choosing Picture Settings Customizing Picture Settings Using Standard Picture Settings Setting the Sleep Timer Using the On/Off Timer Chapter 4: VCR Operation Inserting and Ejecting a Video...

Owner Instructions
Page 6
... Chapter 4: VCR Operation (cont.) Recording TV Programs as You Watch Recording Editing While Recording Using Advanced Recording Features Using One-Touch Recording Recording at a Later Time Using Program Review Chapter 5: Special Features Viewing the Demonstration Mode Using True Repeat Using Block Repeat Viewing Closed Captions Using Special Playback Features Frame Advance Skip Search Slow Motion Video Dubbing Making the Connections Video Dubbing Chapter 6: Troubleshooting Identifying TV Problems Identifying VCR Problems Getting Help Spanish Quick Reference Guide Appendix...
... Chapter 4: VCR Operation (cont.) Recording TV Programs as You Watch Recording Editing While Recording Using Advanced Recording Features Using One-Touch Recording Recording at a Later Time Using Program Review Chapter 5: Special Features Viewing the Demonstration Mode Using True Repeat Using Block Repeat Viewing Closed Captions Using Special Playback Features Frame Advance Skip Search Slow Motion Video Dubbing Making the Connections Video Dubbing Chapter 6: Troubleshooting Identifying TV Problems Identifying VCR Problems Getting Help Spanish Quick Reference Guide Appendix...
Owner Instructions
Page 7
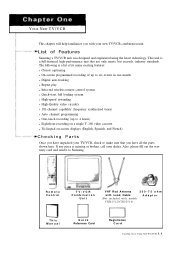
... T V / V C R This chapter will help familiarize you with models CXD2512/CXD2514) This Manual Quick Reference Card Registration Card C HAPTER O N E: YO U R N EW T V / V C R 1 . 1 This unit is a list of its many exciting features: l Closed captioning l On-screen programmed recording of Features Samsung's TV/VCR unit was designed and engineered using the latest technology. Remote Control TV/VCR Combination Unit VHF Rod Antenna 300-75 ohm with Lead Cable Adaptor (Not included...
... T V / V C R This chapter will help familiarize you with models CXD2512/CXD2514) This Manual Quick Reference Card Registration Card C HAPTER O N E: YO U R N EW T V / V C R 1 . 1 This unit is a list of its many exciting features: l Closed captioning l On-screen programmed recording of Features Samsung's TV/VCR unit was designed and engineered using the latest technology. Remote Control TV/VCR Combination Unit VHF Rod Antenna 300-75 ohm with Lead Cable Adaptor (Not included...
Owner Instructions
Page 8
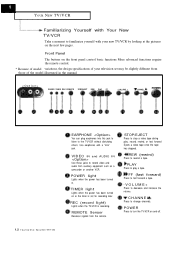
... timer is recording. PLAY Press to the TV/VCR without disturbing others. REMOTE Sensor Receives signals from auxiliary equipment such as a camcorder or another VCR. Use earphones with your new TV/VCR by looking at the pictures on the front panel control basic functions More advanced functions require the remote control. * Because of model variations, the design specifications of your television set for recording later. TIMER light Lights when the power...
... timer is recording. PLAY Press to the TV/VCR without disturbing others. REMOTE Sensor Receives signals from auxiliary equipment such as a camcorder or another VCR. Use earphones with your new TV/VCR by looking at the pictures on the front panel control basic functions More advanced functions require the remote control. * Because of model variations, the design specifications of your television set for recording later. TIMER light Lights when the power...

Owner Instructions
Page 10
... volume on -screen displays. -VOL+ Press -VOL to decrease or Vol+ to repeat a tape or a section of a tape. Also used up to correct errors during programming clear timer programs, or reset the tape counter. PLAY Press to rewind a video tape. REW (rewind) Press to play a video tape. When using the remote control, always point it directly at the TV/VCR POWER Press to display the main menu. MENU Press to turn the TV/VCR...
... volume on -screen displays. -VOL+ Press -VOL to decrease or Vol+ to repeat a tape or a section of a tape. Also used up to correct errors during programming clear timer programs, or reset the tape counter. PLAY Press to rewind a video tape. REW (rewind) Press to play a video tape. When using the remote control, always point it directly at the TV/VCR POWER Press to display the main menu. MENU Press to turn the TV/VCR...
Owner Instructions
Page 11
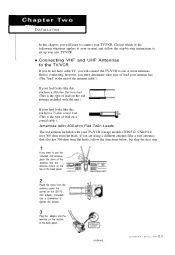
..." is the end of the antenna cable ). If your TV/VCR. Use a screwdriver to tighten the screws. 3 Plug the adaptor into the antenna mount at the top of the back panel. 2 Place the wires from the antenna under the screws on a coaxial cable ). Before connecting, however, you will learn to set up your TV/VCR (except models CXD2512, CXD2514) uses 300-ohm twin flat leads. continued... 2 . 1 C H A P T E R T W O: IN S T A L L A T I O N you...
..." is the end of the antenna cable ). If your TV/VCR. Use a screwdriver to tighten the screws. 3 Plug the adaptor into the antenna mount at the top of the back panel. 2 Place the wires from the antenna under the screws on a coaxial cable ). Before connecting, however, you will learn to set up your TV/VCR (except models CXD2512, CXD2514) uses 300-ohm twin flat leads. continued... 2 . 1 C H A P T E R T W O: IN S T A L L A T I O N you...

Owner Instructions
Page 13
... external cable converter box. You will need a cable box converter for basic cable channels. incoming cable splitter Converter Box incoming cable splitter converter box RF (A/B) switch continued... 2 . 3 C H A P T E R T W O: IN S T A L L A T I O N Because your TV. Cable with a Converter Box If your cable company scrambles some channels and requires you don't need the following pieces of equipment: l A 2-way splitter l An RF (A/B) switch l Four lengths of the rear panel. Plug the incoming cable into the terminal on the RF (A/B) switch. INSTALLATION Connecting Cable...
... external cable converter box. You will need a cable box converter for basic cable channels. incoming cable splitter Converter Box incoming cable splitter converter box RF (A/B) switch continued... 2 . 3 C H A P T E R T W O: IN S T A L L A T I O N Because your TV. Cable with a Converter Box If your cable company scrambles some channels and requires you don't need the following pieces of equipment: l A 2-way splitter l An RF (A/B) switch l Four lengths of the rear panel. Plug the incoming cable into the terminal on the RF (A/B) switch. INSTALLATION Connecting Cable...
Owner Instructions
Page 15
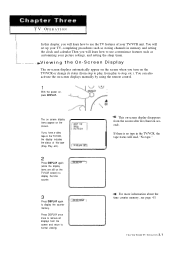
... TV, completing procedures such as storing channels in memory and setting the clock and calendar Then you will learn how to use the TV features of your picture settings, and setting the sleep timer. You can also activate the on-screen displays manually by using the remote control. 1 With the power on the screen. If you have a video tape in the TV/VCR, the tape status will read...
... TV, completing procedures such as storing channels in memory and setting the clock and calendar Then you will learn how to use the TV features of your picture settings, and setting the sleep timer. You can also activate the on-screen displays manually by using the remote control. 1 With the power on the screen. If you have a video tape in the TV/VCR, the tape status will read...

Owner Instructions
Page 21
... how to switch back to change the setting you choose appears on viewing the main menu, see page 3.2. to the standard settings Customizing Picture Settings 1 With the main menu on the screen. 2 Press CH or CH t o select contrast, brightness, sharpness, color, or tint. 3 Press VOL + or VOL- The Video menu appears on the screen, press CH or C H until "Video" is highlighted. TV OPERATION Choosing Picture Settings Your TV/VCR has...
... how to switch back to change the setting you choose appears on viewing the main menu, see page 3.2. to the standard settings Customizing Picture Settings 1 With the main menu on the screen. 2 Press CH or CH t o select contrast, brightness, sharpness, color, or tint. 3 Press VOL + or VOL- The Video menu appears on the screen, press CH or C H until "Video" is highlighted. TV OPERATION Choosing Picture Settings Your TV/VCR has...
Owner Instructions
Page 23
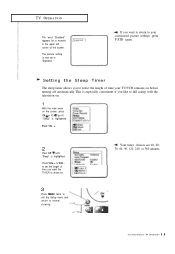
Setting the Sleep Timer The sleep timer allows you like to fall asleep with the television on 1 With the main menu on . 3 Press MENU twice to exit the Setup menu and return to normal viewing. TV OPERATION The word "Standard" appears for a moment in the upper left corner of time you want the TV/VCR to remain on the screen, press CH or C H until "Setup" is highlighted...
Setting the Sleep Timer The sleep timer allows you like to fall asleep with the television on 1 With the main menu on . 3 Press MENU twice to exit the Setup menu and return to normal viewing. TV OPERATION The word "Standard" appears for a moment in the upper left corner of time you want the TV/VCR to remain on the screen, press CH or C H until "Setup" is highlighted...

Owner Instructions
Page 32
VCR OPERATION 2 Press P./STILL to record. 1 lnsert a video cassette tape, Set the tape speed, and select the channel you record television programs with the touch of time (up to four hours) that you want to record. You can even program the length of a button. The TV/VCR won't record on a video cassette tape if the record safety tab on the record safety tab, see...
VCR OPERATION 2 Press P./STILL to record. 1 lnsert a video cassette tape, Set the tape speed, and select the channel you record television programs with the touch of time (up to four hours) that you want to record. You can even program the length of a button. The TV/VCR won't record on a video cassette tape if the record safety tab on the record safety tab, see...

Owner Instructions
Page 34
VCR OPERATION The Timer Record menu appears on program review, see page 4.13. The One Time Programming screen appears. Use CH or C H t o select the hour when you want to begin recording. 4 . 1 0 C HAPTER F O U R: VCR OP E R A T I O N To stop a recording in the channel you choose will be displayed in the program review feature. Press VOL +. The instructions for using the feature are recording a channel that comes through a cable converter box, enter the output number of the channel, is...
VCR OPERATION The Timer Record menu appears on program review, see page 4.13. The One Time Programming screen appears. Use CH or C H t o select the hour when you want to begin recording. 4 . 1 0 C HAPTER F O U R: VCR OP E R A T I O N To stop a recording in the channel you choose will be displayed in the program review feature. Press VOL +. The instructions for using the feature are recording a channel that comes through a cable converter box, enter the output number of the channel, is...

Owner Instructions
Page 42
... VCRS record the closed caption signal from television programs, so home-recorded video tapes also provide closed captions as news or weather Text often covers a large portion of the screen. In text mode, information unrelated to turn the Closed Caption feature on viewing the main menu, see page 3.2. SPECIAL FEATURES Viewing Closed Captions Your TV/VCR decodes and displays the closed caption transmissions, especially those of live events. Most pre-recorded commercial video tapes provide closed captions...
... VCRS record the closed caption signal from television programs, so home-recorded video tapes also provide closed captions as news or weather Text often covers a large portion of the screen. In text mode, information unrelated to turn the Closed Caption feature on viewing the main menu, see page 3.2. SPECIAL FEATURES Viewing Closed Captions Your TV/VCR decodes and displays the closed caption transmissions, especially those of live events. Most pre-recorded commercial video tapes provide closed captions...

Owner Instructions
Page 47
... set correctly. Adjust the tracking. Poor sound quality. Adjust the antenna. chapter six TROUBLESHOOTING Before you time and money. Try another channel. Adjust the antenna. Identifying VCR Problems Problem Unit won 't take video tape. Unit didn't record a timer program. Picture rolls vertically. Check all wire connections. Make sure the unit was turned off. Check the programmed start and stop times. It may save you call a repair person for your TV/VCR, please scan this list...
... set correctly. Adjust the tracking. Poor sound quality. Adjust the antenna. chapter six TROUBLESHOOTING Before you time and money. Try another channel. Adjust the antenna. Identifying VCR Problems Problem Unit won 't take video tape. Unit didn't record a timer program. Picture rolls vertically. Check all wire connections. Make sure the unit was turned off. Check the programmed start and stop times. It may save you call a repair person for your TV/VCR, please scan this list...

Owner Instructions
Page 55
... 3 min. APPENDIX Specifications Format Recording System Television System Audio Track Tape Width Record Speed SP LP SLP Record/Playback Time FF/Rew Time Heads VIDEO Input Signal-to-Noise Ratio Horizontal Resolution VHS Standard Rotary, azimuth two-head helical scanning system Luminance FM azimuth recording Color signal converted subcarrier phase shift recording NTSC-type color signal EIA Standard (525 lines, 60 fields) 1 track 12.7 mm (l/2 inch) 33.35...
... 3 min. APPENDIX Specifications Format Recording System Television System Audio Track Tape Width Record Speed SP LP SLP Record/Playback Time FF/Rew Time Heads VIDEO Input Signal-to-Noise Ratio Horizontal Resolution VHS Standard Rotary, azimuth two-head helical scanning system Luminance FM azimuth recording Color signal converted subcarrier phase shift recording NTSC-type color signal EIA Standard (525 lines, 60 fields) 1 track 12.7 mm (l/2 inch) 33.35...

Owner Instructions
Page 57
... 1.4, 4.3 features 1.1 FF 1.4, 4.3 flat twin lead 2.1 foreign country sending tapes to VCR for Video cassette tapes A.1 changing tape speeds 4.6-7, A.2 CHA, CHI 1.2, 3.3-4 channels adding and erasing 3.4 changing 1.4, 3.3-4 storing 3.3-4 choosing picture settings 3.7 choosing recording speed 4.6-7, A.2 choosing video cassette tapes 4.1, A.1 cleaning A.1 CLEAR 1.4, 4.4-5 Clock 3.5 closed captions 5.4 coaxial cable 2.1, 2.3 Color 3.7 combiner 2.2 connections antennas to TV/VCR 2.1 cable TV system to TV/VCR 2.3 VCR to a A.2 using the TV/VCR in memory 3.4 Adjust 3.2 advanced recording fea-
... 1.4, 4.3 features 1.1 FF 1.4, 4.3 flat twin lead 2.1 foreign country sending tapes to VCR for Video cassette tapes A.1 changing tape speeds 4.6-7, A.2 CHA, CHI 1.2, 3.3-4 channels adding and erasing 3.4 changing 1.4, 3.3-4 storing 3.3-4 choosing picture settings 3.7 choosing recording speed 4.6-7, A.2 choosing video cassette tapes 4.1, A.1 cleaning A.1 CLEAR 1.4, 4.4-5 Clock 3.5 closed captions 5.4 coaxial cable 2.1, 2.3 Color 3.7 combiner 2.2 connections antennas to TV/VCR 2.1 cable TV system to TV/VCR 2.3 VCR to a A.2 using the TV/VCR in memory 3.4 Adjust 3.2 advanced recording fea-

Owner Instructions
Page 58
... 4.2 pause/still 1.4, 4.2 picture 3.7 picture search 4.3 picture settings 3.7 customizing 3.7 using standard 3.8 PLAY 1.2, 1.4, 4.2 playing a video cassette tape 4.2 plugs Safety.2 polarization Safety.2 POWER 1.2, 1.4 power consumption A.3 power cord Safety.2 power requirement A.3 power sources Safety.1 power/timer 4.12 PRE-CH 1.4 problems, fixing 6.1-2 program number 3.4 program overlap 4.12 Program Review 4.13 programming channels 3.3 Q quick reference, Spanish 7.1 quick reference card 1.1 R re-recording 4.13 rear panel 1.3 REC 1.2, 1.4, 4.7 record 4.6 record light 1.2, 4.7 record safety tab...
... 4.2 pause/still 1.4, 4.2 picture 3.7 picture search 4.3 picture settings 3.7 customizing 3.7 using standard 3.8 PLAY 1.2, 1.4, 4.2 playing a video cassette tape 4.2 plugs Safety.2 polarization Safety.2 POWER 1.2, 1.4 power consumption A.3 power cord Safety.2 power requirement A.3 power sources Safety.1 power/timer 4.12 PRE-CH 1.4 problems, fixing 6.1-2 program number 3.4 program overlap 4.12 Program Review 4.13 programming channels 3.3 Q quick reference, Spanish 7.1 quick reference card 1.1 R re-recording 4.13 rear panel 1.3 REC 1.2, 1.4, 4.7 record 4.6 record light 1.2, 4.7 record safety tab...

