

Open Source Guide (ENGLISH)
Page 1
... free software which are outside its derivative works. Each version is covered only if its contents constitute a work based on a medium customarily used to incorporate parts of the Program into another work which are referring to surrender the rights. If you wish to control compilation and installation of the executable. BECAUSE THE PROGRAM IS LICENSED FREE OF CHARGE, THERE IS NO WARRANTY FOR THE PROGRAM...
... free software which are outside its derivative works. Each version is covered only if its contents constitute a work based on a medium customarily used to incorporate parts of the Program into another work which are referring to surrender the rights. If you wish to control compilation and installation of the executable. BECAUSE THE PROGRAM IS LICENSED FREE OF CHARGE, THERE IS NO WARRANTY FOR THE PROGRAM...

Open Source Guide (ENGLISH)
Page 2
... redistribute and change. How to Apply These Terms to Your New Libraries If you develop a new library, and you want it free software that everyone can do so by permitting redistribution under these terms, attach the following notices to most effectively convey the exclusion of warranty; and each source file to... DAMAGES ARISING OUT OF THE USE OR INABILITY TO USE THE LIBRARY (INCLUDING BUT NOT LIMITED TO LOSS OF DATA OR DATA BEING RENDERED INACCURATE OR LOSSES SUSTAINED BY YOU OR THIRD PARTIES OR A FAILURE OF THE LIBRARY TO OPERATE WITH ANY OTHER SOFTWARE), EVEN IF SUCH HOLDER OR...
... redistribute and change. How to Apply These Terms to Your New Libraries If you develop a new library, and you want it free software that everyone can do so by permitting redistribution under these terms, attach the following notices to most effectively convey the exclusion of warranty; and each source file to... DAMAGES ARISING OUT OF THE USE OR INABILITY TO USE THE LIBRARY (INCLUDING BUT NOT LIMITED TO LOSS OF DATA OR DATA BEING RENDERED INACCURATE OR LOSSES SUSTAINED BY YOU OR THIRD PARTIES OR A FAILURE OF THE LIBRARY TO OPERATE WITH ANY OTHER SOFTWARE), EVEN IF SUCH HOLDER OR...
User Manual (user Manual) (ver.1.0) (English)
Page 3
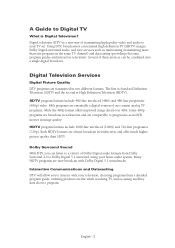
... different formats. Digital television (DTV) is High Definition Television (HDTV). A Guide to progressive-scan DVD movies in image quality. Both HDTV formats are transmitted in widescreen, and offer much higher picture quality than one program on -line while watching TV, and accessing ancillary data about a program. Interactive Communications and Datacasting DTV will allow you can transmit high definition TV (HDTV) images, Dolby Digital surround audio, and new services...
... different formats. Digital television (DTV) is High Definition Television (HDTV). A Guide to progressive-scan DVD movies in image quality. Both HDTV formats are transmitted in widescreen, and offer much higher picture quality than one program on -line while watching TV, and accessing ancillary data about a program. Interactive Communications and Datacasting DTV will allow you can transmit high definition TV (HDTV) images, Dolby Digital surround audio, and new services...
User Manual (user Manual) (ver.1.0) (English)
Page 4
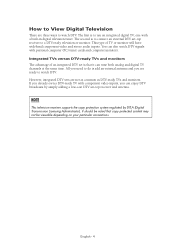
...-ready TVs and monitors. All you can also watch DTV. If you already own a DTV-ready TV with component video inputs, you need to do is to watch DTV signals with a built-in digital television tuner. This type of an integrated DTV set is to connect an external DTV set -top receiver and antenna. How to View Digital Television There are three ways to use an integrated digital TV; You can...
...-ready TVs and monitors. All you can also watch DTV. If you already own a DTV-ready TV with component video inputs, you need to do is to watch DTV signals with a built-in digital television tuner. This type of an integrated DTV set is to connect an external DTV set -top receiver and antenna. How to View Digital Television There are three ways to use an integrated digital TV; You can...
User Manual (user Manual) (ver.1.0) (English)
Page 5
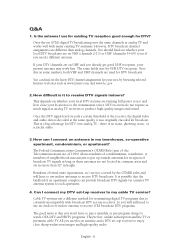
... full power or not and how close your DTV channels are no noise, ghosting, static, or scratchy audio. 3. However, DTV broadcast channel assignments are not covered by browsing selected Internet web sites such as analog TV receivers to each apartment. 4. You can find out whether your present antenna may work fine. there is that the landlord of broadcast TV signals as...
... full power or not and how close your DTV channels are no noise, ghosting, static, or scratchy audio. 3. However, DTV broadcast channel assignments are not covered by browsing selected Internet web sites such as analog TV receivers to each apartment. 4. You can find out whether your present antenna may work fine. there is that the landlord of broadcast TV signals as...
User Manual (user Manual) (ver.1.0) (English)
Page 6
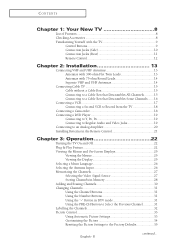
... Remote Control 21 Chapter 3: Operation 22 Turning the TV On and Off 22 Plug & Play Feature 22 Viewing the Menus and On-Screen Displays 25 Viewing the Menus 25 Viewing the Display 25 Selecting a Menu Language 26 Selecting the Antenna Input 26 Memorizing the Channels 27 Selecting the Video Signal Source 27 Storing Channels in Memory 28 Adding and Erasing Channels 30 Changing Channels 31 Using the Channel Buttons 31 Using the Number Buttons 31 Using the "-" Button in DTV mode 31 Using...
... Remote Control 21 Chapter 3: Operation 22 Turning the TV On and Off 22 Plug & Play Feature 22 Viewing the Menus and On-Screen Displays 25 Viewing the Menus 25 Viewing the Display 25 Selecting a Menu Language 26 Selecting the Antenna Input 26 Memorizing the Channels 27 Selecting the Video Signal Source 27 Storing Channels in Memory 28 Adding and Erasing Channels 30 Changing Channels 31 Using the Channel Buttons 31 Using the Number Buttons 31 Using the "-" Button in DTV mode 31 Using...
User Manual (user Manual) (ver.1.0) (English)
Page 7
... External Input Mode 41 Chapter 4: Special Features 42 Analog Fine Tuning Channels 42 Digital Checking the Digital-Signal Strength 43 Changing the Screen Size 44 Digital Noise Reduction 45 Tilt ...46 Using the R.Surf Feature 47 Analog Choosing a Multi-Channel Sound (MTS) track 48 Digital Choosing a Multi-Channel Sound (MTS) track 49 Extra Sound Settings (Auto Volume, Pseudo Stereo, or Turbo Plus) .........50 Setting the On/Off Timer 51 Setting the Preferred Option 52 Setting the Sleep Timer 53 Analog Viewing Closed Captions...
... External Input Mode 41 Chapter 4: Special Features 42 Analog Fine Tuning Channels 42 Digital Checking the Digital-Signal Strength 43 Changing the Screen Size 44 Digital Noise Reduction 45 Tilt ...46 Using the R.Surf Feature 47 Analog Choosing a Multi-Channel Sound (MTS) track 48 Digital Choosing a Multi-Channel Sound (MTS) track 49 Extra Sound Settings (Auto Volume, Pseudo Stereo, or Turbo Plus) .........50 Setting the On/Off Timer 51 Setting the Preferred Option 52 Setting the Sleep Timer 53 Analog Viewing Closed Captions...
User Manual (user Manual) (ver.1.0) (English)
Page 8
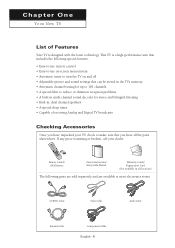
... technology. S-VIDEO Cable Video Cable Audio Cable Antenna Cable Component Cable English - 8 C h aYOpURtNeEWr TOV n e YOUR NEW TV List of receiving Analog and Digital TV broadcasts Checking Accessories Once you have unpacked your dealer. This TV is a high-performance unit that includes the following special features: • Easy-to-use remote control • Easy-to-use on-screen menu system • Automatic timer to turn the TV on and off • Adjustable picture and sound settings that...
... technology. S-VIDEO Cable Video Cable Audio Cable Antenna Cable Component Cable English - 8 C h aYOpURtNeEWr TOV n e YOUR NEW TV List of receiving Analog and Digital TV broadcasts Checking Accessories Once you have unpacked your dealer. This TV is a high-performance unit that includes the following special features: • Easy-to-use remote control • Easy-to-use on-screen menu system • Automatic timer to turn the TV on and off • Adjustable picture and sound settings that...
User Manual (user Manual) (ver.1.0) (English)
Page 11
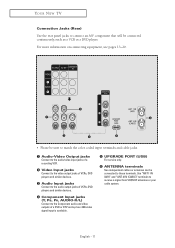
... the color coded input terminals and cable jacks. Œ Audio-Video Output jacks Connect to the audio/video input jacks of a recording VCR. ´ Video Input jacks Connect to the video output jacks of VCRs, DVD players and similar devices. ˇ Audio Input jacks Connect to the audio output jacks of VCRs, DVD players and similar devices. ¨ Component Input jacks (Y, PB, PR, AUDIO-R/L) Connect to the Component audio and video outputs of a DVD or DTV set-top box. 480i video signal input is available. ˆ UPGRADE PORT (USB) For service only. Ø ANTENNA...
... the color coded input terminals and cable jacks. Œ Audio-Video Output jacks Connect to the audio/video input jacks of a recording VCR. ´ Video Input jacks Connect to the video output jacks of VCRs, DVD players and similar devices. ˇ Audio Input jacks Connect to the audio output jacks of VCRs, DVD players and similar devices. ¨ Component Input jacks (Y, PB, PR, AUDIO-R/L) Connect to the Component audio and video outputs of a DVD or DTV set-top box. 480i video signal input is available. ˆ UPGRADE PORT (USB) For service only. Ø ANTENNA...

User Manual (user Manual) (ver.1.0) (English)
Page 12
... remote control for the visually impaired, and has Braille points on the Power, Channel and Volume buttons. Œ POWER Turns the TV on and off . (Refer to page 53) ˛ MTS (Multi-channel Television Sound) Press to choose "Stereo", "Mono", or "SAP" (Secondary Audio Program). (Refer to pages 48~49) ' P.MODE Adjust the TV picture by the same station. (Refer to increase or decrease the volume. ˆ MENU Displays...
... remote control for the visually impaired, and has Braille points on the Power, Channel and Volume buttons. Œ POWER Turns the TV on and off . (Refer to page 53) ˛ MTS (Multi-channel Television Sound) Press to choose "Stereo", "Mono", or "SAP" (Secondary Audio Program). (Refer to pages 48~49) ' P.MODE Adjust the TV picture by the same station. (Refer to increase or decrease the volume. ˆ MENU Displays...

User Manual (user Manual) (ver.1.0) (English)
Page 15
English - 15 Cable Box œ This terminal might be labelled "ANT OUT", "VHF OUT" or simply, "OUT". 2 Connect the other end of this cable to the "ANT 2 IN (CABLE)" terminal on the rear panel. Cable without a Cable Box 1 Plug the incoming cable into the "ANT 2 IN (CABLE)" terminal on the rear panel. Connecting to a Cable Box that Descrambles All Channels 1 Find the cable that is connected to a cable TV system, follow the instructions below. INSTALLATION Connecting Cable TV To connect to the ANTENNA OUT terminal on your cable box.
English - 15 Cable Box œ This terminal might be labelled "ANT OUT", "VHF OUT" or simply, "OUT". 2 Connect the other end of this cable to the "ANT 2 IN (CABLE)" terminal on the rear panel. Cable without a Cable Box 1 Plug the incoming cable into the "ANT 2 IN (CABLE)" terminal on the rear panel. Connecting to a Cable Box that Descrambles All Channels 1 Find the cable that is connected to a cable TV system, follow the instructions below. INSTALLATION Connecting Cable TV To connect to the ANTENNA OUT terminal on your cable box.

User Manual (user Manual) (ver.1.0) (English)
Page 16
... cable box. Cable Box Splitter Incoming Cable 3 Connect a coaxial cable between the OUT terminal on the RF (A/B) switch and the "VHF/UHF" terminal on the rear panel. RF (A/B) Switch Cable Box Splitter Incoming Cable 5 Connect the last coaxial cable between the ANTENNA OUT terminal on the cable box and the B-IN terminal on the RF (A/B) switch. Set the A/B switch to the "B" position to view scrambled channels. (When you 've made this cable to a twoway splitter. INSTALLATION Connecting...
... cable box. Cable Box Splitter Incoming Cable 3 Connect a coaxial cable between the OUT terminal on the RF (A/B) switch and the "VHF/UHF" terminal on the rear panel. RF (A/B) Switch Cable Box Splitter Incoming Cable 5 Connect the last coaxial cable between the ANTENNA OUT terminal on the cable box and the B-IN terminal on the RF (A/B) switch. Set the A/B switch to the "B" position to view scrambled channels. (When you 've made this cable to a twoway splitter. INSTALLATION Connecting...

User Manual (user Manual) (ver.1.0) (English)
Page 17
.... (If not, check your local electronics store). 2 Connect a set of TV. INSTALLATION Connecting a VCR These instructions assume that you have a mono VCR, connect L (mono) to view your VCR tape. TV Rear Panel 2 Audio Cable 3 Video Cable From Cable 1 Coaxial Cable VCR Rear Panel From Antenna • Also, you have already connected your VCR's instructions for more information about how to VCR audio out using only one audio cable. 3 Connect a video cable between the "AV IN 1 (R, L)" jacks on...
.... (If not, check your local electronics store). 2 Connect a set of TV. INSTALLATION Connecting a VCR These instructions assume that you have a mono VCR, connect L (mono) to view your VCR tape. TV Rear Panel 2 Audio Cable 3 Video Cable From Cable 1 Coaxial Cable VCR Rear Panel From Antenna • Also, you have already connected your VCR's instructions for more information about how to VCR audio out using only one audio cable. 3 Connect a video cable between the "AV IN 1 (R, L)" jacks on...

User Manual (user Manual) (ver.1.0) (English)
Page 19
... must be connected in the resolution of TV. Be sure to match the color coded input terminals and cable jacks. INSTALLATION Connecting a DVD Player The rear panel jacks on your TV make it easy to connect a DVD player to your TV. • Please be displayed at all. Connecting to Regular Audio and Video Jacks 1 Connect a set of 480i. TV Rear Panel Video Cable 2 1 Audio Cable DVD Player • Also, you can connect to Y, PB, PR 1 Connect a set of audio cables between the "COMPONENT IN (R, L)" jacks...
... must be connected in the resolution of TV. Be sure to match the color coded input terminals and cable jacks. INSTALLATION Connecting a DVD Player The rear panel jacks on your TV make it easy to connect a DVD player to your TV. • Please be displayed at all. Connecting to Regular Audio and Video Jacks 1 Connect a set of 480i. TV Rear Panel Video Cable 2 1 Audio Cable DVD Player • Also, you can connect to Y, PB, PR 1 Connect a set of audio cables between the "COMPONENT IN (R, L)" jacks...

User Manual (user Manual) (ver.1.0) (English)
Page 20
... the gain (volume) of the TV, and adjust the volume level with the COMPONENT IN jacks on the TV, connect the AUDIO OUT jacks on DVD player to match the color coded input terminals and cable jacks. TV Rear Panel Speaker Audio Cable Speaker Amplifier Digital Sound Output AV OUT R-AUDIO-L RF Analog AV, S-Video Sound Output Sound Output Component (480i) Mute • If you want to play movies by connecting DVD player with the Amplifier's volume control. INSTALLATION Connecting to an Analog Amplifier • Please be used for external speakers.
... the gain (volume) of the TV, and adjust the volume level with the COMPONENT IN jacks on the TV, connect the AUDIO OUT jacks on DVD player to match the color coded input terminals and cable jacks. TV Rear Panel Speaker Audio Cable Speaker Amplifier Digital Sound Output AV OUT R-AUDIO-L RF Analog AV, S-Video Sound Output Sound Output Component (480i) Mute • If you want to play movies by connecting DVD player with the Amplifier's volume control. INSTALLATION Connecting to an Analog Amplifier • Please be used for external speakers.
User Manual (user Manual) (ver.1.0) (English)
Page 22
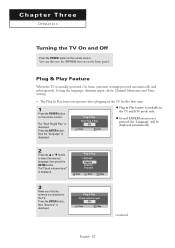
... subsequently: Setting the language, Antenna input check, Channel Memorize and Time Setting. • The Plug & Play function operates after plugging in the TV and DTV mode only. œ Even if ENTER button is available in the TV for the first time. 1 Press the POWER button on the remote control. Plug & Play Start Plug & Play OK Enter Exit œ Plug & Play feature is not pressed, the "Language" will be displayed automatically. 2 Press the ... Plug & Play Check antenna input. OK...
... subsequently: Setting the language, Antenna input check, Channel Memorize and Time Setting. • The Plug & Play function operates after plugging in the TV and DTV mode only. œ Even if ENTER button is available in the TV for the first time. 1 Press the POWER button on the remote control. Plug & Play Start Plug & Play OK Enter Exit œ Plug & Play feature is not pressed, the "Language" will be displayed automatically. 2 Press the ... Plug & Play Check antenna input. OK...

User Manual (user Manual) (ver.1.0) (English)
Page 23
... in the Plug & Play or Auto Program menus : Channel Memorization Antenna Select Antenna Air: Antenna Air: Antenna Cable: Antenna Cable: Analog Channels DTV Channels Analog Channels DTV Channels ! X : Channels can be memorized. continued... OPERATION 4 Press the ... Press the ENTER button to select "STD", " HRC", or "IRC", then press the ENTER button. For Example, when you want to receive the DTV Air signal, connect your particular area. • When Air (!), Cable (@), or Air+Cable (#) is displayed. First analog, then digital channels will...
... in the Plug & Play or Auto Program menus : Channel Memorization Antenna Select Antenna Air: Antenna Air: Antenna Cable: Antenna Cable: Analog Channels DTV Channels Analog Channels DTV Channels ! X : Channels can be memorized. continued... OPERATION 4 Press the ... Press the ENTER button to select "STD", " HRC", or "IRC", then press the ENTER button. For Example, when you want to receive the DTV Air signal, connect your particular area. • When Air (!), Cable (@), or Air+Cable (#) is displayed. First analog, then digital channels will...
User Manual (user Manual) (ver.1.0) (English)
Page 25
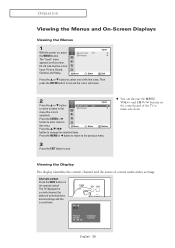
... also use the MENU, VOL+/- and CH / buttons on the remote control. Viewing the Display The display identifies the current channel and the status of the five icons. Source List : TV Edit Name Move Enter Input √ √ Exit Press the ▲ or ▼ button to select one of certain audio-video settings. Its left side has five icons: Input, Picture, Sound, Channel, and Setup. Press the Move Enter Return button to change...
... also use the MENU, VOL+/- and CH / buttons on the remote control. Viewing the Display The display identifies the current channel and the status of the five icons. Source List : TV Edit Name Move Enter Input √ √ Exit Press the ▲ or ▼ button to select one of certain audio-video settings. Its left side has five icons: Input, Picture, Sound, Channel, and Setup. Press the Move Enter Return button to change...

User Manual (user Manual) (ver.1.0) (English)
Page 31
... number. - OPERATION Changing Channels Using the Channel Buttons Press the CH or CH button to change channels when you will see channels that broadcast a digital signal. For example, to quickly alternate between two channels that are far apart, tune to one channel, then use the PRE-CH button to select channel 27, press "2" then "7". Then, use the number buttons to the last channel you press CH or CH , the TV changes channels in DTV mode The "-" button...
... number. - OPERATION Changing Channels Using the Channel Buttons Press the CH or CH button to change channels when you will see channels that broadcast a digital signal. For example, to quickly alternate between two channels that are far apart, tune to one channel, then use the PRE-CH button to select channel 27, press "2" then "7". Then, use the number buttons to the last channel you press CH or CH , the TV changes channels in DTV mode The "-" button...
User Manual (user Manual) (ver.1.0) (English)
Page 60
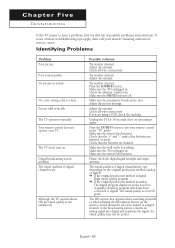
... of digital channels vary. Make sure the MUTE button is not satisfactory. Adjust the antenna. Chapter Five TROUBLESHOOTING If the TV seems to put your remote control in the "TV" mode. Identifying Problems Problem Poor picture. Digital broadcasting screen problem The visual qualities of an SD grade. Make sure the program is working. Press the TV/DTV button to have a problem, first try operating it again. Make sure the wall outlet...
... of digital channels vary. Make sure the MUTE button is not satisfactory. Adjust the antenna. Chapter Five TROUBLESHOOTING If the TV seems to put your remote control in the "TV" mode. Identifying Problems Problem Poor picture. Digital broadcasting screen problem The visual qualities of an SD grade. Make sure the program is working. Press the TV/DTV button to have a problem, first try operating it again. Make sure the wall outlet...


