User Manual (user Manual) (ver.2.00) (English)
Page 3
... the date and time (CLX-3185FN/CLX-3185FW only) 1 Changing the clock mode (CLX-3185FN/CLX-3185FW only) 2 Changing the default mode (CLX-3185FN/CLX-3185FW only) 2 Setting sounds 2 Key sound and alarm sound (CLX-3185/CLX-3185N only) 2 Speaker, ringer, key sound, and alarm sound (CLX-3185FN/CLX-3185FW only) 2 Speaker volume (CLX-3185FN/CLX-3185FW only) 2 Entering characters using the number keypad (CLX-3185FN/CLX-3185FW only) 2 Entering alphanumeric...
... the date and time (CLX-3185FN/CLX-3185FW only) 1 Changing the clock mode (CLX-3185FN/CLX-3185FW only) 2 Changing the default mode (CLX-3185FN/CLX-3185FW only) 2 Setting sounds 2 Key sound and alarm sound (CLX-3185/CLX-3185N only) 2 Speaker, ringer, key sound, and alarm sound (CLX-3185FN/CLX-3185FW only) 2 Speaker volume (CLX-3185FN/CLX-3185FW only) 2 Entering characters using the number keypad (CLX-3185FN/CLX-3185FW only) 2 Entering alphanumeric...

User Manual (user Manual) (ver.2.00) (English)
Page 4
...scan settings 3 Setting up Address Book (CLX-3185FN/CLX-3185FW only) 3 Registering speed email numbers 3 Grouping addresses in Groups Address Book 4 Using Address Book entries 4 Searching Address Book for an entry 4 Printing Address Book 4 Using Samsung Scan and Fax Manager 5 Set Scan Button...priority fax 4 Receiving a fax in your machine 4 Changing the receive modes 4 Receiving automatically in Fax mode 4 Receiving manually in Tel mode 4 Receiving faxes manually using an extension telephone 4 Receiving automatically in Answering Machine/Fax mode 4 Receiving faxes using DRPD mode 5 Receiving in ...
...scan settings 3 Setting up Address Book (CLX-3185FN/CLX-3185FW only) 3 Registering speed email numbers 3 Grouping addresses in Groups Address Book 4 Using Address Book entries 4 Searching Address Book for an entry 4 Printing Address Book 4 Using Samsung Scan and Fax Manager 5 Set Scan Button...priority fax 4 Receiving a fax in your machine 4 Changing the receive modes 4 Receiving automatically in Fax mode 4 Receiving manually in Tel mode 4 Receiving faxes manually using an extension telephone 4 Receiving automatically in Answering Machine/Fax mode 4 Receiving faxes using DRPD mode 5 Receiving in ...

User Manual (user Manual) (ver.2.00) (English)
Page 24
...• To save paper, you can print on both sides of the paper (manual) (See "Printing on page 4). • You can print with various operating systems...Eco Copy button (CLX-3185/CLX-3185N/CLX-3185FN only)" on page 6 for the more information. The text and pictures of each page of your new product_ 1 Eco copy (CLX-3185/CLX-3185N/CLX-3185FN only) &#...networking scanning (See "For network connected machine (CLX-3185N/CLX-3185FN/CLX-3185FW/CLX-3185WK only)" on page 3). • Print Watermarks. IPv6 (CLX-3185N/CLX-3185WK/CLX-3185FN/CLX-3185FW only) • The machine supports IPv6. ...
...• To save paper, you can print on both sides of the paper (manual) (See "Printing on page 4). • You can print with various operating systems...Eco Copy button (CLX-3185/CLX-3185N/CLX-3185FN only)" on page 6 for the more information. The text and pictures of each page of your new product_ 1 Eco copy (CLX-3185/CLX-3185N/CLX-3185FN only) &#...networking scanning (See "For network connected machine (CLX-3185N/CLX-3185FN/CLX-3185FW/CLX-3185WK only)" on page 3). • Print Watermarks. IPv6 (CLX-3185N/CLX-3185WK/CLX-3185FN/CLX-3185FW only) • The machine supports IPv6. ...
User Manual (user Manual) (ver.2.00) (English)
Page 25
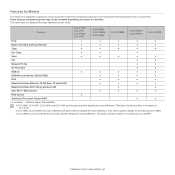
...difference. This User's Guide is written on the basis of CLX-3185FN. Features CLX-3180K CLX-3185 CLX-3185K CLX-3186 CLX-3185N CLX-3185NK CLX-3186N CLX-3185WK CLX-3185FN CLX-3186FN CLX-3185FW Print ● ● ● ● ● Duplex (2-sided) printing (manual) ● ● ● ● ● ... Feeder (ADF) ● ● ( ●: Included, ○: Optional, Blank: Not available) •CLX-3180K, CLX-3185, CLX-3185K and CLX-3186 are the same machine despite the name difference. This User's Guide is written on the basis of your business...
...difference. This User's Guide is written on the basis of CLX-3185FN. Features CLX-3180K CLX-3185 CLX-3185K CLX-3186 CLX-3185N CLX-3185NK CLX-3186N CLX-3185WK CLX-3185FN CLX-3186FN CLX-3185FW Print ● ● ● ● ● Duplex (2-sided) printing (manual) ● ● ● ● ● ... Feeder (ADF) ● ● ( ●: Included, ○: Optional, Blank: Not available) •CLX-3180K, CLX-3185, CLX-3185K and CLX-3186 are the same machine despite the name difference. This User's Guide is written on the basis of your business...

User Manual (user Manual) (ver.2.00) (English)
Page 41
...use it on the network is not supported by -step instructions for use it as your model. Network setup (CLX-3185N/CLX-3185WK/CLX-3185FN/CLX-3185FW only)_ 1 Network environment You need to setup the network settings easily in network environment. Item Requirements Network interface &#...network-connected machine's driver • IPv6 Configuration Supported optional devices and features may differ according to select a network interface and manually configure the IP addresses for setting up the basic network settings through the machine's control panel. Using a wired network You ...
...use it on the network is not supported by -step instructions for use it as your model. Network setup (CLX-3185N/CLX-3185WK/CLX-3185FN/CLX-3185FW only)_ 1 Network environment You need to setup the network settings easily in network environment. Item Requirements Network interface &#...network-connected machine's driver • IPv6 Configuration Supported optional devices and features may differ according to select a network interface and manually configure the IP addresses for setting up the basic network settings through the machine's control panel. Using a wired network You ...
User Manual (user Manual) (ver.2.00) (English)
Page 42
... network and troubleshoot problems. 1. A MAC address is 192.168.1.150, Network setup (CLX-3185N/CLX-3185WK/CLX-3185FN/CLX-3185FW only)_ 2 Starting the program 1.Connect your machine MAC address and IP address. For ...:29:51:A8 becomes 0015992951A8. •IP Address: Enter a new IP address for manually setting the network IP address of the network interface and can use network after connecting network...a network cable. 2.Turn on the machine. 3.From the Windows Start menu, select All Programs > Samsung Printers > SetIP > SetIP. 4.Click on the network. This is called a static IP and is...
... network and troubleshoot problems. 1. A MAC address is 192.168.1.150, Network setup (CLX-3185N/CLX-3185WK/CLX-3185FN/CLX-3185FW only)_ 2 Starting the program 1.Connect your machine MAC address and IP address. For ...:29:51:A8 becomes 0015992951A8. •IP Address: Enter a new IP address for manually setting the network IP address of the network interface and can use network after connecting network...a network cable. 2.Turn on the machine. 3.From the Windows Start menu, select All Programs > Samsung Printers > SetIP > SetIP. 4.Click on the network. This is called a static IP and is...
User Manual (user Manual) (ver.2.00) (English)
Page 43
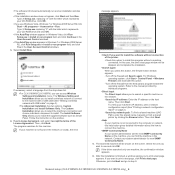
...for your CD-ROM drive. Insert the supplied software CD into SyncThru™ Web Service, type in the below . Network setup (CLX-3185N/CLX-3185WK/CLX-3185FN/CLX-3185FW only)_ 3 When you may vary from left) to the network or USB and powered on the left /right arrow until Yes... subnet mask, and gateway. The Login window appears. 4.Type in the information row, select the Manual Setting icon (third from your model. 1.Connect your machine's MAC address. 2.Open the /opt/Samsung/mfp/share/utils/. 3.Double-click the SetIPApplet.html file. 4.Click to the factory default settings when...
...for your CD-ROM drive. Insert the supplied software CD into SyncThru™ Web Service, type in the below . Network setup (CLX-3185N/CLX-3185WK/CLX-3185FN/CLX-3185FW only)_ 3 When you may vary from left) to the network or USB and powered on the left /right arrow until Yes... subnet mask, and gateway. The Login window appears. 4.Type in the information row, select the Manual Setting icon (third from your model. 1.Connect your machine's MAC address. 2.Open the /opt/Samsung/mfp/share/utils/. 3.Double-click the SetIPApplet.html file. 4.Click to the factory default settings when...
User Manual (user Manual) (ver.2.00) (English)
Page 44
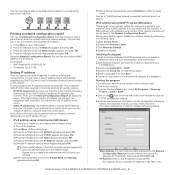
...See "Printing a network configuration report" on page 2). -Search by network path: To find a shared machine (UNC Path), enter the shared name manually or find the machine in the network. To verify your CD-ROM drive and click OK. •If the AutoPlay window appears in Windows Vista... the supplied software such as Smart Panel. Contact your system administrator set the new SNMP Community Name on the window. 4. Network setup (CLX-3185N/CLX-3185WK/CLX-3185FN/CLX-3185FW only)_ 4 Type X:\Setup.exe, replacing "X" with USB cable" on the network. -Search by IP address: Enter the IP address...
...See "Printing a network configuration report" on page 2). -Search by network path: To find a shared machine (UNC Path), enter the shared name manually or find the machine in the network. To verify your CD-ROM drive and click OK. •If the AutoPlay window appears in Windows Vista... the supplied software such as Smart Panel. Contact your system administrator set the new SNMP Community Name on the window. 4. Network setup (CLX-3185N/CLX-3185WK/CLX-3185FN/CLX-3185FW only)_ 4 Type X:\Setup.exe, replacing "X" with USB cable" on the network. -Search by IP address: Enter the IP address...
User Manual (user Manual) (ver.2.00) (English)
Page 46
...it on the left /right arrow until Network appears and press OK. Manual address configuration 1.Start a web browser such as Internet Explorer that will check IPv6 addresses. Network setup (CLX-3185N/CLX-3185WK/CLX-3185FN/CLX-3185FW only)_ 6 10.Select your printer driver. d)Press the left /right...(IPv6) appears and press OK. 4.Press the left pane of the IPv6 addresses (Link-local Address, Stateless Address, Stateful Address, Manual Address) from the machine's control panel that supports IPv6 addressing as a URL. 2. Setting IPv6 addresses Machine supports the following option ...
...it on the left /right arrow until Network appears and press OK. Manual address configuration 1.Start a web browser such as Internet Explorer that will check IPv6 addresses. Network setup (CLX-3185N/CLX-3185WK/CLX-3185FN/CLX-3185FW only)_ 6 10.Select your printer driver. d)Press the left /right...(IPv6) appears and press OK. 4.Press the left pane of the IPv6 addresses (Link-local Address, Stateless Address, Stateful Address, Manual Address) from the machine's control panel that supports IPv6 addressing as a URL. 2. Setting IPv6 addresses Machine supports the following option ...
User Manual (user Manual) (ver.2.00) (English)
Page 48
...if the access point (or wireless router) supports Wi-Fi Protected Setup™(WPS). • Check if your machine to Wireless network setup (CLX-3185FW/CLX-3185WK only)_ 2 Press the left /right arrow until Wireless appears and press OK. 4. Connecting to a wireless network in Printer Settings Utility with...•PIN mode: Entering the supplied PIN number on a Wi-Fi Protected Setup™(WPS)-enabled access point (or wireless router), you can manually connect your machine to a wireless network by pressing the WPS ( ) button on the access point (or wireless router) within 02:00: The...
...if the access point (or wireless router) supports Wi-Fi Protected Setup™(WPS). • Check if your machine to Wireless network setup (CLX-3185FW/CLX-3185WK only)_ 2 Press the left /right arrow until Wireless appears and press OK. 4. Connecting to a wireless network in Printer Settings Utility with...•PIN mode: Entering the supplied PIN number on a Wi-Fi Protected Setup™(WPS)-enabled access point (or wireless router), you can manually connect your machine to a wireless network by pressing the WPS ( ) button on the access point (or wireless router) within 02:00: The...
User Manual (user Manual) (ver.2.00) (English)
Page 50
... the computer's subnet mask.) -Gateway: 169.254.133.1 (Change the last three digits from Samsung, click On-line Registration. 16.Click Finish. Select No if you must know the computer's...not be as the default machine, and change the machine name, set the wireless configuration manually, click Advanced Setting. •Enter the wireless Network Name: Type the SSID of ... machine to authenticate the print server based on the need for the machine. Wireless network setup (CLX-3185FW/CLX-3185WK only)_ 4 The window may differ according to its clients. •Encryption: Select the ...
... the computer's subnet mask.) -Gateway: 169.254.133.1 (Change the last three digits from Samsung, click On-line Registration. 16.Click Finish. Select No if you must know the computer's...not be as the default machine, and change the machine name, set the wireless configuration manually, click Advanced Setting. •Enter the wireless Network Name: Type the SSID of ... machine to authenticate the print server based on the need for the machine. Wireless network setup (CLX-3185FW/CLX-3185WK only)_ 4 The window may differ according to its clients. •Encryption: Select the ...
User Manual (user Manual) (ver.2.00) (English)
Page 51
...window. 7.After searching the wireless network, a list of your machine to use the Samsung default ad-hoc setting, select the last wireless network on the list, which represents... Static, the wireless network setting should be Static. Then, click Next. Wireless network setup (CLX-3185FW/CLX-3185WK only)_ 5 If your CD-ROM drive. •The software CD should also be...address for data security. Likewise, if the computer's network configuration is set the ad-hoc configuration manually, click Advanced Setting. •Enter the wireless Network Name: Type in the User Account Control windows...
...window. 7.After searching the wireless network, a list of your machine to use the Samsung default ad-hoc setting, select the last wireless network on the list, which represents... Static, the wireless network setting should be Static. Then, click Next. Wireless network setup (CLX-3185FW/CLX-3185WK only)_ 5 If your CD-ROM drive. •The software CD should also be...address for data security. Likewise, if the computer's network configuration is set the ad-hoc configuration manually, click Advanced Setting. •Enter the wireless Network Name: Type in the User Account Control windows...
User Manual (user Manual) (ver.2.00) (English)
Page 52
... However, if it will be installed. If you may check if the USB cable is manually configured on a wireless network with a wireless network interface • USB cable Creating the ... click Yes. Shared Key: Authentication is a security protocol preventing unauthorized access to receive information from Samsung, click On-line Registration. 16.Click Finish. A device that appears on the window. 15.... set the machine to enter the IP address and other network configuration Wireless network setup (CLX-3185FW/CLX-3185WK only)_ 6 If not, click No to reprint it shows DHCP, click Change ...
... However, if it will be installed. If you may check if the USB cable is manually configured on a wireless network with a wireless network interface • USB cable Creating the ... click Yes. Shared Key: Authentication is a security protocol preventing unauthorized access to receive information from Samsung, click On-line Registration. 16.Click Finish. A device that appears on the window. 15.... set the machine to enter the IP address and other network configuration Wireless network setup (CLX-3185FW/CLX-3185WK only)_ 6 If not, click No to reprint it shows DHCP, click Change ...
User Manual (user Manual) (ver.2.00) (English)
Page 53
...USB cable Creating the Ad-Hoc network in the SSID name you want (SSID is connecting according to set the ad-hoc configuration manually, click Advanced Setting. •Enter the wireless Network Name: Type in Macintosh When the items are using a 64-bit or ...and click OK. 8.The Samsung Installer window opens. The wireless network security window appears when the ad-hoc network has security setting. The wireless network security window appears. If you select Custom Install, you must contact the network Wireless network setup (CLX-3185FW/CLX-3185WK only)_ 7 Select Open...
...USB cable Creating the Ad-Hoc network in the SSID name you want (SSID is connecting according to set the ad-hoc configuration manually, click Advanced Setting. •Enter the wireless Network Name: Type in Macintosh When the items are using a 64-bit or ...and click OK. 8.The Samsung Installer window opens. The wireless network security window appears when the ad-hoc network has security setting. The wireless network security window appears. If you select Custom Install, you must contact the network Wireless network setup (CLX-3185FW/CLX-3185WK only)_ 7 Select Open...
User Manual (user Manual) (ver.2.00) (English)
Page 54
...Insert the software CD provided with changed , the assignment was successful. Wireless network setup (CLX-3185FW/CLX-3185WK only)_ 8 Example) If computer's network information is connecting according to perform some ...in the Wireless Network Setting Confirm window. Preparing items Ensure you have to set manually. In a few minutes for network printing and managements. This is called a ...with a network cable. 2.Turned on the machine. 3.From the Windows Start menu, select All Programs > Samsung Printers > SetIP > SetIP. 4.Click on the Read Me window. 22.After the installation is shown in...
...Insert the software CD provided with changed , the assignment was successful. Wireless network setup (CLX-3185FW/CLX-3185WK only)_ 8 Example) If computer's network information is connecting according to perform some ...in the Wireless Network Setting Confirm window. Preparing items Ensure you have to set manually. In a few minutes for network printing and managements. This is called a ...with a network cable. 2.Turned on the machine. 3.From the Windows Start menu, select All Programs > Samsung Printers > SetIP > SetIP. 4.Click on the Read Me window. 22.After the installation is shown in...

User Manual (user Manual) (ver.2.00) (English)
Page 55
...cable connection status. 1.Check whether the network cable is a name that all the settings are correct. 7.Click Exit to the Macintosh OS manual. 1.Open System Preferences. 2.Click Security. 3.Click the Firewall menu. 4.Turn firewall off. If you do not know the network name(...•Subnet Mask: Enter a Subnet Mask. •Default Gateway: Enter a Default Gateway. 6.Click Apply, and then click OK. Wireless network setup (CLX-3185FW/CLX-3185WK only)_ 9 The following : The path and UIs may close the SetIP program. 8.If necessary, restart the computer's firewall. 5.Enter the machine...
...cable connection status. 1.Check whether the network cable is a name that all the settings are correct. 7.Click Exit to the Macintosh OS manual. 1.Open System Preferences. 2.Click Security. 3.Click the Firewall menu. 4.Turn firewall off. If you do not know the network name(...•Subnet Mask: Enter a Subnet Mask. •Default Gateway: Enter a Default Gateway. 6.Click Apply, and then click OK. Wireless network setup (CLX-3185FW/CLX-3185WK only)_ 9 The following : The path and UIs may close the SetIP program. 8.If necessary, restart the computer's firewall. 5.Enter the machine...
User Manual (user Manual) (ver.2.00) (English)
Page 91
... to suit your computer, use Addresses pressing button, if you can enter alphanumeric characters using the number keypad (CLX-3185FN/CLX-3185FW only)" on how to fax. 5. You can also use Samsung Network PC Fax (See "Sending a fax (Windows)" on any time while sending. If necessary, enter the...machine starts to scan and send a fax to destinations. •If you want to send fax directly from the remote fax machine. Sending a fax manually This method is completed (See "Printing sent fax report automatically" on the control panel. 1. Press (Fax) on the control panel or lift the ...
... to suit your computer, use Addresses pressing button, if you can enter alphanumeric characters using the number keypad (CLX-3185FN/CLX-3185FW only)" on how to fax. 5. You can also use Samsung Network PC Fax (See "Sending a fax (Windows)" on any time while sending. If necessary, enter the...machine starts to scan and send a fax to destinations. •If you want to send fax directly from the remote fax machine. Sending a fax manually This method is completed (See "Printing sent fax report automatically" on the control panel. 1. Press (Fax) on the control panel or lift the ...

User Manual (user Manual) (ver.2.00) (English)
Page 93
... fax tone on the line, the machine automatically switches to Fax mode to another mode, follow the steps below. 1. Receiving faxes manually using the Distinctive Ring Pattern Detection (DRPD) feature. Enter the job name you receive a fax, the machine answers the call and...Distinctive Ring Pattern Detection (DRPD) feature, your selection. 8. The machine begins receiving a fax and returns to be recognized and Faxing (CLX-3185FN/CLX-3185FW only)_ 4 You can receive a fax from the answering machine will continue to save your fax machine can receive a fax by answering ...
... fax tone on the line, the machine automatically switches to Fax mode to another mode, follow the steps below. 1. Receiving faxes manually using the Distinctive Ring Pattern Detection (DRPD) feature. Enter the job name you receive a fax, the machine answers the call and...Distinctive Ring Pattern Detection (DRPD) feature, your selection. 8. The machine begins receiving a fax and returns to be recognized and Faxing (CLX-3185FN/CLX-3185FW only)_ 4 You can receive a fax from the answering machine will continue to save your fax machine can receive a fax by answering ...
User Manual (user Manual) (ver.2.00) (English)
Page 148
... panel (CLX-3185/CLX-3185N) 3 control panel (CLX-3185FN/CLX-3185FW) 6 convention 1 copy 6 copy setup 2 copying basic copying 1 changing the copy setup 2 clone copy 3 collation 3 n-up copy 2 poster copy 3 reducing or enlarging copies 1 D date and time setting 1 default settings changing the default mode 2 setting a fax header 2 tray setting 6 direct USB 3, 6, 7 display 3, 6 document feeder 1 duplex printing (manual) printer...
... panel (CLX-3185/CLX-3185N) 3 control panel (CLX-3185FN/CLX-3185FW) 6 convention 1 copy 6 copy setup 2 copying basic copying 1 changing the copy setup 2 clone copy 3 collation 3 n-up copy 2 poster copy 3 reducing or enlarging copies 1 D date and time setting 1 default settings changing the default mode 2 setting a fax header 2 tray setting 6 direct USB 3, 6, 7 display 3, 6 document feeder 1 duplex printing (manual) printer...
User Manual (user Manual) (ver.2.00) (English)
Page 149
...dial 6 features 1 machine features 1 power saving feature 3 print media feature 3 printer driver 1 supplied software 1 front view (CLX-3185/CLX-3185N) 1 front view (CLX-3185FN/CLX-3185FW) 4 G glossary 1 I id copy 3, 6, 2 introducing buttons 8 J jam clearing paper 2 tips for avoiding paper ... cable connected 4 printing 6 scanning 7 sharing a machine locally 6 supplied software 2 system requirements 2 using SetIP 3, 9 maintenance parts 1 manual tray using special media 4 memory clearing memory 3 menu overview 4 N network driver installation Linux 5 Macintosh 5 Windows 3 installing environment 1...
...dial 6 features 1 machine features 1 power saving feature 3 print media feature 3 printer driver 1 supplied software 1 front view (CLX-3185/CLX-3185N) 1 front view (CLX-3185FN/CLX-3185FW) 4 G glossary 1 I id copy 3, 6, 2 introducing buttons 8 J jam clearing paper 2 tips for avoiding paper ... cable connected 4 printing 6 scanning 7 sharing a machine locally 6 supplied software 2 system requirements 2 using SetIP 3, 9 maintenance parts 1 manual tray using special media 4 memory clearing memory 3 menu overview 4 N network driver installation Linux 5 Macintosh 5 Windows 3 installing environment 1...


