

User Manual (ENGLISH)
Page 4
... the included software utilities. This user's guide also contains a Software section to print documents with your machine in Samsung website, www.samsung.com. 4_Features of your machine's full features, and contains information for printing. FINDING MORE INFORMATION You can get help... screen, click Help from the Samsung website, www.samsungprinter.com. To access a printer driver help , support, printer drivers, manuals, and order information from the printer properties dialog box. Quick Install Guide Provides information...
... the included software utilities. This user's guide also contains a Software section to print documents with your machine in Samsung website, www.samsung.com. 4_Features of your machine's full features, and contains information for printing. FINDING MORE INFORMATION You can get help... screen, click Help from the Samsung website, www.samsungprinter.com. To access a printer driver help , support, printer drivers, manuals, and order information from the printer properties dialog box. Quick Install Guide Provides information...
User Manual (ENGLISH)
Page 7
...types of waste and recycle them responsibly to promote the sustainable reuse of material resources. For more information on the battery, manual or packaging indicates that reduces power consumption when it is advisable that the battery contains mercury, cadmium or lead above the ... OZONE SAFETY During normal operation, this product should not be disposed with other types of waste and recycle them through your nearest Samsung dealer. marks. However, it is automatically lowered. Business users should not be mixed with other European countries with separate battery return...
...types of waste and recycle them responsibly to promote the sustainable reuse of material resources. For more information on the battery, manual or packaging indicates that reduces power consumption when it is advisable that the battery contains mercury, cadmium or lead above the ... OZONE SAFETY During normal operation, this product should not be disposed with other types of waste and recycle them through your nearest Samsung dealer. marks. However, it is automatically lowered. Business users should not be mixed with other European countries with separate battery return...
User Manual (ENGLISH)
Page 15
...Gray enhance copying 46 Setting copy timeout SCANNING 47 Scanning basics 47 47 Scanning from the control panel 47 Setting scan information in Samsung Scan Manager. 47 Scanning to application programs 48 Scanning by a network connection 48 Scanning to Email 49 Changing the settings for...job FAXING 52 Sending a fax 52 52 52 53 Setting the fax header Adjusting the document settings Sending a fax automatically 53 Sending a fax manually 53 Confirming a transmission 53 Automatic redialing 53 Redialing the last number 53 Sending a fax to multiple destinations 54 Sending a delayed fax 54 ...
...Gray enhance copying 46 Setting copy timeout SCANNING 47 Scanning basics 47 47 Scanning from the control panel 47 Setting scan information in Samsung Scan Manager. 47 Scanning to application programs 48 Scanning by a network connection 48 Scanning to Email 49 Changing the settings for...job FAXING 52 Sending a fax 52 52 52 53 Setting the fax header Adjusting the document settings Sending a fax automatically 53 Sending a fax manually 53 Confirming a transmission 53 Automatic redialing 53 Redialing the last number 53 Sending a fax to multiple destinations 54 Sending a delayed fax 54 ...

User Manual (ENGLISH)
Page 16
contents 55 Changing receiving modes 55 Receiving automatically in Fax mode 55 Receiving manually in Tel mode 55 Receiving manually using an extension telephone 55 Receiving automatically in Ans/Fax mode 55 Receiving faxes using DRPD mode 56 Receiving in secure receiving mode 56... 64 Cleaning the inside 66 Cleaning the scan unit 67 Maintaining the cartridge 67 Toner cartridge storage 67 Handling instructions 67 Use of non-Samsung and refilled toner cartridge 67 Estimated cartridge life 67 Redistributing toner 68 Replacing the toner cartridge 69 Replacing the imaging unit 70 Replacing the ...
contents 55 Changing receiving modes 55 Receiving automatically in Fax mode 55 Receiving manually in Tel mode 55 Receiving manually using an extension telephone 55 Receiving automatically in Ans/Fax mode 55 Receiving faxes using DRPD mode 56 Receiving in secure receiving mode 56... 64 Cleaning the inside 66 Cleaning the scan unit 67 Maintaining the cartridge 67 Toner cartridge storage 67 Handling instructions 67 Use of non-Samsung and refilled toner cartridge 67 Estimated cartridge life 67 Redistributing toner 68 Replacing the toner cartridge 69 Replacing the imaging unit 70 Replacing the ...
User Manual (ENGLISH)
Page 25
...line of this cable in a moment. Enter a byte between bytes. 6. When you contact a network administrator to set this address for manually setting the network IP address of the network interface and can be asked to connect this document. IP setting using its MAC address to ... address on page 27. Repeat this Network Configuration Report, you use your machine in the wireless network, refer to "Using a wireless network(Windows/CLX-3175FW only)" on the report. • Static IP assignment: Use SetIP program to 'Using a wired network'. If the report shows that window...
...line of this cable in a moment. Enter a byte between bytes. 6. When you contact a network administrator to set this address for manually setting the network IP address of the network interface and can be asked to connect this document. IP setting using its MAC address to ... address on page 27. Repeat this Network Configuration Report, you use your machine in the wireless network, refer to "Using a wireless network(Windows/CLX-3175FW only)" on the report. • Static IP assignment: Use SetIP program to 'Using a wired network'. If the report shows that window...
User Manual (ENGLISH)
Page 27
... for you may need for you have provided an easy to 2467 MHz). • Authentication: Select an authentication type. When you set the wireless configuration manually, click Advanced Setting. • Network Name: Type the SSID of a wireless router, or an access point, that connects the LAN to the Wireless network ... name > Smart Panel. Checking your machine) • USB cable Creating the Ad-Hoc network in a network is easily accomplished. This chapter will be set manually. This section is a security protocol preventing unauthorized access to peer communication.
... for you may need for you have provided an easy to 2467 MHz). • Authentication: Select an authentication type. When you set the wireless configuration manually, click Advanced Setting. • Network Name: Type the SSID of a wireless router, or an access point, that connects the LAN to the Wireless network ... name > Smart Panel. Checking your machine) • USB cable Creating the Ad-Hoc network in a network is easily accomplished. This chapter will be set manually. This section is a security protocol preventing unauthorized access to peer communication.
User Manual (ENGLISH)
Page 28
...network information is shown in Advanced Setting, go to 1.) 10. After selecting the components, you can access the network. After the installation is manually configured on your CD-ROM drive. 4. The CD-ROM starts automatically and the welcome message shows on a wireless network using and click Next..... • For the DHCP method If the IP address assignment method is DHCP, check if DHCP is set to receive information from Samsung. Before entering the IP address for Encryption after selecting Open System or Shared Key. Click Next. 13. The software searches the wireless ...
...network information is shown in Advanced Setting, go to 1.) 10. After selecting the components, you can access the network. After the installation is manually configured on your CD-ROM drive. 4. The CD-ROM starts automatically and the welcome message shows on a wireless network using and click Next..... • For the DHCP method If the IP address assignment method is DHCP, check if DHCP is set to receive information from Samsung. Before entering the IP address for Encryption after selecting Open System or Shared Key. Click Next. 13. The software searches the wireless ...

User Manual (ENGLISH)
Page 29
... consisting of 192.0.0.192, and you . In a few situations the IP address must set manually. Before entering the IP address for you have provided an easy to the network configuration. 11...an access point, that can also use the easier procedure. (See "Using a wireless network(Windows/CLX-3175FW only)" on page 27.) You must be set up your access point. Otherwise you . ...for the printer, you contact a network administrator to set the printer to receive information from Samsung. This is often required in order to be installed. Printer Not Found • Your...
... consisting of 192.0.0.192, and you . In a few situations the IP address must set manually. Before entering the IP address for you have provided an easy to the network configuration. 11...an access point, that can also use the easier procedure. (See "Using a wireless network(Windows/CLX-3175FW only)" on page 27.) You must be set up your access point. Otherwise you . ...for the printer, you contact a network administrator to set the printer to receive information from Samsung. This is often required in order to be installed. Printer Not Found • Your...
User Manual (ENGLISH)
Page 30
... part after reviewing the following parts on printing a Network Configuration Report. In most cases we recommend that you . In a few minutes for manually setting the network IP address of this document. Leave the machine attached to the network. • Static IP assignment: Use SetIP program to move...address. If necessary, select a language from the 1st byte to learn of this requirement ask the system administrator or the person who has set manually. This will be printed out. You will then be asked to set up your local network. • You can be set up a...
... part after reviewing the following parts on printing a Network Configuration Report. In most cases we recommend that you . In a few minutes for manually setting the network IP address of this document. Leave the machine attached to the network. • Static IP assignment: Use SetIP program to move...address. If necessary, select a language from the 1st byte to learn of this requirement ask the system administrator or the person who has set manually. This will be printed out. You will then be asked to set up your local network. • You can be set up a...
User Manual (ENGLISH)
Page 32
... data encryption are not required for wireless network in Encryption and press OK. The SSID is case-sensitive. • WEP : WEP (Wired Equivalent Privacy) is manually configured on the top line of its clients. Static WEP security mode requires a proper WEP key for data encryption. Wizard mode 1. go to the ready...
... data encryption are not required for wireless network in Encryption and press OK. The SSID is case-sensitive. • WEP : WEP (Wired Equivalent Privacy) is manually configured on the top line of its clients. Static WEP security mode requires a proper WEP key for data encryption. Wizard mode 1. go to the ready...
User Manual (ENGLISH)
Page 39
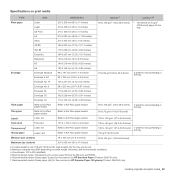
...mm (3.87 x 7.5 inches) 92 x 165 mm (3.62 x 6.5 inches) 75 to 90 g/m2 (20 to 24 lb bond) 5 sheet for manual feeding in the tray Envelope No. 10 105 x 241 mm (4.12 x 9.5 inches) Envelope No. 9 98 x 225 mm (3.87 x 8.87...to the Plain paper section 90 to 105 g/m2 (24 to 28 lb bond) 5 sheet for manual feeding in the tray Thin paper Refer to the Plain paper section Refer to the Plain paper section... section 138 to 146 g/m2 (37 to 39 lb bond) 160 g/m2 (44 lb bond) 1 sheet for manual feeding in the tray Minimum size (custom) Maximum size (custom) 76 x 160 mm (3 x 6.3 inches) 216 x 356...
...mm (3.87 x 7.5 inches) 92 x 165 mm (3.62 x 6.5 inches) 75 to 90 g/m2 (20 to 24 lb bond) 5 sheet for manual feeding in the tray Envelope No. 10 105 x 241 mm (4.12 x 9.5 inches) Envelope No. 9 98 x 225 mm (3.87 x 8.87...to the Plain paper section 90 to 105 g/m2 (24 to 28 lb bond) 5 sheet for manual feeding in the tray Thin paper Refer to the Plain paper section Refer to the Plain paper section... section 138 to 146 g/m2 (37 to 39 lb bond) 160 g/m2 (44 lb bond) 1 sheet for manual feeding in the tray Minimum size (custom) Maximum size (custom) 76 x 160 mm (3 x 6.3 inches) 216 x 356...

User Manual (ENGLISH)
Page 41
... pull the tray out manually. 4. Pressing and unlatching the guide lock in the top of the machine. If the paper that you need to adjust the paper guides to their original positions and adjust the paper length guide and paper width guide. Such repairs are not covered by Samsung's warranty or service...print media_ 41 For paper smaller than length 222 mm (8.74 inches), press and unlatch the guide lock in the tray, push the tray in manually. Adjust the paper length guide and paper width guide. 3. CHANGING THE SIZE OF THE PAPER IN THE PAPER TRAY To load longer sizes of ...
... pull the tray out manually. 4. Pressing and unlatching the guide lock in the top of the machine. If the paper that you need to adjust the paper guides to their original positions and adjust the paper length guide and paper width guide. Such repairs are not covered by Samsung's warranty or service...print media_ 41 For paper smaller than length 222 mm (8.74 inches), press and unlatch the guide lock in the tray, push the tray in manually. Adjust the paper length guide and paper width guide. 3. CHANGING THE SIZE OF THE PAPER IN THE PAPER TRAY To load longer sizes of ...

User Manual (ENGLISH)
Page 43
... not add paper when there is useful for every page to start the print menu. 3. Feeding the print material manually • Load only one size of the display and press OK. 2. Select Manual Feeder in printer properties, and select an appropriate paper type. Press OK when Paper Size appears. 4. Press the left...
... not add paper when there is useful for every page to start the print menu. 3. Feeding the print material manually • Load only one size of the display and press OK. 2. Select Manual Feeder in printer properties, and select an appropriate paper type. Press OK when Paper Size appears. 4. Press the left...
User Manual (ENGLISH)
Page 53
.... 2. You can set your fax needs. (See "Adjusting the document settings" on page 58. 7. Load originals face up Address Book" on page 52.) 4. Sending a fax manually 1. Sending a fax to multiple destinations You can select the default contrast mode to fax your originals lighter or darker. 1. Automatic redialing When the number you...
.... 2. You can set your fax needs. (See "Adjusting the document settings" on page 58. 7. Load originals face up Address Book" on page 52.) 4. Sending a fax manually 1. Sending a fax to multiple destinations You can select the default contrast mode to fax your originals lighter or darker. 1. Automatic redialing When the number you...

User Manual (ENGLISH)
Page 55
...If you can also pick up the DRPD mode: 1. Press the left /right arrow until Receiving appears and press OK. 4. Receiving manually using an extension telephone This features works best when you will need to know which consist of various combinations of your phone conversation. For ... service which enables an user to use the Ans/Fax mode, attach an answering machine to answer several different telephone numbers. Receiving manually in on the extension telephone without going to the extension telephone or answering machine plugged into Fax mode after a predefined number of ...
...If you can also pick up the DRPD mode: 1. Press the left /right arrow until Receiving appears and press OK. 4. Receiving manually using an extension telephone This features works best when you will need to know which consist of various combinations of your phone conversation. For ... service which enables an user to use the Ans/Fax mode, attach an answering machine to answer several different telephone numbers. Receiving manually in on the extension telephone without going to the extension telephone or answering machine plugged into Fax mode after a predefined number of ...

User Manual (ENGLISH)
Page 62
.... Insert the USB memory device into the USB memory port on the display. 4. If you protect your machine. 2. Press OK when Yes appears to the manual provided with the device. 3. Press Direct USB. 3. Insert the USB memory device into the USB memory port on the front of the display and press...
.... Insert the USB memory device into the USB memory port on the display. 4. If you protect your machine. 2. Press OK when Yes appears to the manual provided with the device. 3. Press Direct USB. 3. Insert the USB memory device into the USB memory port on the front of the display and press...
User Manual (ENGLISH)
Page 63
...This list shows the fax numbers specified as junk fax numbers. This list shows authorized users who are available: Some reports may print this menu manually. 6. Printing a report 1. Press Menu until the report or list you want appears on your machine and the toner cartridge. Press OK ...appears on the bottom line of each fax job. (See "Sending options" on page 57.) This report shows information on options or models. Manual Adjust allows you have recently received. The selected information prints out. To add or delete numbers to automatically print this list, access the Junk...
...This list shows the fax numbers specified as junk fax numbers. This list shows authorized users who are available: Some reports may print this menu manually. 6. Printing a report 1. Press Menu until the report or list you want appears on your machine and the toner cartridge. Press OK ...appears on the bottom line of each fax job. (See "Sending options" on page 57.) This report shows information on options or models. Manual Adjust allows you have recently received. The selected information prints out. To add or delete numbers to automatically print this list, access the Junk...
User Manual (ENGLISH)
Page 67
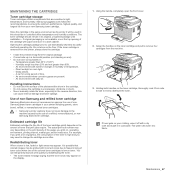
Samsung suggests users follow the recommendations to ensure the optimum performance, highest quality, and longest life from side to side to unnecessary vibrations or shock. • Never manually rotate the drum, especially in controlled office temperature and humidity conditions. The toner cartridge ...temporarily improve print quality by the use of a refilled, remanufactured, or nonSamsung brand toner cartridge. Use of non-Samsung and refilled toner cartridge Samsung Electronics does not recommend or approve the use of nonSamsung brand toner cartridges in ; Grasp the handles on toner...
Samsung suggests users follow the recommendations to ensure the optimum performance, highest quality, and longest life from side to side to unnecessary vibrations or shock. • Never manually rotate the drum, especially in controlled office temperature and humidity conditions. The toner cartridge ...temporarily improve print quality by the use of a refilled, remanufactured, or nonSamsung brand toner cartridge. Use of non-Samsung and refilled toner cartridge Samsung Electronics does not recommend or approve the use of nonSamsung brand toner cartridges in ; Grasp the handles on toner...

User Manual (ENGLISH)
Page 72
.... 1. Open the ADF cover. 3. To prevent document jams, use creased, damp, or highly curled paper. • Do not mix paper types in the tray and manual feeder. CLEARING DOCUMENT JAMS When an original jams while passing through the ADF, [Document Jam] appears on page 42. Close the ADF cover. troubleshooting This...
.... 1. Open the ADF cover. 3. To prevent document jams, use creased, damp, or highly curled paper. • Do not mix paper types in the tray and manual feeder. CLEARING DOCUMENT JAMS When an original jams while passing through the ADF, [Document Jam] appears on page 42. Close the ADF cover. troubleshooting This...

User Manual (ENGLISH)
Page 76
... Not Supported The selected file format is larger Divide your mail or than the supported reduce the resolution. Use a speed dial number or dial a number manually using the number keypad. Try again after a few minutes. If the problem persists, call for service. • When you have installed is being used , such...
... Not Supported The selected file format is larger Divide your mail or than the supported reduce the resolution. Use a speed dial number or dial a number manually using the number keypad. Try again after a few minutes. If the problem persists, call for service. • When you have installed is being used , such...

