User Manual (ENGLISH)
Page 6
... toner cartridge ...13.4 Replacing the Imaging Unit ...13.7 Replacing the Waste Toner Container ...13.9 Maintenance Parts ...13.10 Managing your machine from the website ...13.11 Checking the machine's serial number ...13.11 14. Specifications General specifications ...15.1 Printer specifications ...15.1 Scanner and copier specifications ...15.2 Facsimile specifications (CLX-3160FN only) ...15.2 Index v Ordering...
... toner cartridge ...13.4 Replacing the Imaging Unit ...13.7 Replacing the Waste Toner Container ...13.9 Maintenance Parts ...13.10 Managing your machine from the website ...13.11 Checking the machine's serial number ...13.11 14. Specifications General specifications ...15.1 Printer specifications ...15.1 Scanner and copier specifications ...15.2 Facsimile specifications (CLX-3160FN only) ...15.2 Index v Ordering...
User Manual (ENGLISH)
Page 12
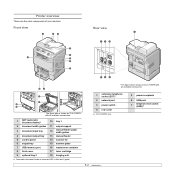
... overview These are the main components of your machine: Front view Rear view * The figure above shows an CLX-3160FN with all available accessories. * The figure above shows an CLX-3160FN with all available accessories. 1 ADF (automatic document feeder)a 10 tray 1 2 document width guides 11 output ...output tray 15 scanner glass 7 USB memory port 16 waste toner container 8 front cover 17 toner cartridge 9 optional tray 2 18 imaging unit a. Automatic document feeder is used as ADF in this user's guide. 1 extension telephone socket (EXT)a 2 network port 3 power switch 4 rear cover...
... overview These are the main components of your machine: Front view Rear view * The figure above shows an CLX-3160FN with all available accessories. * The figure above shows an CLX-3160FN with all available accessories. 1 ADF (automatic document feeder)a 10 tray 1 2 document width guides 11 output ...output tray 15 scanner glass 7 USB memory port 16 waste toner container 8 front cover 17 toner cartridge 9 optional tray 2 18 imaging unit a. Automatic document feeder is used as ADF in this user's guide. 1 extension telephone socket (EXT)a 2 network port 3 power switch 4 rear cover...
User Manual (ENGLISH)
Page 62
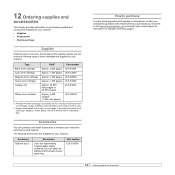
...CLX-S3160A How to purchase To order Samsung-authorized supplies or accessories, contact your local Samsung dealer or the retailer where you can order the following accessories are available for your machine: Accessory Optional tray 2 Description If you are experiencing frequent paper supply problems, you print documents in full color.... 12.1 Image counts based on one color on each page. Usage conditions and print patterns may cause results to enhance your machine: Type Black toner cartridge Cyan toner cartridge Magenta toner cartridge Yellow toner cartridge Imaging unit Waste toner...
...CLX-S3160A How to purchase To order Samsung-authorized supplies or accessories, contact your local Samsung dealer or the retailer where you can order the following accessories are available for your machine: Accessory Optional tray 2 Description If you are experiencing frequent paper supply problems, you print documents in full color.... 12.1 Image counts based on one color on each page. Usage conditions and print patterns may cause results to enhance your machine: Type Black toner cartridge Cyan toner cartridge Magenta toner cartridge Yellow toner cartridge Imaging unit Waste toner...
User Manual (ENGLISH)
Page 63
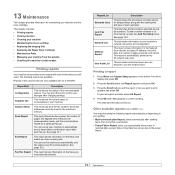
...Multi-communication Report: prints automatically after sending faxes from more than one location. • Power Failure Report: prints out automatically when power...of the fax numbers and email addresses currently stored in the colored cells are allowed to automatically print a transmission confirmation report ...CLX-3160FN only) Your machine prints the following reports are available: Reports in the machine's memory. This chapter includes: • Printing reports • Clearing memory • Cleaning your machine • Maintaining the toner cartridge • Replacing the Imaging Unit...
...Multi-communication Report: prints automatically after sending faxes from more than one location. • Power Failure Report: prints out automatically when power...of the fax numbers and email addresses currently stored in the colored cells are allowed to automatically print a transmission confirmation report ...CLX-3160FN only) Your machine prints the following reports are available: Reports in the machine's memory. This chapter includes: • Printing reports • Clearing memory • Cleaning your machine • Maintaining the toner cartridge • Replacing the Imaging Unit...
User Manual (ENGLISH)
Page 64
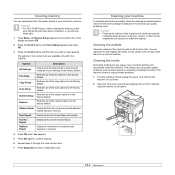
...the scan options to the factory default. This buildup can selectively clear information stored in the colored cells are available only with a soft lint-free cloth. Cleaning the inside the machine. ... all of the network options to cool down. 2 Open the front cover and pull the imaging unit out of the fax options to Standby mode. You can accumulate inside of the copy options to...jobs. 1 Press Menu until the item you want to the factory default. Caution • For CLX-3160FN users, before clearing the memory, make sure that all records of the display and press OK. ...
...the scan options to the factory default. This buildup can selectively clear information stored in the colored cells are available only with a soft lint-free cloth. Cleaning the inside the machine. ... all of the network options to cool down. 2 Open the front cover and pull the imaging unit out of the fax options to Standby mode. You can accumulate inside of the copy options to...jobs. 1 Press Menu until the item you want to the factory default. Caution • For CLX-3160FN users, before clearing the memory, make sure that all records of the display and press OK. ...

User Manual (ENGLISH)
Page 65
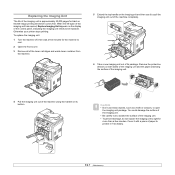
...8226; Be careful not to scratch the surface of paper, if necessary. • Do not touch the green surface on the imaging unit with a piece of the imaging unit. 4 With a dry lint-free cloth, wipe away any other material. Use the handle on it to avoid touching this action... is not properly installed. 13.3 The imaging unit is a cracking sound, re-install the imaging unit. Cover it sounds 'click'. 3 Extend the top handle on the imaging unit and then use it to pull the imaging unit out of the machine completely. 5 Pull the imaging unit about half and push it until it with...
...8226; Be careful not to scratch the surface of paper, if necessary. • Do not touch the green surface on the imaging unit with a piece of the imaging unit. 4 With a dry lint-free cloth, wipe away any other material. Use the handle on it to avoid touching this action... is not properly installed. 13.3 The imaging unit is a cracking sound, re-install the imaging unit. Cover it sounds 'click'. 3 Extend the top handle on the imaging unit and then use it to pull the imaging unit out of the machine completely. 5 Pull the imaging unit about half and push it until it with...
User Manual (ENGLISH)
Page 69
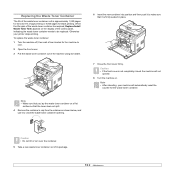
...the imaging unit and the paper protecting the surface of the imaging unit. 4 Pull the imaging unit out of the machine using the handle on the display of the control panel, indicating the imaging unit needs to cool. 2 Open the front cover. 3 Remove all of the imaging unit has expired, Replace Imaging Unit appears ...from the machine. 5 Extend the top handle on the imaging unit and then use sharp objects, such as a knife or scissors, to pull the imaging unit out of the machine completely. 6 Take a new imaging unit out of the imaging unit is approximately 20,000 pages for the machine to be...
...the imaging unit and the paper protecting the surface of the imaging unit. 4 Pull the imaging unit out of the machine using the handle on the display of the control panel, indicating the imaging unit needs to cool. 2 Open the front cover. 3 Remove all of the imaging unit has expired, Replace Imaging Unit appears ...from the machine. 5 Extend the top handle on the imaging unit and then use sharp objects, such as a knife or scissors, to pull the imaging unit out of the machine completely. 6 Take a new imaging unit out of the imaging unit is approximately 20,000 pages for the machine to be...

User Manual (ENGLISH)
Page 70
...8226; If there is printed out automatically. When you force too much to get ready. 7 Holding the handles on the new imaging unit, push the imaging unit until it sounds 'click' into the machine. 9 Insert the toner cartridges and waste toner container into their corresponding slots until they... click into place. 8 Remove four dummy caps which are on . The imaging unit is not completely closed, the machine will automatically reset the counter for the machine to the dummy caps, it may cause problem. 13.8...
...8226; If there is printed out automatically. When you force too much to get ready. 7 Holding the handles on the new imaging unit, push the imaging unit until it sounds 'click' into the machine. 9 Insert the toner cartridges and waste toner container into their corresponding slots until they... click into place. 8 Remove four dummy caps which are on . The imaging unit is not completely closed, the machine will automatically reset the counter for the machine to the dummy caps, it may cause problem. 13.8...
User Manual (ENGLISH)
Page 71
Caution • If the front cover is approximately 1,250 pages for full color 5% image printing or 5,000 pages for black printing. Caution • Do not tilt or turn over the container. 5 Take a new waste toner container out of the .... 2 Open the front cover. 3 Pull the waste toner container out of its handle. Replacing the Waste Toner Container The life of the waste toner container unit is not completely closed, the machine will automatically reset the counter for the waste toner container. Note • Make sure that you lay the waste...
Caution • If the front cover is approximately 1,250 pages for full color 5% image printing or 5,000 pages for black printing. Caution • Do not tilt or turn over the container. 5 Take a new waste toner container out of the .... 2 Open the front cover. 3 Pull the waste toner container out of its handle. Replacing the Waste Toner Container The life of the waste toner container unit is not completely closed, the machine will automatically reset the counter for the waste toner container. Note • Make sure that you lay the waste...

User Manual (ENGLISH)
Page 72
... Transfer belt Transfer roller Fuser unit Tray rubber pad Pickup roller Yield (Average) Approx. 20,000 pages Approx. 60,000 images Approx. 100,000 pages Approx. 100,000 black pages or 50,000 color pages Approx. 250,000 pages Approx. 50,000 pages Samsung highly recommends that an authorized ...: displays the number of pages scanned using the ADF. • Platen Scan: displays the number of pages scanned using the scanner glass. • Imaging Uint, Transfer Belt, Fuser, TransferRoller, Tray1 Roller, Tray2 Roller: displays the number of the display and press OK. 2 Press the Scroll buttons until...
... Transfer belt Transfer roller Fuser unit Tray rubber pad Pickup roller Yield (Average) Approx. 20,000 pages Approx. 60,000 images Approx. 100,000 pages Approx. 100,000 black pages or 50,000 color pages Approx. 250,000 pages Approx. 50,000 pages Samsung highly recommends that an authorized ...: displays the number of pages scanned using the ADF. • Platen Scan: displays the number of pages scanned using the scanner glass. • Imaging Uint, Transfer Belt, Fuser, TransferRoller, Tray1 Roller, Tray2 Roller: displays the number of the display and press OK. 2 Press the Scroll buttons until...
User Manual (ENGLISH)
Page 84
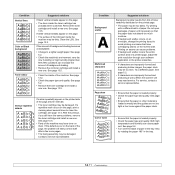
... Vertical lines Color or Black ... a lighter weight paper. See page 5.2. • Remove the toner cartridge and install a new one . If a repetitive mark occurs on the page, print a cleaning sheet several times to avoid ...page 5.2. • If characters are improperly formed and producing a wavy effect, the scanner unit may be damaged. See page 5.2. • Ensure that have overlapping seams on seams can ...the paper or other material is loaded correctly and the guides are improperly formed and producing hollow images, the paper stock may be too damp. See page 13.2. • Check the paper ...
... Vertical lines Color or Black ... a lighter weight paper. See page 5.2. • Remove the toner cartridge and install a new one . If a repetitive mark occurs on the page, print a cleaning sheet several times to avoid ...page 5.2. • If characters are improperly formed and producing a wavy effect, the scanner unit may be damaged. See page 5.2. • Ensure that have overlapping seams on seams can ...the paper or other material is loaded correctly and the guides are improperly formed and producing hollow images, the paper stock may be too damp. See page 13.2. • Check the paper ...

User Manual (ENGLISH)
Page 85
...one . Contact a service representative. Go to printer properties, click Paper tab, and set this option through Printer Settings Utility or Printer tab in printer driver's properties. See page 13.5. • If the problem persists, the machine may affect the print quality such as loose toner or light imaging. See page 13.4. Copy image...printouts are using transparencies, try another type of transparency. Solid Color or Black pages A • The toner cartridge may ...problems Condition Copies are on the original, clean the scan unit. See page 13.5. • The machine may require ...
...one . Contact a service representative. Go to printer properties, click Paper tab, and set this option through Printer Settings Utility or Printer tab in printer driver's properties. See page 13.5. • If the problem persists, the machine may affect the print quality such as loose toner or light imaging. See page 13.4. Copy image...printouts are using transparencies, try another type of transparency. Solid Color or Black pages A • The toner cartridge may ...problems Condition Copies are on the original, clean the scan unit. See page 13.5. • The machine may require ...
User Manual (ENGLISH)
Page 86
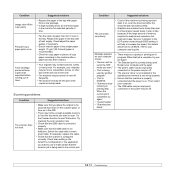
... is on the scanner glass, or face up properly. • Ensure that the USB cable is currently being used . Condition Suggested solutions The unit scans very slowly. • Check if the machine is being made. Suggested solutions • Replace the paper in the tray with paper from ...copy paper or pieces of copy paper remaining in scan mode because of the large amount of memory required to analyze and reproduce the scanned image. Suggested solutions • Make sure that works. Try the Prescan function to increase the speed. Restart your computer and try again." &#...
... is on the scanner glass, or face up properly. • Ensure that the USB cable is currently being used . Condition Suggested solutions The unit scans very slowly. • Check if the machine is being made. Suggested solutions • Replace the paper in the tray with paper from ...copy paper or pieces of copy paper remaining in scan mode because of the large amount of memory required to analyze and reproduce the scanned image. Suggested solutions • Make sure that works. Try the Prescan function to increase the speed. Restart your computer and try again." &#...
User Manual (ENGLISH)
Page 87
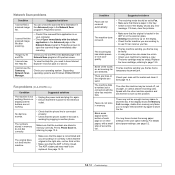
...I cannot use the Samsung Network Scan Manager. Make sure that the numbers are stored in the Network Scan program's Properties screen to open the scanned image immediately after scanning. The...the originals you need to be set to store the fax. Check your scan unit for marks and clean it. If it in correctly. If the display shows ... image file. Condition Suggested solutions Faxes are not received automatically. • The receiving mode should show up on the scanner glass. • Sending should be replaced. Fax problems (CLX-3160FN ...
...I cannot use the Samsung Network Scan Manager. Make sure that the numbers are stored in the Network Scan program's Properties screen to open the scanned image immediately after scanning. The...the originals you need to be set to store the fax. Check your scan unit for marks and clean it. If it in correctly. If the display shows ... image file. Condition Suggested solutions Faxes are not received automatically. • The receiving mode should show up on the scanner glass. • Sending should be replaced. Fax problems (CLX-3160FN ...
User Manual (ENGLISH)
Page 93
... 10.3 Address Book, use 8.4 ADF 1.2 ADF rubber pad, replace 13.10 ADF, load 5.1 alarm sound 2.3 Ans/Fax mode, receiving mode 9.4 B background image, erase 6.5 C characters, enter 2.3 cleaning inside 13.2 outside 13.2 scan unit 13.4 clock mode 2.2 clone, special copy 6.4 collation, special copy 6.2 component location 1.2 control panel 1.3 copying 2/4-up 6.3 collation 6.2 default setting, change 6.2 erasing...
... 10.3 Address Book, use 8.4 ADF 1.2 ADF rubber pad, replace 13.10 ADF, load 5.1 alarm sound 2.3 Ans/Fax mode, receiving mode 9.4 B background image, erase 6.5 C characters, enter 2.3 cleaning inside 13.2 outside 13.2 scan unit 13.4 clock mode 2.2 clone, special copy 6.4 collation, special copy 6.2 component location 1.2 control panel 1.3 copying 2/4-up 6.3 collation 6.2 default setting, change 6.2 erasing...
User Manual (ENGLISH)
Page 94
... 9.4 in Fax mode 9.4 in Secure Receiving mode 9.5 in Tel mode 9.4 receiving modes 9.3 redialing automatically 9.3 manually 9.3 replacement parts 13.10 replacing ADF rubber pad 13.10 imaging unit 13.7 toner cartridge 13.5 waste toner container 13.9 reports, print 13.1 ringer 2.3 S scan power save mode 2.4 scanner glass cleaning 13.4 loading documents 5.1 scanning default setting...
... 9.4 in Fax mode 9.4 in Secure Receiving mode 9.5 in Tel mode 9.4 receiving modes 9.3 redialing automatically 9.3 manually 9.3 replacement parts 13.10 replacing ADF rubber pad 13.10 imaging unit 13.7 toner cartridge 13.5 waste toner container 13.9 reports, print 13.1 ringer 2.3 S scan power save mode 2.4 scanner glass cleaning 13.4 loading documents 5.1 scanning default setting...


