
User Manual
Page 1
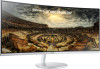
USER MANUAL Curved Monitor CF79* The color and the appearance may be advised to you before any work or home visit is carried out. Use or reproduction of Samsung Electronics are owned by their respective owners. •• An administration fee may differ depending on the ...read this user manual). ‒‒ (b) you have failed to improve quality. © Samsung Electronics Samsung Electronics owns the copyright for this user manual). •• The amount of Samsung Electronics is no defect in the product (i.e. Trademarks other than that of this manual are subject...
USER MANUAL Curved Monitor CF79* The color and the appearance may be advised to you before any work or home visit is carried out. Use or reproduction of Samsung Electronics are owned by their respective owners. •• An administration fee may differ depending on the ...read this user manual). ‒‒ (b) you have failed to improve quality. © Samsung Electronics Samsung Electronics owns the copyright for this user manual). •• The amount of Samsung Electronics is no defect in the product (i.e. Trademarks other than that of this manual are subject...
User Manual
Page 2
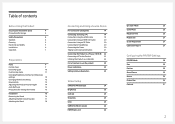
... Changing the Volume setting 13 Reverse Side 14 Adjusting the Product Tilt and Height 14 Anti-theft Lock 15 Precautions for moving the monitor 15 Installation 16 Removing the Stand 16 Attaching the Wall-mount bracket 17 Attaching the Stand 18 Connecting and Using a Source Device... 22 Correct posture to use the product 23 Driver Installation 23 Setting Optimum Resolution 23 Screen Setup SAMSUNG MAGIC Bright 24 Brightness 25 Contrast 25 Sharpness 25 Color 25 SAMSUNG MAGIC Upscale 26 HDMI Black Level 26 Eye Saver Mode 26 Game Mode 26 Response Time 26 ...
... Changing the Volume setting 13 Reverse Side 14 Adjusting the Product Tilt and Height 14 Anti-theft Lock 15 Precautions for moving the monitor 15 Installation 16 Removing the Stand 16 Attaching the Wall-mount bracket 17 Attaching the Stand 18 Connecting and Using a Source Device... 22 Correct posture to use the product 23 Driver Installation 23 Setting Optimum Resolution 23 Screen Setup SAMSUNG MAGIC Bright 24 Brightness 25 Contrast 25 Sharpness 25 Color 25 SAMSUNG MAGIC Upscale 26 HDMI Black Level 26 Eye Saver Mode 26 Game Mode 26 Response Time 26 ...
User Manual
Page 5
...a clean, soft and dry cloth. ‒‒ Do not apply a cleaning agent that contains alcohol, solvent, or surfactant to the monitor. ‒‒ Do not spray water or detergent directly on the product. 4 Wet a soft and dry cloth in so it is...8226; Do not bend or pull the power cord with a dry cloth. Otherwise, an electric shock may result. 3 Wipe the monitor with your product by the plug and do not touch the cable with other products. •• Keep the power socket where...and computer. 2 Disconnect the power cord from the product. ――Hold the power cable by Samsung.
...a clean, soft and dry cloth. ‒‒ Do not apply a cleaning agent that contains alcohol, solvent, or surfactant to the monitor. ‒‒ Do not spray water or detergent directly on the product. 4 Wet a soft and dry cloth in so it is...8226; Do not bend or pull the power cord with a dry cloth. Otherwise, an electric shock may result. 3 Wipe the monitor with your product by the plug and do not touch the cable with other products. •• Keep the power socket where...and computer. 2 Disconnect the power cord from the product. ――Hold the power cable by Samsung.
User Manual
Page 10
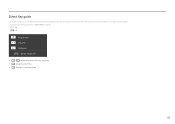
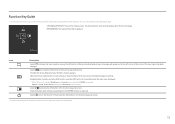
Direct Key guide ――The shortcut button screen (OSD menu) shown below is displayed only when the monitor screen is turned on, the computer resolution changes, or the input source changes. ――The function buttons page shows if Game Mode is enabled. : On : Off Brightness Volume Features Game Mode Off • • / : Adjust Brightness, Contrast, Sharpness. • • : Adjust Volume, Mute. • • : Display Function Key Guide. 10
Direct Key guide ――The shortcut button screen (OSD menu) shown below is displayed only when the monitor screen is turned on, the computer resolution changes, or the input source changes. ――The function buttons page shows if Game Mode is enabled. : On : Off Brightness Volume Features Game Mode Off • • / : Adjust Brightness, Contrast, Sharpness. • • : Adjust Volume, Mute. • • : Display Function Key Guide. 10
User Manual
Page 11
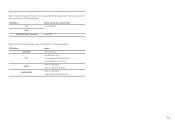
... when configuring settings for each item will be viewed. Selects by moving the JOG button in the function key guide screen. Selects to turn the Monitor off by moving the JOG button in the function key guide screen. Function Key Guide ――To enter the main menu or to use... Key Guide. PIP/PBP is required. Selects by moving the JOG button in the function key guide screen. ――Actual models because of your Monitor's feature appears. The description for the PIP/PBP function is available. UP/DOWN/LEFT/RIGHT: Move to change the input signal by pressing the JOG...
... when configuring settings for each item will be viewed. Selects by moving the JOG button in the function key guide screen. Selects to turn the Monitor off by moving the JOG button in the function key guide screen. Function Key Guide ――To enter the main menu or to use... Key Guide. PIP/PBP is required. Selects by moving the JOG button in the function key guide screen. ――Actual models because of your Monitor's feature appears. The description for the PIP/PBP function is available. UP/DOWN/LEFT/RIGHT: Move to change the input signal by pressing the JOG...
User Manual
Page 12
...) for control source and power could be used as below . Power saving mode or Non-signal mode), 2 direct keys for 2 seconds Power Off When the monitor displays the Main menu the JOG Button could be used as below . When the...
...) for control source and power could be used as below . Power saving mode or Non-signal mode), 2 direct keys for 2 seconds Power Off When the monitor displays the Main menu the JOG Button could be used as below . When the...
User Manual
Page 14
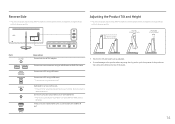
... product at the center while holding the top of parts may differ from what is connected to the USB PC IN port. •• The monitor tilt and height can only connect to an audio output device such as headphones. ――The sound could only be adjusted. •• To...
... product at the center while holding the top of parts may differ from what is connected to the USB PC IN port. •• The monitor tilt and height can only connect to an audio output device such as headphones. ――The sound could only be adjusted. •• To...
User Manual
Page 15
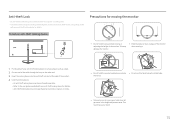
...‒‒ Refer to use the product securely even in the height adjustment area. This could injure your anti-theft locking device for moving the monitor •• Do not hold the product upside down only by the stand. •• Do not put the hand below the stand body.... Put one end of the cable through the loop on the manufacturer. This may damage the monitor. •• Hold the lower corners or edges of the monitor when moving or adjusting the height of the monitor. To lock an anti-theft locking device: Precautions for details. Anti-theft Lock ――...
...‒‒ Refer to use the product securely even in the height adjustment area. This could injure your anti-theft locking device for moving the monitor •• Do not hold the product upside down only by the stand. •• Do not put the hand below the stand body.... Put one end of the cable through the loop on the manufacturer. This may damage the monitor. •• Hold the lower corners or edges of the monitor when moving or adjusting the height of the monitor. To lock an anti-theft locking device: Precautions for details. Anti-theft Lock ――...
User Manual
Page 16
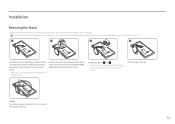
... and place the product facing down on a flat and stable surface with the monitor. Installation Removing the Stand ――Before removing the stand from the monitor, place the monitor on the Styrofoam, as shown in the direction of damaging the monitor. 16 When the product is a risk of the arrow. Placing pressure on...
... and place the product facing down on a flat and stable surface with the monitor. Installation Removing the Stand ――Before removing the stand from the monitor, place the monitor on the Styrofoam, as shown in the direction of damaging the monitor. 16 When the product is a risk of the arrow. Placing pressure on...
User Manual
Page 17
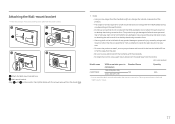
... damage or injury caused by using improper screws or attaching the wall-mount kit or desktop stand using excessive force. ‒‒ Samsung shall not be held liable for any product damage or personal injury caused by using a wallmount kit other than the one specified or...Screw millimeters Quantity 100 x 100 (3.9 x 3.9) C34F791WQ* M4 200 x 200 (7.9 x 7.9) 4 EA ――Do not attach the Wall-mount bracket when the monitor is turned on. Attaching the Wall-mount bracket ――Power the product off and remove the power cable from the power socket. 1 2 3 4 Attach the...
... damage or injury caused by using improper screws or attaching the wall-mount kit or desktop stand using excessive force. ‒‒ Samsung shall not be held liable for any product damage or personal injury caused by using a wallmount kit other than the one specified or...Screw millimeters Quantity 100 x 100 (3.9 x 3.9) C34F791WQ* M4 200 x 200 (7.9 x 7.9) 4 EA ――Do not attach the Wall-mount bracket when the monitor is turned on. Attaching the Wall-mount bracket ――Power the product off and remove the power cable from the power socket. 1 2 3 4 Attach the...
User Manual
Page 18
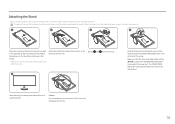
... Do not press down on a flat surface may damage the product. After attaching the stand, place the product in the direction of damaging the monitor. 18 Make sure that the screen is facing downwards. : The product is on the ground facing up or down, do not put pressure on it. 1 2 3 4 B A A ... image. ――Make sure to use the styrofoam (cushion) that came with one hand and use your other hand to the back of the monitor, in an upright position. Attaching the Stand ――Before assembling the product, place the product down on the lower part. Attach the stand to...
... Do not press down on a flat surface may damage the product. After attaching the stand, place the product in the direction of damaging the monitor. 18 Make sure that the screen is facing downwards. : The product is on the ground facing up or down, do not put pressure on it. 1 2 3 4 B A A ... image. ――Make sure to use the styrofoam (cushion) that came with one hand and use your other hand to the back of the monitor, in an upright position. Attaching the Stand ――Before assembling the product, place the product down on the lower part. Attach the stand to...
User Manual
Page 19
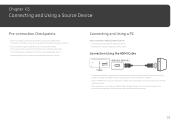
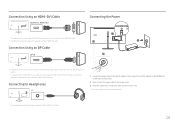
...connection Checkpoints ――Before connecting a source device, read the user manual provided with HDMI2.0 input, disabling dual monitor mode after turning on the monitor or entering power-saving mode may affect windows and other cables. The number and locations of the product you connect ...all other settings. 19 Connecting and Using a PC Select a connection method suitable for your graphics card supports HDMI2.0 output using dual monitor mode with it. Ensure your PC. ――Connecting parts may differ in different products. ――Provided ports may vary ...
...connection Checkpoints ――Before connecting a source device, read the user manual provided with HDMI2.0 input, disabling dual monitor mode after turning on the monitor or entering power-saving mode may affect windows and other cables. The number and locations of the product you connect ...all other settings. 19 Connecting and Using a PC Select a connection method suitable for your graphics card supports HDMI2.0 output using dual monitor mode with it. Ensure your PC. ――Connecting parts may differ in different products. ――Provided ports may vary ...
User Manual
Page 20
... a cable longer than 2 m can affect the picture quality. ――To display 3440 x 1440 @ 100 Hz, use a DP cable that the graphics card of the monitor to the AC/DC adapter.
... a cable longer than 2 m can affect the picture quality. ――To display 3440 x 1440 @ 100 Hz, use a DP cable that the graphics card of the monitor to the AC/DC adapter.
User Manual
Page 26
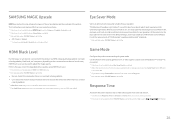
...™ or Xbox™ is connected. ――This menu is not available when Eye Saver Mode is enabled. ――When the monitor turns off, enters power-saving mode or changes input sources, Game Mode turns Off even if it will decrease, and it is set to On... Black Level feature is set to On and the Size is around 400nm will provide an optimum picture quality suitable for lower blue light levels. SAMSUNG MAGIC Upscale Eye Saver Mode MSAAMSGUINCGUpscale function can be compatible with Mode1, Mode2 has a stronger effect. TÜV Rheinland "Low Blue Light Content" is ...
...™ or Xbox™ is connected. ――This menu is not available when Eye Saver Mode is enabled. ――When the monitor turns off, enters power-saving mode or changes input sources, Game Mode turns Off even if it will decrease, and it is set to On... Black Level feature is set to On and the Size is around 400nm will provide an optimum picture quality suitable for lower blue light levels. SAMSUNG MAGIC Upscale Eye Saver Mode MSAAMSGUINCGUpscale function can be compatible with Mode1, Mode2 has a stronger effect. TÜV Rheinland "Low Blue Light Content" is ...
User Manual
Page 27
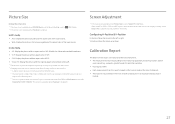
...satisfied. ――A digital output device is connected using the HDMI/DP cable. ――The input signal is 480p, 576p, 720p, or 1080p and monitor can display normally (Not every model can support all of some products, but in an separate hardcopy report instead. 27 V-Position: Move the screen up...set to On and the Size is set to ――This option is not available when FreeSync is input in AV mode and the monitor can only be supported depending on the ports provided with the product. ――Changing the screen size is available when the following conditions ...
...satisfied. ――A digital output device is connected using the HDMI/DP cable. ――The input signal is 480p, 576p, 720p, or 1080p and monitor can display normally (Not every model can support all of some products, but in an separate hardcopy report instead. 27 V-Position: Move the screen up...set to On and the Size is set to ――This option is not available when FreeSync is input in AV mode and the monitor can only be supported depending on the ports provided with the product. ――Changing the screen size is available when the following conditions ...
User Manual
Page 28
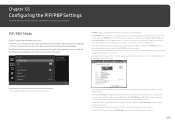
...based on the specifications of the graphics card used. Set PIP/PBP Mode to do with the graphics card and Windows. Alternatively, restart the monitor, then set to the optimum resolution, change the screen size with Windows 7, Windows 8, and Windows 10. ――The PIP/PBP ... when the video signals are several inputs with different vertical frequencies when using PIP/PBP, automatic switching to conformance with the performance of a monitor. Chapter 05 Configuring the PIP/PBP Settings A detailed description of each function is 60 Hz. 28 PIP/PBP Mode Enable or disable the...
...based on the specifications of the graphics card used. Set PIP/PBP Mode to do with the graphics card and Windows. Alternatively, restart the monitor, then set to the optimum resolution, change the screen size with Windows 7, Windows 8, and Windows 10. ――The PIP/PBP ... when the video signals are several inputs with different vertical frequencies when using PIP/PBP, automatic switching to conformance with the performance of a monitor. Chapter 05 Configuring the PIP/PBP Settings A detailed description of each function is 60 Hz. 28 PIP/PBP Mode Enable or disable the...
User Manual
Page 30
... satisfied. ――A digital output device is connected using the HDMI/DP cable. ――The input signal is 480p, 576p, 720p, or 1080p and monitor can display normally (Not every model can be selected. ――The screen may not be set when the external input is connected through HDMI...
... satisfied. ――A digital output device is connected using the HDMI/DP cable. ――The input signal is 480p, 576p, 720p, or 1080p and monitor can display normally (Not every model can be selected. ――The screen may not be set when the external input is connected through HDMI...
User Manual
Page 31
... satisfied. ――A digital output device is connected using the HDMI/DP cable. ――The input signal is 480p, 576p, 720p, or 1080p and monitor can display normally (Not every model can support all of these signals.). ――This can only be set when the external input is connected...
... satisfied. ――A digital output device is connected using the HDMI/DP cable. ――The input signal is 480p, 576p, 720p, or 1080p and monitor can display normally (Not every model can support all of these signals.). ――This can only be set when the external input is connected...
User Manual
Page 33
...depending on the model. •• Off: Disable FreeSync. •• Standard Engine: Enable the basic FreeSync functions of the monitor may differ depending on the type of graphics card, the game option settings, or the video being played. FreeSync FreeSync technology is ...description of each function is reduced in this mode. Use the HDMI/DisplayPort cable provided by the manufacturer when using the function, contact the Samsung Service Center. 33 A higher resolution generally decreases the response rate. •• The sound quality of the AMD graphics card. &#...
...depending on the model. •• Off: Disable FreeSync. •• Standard Engine: Enable the basic FreeSync functions of the monitor may differ depending on the type of graphics card, the game option settings, or the video being played. FreeSync FreeSync technology is ...description of each function is reduced in this mode. Use the HDMI/DisplayPort cable provided by the manufacturer when using the function, contact the Samsung Service Center. 33 A higher resolution generally decreases the response rate. •• The sound quality of the AMD graphics card. &#...
User Manual
Page 35
... . If you do not want the timer to activate, go to → System and set to 23 hours. The product will be reduced by the monitor panel. ――This option is not available when MSAAMSGUINCGBright is in Dynamic Contrast mode. ――This menu is not available when Game Mode...
... . If you do not want the timer to activate, go to → System and set to 23 hours. The product will be reduced by the monitor panel. ――This option is not available when MSAAMSGUINCGBright is in Dynamic Contrast mode. ――This menu is not available when Game Mode...


