User Manual
Page 2
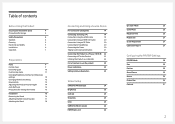
...Parts 9 Control Panel 9 Direct Key guide 10 Function Key Guide 11 Changing Brightness, Contrast and Sharpness settings 13 Changing the Volume setting 13 Reverse Side 14 Adjusting the Product Tilt and Height 14 Anti-theft Lock 15 Precautions for moving the monitor 15 Installation 16 Removing the Stand 16 Attaching the Wall-mount bracket 17 Attaching the Stand 18 Connecting and Using a Source Device Pre-connection Checkpoints 19 Connecting and Using a PC 19 Connection Using the HDMI Cable 19 Connection Using an HDMI-DVI Cable 20 Connection Using an DP Cable...
...Parts 9 Control Panel 9 Direct Key guide 10 Function Key Guide 11 Changing Brightness, Contrast and Sharpness settings 13 Changing the Volume setting 13 Reverse Side 14 Adjusting the Product Tilt and Height 14 Anti-theft Lock 15 Precautions for moving the monitor 15 Installation 16 Removing the Stand 16 Attaching the Wall-mount bracket 17 Attaching the Stand 18 Connecting and Using a Source Device Pre-connection Checkpoints 19 Connecting and Using a PC 19 Connection Using the HDMI Cable 19 Connection Using an HDMI-DVI Cable 20 Connection Using an DP Cable...

User Manual
Page 3
... 32 Position 32 Language 32 Display Time 32 Setup and Reset FreeSync 33 Sound 35 Volume 35 Sound Mode 35 Select Sound 35 Eco Saving Plus 35 Off Timer 35 PC/AV Mode 36 DisplayPort Ver. 36 HDMI Mode 36 Source Detection 36 Key Repeat Time 36 Power LED On 37 Reset All 37 Information 37 Installing the Software Easy Setting Box 38 Restrictions and Problems with the Installation 38 System Requirements 38 Troubleshooting Guide...
... 32 Position 32 Language 32 Display Time 32 Setup and Reset FreeSync 33 Sound 35 Volume 35 Sound Mode 35 Select Sound 35 Eco Saving Plus 35 Off Timer 35 PC/AV Mode 36 DisplayPort Ver. 36 HDMI Mode 36 Source Detection 36 Key Repeat Time 36 Power LED On 37 Reset All 37 Information 37 Installing the Software Easy Setting Box 38 Restrictions and Problems with the Installation 38 System Requirements 38 Troubleshooting Guide...
User Manual
Page 6
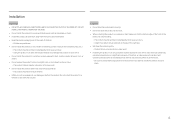
...Keep the plastic packaging out of the reach of children. ‒‒ Children may suffocate. •• Do not install the product on cabinets or shelves of the right size. •• Set down the product on its front. •• When installing the product on a cabinet or shelf, make ... lifespan may be reduced or a fire may result. •• Do not install the product within the reach of time) may seriously affect its performance. ‒‒ Be sure to consult Samsung Customer Service Center if you want to a lot of fine dust, chemical substances, extreme temperatures...
...Keep the plastic packaging out of the reach of children. ‒‒ Children may suffocate. •• Do not install the product on cabinets or shelves of the right size. •• Set down the product on its front. •• When installing the product on a cabinet or shelf, make ... lifespan may be reduced or a fire may result. •• Do not install the product within the reach of time) may seriously affect its performance. ‒‒ Be sure to consult Samsung Customer Service Center if you want to a lot of fine dust, chemical substances, extreme temperatures...
User Manual
Page 7
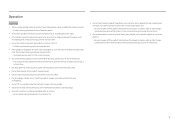
... inside the product. Then contact Samsung Customer Service Center. ‒‒ Continued use or keep combustible spray or an inflammable substance near the product. •• Ensure the vents are not blocked by pulling the power cord or any cable. •• If a gas leakage is found, do not touch the product or power plug. Also, ventilate the area immediately...
... inside the product. Then contact Samsung Customer Service Center. ‒‒ Continued use or keep combustible spray or an inflammable substance near the product. •• Ensure the vents are not blocked by pulling the power cord or any cable. •• If a gas leakage is found, do not touch the product or power plug. Also, ventilate the area immediately...
User Manual
Page 11
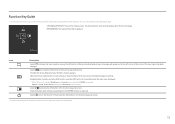
... the JOG button to settings. The OSD (On Screen Display) of functional variation, Function key guide options will be viewed. OSD control lock: Maintain the current settings, or lock the OSD control to prevent unintended changes to display the Function Key Guide. System → Sound, Power LED On is required. Selects to turn the Monitor off by moving the JOG button in the function key guide screen. UP/DOWN/LEFT/RIGHT: Move to change the input signal by...
... the JOG button to settings. The OSD (On Screen Display) of functional variation, Function key guide options will be viewed. OSD control lock: Maintain the current settings, or lock the OSD control to prevent unintended changes to display the Function Key Guide. System → Sound, Power LED On is required. Selects to turn the Monitor off by moving the JOG button in the function key guide screen. UP/DOWN/LEFT/RIGHT: Move to change the input signal by...
User Manual
Page 13
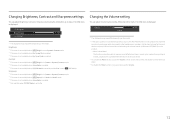
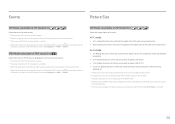
... Mode is poor, the Auto Mute function on the model. Volume 50 Mute ――The displayed image may mute the sound or cause choppy audio when applying the headphones or speakers. Set the input volume for the input device to move the focus down , if no OSD menu is displayed. Changing the Volume setting You can adjust Brightness, Contrast or Sharpness by moving the JOG button up or down . ――To disable...
... Mode is poor, the Auto Mute function on the model. Volume 50 Mute ――The displayed image may mute the sound or cause choppy audio when applying the headphones or speakers. Set the input volume for the input device to move the focus down , if no OSD menu is displayed. Changing the Volume setting You can adjust Brightness, Contrast or Sharpness by moving the JOG button up or down . ――To disable...
User Manual
Page 14
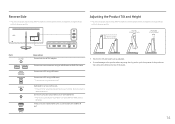
... a PC is for servicing only and has no user function. Specifications are subject to change without notice to a PC using a USB cable. ――This port can be heard when using the HDMI to a source device using an HDMI cable or HDMI-DVI cable. Connects to improve quality. 1 2 DC 19V HDMI IN 1 HDMI IN 2 DP IN (PC IN) SERVICE Adjusting the Product Tilt and Height ――The color and shape of parts may differ from...
... a PC is for servicing only and has no user function. Specifications are subject to change without notice to a PC using a USB cable. ――This port can be heard when using the HDMI to a source device using an HDMI cable or HDMI-DVI cable. Connects to improve quality. 1 2 DC 19V HDMI IN 1 HDMI IN 2 DP IN (PC IN) SERVICE Adjusting the Product Tilt and Height ――The color and shape of parts may differ from...
User Manual
Page 19
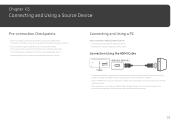
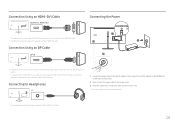
... HDMI Cable HDMI IN 1, HDMI IN 2 ――For optimum resolution, use a graphics card and an HDMI cable that support HDMI2.0 output. Connecting the power cable during connection may differ from device to 50 Hz. ――When using the graphics card manufacturer's website. ――Select an HDMI version. Chapter 03 Connecting and Using a Source Device Pre-connection Checkpoints ――Before connecting a source device, read the user manual provided with HDMI2.0 input, disabling dual monitor mode after turning...
... HDMI Cable HDMI IN 1, HDMI IN 2 ――For optimum resolution, use a graphics card and an HDMI cable that support HDMI2.0 output. Connecting the power cable during connection may differ from device to 50 Hz. ――When using the graphics card manufacturer's website. ――Select an HDMI version. Chapter 03 Connecting and Using a Source Device Pre-connection Checkpoints ――Before connecting a source device, read the user manual provided with HDMI2.0 input, disabling dual monitor mode after turning...
User Manual
Page 20
...;The input voltage is recommended. Connection Using an HDMI-DVI Cable HDMI IN 1, HDMI IN 2 ――The audio function is not supported if the source device is connected using the HDMI-DVI cable. ――The optimum resolution may not be available with a HDMI-HDMI or DP cable. 20 Using a cable longer than 2 m can affect the picture quality. ――To display 3440 x 1440 @ 100 Hz, use a DP cable that the graphics card of the monitor to...
...;The input voltage is recommended. Connection Using an HDMI-DVI Cable HDMI IN 1, HDMI IN 2 ――The audio function is not supported if the source device is connected using the HDMI-DVI cable. ――The optimum resolution may not be available with a HDMI-HDMI or DP cable. 20 Using a cable longer than 2 m can affect the picture quality. ――To display 3440 x 1440 @ 100 Hz, use a DP cable that the graphics card of the monitor to...
User Manual
Page 23
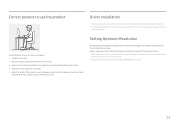
... the product is turned off and on again. ――The optimum resolution can set the optimum resolution and frequency for the first time after purchase. Setting Optimum Resolution An information message about a right angle. •• Adjust the height of the product so you power on the product for this product by installing the corresponding drivers. ――To install the latest...
... the product is turned off and on again. ――The optimum resolution can set the optimum resolution and frequency for the first time after purchase. Setting Optimum Resolution An information message about a right angle. •• Adjust the height of the product so you power on the product for this product by installing the corresponding drivers. ――To install the latest...
User Manual
Page 24
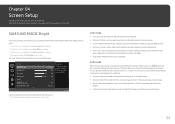
... will save power and reduce eye fatigue. •• Custom: Select this mode when the surroundings are preset at the factory. In AV mode When the external input is connected through automatic contrast adjustment. •• Basic Color: This model supports a photochromic station. You can customize the brightness to your preferences. Chapter 04 Screen Setup Configure the screen settings such as required. •• Standard: Obtain a picture quality...
... will save power and reduce eye fatigue. •• Custom: Select this mode when the surroundings are preset at the factory. In AV mode When the external input is connected through automatic contrast adjustment. •• Basic Color: This model supports a photochromic station. You can customize the brightness to your preferences. Chapter 04 Screen Setup Configure the screen settings such as required. •• Standard: Obtain a picture quality...
User Manual
Page 26
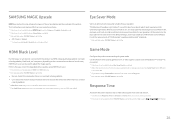
...;―When the monitor turns off, enters power-saving mode or changes input sources, Game Mode turns Off even if it met the requirements of the picture. Game Mode Configure the product screen settings for eye relaxation. Response Time Accelerate the panel response rate to make video appear more obvious effects on the connected source device. Set to On. TÜV Rheinland "Low Blue Light Content" is set to adjust the image quality. SAMSUNG MAGIC Upscale Eye Saver...
...;―When the monitor turns off, enters power-saving mode or changes input sources, Game Mode turns Off even if it met the requirements of the picture. Game Mode Configure the product screen settings for eye relaxation. Response Time Accelerate the panel response rate to make video appear more obvious effects on the connected source device. Set to On. TÜV Rheinland "Low Blue Light Content" is set to adjust the image quality. SAMSUNG MAGIC Upscale Eye Saver...
User Manual
Page 27
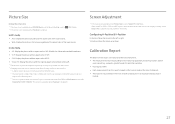
... when PIP/PBP Mode is set to On and the Size is set to the measuring equipment, measuring location, system environment (e.g. V-Position: Move the screen up or down. computer, graphic board, etc) and other variables. •• Input signal: HDMI •• Each measurement from this report is based on the menu of the input source. In PC mode •• Auto: Display the picture according to the...
... when PIP/PBP Mode is set to On and the Size is set to the measuring equipment, measuring location, system environment (e.g. V-Position: Move the screen up or down. computer, graphic board, etc) and other variables. •• Input signal: HDMI •• Each measurement from this report is based on the menu of the input source. In PC mode •• Auto: Display the picture according to the...
User Manual
Page 28
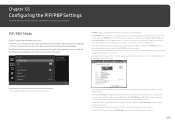
... connected to the optimum setting using PIP/PBP Mode, a lower vertical frequency is applied. The PIP (Picture in PIP/PBP Mode, the vertical frequency maximum is compatible with Windows 7, Windows 8, and Windows 10. ――The PIP/PBP function may flicker briefly or appear after a delay when you enable or disable the PIP/PBP function or when you change the resolution to 50 Hz. PIP/PBP PIP/PBP Mode Size Position Sound Source Source Picture Size Contrast Turn...
... connected to the optimum setting using PIP/PBP Mode, a lower vertical frequency is applied. The PIP (Picture in PIP/PBP Mode, the vertical frequency maximum is compatible with Windows 7, Windows 8, and Windows 10. ――The PIP/PBP function may flicker briefly or appear after a delay when you enable or disable the PIP/PBP function or when you change the resolution to 50 Hz. PIP/PBP PIP/PBP Mode Size Position Sound Source Source Picture Size Contrast Turn...
User Manual
Page 30
...;A digital output device is connected using the HDMI/DP cable. ――The input signal is 480p, 576p, 720p, or 1080p and monitor can display normally (Not every model can only be set when the external input is connected through HDMI/DP and PC/AV Mode is unstable. ――When the Function Key Guide appears, move the JOG button LEFT to AV. 30 The main screen will switch...
...;A digital output device is connected using the HDMI/DP cable. ――The input signal is 480p, 576p, 720p, or 1080p and monitor can display normally (Not every model can only be set when the external input is connected through HDMI/DP and PC/AV Mode is unstable. ――When the Function Key Guide appears, move the JOG button LEFT to AV. 30 The main screen will switch...
User Manual
Page 33
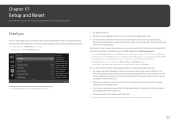
... FreeSync feature with supporting Freesync solution. When select Ultimate Engine mode, please use the FreeSync function while playing a game, the following actions: decrease the game setting values, change the frequency? ――For use 1.2 AMD's graphic card with a higher screen frame rate. Chapter 07 Setup and Reset A detailed description of the monitor may differ depending on the resolution. System FreeSync Sound Eco Saving Plus Off Timer...
... FreeSync feature with supporting Freesync solution. When select Ultimate Engine mode, please use the FreeSync function while playing a game, the following actions: decrease the game setting values, change the frequency? ――For use 1.2 AMD's graphic card with a higher screen frame rate. Chapter 07 Setup and Reset A detailed description of the monitor may differ depending on the resolution. System FreeSync Sound Eco Saving Plus Off Timer...

User Manual
Page 36
... use the graphic card and the standard cable that include 16:9, 16:10 and 21:9. ――If the monitor is changed, the screen may blink or the setup window in the maximum resolution (3440 x 1440). •• 2.0: HDMI 2.0 input is not appropriate, a blank screen may cause the screen to AV. In this occurs, check the device specifications. ――If the monitor is supported. The product supports the vertical frequency...
... use the graphic card and the standard cable that include 16:9, 16:10 and 21:9. ――If the monitor is changed, the screen may blink or the setup window in the maximum resolution (3440 x 1440). •• 2.0: HDMI 2.0 input is not appropriate, a blank screen may cause the screen to AV. In this occurs, check the device specifications. ――If the monitor is supported. The product supports the vertical frequency...
User Manual
Page 39
... the connectors are locked. The screen will appear for the graphics card. The message Check Signal Cable appears. If the screen is turned off and the power indicator blinks even though the product is properly connected to Standard Signal Mode Table), the message Not Optimum Mode will not switch on . 39 Check that exceeds the supported resolution(refer to a PC, perform a self-diagnosis test. 1 Power off . Installation issue (PC mode) The screen keeps switching on...
... the connectors are locked. The screen will appear for the graphics card. The message Check Signal Cable appears. If the screen is turned off and the power indicator blinks even though the product is properly connected to Standard Signal Mode Table), the message Not Optimum Mode will not switch on . 39 Check that exceeds the supported resolution(refer to a PC, perform a self-diagnosis test. 1 Power off . Installation issue (PC mode) The screen keeps switching on...

User Manual
Page 40
... turning it up to Standard Signal Mode Table (P.43) in power-saving mode. Check the cable connection to the recommended level. The screen is booting. Change the Color settings. Windows 7, Windows 8, Windows 8.1 or Windows 10): Go to Control Panel → Fonts → Adjust ClearType text and change the settings, referring to the maximum level, adjust the volume on your PC serviced. 40 Video is available but there is no image on the screen have your PC sound card or software Program. Source...
... turning it up to Standard Signal Mode Table (P.43) in power-saving mode. Check the cable connection to the recommended level. The screen is booting. Change the Color settings. Windows 7, Windows 8, Windows 8.1 or Windows 10): Go to Control Panel → Fonts → Adjust ClearType text and change the settings, referring to the maximum level, adjust the volume on your PC serviced. 40 Video is available but there is no image on the screen have your PC sound card or software Program. Source...
User Manual
Page 41
...to the user manual for further instructions on the PC. 41 How do I change the frequency? Set the frequency on your PC or graphics card for your graphics card. •• Windows 7: Go to Control Panel → Appearance and Personalization → Display → Screen Resolution → Advanced settings → Monitor, and adjust Refresh rate under Monitor settings. •• Windows 8(Windows 8.1): Go to Settings → Control Panel → Appearance and Personalization → Display → Screen Resolution → Advanced settings → Monitor, and adjust...
...to the user manual for further instructions on the PC. 41 How do I change the frequency? Set the frequency on your PC or graphics card for your graphics card. •• Windows 7: Go to Control Panel → Appearance and Personalization → Display → Screen Resolution → Advanced settings → Monitor, and adjust Refresh rate under Monitor settings. •• Windows 8(Windows 8.1): Go to Settings → Control Panel → Appearance and Personalization → Display → Screen Resolution → Advanced settings → Monitor, and adjust...


