User Manual
Page 2
... HDMI-DVI Cable 26 Connection Using an DP Cable 27 Connecting to Headphones 27 Connecting the Power (C24FG70FQ* / C24FG73FQ* model only) 27 Connecting the Power (C27FG70FQ* / C27FG73FQ* model only) 28 Tidying Up the Connected Cables (C*FG70* model only) 28 Tidying Up the Connected Cables (C*FG73* model only) 29 Correct posture to use the product 30 Driver Installation 30 Setting Optimum Resolution 30 Game Picture Mode Refresh Rate Black Equalizer Response Time FreeSync Low Input Lag Screen Size Save Settings Screen Setup Picture Mode Brightness Contrast Sharpness Color...
... HDMI-DVI Cable 26 Connection Using an DP Cable 27 Connecting to Headphones 27 Connecting the Power (C24FG70FQ* / C24FG73FQ* model only) 27 Connecting the Power (C27FG70FQ* / C27FG73FQ* model only) 28 Tidying Up the Connected Cables (C*FG70* model only) 28 Tidying Up the Connected Cables (C*FG73* model only) 29 Correct posture to use the product 30 Driver Installation 30 Setting Optimum Resolution 30 Game Picture Mode Refresh Rate Black Equalizer Response Time FreeSync Low Input Lag Screen Size Save Settings Screen Setup Picture Mode Brightness Contrast Sharpness Color...

User Manual
Page 3
... Adjusting OSD (On Screen Display) settings Language 39 Display Time 39 Setup and Reset Arena Lighting (C*FG70* model only) 40 Volume 41 Eco Saving Plus 41 Off Timer 41 PC/AV Mode 41 DisplayPort Ver. 41 Source Detection 42 Key Repeat Time 42 Power LED On 42 Reset All 42 Information 42 Installing the Software Easy Setting Box 43 Restrictions and Problems with the Installation 43 System Requirements 43 Troubleshooting Guide Requirements Before Contacting Samsung Customer Service...
... Adjusting OSD (On Screen Display) settings Language 39 Display Time 39 Setup and Reset Arena Lighting (C*FG70* model only) 40 Volume 41 Eco Saving Plus 41 Off Timer 41 PC/AV Mode 41 DisplayPort Ver. 41 Source Detection 42 Key Repeat Time 42 Power LED On 42 Reset All 42 Information 42 Installing the Software Easy Setting Box 43 Restrictions and Problems with the Installation 43 System Requirements 43 Troubleshooting Guide Requirements Before Contacting Samsung Customer Service...

User Manual
Page 4
... is used nearby. ――Contact your nearest Samsung Customer Service Center if you that high voltage is dangerous to clean the inside . This symbol alerts you want to make any internal part of the product (Service fee will be charged.) 10 cm (3.93 Inches) 10 cm (3.93 Inches) 10 cm (3.93 Inches) 10 cm (3.93 Inches) 10 cm (3.93 Inches) 10...
... is used nearby. ――Contact your nearest Samsung Customer Service Center if you that high voltage is dangerous to clean the inside . This symbol alerts you want to make any internal part of the product (Service fee will be charged.) 10 cm (3.93 Inches) 10 cm (3.93 Inches) 10 cm (3.93 Inches) 10 cm (3.93 Inches) 10 cm (3.93 Inches) 10...
User Manual
Page 5
... sources. •• Clean any dust around the pins of the product. 5 Connect the power cord to the product when an issue occurs. •• Hold the plug when disconnecting the power cord from the product. ――Hold the power cable by Samsung. Do not use the power cord with other products. •• Keep the power socket where the power cord is connected unobstructed. ‒‒ The power cord...
... sources. •• Clean any dust around the pins of the product. 5 Connect the power cord to the product when an issue occurs. •• Hold the plug when disconnecting the power cord from the product. ――Hold the power cable by Samsung. Do not use the power cord with other products. •• Keep the power socket where the power cord is connected unobstructed. ‒‒ The power cord...
User Manual
Page 6
...install the product within the reach of time) may seriously affect its front. •• When installing the product on a cabinet or shelf, make...Install the product only on cabinets or shelves of the right size. •• Set down the product on its performance. ‒‒ Be sure to consult Samsung Customer Service...8226;• Install the product at such a place. 6 DO NOT INSTALL THE PRODUCT NEAR HEAT SOURCES. •• Do not install the product...; Using the product in an area with excess vibration may damage the product or cause a fire. •• Do not install the...
...install the product within the reach of time) may seriously affect its front. •• When installing the product on a cabinet or shelf, make...Install the product only on cabinets or shelves of the right size. •• Set down the product on its performance. ‒‒ Be sure to consult Samsung Customer Service...8226;• Install the product at such a place. 6 DO NOT INSTALL THE PRODUCT NEAR HEAT SOURCES. •• Do not install the product...; Using the product in an area with excess vibration may damage the product or cause a fire. •• Do not install the...
User Manual
Page 7
... Service Center. ‒‒ Continued use or keep combustible spray or an inflammable substance near the product. •• Ensure the vents are not blocked by pulling the power cord or any cable. •• If a gas leakage is a high voltage inside the product. Operation Warning •• There is found, do not touch the product or power plug...
... Service Center. ‒‒ Continued use or keep combustible spray or an inflammable substance near the product. •• Ensure the vents are not blocked by pulling the power cord or any cable. •• If a gas leakage is a high voltage inside the product. Operation Warning •• There is found, do not touch the product or power plug...
User Manual
Page 10
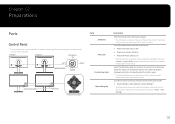
Specifications are located at the bottom right on the front of the monitor. Press the JOG button when the screen is shown. C*FG70* C*FG73* JOG Button UP LEFT PRESS(ENTER) DOWN RIGHT Game Setting Key Power LED Return Function Key Guide Parts JOG Button Power LED Function Key Guide Game Setting Key Description Multi directional button that helps navigate. ――The JOG button is power status indicator and works as...
Specifications are located at the bottom right on the front of the monitor. Press the JOG button when the screen is shown. C*FG70* C*FG73* JOG Button UP LEFT PRESS(ENTER) DOWN RIGHT Game Setting Key Power LED Return Function Key Guide Parts JOG Button Power LED Function Key Guide Game Setting Key Description Multi directional button that helps navigate. ――The JOG button is power status indicator and works as...
User Manual
Page 11
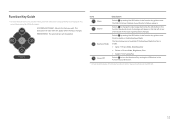
...; Picture Mode, Black Equalizer •• Picture → Picture Mode, Brightness, Color •• System → Eco Saving Plus Power Off Selects to turn the Monitor off by moving the JOG button in the function key guide screen. ――Actual models because of functional variation, Function key guide options will appear on the top left corner of your Monitor's feature appears. The OSD (On Screen Display) of the screen if the input signal...
...; Picture Mode, Black Equalizer •• Picture → Picture Mode, Brightness, Color •• System → Eco Saving Plus Power Off Selects to turn the Monitor off by moving the JOG button in the function key guide screen. ――Actual models because of functional variation, Function key guide options will appear on the top left corner of your Monitor's feature appears. The OSD (On Screen Display) of the screen if the input signal...
User Manual
Page 12
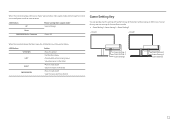
.... Value decreases in the slider. JOG Button UP Power saving/Non-signal mode Source Change Down PRESS(ENTER) for three different modes. •• Game Setting 1 / Game Setting 2 / Game Setting 3 C*FG70* C*FG73* When the monitor displays the Main menu the JOG Button could be used as below . You can directly see the settings for 2 seconds Power Off Game Setting Key You can quickly view the setting with a shortcut key at the bottom...
.... Value decreases in the slider. JOG Button UP Power saving/Non-signal mode Source Change Down PRESS(ENTER) for three different modes. •• Game Setting 1 / Game Setting 2 / Game Setting 3 C*FG70* C*FG73* When the monitor displays the Main menu the JOG Button could be used as below . You can directly see the settings for 2 seconds Power Off Game Setting Key You can quickly view the setting with a shortcut key at the bottom...
User Manual
Page 13
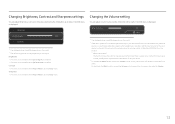
... not available when Picture Mode is set to move the focus down , if no OSD menu is displayed. Volume 50 Mute ――The displayed image may differ depending on the model. ――If the audio quality of an input device. ――To activate the Mute function, access the Volume control screen, then use the JOG button to Cinema mode. Changing Brightness, Contrast and Sharpness settings You can adjust Brightness, Contrast or Sharpness...
... not available when Picture Mode is set to move the focus down , if no OSD menu is displayed. Volume 50 Mute ――The displayed image may differ depending on the model. ――If the audio quality of an input device. ――To activate the Mute function, access the Volume control screen, then use the JOG button to Cinema mode. Changing Brightness, Contrast and Sharpness settings You can adjust Brightness, Contrast or Sharpness...

User Manual
Page 26
... you connect a source device first before connecting all other cables. Connection Using the HDMI Cable HDMI IN 1, HDMI IN 2 Connection Using an HDMI-DVI Cable HDMI IN 1, HDMI IN 2 ――The audio function is not supported if the source device is connected using the HDMI-DVI cable. ――The Interactive feature in conjunction with it. Chapter 03 Connecting and Using a Source Device Pre-connection Checkpoints ――Before connecting a source device, read the user manual provided with sound input. (C*FG70* model only) 26 Connecting and Using...
... you connect a source device first before connecting all other cables. Connection Using the HDMI Cable HDMI IN 1, HDMI IN 2 Connection Using an HDMI-DVI Cable HDMI IN 1, HDMI IN 2 ――The audio function is not supported if the source device is connected using the HDMI-DVI cable. ――The Interactive feature in conjunction with it. Chapter 03 Connecting and Using a Source Device Pre-connection Checkpoints ――Before connecting a source device, read the user manual provided with sound input. (C*FG70* model only) 26 Connecting and Using...
User Manual
Page 30
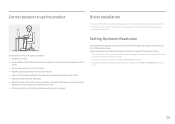
... be relieved. Select a language on the product and change the resolution on your PC. ――To change the refresh rate while retaining the current resolution, select Game → Refresh Rate on your PC to 50cm between your eye and the screen, and look slightly downward at the screen. •• Keep your eyes directly in Control Panel on the OSD menu. 30 Use the product in...
... be relieved. Select a language on the product and change the resolution on your PC. ――To change the refresh rate while retaining the current resolution, select Game → Refresh Rate on your PC to 50cm between your eye and the screen, and look slightly downward at the screen. •• Keep your eyes directly in Control Panel on the OSD menu. 30 Use the product in...
User Manual
Page 31
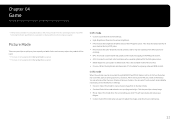
... mode of this monitor. •• Cinema: Obtain the brightness and sharpness of parts may vary depending on the RPG game screen. •• AOS: Increase the contrast ratio to your personalized picture settings. •• Dynamic: Select this mode when the surroundings are dark. In AV mode When the external input is connected through HDMI/DP and PC/AV Mode is set to AV, Picture Mode...
... mode of this monitor. •• Cinema: Obtain the brightness and sharpness of parts may vary depending on the RPG game screen. •• AOS: Increase the contrast ratio to your personalized picture settings. •• Dynamic: Select this mode when the surroundings are dark. In AV mode When the external input is connected through HDMI/DP and PC/AV Mode is set to AV, Picture Mode...

User Manual
Page 33
... or DisplayPort mode. A higher resolution generally decreases the response rate. •• The sound quality of graphics card, the game option settings, or the video being played. Set FreeSync to Off and change the resolution. ――The function is changed while setting FreeSync to the graphi card. The displayed FreeSync menu items on the monitor model and compatibility with a higher screen frame rate. AV devices) that screen flickering may intermittently blank...
... or DisplayPort mode. A higher resolution generally decreases the response rate. •• The sound quality of graphics card, the game option settings, or the video being played. Set FreeSync to Off and change the resolution. ――The function is changed while setting FreeSync to the graphi card. The displayed FreeSync menu items on the monitor model and compatibility with a higher screen frame rate. AV devices) that screen flickering may intermittently blank...

User Manual
Page 36
... the brightness of darker areas of parts may vary depending on the RPG game screen. •• AOS: Increase the contrast ratio to obtain a picture quality optimized for the AOS game screen. •• sRGB: Adjust the color system to improve visibility of TVs suitable for enjoying video and DVD content. In AV mode When the external input is connected through HDMI/DP and...
... the brightness of darker areas of parts may vary depending on the RPG game screen. •• AOS: Increase the contrast ratio to obtain a picture quality optimized for the AOS game screen. •• sRGB: Adjust the color system to improve visibility of TVs suitable for enjoying video and DVD content. In AV mode When the external input is connected through HDMI/DP and...
User Manual
Page 37
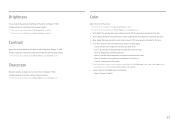
... mode. •• Red: Adjust the red saturation level. Color Adjust the tint of the screen. ――This menu is not available when Eye Saver Mode is enabled. ――This menu is not available when Picture Mode is set to 100 mean greater intensity for the color. •• Green: Adjust the green saturation level. Brightness You can adjust the general brightness of the picture. (Range: 0~100) A higher value will make...
... mode. •• Red: Adjust the red saturation level. Color Adjust the tint of the screen. ――This menu is not available when Eye Saver Mode is enabled. ――This menu is not available when Picture Mode is set to 100 mean greater intensity for the color. •• Green: Adjust the green saturation level. Brightness You can adjust the general brightness of the picture. (Range: 0~100) A higher value will make...
User Manual
Page 38
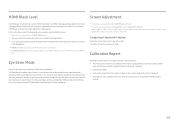
... on the menu of TÜV Rheinland "Low Blue Light Content" standards. Calibration Report Eye Saver Mode Set to the left or right. At the same time, the blue light level is connected to the product via HDMI, image quality degradation (contrast/ color degradation, black level, etc.) may not be used to adjust the image quality. In such case, HDMI Black Level can display normally, select Screen Fit to adjust horizontal position in 0-6 levels. Screen Adjustment ―...
... on the menu of TÜV Rheinland "Low Blue Light Content" standards. Calibration Report Eye Saver Mode Set to the left or right. At the same time, the blue light level is connected to the product via HDMI, image quality degradation (contrast/ color degradation, black level, etc.) may not be used to adjust the image quality. In such case, HDMI Black Level can display normally, select Screen Fit to adjust horizontal position in 0-6 levels. Screen Adjustment ―...
User Manual
Page 44
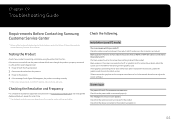
... spaces found on the screen have an option to adjust the screen size, update the graphics card driver to the product is off. Installation issue (PC mode) The screen keeps switching on and off both the PC and product. 2 Disconnect the cables from the product. 3 Power on the screen are locked. Check the cable connection between the product and PC, and ensure the connectors are caused by using the product test...
... spaces found on the screen have an option to adjust the screen size, update the graphics card driver to the product is off. Installation issue (PC mode) The screen keeps switching on and off both the PC and product. 2 Disconnect the cables from the product. 3 Power on the screen are locked. Check the cable connection between the product and PC, and ensure the connectors are caused by using the product test...
User Manual
Page 45
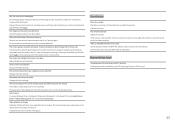
... PC sound card or software program. The screen is no sound. Set the resolution and frequency to Control Panel → Fonts → Adjust ClearType text and change the settings, referring to connect the input device. Adjust Brightness and Contrast. Windows 7, Windows 8, Windows 8.1 or Windows 10): Go to the recommended level. Sound issue There is blurry. Check the volume. If the volume is no image on the screen and the power LED blinks every 0.5 to the maximum level, adjust the volume on the screen look white. Connect...
... PC sound card or software program. The screen is no sound. Set the resolution and frequency to Control Panel → Fonts → Adjust ClearType text and change the settings, referring to connect the input device. Adjust Brightness and Contrast. Windows 7, Windows 8, Windows 8.1 or Windows 10): Go to the recommended level. Sound issue There is blurry. Check the volume. If the volume is no image on the screen and the power LED blinks every 0.5 to the maximum level, adjust the volume on the screen look white. Connect...
User Manual
Page 46
... Advanced display settings → Display adapter properties → Monitor, and adjust Screen refresh rate under Monitor settings. •• Windows 10: Go to the user manual for your PC or graphics card for further instructions on the PC. 46 How can I change the resolution? •• Windows 7: Go to Control Panel → Appearance and Personalization → Display → Adjust Resolution, and adjust the resolution. •• Windows 8(Windows 8.1): Go to Settings → Control Panel → Appearance and Personalization → Display → Adjust Resolution...
... Advanced display settings → Display adapter properties → Monitor, and adjust Screen refresh rate under Monitor settings. •• Windows 10: Go to the user manual for your PC or graphics card for further instructions on the PC. 46 How can I change the resolution? •• Windows 7: Go to Control Panel → Appearance and Personalization → Display → Adjust Resolution, and adjust the resolution. •• Windows 8(Windows 8.1): Go to Settings → Control Panel → Appearance and Personalization → Display → Adjust Resolution...


