
User Manual
Page 3
...-bracket 28 5. Attaching the Door Trim 47 18. Cleaning 50 23. Attaching kickplate and Toe kickplate 46 17. Hanging a Custom Panel 39 13. Remove Upper & Lower Door Cover, Kickplate 31 6. Attaching Panel brackets 36 12. Attaching the Door's Interior Covers 43 15. Attaching Trim Top Cover 48 19. Installation instructions 26 1. Moving the Refrigerator 27 3. Attaching the Refrigerator's Top Cover 32 7. Connecting the Water Line 45 16. Attaching the Cabinet...
...-bracket 28 5. Attaching the Door Trim 47 18. Cleaning 50 23. Attaching kickplate and Toe kickplate 46 17. Hanging a Custom Panel 39 13. Remove Upper & Lower Door Cover, Kickplate 31 6. Attaching Panel brackets 36 12. Attaching the Door's Interior Covers 43 15. Attaching Trim Top Cover 48 19. Installation instructions 26 1. Moving the Refrigerator 27 3. Attaching the Refrigerator's Top Cover 32 7. Connecting the Water Line 45 16. Attaching the Cabinet...
User Manual
Page 4
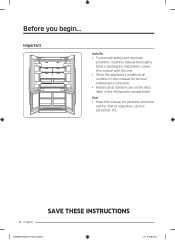
User • Keep this manual thoroughly before starting the installation. Before you begin... Important Installer • To promote safety and minimize problems, read this manual for personal reference and for service/ maintenance reference. • Model/serial numbers are on the data label in the refrigerator compartment. Leave this manual with the user. • Write the appliance's model/serial numbers in this manual for that of inspectors, service personnel, etc. 4 English SAVE THESE INSTRUCTIONS T-TYPE_BRF9000M_IM_DA68-03621D-02_EN.indd 4 2017-12-14 12:26:57
User • Keep this manual thoroughly before starting the installation. Before you begin... Important Installer • To promote safety and minimize problems, read this manual for personal reference and for service/ maintenance reference. • Model/serial numbers are on the data label in the refrigerator compartment. Leave this manual with the user. • Write the appliance's model/serial numbers in this manual for that of inspectors, service personnel, etc. 4 English SAVE THESE INSTRUCTIONS T-TYPE_BRF9000M_IM_DA68-03621D-02_EN.indd 4 2017-12-14 12:26:57
User Manual
Page 6
... with manufacturer-authorized replacement components. • Refrigeration products contain refrigerants, which under federal law must be 35.3 ft³ in explosive gas atmospheres. • Do not use electrical appliances inside the appliance. • The installation location should be taken to avoid damage to avoid the creation of a flammable gas-air mixture if a leak in the refrigerating circuit occurs, the size of the...
... with manufacturer-authorized replacement components. • Refrigeration products contain refrigerants, which under federal law must be 35.3 ft³ in explosive gas atmospheres. • Do not use electrical appliances inside the appliance. • The installation location should be taken to avoid damage to avoid the creation of a flammable gas-air mixture if a leak in the refrigerating circuit occurs, the size of the...
User Manual
Page 7
... install, repair, modify, or replace any other service. DO NOT connect the appliance to have it . • A qualified service technician should perform all other appliance. Do not store flammable or explosive materials in use an adapter plug. DO NOT cut or remove the third (ground) prong from heated surfaces. Also keep items that is equipped with a three-prong grounding electric plug...
... install, repair, modify, or replace any other service. DO NOT connect the appliance to have it . • A qualified service technician should perform all other appliance. Do not store flammable or explosive materials in use an adapter plug. DO NOT cut or remove the third (ground) prong from heated surfaces. Also keep items that is equipped with a three-prong grounding electric plug...

User Manual
Page 8
... on the power cord. circuit that this appliance to these installation instructions. Always grip the plug firmly and pull straight out from children. Make sure Install outlet locations according to avoid damaging the refrigeration system. This applies to your old appliance and to dispose of the appliance to electric supply location. Plastic sheets and bags can cause suffocation. Take care when handling, moving, using or...
... on the power cord. circuit that this appliance to these installation instructions. Always grip the plug firmly and pull straight out from children. Make sure Install outlet locations according to avoid damaging the refrigeration system. This applies to your old appliance and to dispose of the appliance to electric supply location. Plastic sheets and bags can cause suffocation. Take care when handling, moving, using or...
User Manual
Page 9
... stainless steel surfaces with the controls. Clean this appliance only for commercial or industrial use any type of electrical equipment inside the refrigerator or freezer compartments. Never allow anyone, including children to sit, stand or climb on any of the vents or openings on the appliance. Do not obstruct any part of the appliance, including the door. Do not use . Open and hold the handle...
... stainless steel surfaces with the controls. Clean this appliance only for commercial or industrial use any type of electrical equipment inside the refrigerator or freezer compartments. Never allow anyone, including children to sit, stand or climb on any of the vents or openings on the appliance. Do not obstruct any part of the appliance, including the door. Do not use . Open and hold the handle...

User Manual
Page 10
... from the opening and closing of the refrigerator. Safety and warning information Installation safety Location and installation safety WARNING • Before installing the refrigerator, connect it to a power outlet and turn the refrigerator ON to make sure the refrigerator is working. • Choose a location away from the heat of a heater, boiler, or direct sunlight. • Install the unit where air flows freely and where the refrigerator is well...
... from the opening and closing of the refrigerator. Safety and warning information Installation safety Location and installation safety WARNING • Before installing the refrigerator, connect it to a power outlet and turn the refrigerator ON to make sure the refrigerator is working. • Choose a location away from the heat of a heater, boiler, or direct sunlight. • Install the unit where air flows freely and where the refrigerator is well...

User Manual
Page 12
... installation. power supply. This appliance comes with an electrical cord with the applicable portions of the national electrical code and/or other local electrical codes. The ICE key is lit when the ice maker is turned off. Turn OFF the Ice Maker using the ICE key whenever the water supply valve is on to the User manual. WARNING Electrical and grounding connections must comply with a three-prong grounding plug for further information. The appliance features a lighting...
... installation. power supply. This appliance comes with an electrical cord with the applicable portions of the national electrical code and/or other local electrical codes. The ICE key is lit when the ice maker is turned off. Turn OFF the Ice Maker using the ICE key whenever the water supply valve is on to the User manual. WARNING Electrical and grounding connections must comply with a three-prong grounding plug for further information. The appliance features a lighting...
User Manual
Page 15
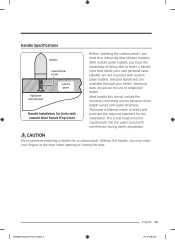
Handle Specifications Handle Countersunk screw Appliance door/drawer Custom panel Handle Installation for Units with Custom Door Panels (Top View) Before installing the custom panels, you may catch your fingers in the door when opening or closing the door. Most handle kits do not include the necessary mounting screws because screw length varies with custom panel models. Without the handle, you must be countersunk into the panel to select and purchase the required fasteners for a custom panel. Samsung does not...
Handle Specifications Handle Countersunk screw Appliance door/drawer Custom panel Handle Installation for Units with Custom Door Panels (Top View) Before installing the custom panels, you may catch your fingers in the door when opening or closing the door. Most handle kits do not include the necessary mounting screws because screw length varies with custom panel models. Without the handle, you must be countersunk into the panel to select and purchase the required fasteners for a custom panel. Samsung does not...

User Manual
Page 17
... very heavy and has a tendency to use the supplied anti-tipping devices. Stable installation The appliance is very heavy : T 42" approx. 661 Ib / 300 kg Installation room The appliance should be levelled properly. Do not open the door until there is securely installed and works correctly. The subsurface must be installed in an environment with dripping water. T-TYPE_BRF9000M_IM_DA68-03621D-02_EN.indd 17...
... very heavy and has a tendency to use the supplied anti-tipping devices. Stable installation The appliance is very heavy : T 42" approx. 661 Ib / 300 kg Installation room The appliance should be levelled properly. Do not open the door until there is securely installed and works correctly. The subsurface must be installed in an environment with dripping water. T-TYPE_BRF9000M_IM_DA68-03621D-02_EN.indd 17...

User Manual
Page 22
...:03 Installation requirements Grounding the refrigerator CAUTION Electrical and grounding connections must comply with a three-prong grounding plug for a 115 Vac, 15 Amp. DO NOT, UNDER ANY CIRCUMSTANCES, CUT OR REMOVE THE THIRD (GROUND) PRONG FROM THE POWER CORD. DO NOT USE AN ADAPTER PLUG TO CONNECT THE REFRIGERATOR TO A 2-PRONG OUTLET. DO NOT USE AN EXTENSION CORD WITH THIS APPLIANCE. power supply. Do not use...
...:03 Installation requirements Grounding the refrigerator CAUTION Electrical and grounding connections must comply with a three-prong grounding plug for a 115 Vac, 15 Amp. DO NOT, UNDER ANY CIRCUMSTANCES, CUT OR REMOVE THE THIRD (GROUND) PRONG FROM THE POWER CORD. DO NOT USE AN ADAPTER PLUG TO CONNECT THE REFRIGERATOR TO A 2-PRONG OUTLET. DO NOT USE AN EXTENSION CORD WITH THIS APPLIANCE. power supply. Do not use...
User Manual
Page 24
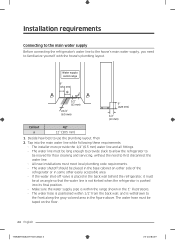
... angle so that the water line is not kinked when the refrigerator is pushed into the main water line while following these requirements: - If the water shut-off valve is positioned within the range shown in some other easily accessible area. - The water hose must be moved for floor cleaning and servicing, without the need to use the plumbing layout. Water supply outlet range 6" (154...
... angle so that the water line is not kinked when the refrigerator is pushed into the main water line while following these requirements: - If the water shut-off valve is positioned within the range shown in some other easily accessible area. - The water hose must be moved for floor cleaning and servicing, without the need to use the plumbing layout. Water supply outlet range 6" (154...
User Manual
Page 28
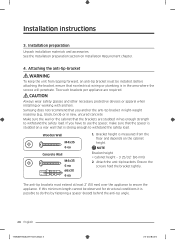
...safety load. Two such brackets per appliance are studded in has enough strength to use the spacer, make sure that the spacer is studded on a rear wall that the brackets are required...height. Make sure the wall or the cabinet that is in new, uncured concrete. If you anchor the anti-tip bracket in light-weight masonry (e.g., block, brick) or in the area where the screws will penetrate. Installation preparation Unpack installation materials and accessories. Installation instructions 3. NOTE Bracket height = Cabinet height - 3 25/32" (96 mm) 2. CAUTION Always wear safety glasses...
...safety load. Two such brackets per appliance are studded in has enough strength to use the spacer, make sure that the spacer is studded on a rear wall that the brackets are required...height. Make sure the wall or the cabinet that is in new, uncured concrete. If you anchor the anti-tip bracket in light-weight masonry (e.g., block, brick) or in the area where the screws will penetrate. Installation preparation Unpack installation materials and accessories. Installation instructions 3. NOTE Bracket height = Cabinet height - 3 25/32" (96 mm) 2. CAUTION Always wear safety glasses...

User Manual
Page 35
Chassis spacer Fixed location Panel ready Cabi Top View (TH) M4x14 12 ea 10. Attaching the Cabinet Trim • Cabinet-side trim: Attach the trim between the refrigerator and the cabinet. Cabinet Depth : 25" Cabinet Depth : 24" Cabinet Chassis spacer Cabinet-side trim Cabinet Chassis spacer...-side trim T-TYPE_BRF9000M_IM_DA68-03621D-02_EN.indd 35 English 35 2017-12-14 12:27:06 Securing the Refrigerator • Open the fridge & freezer/flexzone door. • Secure the refrigerator to its enclosure with (TH) M4x14 screws (6 screws per side, as shown in the graphic). 9.
Chassis spacer Fixed location Panel ready Cabi Top View (TH) M4x14 12 ea 10. Attaching the Cabinet Trim • Cabinet-side trim: Attach the trim between the refrigerator and the cabinet. Cabinet Depth : 25" Cabinet Depth : 24" Cabinet Chassis spacer Cabinet-side trim Cabinet Chassis spacer...-side trim T-TYPE_BRF9000M_IM_DA68-03621D-02_EN.indd 35 English 35 2017-12-14 12:27:06 Securing the Refrigerator • Open the fridge & freezer/flexzone door. • Secure the refrigerator to its enclosure with (TH) M4x14 screws (6 screws per side, as shown in the graphic). 9.

User Manual
Page 36
Attaching Panel brackets Attach the panel brackets to the top and bottom brackets as shown in the graphic. (The other holes on each side of the panel. Installation instructions 11. Custom Panel: STS Drive screws each to the top and bottom of the bracket are for a different application.) Fridge Door Up Freezer/Flexzone Door Up Fridge Door Low (FH) M4x14 10 ea UPP : 5 ea / LOW : 5 ea Freezer/Flexzone Door Low (FH) M4x14 10 ea UPP : 5 ea / LOW : 5 ea 36 English T-TYPE_BRF9000M_IM_DA68-03621D-02_EN.indd 36 2017-12-14 12:27:06
Attaching Panel brackets Attach the panel brackets to the top and bottom brackets as shown in the graphic. (The other holes on each side of the panel. Installation instructions 11. Custom Panel: STS Drive screws each to the top and bottom of the bracket are for a different application.) Fridge Door Up Freezer/Flexzone Door Up Fridge Door Low (FH) M4x14 10 ea UPP : 5 ea / LOW : 5 ea Freezer/Flexzone Door Low (FH) M4x14 10 ea UPP : 5 ea / LOW : 5 ea 36 English T-TYPE_BRF9000M_IM_DA68-03621D-02_EN.indd 36 2017-12-14 12:27:06

User Manual
Page 37
Custom Panel : Wood, Other • The template informs you the position of the bracket and holes. • Mark hole positions on every corner of the panel according to the template and drive the screws into the holes. Fridge Door Template Freezer/Flexzone Door Template (FH) M4x14 10 ea UPP : 5 ea / LOW : 5 ea (FH) M4x14 10 ea UPP : 5 ea / LOW : 5 ea T-TYPE_BRF9000M_IM_DA68-03621D-02_EN.indd 37 English 37 2017-12-14 12:27:07
Custom Panel : Wood, Other • The template informs you the position of the bracket and holes. • Mark hole positions on every corner of the panel according to the template and drive the screws into the holes. Fridge Door Template Freezer/Flexzone Door Template (FH) M4x14 10 ea UPP : 5 ea / LOW : 5 ea (FH) M4x14 10 ea UPP : 5 ea / LOW : 5 ea T-TYPE_BRF9000M_IM_DA68-03621D-02_EN.indd 37 English 37 2017-12-14 12:27:07

User Manual
Page 43
Upper Door Cover • Connect housing connectors to separate Upper Door Cover. (Fridge Left Door) • Atattch the wire cover. (Fridge Left Door) • Push to the arrow direction. 14. Attaching the Door's Interior Covers 1. Fridge Door Screw Wire Cover Freezer/Flexzone Door Trim Cap Door T-TYPE_BRF9000M_IM_DA68-03621D-02_EN.indd 43 English 43 2017-12-14 12:27:08
Upper Door Cover • Connect housing connectors to separate Upper Door Cover. (Fridge Left Door) • Atattch the wire cover. (Fridge Left Door) • Push to the arrow direction. 14. Attaching the Door's Interior Covers 1. Fridge Door Screw Wire Cover Freezer/Flexzone Door Trim Cap Door T-TYPE_BRF9000M_IM_DA68-03621D-02_EN.indd 43 English 43 2017-12-14 12:27:08

User Manual
Page 44
Installation instructions 2. Fridge Door Freezer/Flexzone Door 44 English T-TYPE_BRF9000M_IM_DA68-03621D-02_EN.indd 44 2017-12-14 12:27:09 Lower Door Cover Push to the arrow direction.
Installation instructions 2. Fridge Door Freezer/Flexzone Door 44 English T-TYPE_BRF9000M_IM_DA68-03621D-02_EN.indd 44 2017-12-14 12:27:09 Lower Door Cover Push to the arrow direction.

User Manual
Page 45
... the water line according to the location of the water supply line and make sure there is no leak. Remove the cap from the appliance connection. 2. Check the connection on the shut-off valve and main water tap. 6. Connecting the Water Line To prevent leaks and water damage, be careful not to complete this connection. You may find these items sold as possible. Push the water line into the guard tube as far as a kit...
... the water line according to the location of the water supply line and make sure there is no leak. Remove the cap from the appliance connection. 2. Check the connection on the shut-off valve and main water tap. 6. Connecting the Water Line To prevent leaks and water damage, be careful not to complete this connection. You may find these items sold as possible. Push the water line into the guard tube as far as a kit...

User Manual
Page 50
... for leaks? Is the unit properly aligned with the surrounding cabinetry. Cleaning Remove protective vinyl and clean the custom panel. 23. Installation Checklist Ensure the refrigerator functions properly and that the custom door panel aligns with the adjacent cabinets? Do all doors, drawers and shelves operate smoothly, without interference? Has all refrigerator components function properly? Has the warranty been activated on-line or the warranty...
... for leaks? Is the unit properly aligned with the surrounding cabinetry. Cleaning Remove protective vinyl and clean the custom panel. 23. Installation Checklist Ensure the refrigerator functions properly and that the custom door panel aligns with the adjacent cabinets? Do all doors, drawers and shelves operate smoothly, without interference? Has all refrigerator components function properly? Has the warranty been activated on-line or the warranty...


