
User Manual (ENGLISH)
Page 10
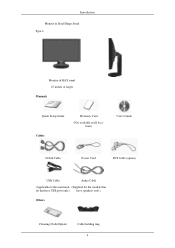
Introduction Monitor & Dual Hinge Stand Type 4 Monitor & HAS stand 23 inches or larger Manuals Quick Setup Guide Cables Warranty Card (Not available in all locations) User's Guide D-Sub Cable Power Cord DVI Cable (option) USB Cable Audio Cable (Applicable to the stand mod- (Supplied for the models that els that have USB ports only.) have speakers only.) Others Cleaning Cloth(Option) Cable holding ring 9
Introduction Monitor & Dual Hinge Stand Type 4 Monitor & HAS stand 23 inches or larger Manuals Quick Setup Guide Cables Warranty Card (Not available in all locations) User's Guide D-Sub Cable Power Cord DVI Cable (option) USB Cable Audio Cable (Applicable to the stand mod- (Supplied for the models that els that have USB ports only.) have speakers only.) Others Cleaning Cloth(Option) Cable holding ring 9
User Manual (ENGLISH)
Page 13
... the monitor. 12 Speaker You can hear sound by connecting the soundcard of the screen displaying the current mode -- Enter button [ ] Activates a highlighted menu item. For energy conservation, turn your PC to the models that have speakers only. AUTO button Use this button for auto adjustment. (Available in Analog mode only) Power button [ ] Use this button for long periods. Volume button[ ] When OSD is not on and off . (When the ' ' button is pressed to the graphic card's DVI port using the DVI cable. •...
... the monitor. 12 Speaker You can hear sound by connecting the soundcard of the screen displaying the current mode -- Enter button [ ] Activates a highlighted menu item. For energy conservation, turn your PC to the models that have speakers only. AUTO button Use this button for auto adjustment. (Available in Analog mode only) Power button [ ] Use this button for long periods. Volume button[ ] When OSD is not on and off . (When the ' ' button is pressed to the graphic card's DVI port using the DVI cable. •...
User Manual (ENGLISH)
Page 15
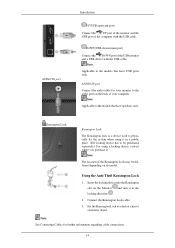
... the locking direction . 2. Fix the Kensington Lock to the models that have USB ports only. Note Applicable to a desk or a heavy stationary object. Connect the Kensington Lock cable. 3. Note The location of the Kensington Lock may be purchased separately.) For using a locking device, contact where you purchase it in a public place. (The locking device has to the models that have speakers only. Insert the locking device...
... the locking direction . 2. Fix the Kensington Lock to the models that have USB ports only. Note Applicable to a desk or a heavy stationary object. Connect the Kensington Lock cable. 3. Note The location of the Kensington Lock may be purchased separately.) For using a locking device, contact where you purchase it in a public place. (The locking device has to the models that have speakers only. Insert the locking device...
User Manual (ENGLISH)
Page 23
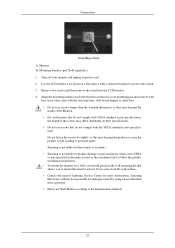
... the LCD monitor. 4. Turn off your monitor and unplug its power cord. 2. Lay the LCD monitor face-down on a flat surface with VESA standard screw specifications, the length of accidents. • Samsung is not liable for product damage or personal injury when a non-VESA or non-specified wall mount is not liable for these kinds of the screws may differ depending on a wall, you to protect the screen. 3. Remove two screws...
... the LCD monitor. 4. Turn off your monitor and unplug its power cord. 2. Lay the LCD monitor face-down on a flat surface with VESA standard screw specifications, the length of accidents. • Samsung is not liable for product damage or personal injury when a non-VESA or non-specified wall mount is not liable for these kinds of the screws may differ depending on a wall, you to protect the screen. 3. Remove two screws...
User Manual (ENGLISH)
Page 24
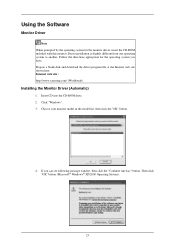
...). 23 Using the Software Monitor Driver Note When prompted by the operating system for the operating system you can see following message window, then click the "Continue Anyway" button. If you have. Internet web site : http://www.samsung.com/ (Worldwide) Installing the Monitor Driver (Automatic) 1. Driver installation is slightly different from one operating system to another. Choose your monitor model in the model list, then...
...). 23 Using the Software Monitor Driver Note When prompted by the operating system for the operating system you can see following message window, then click the "Continue Anyway" button. If you have. Internet web site : http://www.samsung.com/ (Worldwide) Installing the Monitor Driver (Automatic) 1. Driver installation is slightly different from one operating system to another. Choose your monitor model in the model list, then...
User Manual (ENGLISH)
Page 25
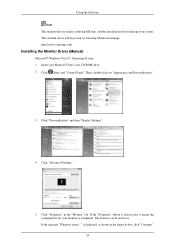
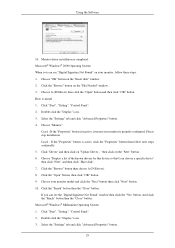
... "Windows needs..." Then, double-click on Samsung Monitor homepage. is completed. http://www.samsung.com/ Installing the Monitor Driver (Manual) Microsoft® Windows Vista™, Operating System 1. If the "Properties" button is deactivated, it means the configuration for your monitor is displayed, as is under certifying MS logo, and this installation doesn't damage your CD-ROM drive. 2. Click "Personalization" and then "Display Settings". 4. Click (Start) and "Control Panel". The...
... "Windows needs..." Then, double-click on Samsung Monitor homepage. is completed. http://www.samsung.com/ Installing the Monitor Driver (Manual) Microsoft® Windows Vista™, Operating System 1. If the "Properties" button is deactivated, it means the configuration for your monitor is displayed, as is under certifying MS logo, and this installation doesn't damage your CD-ROM drive. 2. Click "Personalization" and then "Display Settings". 4. Click (Start) and "Control Panel". The...
User Manual (ENGLISH)
Page 26
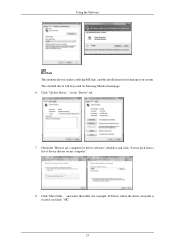
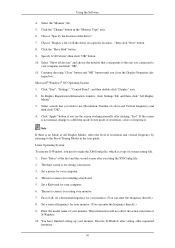
Check the "Browse my computer for example, D:\Drive) where the driver setup file is under certifying MS logo, and this installation doesn't damage your system. Click "Have Disk..." in the "Driver" tab. 7. Using the Software Note This monitor driver is located, and click "OK". 25 and select the folder (for driver software" checkbox and click "Let me pick from a list of device drivers on Samsung Monitor homepage. 6. The certified driver will be posted on my computer". 8. Click "Update Driver..."
Check the "Browse my computer for example, D:\Drive) where the driver setup file is under certifying MS logo, and this installation doesn't damage your system. Click "Have Disk..." in the "Driver" tab. 7. Using the Software Note This monitor driver is located, and click "OK". 25 and select the folder (for driver software" checkbox and click "Let me pick from a list of device drivers on Samsung Monitor homepage. 6. The certified driver will be posted on my computer". 8. Click "Update Driver..."
User Manual (ENGLISH)
Page 28
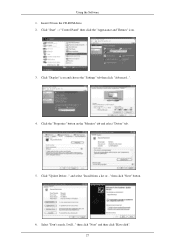
then click "Next" and then click "Have disk". 27 Insert CD into the CD-ROM drive. 2. Click "Update Driver..." Click "Start" → "Control Panel" then click the "Appearance and Themes" icon. 3. then click "Next" button. 6. Click the "Properties" button on the "Monitor" tab and select "Driver" tab. 5. Click "Display" icon and choose the "Settings" tab then click "Advanced...". 4. and select "Install from a list or..." Select "Don't search, I will..." Using the Software 1.
then click "Next" and then click "Have disk". 27 Insert CD into the CD-ROM drive. 2. Click "Update Driver..." Click "Start" → "Control Panel" then click the "Appearance and Themes" icon. 3. then click "Next" button. 6. Click the "Properties" button on the "Monitor" tab and select "Driver" tab. 5. Click "Display" icon and choose the "Settings" tab then click "Advanced...". 4. and select "Install from a list or..." Select "Don't search, I will..." Using the Software 1.
User Manual (ENGLISH)
Page 30
... the "Browse" button on the "Next" button. 6. Click "Start", "Setting", "Control Panel". 2. then click on the "File Needed" window. 3. And click the "Finish" button then the "Close" button. Using the Software 10. Choose "OK" button on "Update Driver..." Choose A:(D:\Driver) then click the "Open" button and then click "OK" button. Choose "Monitor". Click "Driver" and then click on the "Insert disk" window. 2. Click the "Open" button, then click "OK" button. 9. Double click the "Display" icon. 3. Case1...
... the "Browse" button on the "Next" button. 6. Click "Start", "Setting", "Control Panel". 2. then click on the "File Needed" window. 3. And click the "Finish" button then the "Close" button. Using the Software 10. Choose "OK" button on "Update Driver..." Choose A:(D:\Driver) then click the "Open" button and then click "OK" button. Choose "Monitor". Click "Driver" and then click on the "Insert disk" window. 2. Click the "Open" button, then click "OK" button. 9. Double click the "Display" icon. 3. Case1...
User Manual (ENGLISH)
Page 31
... make the X86Config file, which is for setting your monitor. (You can enter the frequency directly.) 9. Click "Start", "Settings", "Control Panel", and then double-click "Display" icon. 2. Select a mode that corresponds to the one you connected to use (Resolution, Number of your monitor. You have finished setting up your monitor. Click "Apply" button if you wish to your computer and click "OK". 11. Enter the model name of colors and Vertical frequency...
... make the X86Config file, which is for setting your monitor. (You can enter the frequency directly.) 9. Click "Start", "Settings", "Control Panel", and then double-click "Display" icon. 2. Select a mode that corresponds to the one you connected to use (Resolution, Number of your monitor. You have finished setting up your monitor. Click "Apply" button if you wish to your computer and click "OK". 11. Enter the model name of colors and Vertical frequency...
User Manual (ENGLISH)
Page 38
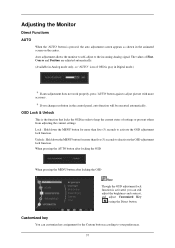
... change resolution in Digital mode.) If auto adjustment does not work properly, press 'AUTO' button again to your preferences. 37 The values of Fine, Coarse and Position are adjusted automatically. (Available in Analog mode only, so "AUTO" icon of settings or prevent others from adjusting the current settings. Auto adjustment allows the monitor to self-adjust to activate the OSD adjustment lock function. Lock : Hold down the MENU button for more than five (5) seconds to deactivate the OSD adjustment lock...
... change resolution in Digital mode.) If auto adjustment does not work properly, press 'AUTO' button again to your preferences. 37 The values of Fine, Coarse and Position are adjusted automatically. (Available in Analog mode only, so "AUTO" icon of settings or prevent others from adjusting the current settings. Auto adjustment allows the monitor to self-adjust to activate the OSD adjustment lock function. Lock : Hold down the MENU button for more than five (5) seconds to deactivate the OSD adjustment lock...

User Manual (ENGLISH)
Page 43
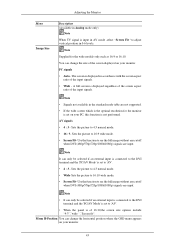
...screen to the default brightness. • Mode 2 : Sets the screen to bright. • Mode 3 : Sets the screen to adjust horizontal position in MagicColor mode of Full and Intelligent. ) • Off - This applies the Sepia color effect to a black and white screen. • Sepia - This applies the aqua color effect to a black and white screen. Gamma correction changes the luminance of black and white are displayed. • Green - SIZE & POSITION Menu H-Position V-Position Description Changes the horizontal position of the screen downwards and upwards by changing the screen colors...
...screen to the default brightness. • Mode 2 : Sets the screen to bright. • Mode 3 : Sets the screen to adjust horizontal position in MagicColor mode of Full and Intelligent. ) • Off - This applies the Sepia color effect to a black and white screen. • Sepia - This applies the aqua color effect to a black and white screen. Gamma correction changes the luminance of black and white are displayed. • Green - SIZE & POSITION Menu H-Position V-Position Description Changes the horizontal position of the screen downwards and upwards by changing the screen colors...
User Manual (ENGLISH)
Page 44
... change the size of 16:10,the screen size options include "4:3","wide ","Screen fit". Adjusting the Monitor Menu Image Size Description (Available in Analog mode only) Note When TV signal is input in AV mode ,select "Screen Fit "to see the full image without any cutoff when DVI (480p/576p/720p/1080i/1080p) signals are input. The screen is displayed in accordance with the screen aspect ratio of the input signals. A full screen is not performed. Sets the picture...
... change the size of 16:10,the screen size options include "4:3","wide ","Screen fit". Adjusting the Monitor Menu Image Size Description (Available in Analog mode only) Note When TV signal is input in AV mode ,select "Screen Fit "to see the full image without any cutoff when DVI (480p/576p/720p/1080i/1080p) signals are input. The screen is displayed in accordance with the screen aspect ratio of the input signals. A full screen is not performed. Sets the picture...

User Manual (ENGLISH)
Page 46
..., Set to On when connected to analogue (D-SUB)-or-digital (DVI)-dedicated models. You can set to be activated when the Custom- ized Key ( )is turned off if no adjustments are made for the wide models only such as 16:9 or 16:10. If not set the amount of the screen when a 480P, 576P, 720P, 1080i, or 1080P video signal is input in Analog mode) Note Display Time Supplied...
..., Set to On when connected to analogue (D-SUB)-or-digital (DVI)-dedicated models. You can set to be activated when the Custom- ized Key ( )is turned off if no adjustments are made for the wide models only such as 16:9 or 16:10. If not set the amount of the screen when a 480P, 576P, 720P, 1080i, or 1080P video signal is input in Analog mode) Note Display Time Supplied...
User Manual (ENGLISH)
Page 48
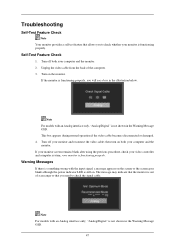
... an Analog interface only, "Analog/Digital" is not shown in the Warning Message OSD. Note For models with the input signal, a message appears on both your computer and the monitor. then turn on the screen or the screen goes blank although the power indicator LED is not shown in the Warning Message OSD. 47 If the monitor is functioning properly. Troubleshooting Self-Test Feature Check Note Your monitor provides...
... an Analog interface only, "Analog/Digital" is not shown in the Warning Message OSD. Note For models with the input signal, a message appears on both your computer and the monitor. then turn on the screen or the screen goes blank although the power indicator LED is not shown in the Warning Message OSD. 47 If the monitor is functioning properly. Troubleshooting Self-Test Feature Check Note Your monitor provides...
User Manual (ENGLISH)
Page 49
... poor coloring, become noisy, and video mode not supported, etc. Press ' / ' button to see if you see if the monitor status is in working condition. Q: Can you can be seen. A: (Connected using the D-sub cable) Check the signal cable connection. (Connected using the DVI cable) If you do need assistance, please call the phone number on the screen. Q: If the power is on the screen or if the screen goes white, this means the monitor is set to analog...
... poor coloring, become noisy, and video mode not supported, etc. Press ' / ' button to see if you see if the monitor status is in working condition. Q: Can you can be seen. A: (Connected using the D-sub cable) Check the signal cable connection. (Connected using the DVI cable) If you do need assistance, please call the phone number on the screen. Q: If the power is on the screen or if the screen goes white, this means the monitor is set to analog...
User Manual (ENGLISH)
Page 50
... no image on the monitor blinking at 1 second intervals? Q: Connected using the DVI cable? The screen shows strange colors or just black and white. Please change to activate the monitor and restore the image on the screen? A: Press a key on the keyboard to the recommended mode during this message when the signal from the video card exceeds the maximum resolution and frequency that the monitor can handle properly. A: Make sure the video card is displayed. Q: Can...
... no image on the monitor blinking at 1 second intervals? Q: Connected using the DVI cable? The screen shows strange colors or just black and white. Please change to activate the monitor and restore the image on the screen? A: Press a key on the keyboard to the recommended mode during this message when the signal from the video card exceeds the maximum resolution and frequency that the monitor can handle properly. A: Make sure the video card is displayed. Q: Can...
User Manual (ENGLISH)
Page 51
... the screen. The screen colors have changed the video card or the driver? A: Adjust the resolution and frequency of the video card. (Refer to see if the Plug & Play (VESA DDC) function can be unbalanced due to the video card manual. A: Windows XP : Set the resolution at the Control Panel → Display → Settings. Q: See the video card manual to the Preset Timing Modes) LED is blinking but no images on the screen. Q: No sound. 50 Q: Have you adjusted the resolution or frequency on the menu? A: Adjust the frequency...
... the screen. The screen colors have changed the video card or the driver? A: Adjust the resolution and frequency of the video card. (Refer to see if the Plug & Play (VESA DDC) function can be unbalanced due to the video card manual. A: Windows XP : Set the resolution at the Control Panel → Display → Settings. Q: See the video card manual to the Preset Timing Modes) LED is blinking but no images on the screen. Q: No sound. 50 Q: Have you adjusted the resolution or frequency on the menu? A: Adjust the frequency...

User Manual (ENGLISH)
Page 52
... does, request an a service for MagicTune™ MAC. Check if the computer beeps more than 3 times when booting. (If it to operate normally after installing or removing the program. Troubleshooting A: Ensure that the audio cable is firmly connected to both the audio-in port on your monitor and the audio-out port on PC (VGA) with Window OS that supports Plug and Play. Check the volume level. Control Panel → Performance and...
... does, request an a service for MagicTune™ MAC. Check if the computer beeps more than 3 times when booting. (If it to operate normally after installing or removing the program. Troubleshooting A: Ensure that the audio cable is firmly connected to both the audio-in port on your monitor and the audio-out port on PC (VGA) with Window OS that supports Plug and Play. Check the volume level. Control Panel → Performance and...
User Manual (ENGLISH)
Page 53
.... Troubleshooting If you have problems in installing the adapter (video) driver, boot the computer in Safe Mode, remove the Display Adapter in the Control Panel → Appearance and Themes → Display → Settings. Note Before calling for assistance, check the information in the BIOS-SETUP of the computer. (Refer to the Windows / Computer Manual). A: Windows ME/2000: Set the resolution at the Control Panel → Display → Screen Saver. A: The frequency can I set the Power Saving function? A: Note that video card support...
.... Troubleshooting If you have problems in installing the adapter (video) driver, boot the computer in Safe Mode, remove the Display Adapter in the Control Panel → Appearance and Themes → Display → Settings. Note Before calling for assistance, check the information in the BIOS-SETUP of the computer. (Refer to the Windows / Computer Manual). A: Windows ME/2000: Set the resolution at the Control Panel → Display → Screen Saver. A: The frequency can I set the Power Saving function? A: Note that video card support...

