
User Manual (ENGLISH)
Page 3
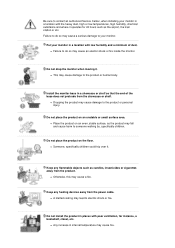
... nor place heavy objects upon them, which could cause damage. Do not disconnect the power cord while using the monitor. Do not pull the plug out by the separation and may damage the monitor. z An improper ground may cause fire. z If the connector or plug of the power cord is dusty. z This...
... nor place heavy objects upon them, which could cause damage. Do not disconnect the power cord while using the monitor. Do not pull the plug out by the separation and may damage the monitor. z An improper ground may cause fire. z If the connector or plug of the power cord is dusty. z This...
User Manual (ENGLISH)
Page 4
z Failure to do so may lead to electric shock or fire. z Dropping the product may cause an electric shock or fire inside the monitor. z Place the product on an even, stable surface, as the product may cause a fire. Do not install the product in places with..., high humidity, chemical substance and where it operates for instance, a bookshelf, closet, etc. z A melted coating may cause a serious damage to your monitor in a location with poor ventilation, for 24 hours such as candles, insecticides or cigarettes away from the product. Failure to do so may cause damage...
z Failure to do so may lead to electric shock or fire. z Dropping the product may cause an electric shock or fire inside the monitor. z Place the product on an even, stable surface, as the product may cause a fire. Do not install the product in places with..., high humidity, chemical substance and where it operates for instance, a bookshelf, closet, etc. z A melted coating may cause a serious damage to your monitor in a location with poor ventilation, for 24 hours such as candles, insecticides or cigarettes away from the product. Failure to do so may cause damage...

User Manual (ENGLISH)
Page 5
... Always use the mounting device specified in a shortened component life and degraded performance. Do not spray water or detergent directly on the monitor. z Poor ventilation may cause suffocation if children play with a smooth cloth. Use the recommended detergent with it away from the wall...in the internal temperature of the product, resulting in the owner's manual. z Installation by a qualified professional. z The monitor could be damaged. z The TFT-LCD surface may cause damage, electric shock or fire. When installing the product, make sure to keep it . Clean When ...
... Always use the mounting device specified in a shortened component life and degraded performance. Do not spray water or detergent directly on the monitor. z Poor ventilation may cause suffocation if children play with a smooth cloth. Use the recommended detergent with it away from the wall...in the internal temperature of the product, resulting in the owner's manual. z Installation by a qualified professional. z The monitor could be damaged. z The TFT-LCD surface may cause damage, electric shock or fire. When installing the product, make sure to keep it . Clean When ...
User Manual (ENGLISH)
Page 6
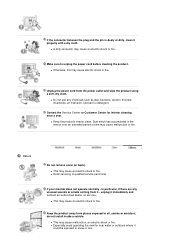
Contact the Service Center or Customer Center for interior cleaning once a year. Others Do not remove cover (or back). z Especially avoid operating the monitor near water or outdoors where it properly with a dry cloth. z A dirty connector may cause electric shock or fire. z Otherwise, this may ...cause an electric shock or fire. z This may cause an electric shock or fire. If your monitor does not operate normally - unplug it - Unplug the power cord from places exposed to unplug the power cord before cleaning the product. in the...
Contact the Service Center or Customer Center for interior cleaning once a year. Others Do not remove cover (or back). z Especially avoid operating the monitor near water or outdoors where it properly with a dry cloth. z A dirty connector may cause electric shock or fire. z Otherwise, this may ...cause an electric shock or fire. z This may cause an electric shock or fire. If your monitor does not operate normally - unplug it - Unplug the power cord from places exposed to unplug the power cord before cleaning the product. in the...
User Manual (ENGLISH)
Page 7
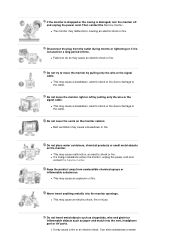
... electric shock or fire. Do not insert metal objects such as chopsticks, wire and gimlet or inflammable objects such as paper and match into the monitor openings. If an alien substances or water Do not try to the cable. Do not place water containers, chemical products or small metal objects on... fire. z This may cause a breakdown, electric shock or fire due to damage to do so may cause an electric shock, fire or injury. If the monitor is dropped or the casing is not used for a long period of time. Then contact the Service Center . Never insert anything metallic into the vent...
... electric shock or fire. Do not insert metal objects such as chopsticks, wire and gimlet or inflammable objects such as paper and match into the monitor openings. If an alien substances or water Do not try to the cable. Do not place water containers, chemical products or small metal objects on... fire. z This may cause a breakdown, electric shock or fire due to damage to do so may cause an electric shock, fire or injury. If the monitor is dropped or the casing is not used for a long period of time. Then contact the Service Center . Never insert anything metallic into the vent...

User Manual (ENGLISH)
Page 8
...and unplug the power cord. To ease eye strain, take at a too close angle may cause undesirable picture quality. 17,19 inch (43, 48 cm) - 1280 X 1024 Watching the monitor continuously at least a five-minute break after every hour of using the product for an extended period of time, residual...the product on an unstable, uneven surface or a location prone to moving picture when you view a fixed screen for the model. When moving the monitor. Make sure that all cables, including the antenna cable and cables connecting to the levels appropriate for an extended period of time. z Failure to...
...and unplug the power cord. To ease eye strain, take at a too close angle may cause undesirable picture quality. 17,19 inch (43, 48 cm) - 1280 X 1024 Watching the monitor continuously at least a five-minute break after every hour of using the product for an extended period of time, residual...the product on an unstable, uneven surface or a location prone to moving picture when you view a fixed screen for the model. When moving the monitor. Make sure that all cables, including the antenna cable and cables connecting to the levels appropriate for an extended period of time. z Failure to...
User Manual (ENGLISH)
Page 10
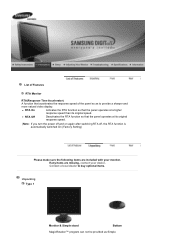
...again after switching RTA off, the RTA function is automatically switched On (Factory Setting) Please make sure the following items are missing, contact your monitor. If any items are included with your dealer. Contact a local dealer to provide a sharper and more natural video display. z RTA Off ...Deactivates the RTA function so that the panel operates at its original speed. List of Features RTA Monitor RTA(Response Time Accelerator) A function that accelerates the response speed of the panel so as to buy optional items. Unpacking Type...
...again after switching RTA off, the RTA function is automatically switched On (Factory Setting) Please make sure the following items are missing, contact your monitor. If any items are included with your dealer. Contact a local dealer to provide a sharper and more natural video display. z RTA Off ...Deactivates the RTA function so that the panel operates at its original speed. List of Features RTA Monitor RTA(Response Time Accelerator) A function that accelerates the response speed of the panel so as to buy optional items. Unpacking Type...
User Manual (ENGLISH)
Page 11
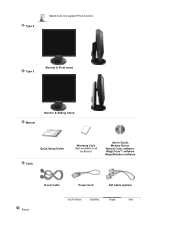
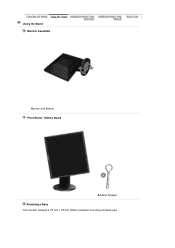
Type 3 Monitor & Pivot stand Manual Monitor & Sliding Stand Quick Setup Guide Cable Warranty Card (Not available in all locations) User's Guide, Monitor Driver, Natural Color software, MagicTune™ software MagicRotation software D-sub Cable Power Cord DVI Cable (option) Front Type 2 Stand does not support Pivot function.
Type 3 Monitor & Pivot stand Manual Monitor & Sliding Stand Quick Setup Guide Cable Warranty Card (Not available in all locations) User's Guide, Monitor Driver, Natural Color software, MagicTune™ software MagicRotation software D-sub Cable Power Cord DVI Cable (option) Front Type 2 Stand does not support Pivot function.
User Manual (ENGLISH)
Page 12
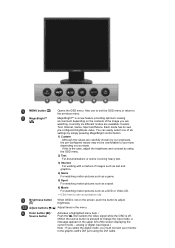
... as a DVD or Video CD. >>Click here to change the input mode, a message appears in the menu. MagicBright™ [] MagicBright™ is not on your monitor to the graphic card's DVI port using the OSD menu. 2) Text For documentations or works involving heavy text. 3) Internet For working with a mixture of the...
... as a DVD or Video CD. >>Click here to change the input mode, a message appears in the menu. MagicBright™ [] MagicBright™ is not on your monitor to the graphic card's DVI port using the OSD menu. 2) Text For documentations or works involving heavy text. 3) Internet For working with a mixture of the...

User Manual (ENGLISH)
Page 13
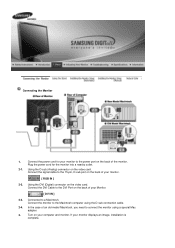
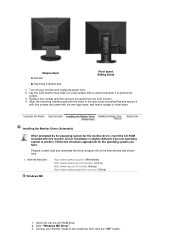
... vary from product to product.) POWER port DVI IN port RGB IN port Kensington Lock Connect the power cord for your monitor to be purchased separately. ) For using a locking device, contact where you purchase it. See PowerSaver described in a public place. (The locking device has to... the power port on the back of your monitor. Rear Simple stand Pivot stand / Sliding Stand (The configuration at the back of the monitor. The Kensington lock is not needed, or when leaving it unattended for long periods. AUTO button Power ...
... vary from product to product.) POWER port DVI IN port RGB IN port Kensington Lock Connect the power cord for your monitor to be purchased separately. ) For using a locking device, contact where you purchase it. See PowerSaver described in a public place. (The locking device has to... the power port on the back of your monitor. Rear Simple stand Pivot stand / Sliding Stand (The configuration at the back of the monitor. The Kensington lock is not needed, or when leaving it unattended for long periods. AUTO button Power ...
User Manual (ENGLISH)
Page 14
... the D-sub connection cable. 2-4. If your computer and monitor. Using the DVI (Digital) connector on the video card. Connect the monitor to the 15-pin, D-sub port on the back of your Monitor. [ DVI IN ] 2-3. Connect the signal cable to the Macintosh computer using a special Mac adapter. 3. Turn...to a Macintosh. Connect the DVI Cable to the DVI Port on the back of your monitor to the power port on your monitor displays an image, installation is complete. In the case of the monitor. Using the D-sub (Analog) connector on the video card. Connect the power cord for...
... the D-sub connection cable. 2-4. If your computer and monitor. Using the DVI (Digital) connector on the video card. Connect the monitor to the 15-pin, D-sub port on the back of your Monitor. [ DVI IN ] 2-3. Connect the signal cable to the Macintosh computer using a special Mac adapter. 3. Turn...to a Macintosh. Connect the DVI Cable to the DVI Port on the back of your monitor to the power port on your monitor displays an image, installation is complete. In the case of the monitor. Using the D-sub (Analog) connector on the video card. Connect the power cord for...
User Manual (ENGLISH)
Page 15
Using the Stand Monitor Assembly Monitor and Bottom Pivot Stand / Sliding Stand A.Stand Stopper Attaching a Base This monitor accepts a 75 mm x 75 mm VESA-compliant mounting interface pad.
Using the Stand Monitor Assembly Monitor and Bottom Pivot Stand / Sliding Stand A.Stand Stopper Attaching a Base This monitor accepts a 75 mm x 75 mm VESA-compliant mounting interface pad.
User Manual (ENGLISH)
Page 16
...protect the screen. 3. Choose your monitor and unplug its power cord. 2. Mounting interface pad 1. Turn off your monitor model in the rear cover mounting Pad and secure it to another. Monitor Pivot stand Sliding Stand B. Lay the LCD monitor face-down on a flat surface with...click the "OK" button. Insert CD into the CD-ROM drive. 2. z Internet web site : http://www.samsung.com/ (Worldwide) http://www.samsung.com/monitor (U.S.A) http://www.sec.co.kr/monitor (Korea) http://www.samsungmonitor.com.cn/ (China) Windows ME 1. Click "Windows ME Driver". 3. Prepare a...
...protect the screen. 3. Choose your monitor and unplug its power cord. 2. Mounting interface pad 1. Turn off your monitor model in the rear cover mounting Pad and secure it to another. Monitor Pivot stand Sliding Stand B. Lay the LCD monitor face-down on a flat surface with...click the "OK" button. Insert CD into the CD-ROM drive. 2. z Internet web site : http://www.samsung.com/ (Worldwide) http://www.samsung.com/monitor (U.S.A) http://www.sec.co.kr/monitor (Korea) http://www.samsungmonitor.com.cn/ (China) Windows ME 1. Click "Windows ME Driver". 3. Prepare a...

User Manual (ENGLISH)
Page 17
..." button. Windows XP/2000 1. Insert CD into the CD-ROM drive. 2. 4. Then click "OK" button. Choose your system.The certified driver will be posted on Samsung Monitor momepage http://www.samsung.com/. 5. This monitor driver is under certifying MS logo,and this installation don't damage your...
..." button. Windows XP/2000 1. Insert CD into the CD-ROM drive. 2. 4. Then click "OK" button. Choose your system.The certified driver will be posted on Samsung Monitor momepage http://www.samsung.com/. 5. This monitor driver is under certifying MS logo,and this installation don't damage your...
User Manual (ENGLISH)
Page 18
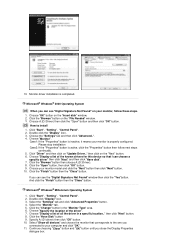
... a blank disk and download the driver program file at the Internet web site shown here. z Internet web site : http://www.samsung.com/ (Worldwide) http://www.samsung.com/monitor (U.S.A) http://www.sec.co.kr/monitor (Korea) http://www.samsungmonitor.com.cn/ (China) Microsoft® Windows® XP Operating System 1. Click "Start" -> "Control Panel" then click...
... a blank disk and download the driver program file at the Internet web site shown here. z Internet web site : http://www.samsung.com/ (Worldwide) http://www.samsung.com/monitor (U.S.A) http://www.sec.co.kr/monitor (Korea) http://www.samsungmonitor.com.cn/ (China) Microsoft® Windows® XP Operating System 1. Click "Start" -> "Control Panel" then click...
User Manual (ENGLISH)
Page 19
Select "Don't search ,I will be posted on Samsung Monitor homepage. Click the "Browse" button then choose A:(D:\Driver) and choose your system.The certified driver will .." http://www.samsung.com/ 9. If you can see following "Message" window, then click the "Continue Anyway" button. Click the "Close" button then click "OK" button continually. Then click "...
Select "Don't search ,I will be posted on Samsung Monitor homepage. Click the "Browse" button then choose A:(D:\Driver) and choose your system.The certified driver will .." http://www.samsung.com/ 9. If you can see following "Message" window, then click the "Continue Anyway" button. Click the "Close" button then click "OK" button continually. Then click "...
User Manual (ENGLISH)
Page 20
..." button is properly configured. If you close the Display Properties dialogue box. Choose "Specify the location of all devices" and choose the monitor that I can choose a specific driver" then click "Next" and then click "Have disk". 7. Choose "Display a list of the.... 10. then click on "Update Driver.." Click the "Browse" button then choose A:(D:\Driver). 8. Click the "Change" button in a specific location.." Choose "Monitor". Click "Start" , "Setting" , "Control Panel". 2. Click "Start" , "Setting" , "Control Panel". 2. Choose "Display a list of the known...
..." button is properly configured. If you close the Display Properties dialogue box. Choose "Specify the location of all devices" and choose the monitor that I can choose a specific driver" then click "Next" and then click "Have disk". 7. Choose "Display a list of the.... 10. then click on "Update Driver.." Click the "Browse" button then choose A:(D:\Driver). 8. Click the "Change" button in a specific location.." Choose "Monitor". Click "Start" , "Setting" , "Control Panel". 2. Click "Start" , "Setting" , "Control Panel". 2. Choose "Display a list of the known...

User Manual (ENGLISH)
Page 21
... of colors and Vertical frequency) and then click OK. 4. It is a color administration system developed by Samsung Electronics in using a computer is available only for Samsung monitors and makes the color of resolution and vertical frequency by a scanner or a digital camera are not the same as ...setting other images scanned by referring to a different mode (lower mode of X-Window. 10. The Natural Color S/W is a type of your monitor. Enter the model name of system setting file. 1. Natural Color Natural Color One of the recent problems in association with Korea Electronics & ...
... of colors and Vertical frequency) and then click OK. 4. It is a color administration system developed by Samsung Electronics in using a computer is available only for Samsung monitors and makes the color of resolution and vertical frequency by a scanner or a digital camera are not the same as ...setting other images scanned by referring to a different mode (lower mode of X-Window. 10. The Natural Color S/W is a type of your monitor. Enter the model name of system setting file. 1. Natural Color Natural Color One of the recent problems in association with Korea Electronics & ...

User Manual (ENGLISH)
Page 22
To install the program manually, insert the CD included with the Samsung monitor into the CDROM Drive, click the [Start] button of the program Natural Color will be executed. Enter D:\color\eng\setup.exe and then press the ... the Natural Color software program Select "Setting/Control Panel" on the initial screen to install the Natural Color software Insert the CD included with the Samsung monitor into the CD-ROM Drive. Click Natural Color on the "Start" menu and then double-click "Add/Delete a program". Select Natural Color from the list...
To install the program manually, insert the CD included with the Samsung monitor into the CDROM Drive, click the [Start] button of the program Natural Color will be executed. Enter D:\color\eng\setup.exe and then press the ... the Natural Color software program Select "Setting/Control Panel" on the initial screen to install the Natural Color software Insert the CD included with the Samsung monitor into the CD-ROM Drive. Click Natural Color on the "Start" menu and then double-click "Add/Delete a program". Select Natural Color from the list...
User Manual (ENGLISH)
Page 24
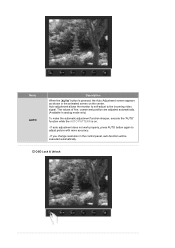
Menu AUTO Description When the 'AUTO' button is on the center. Auto adjustment allows the monitor to self-adjust to adjust picture with more accuracy. - If auto adjustment does not work properly, press AUTO button again to the incoming video signal. ...
Menu AUTO Description When the 'AUTO' button is on the center. Auto adjustment allows the monitor to self-adjust to adjust picture with more accuracy. - If auto adjustment does not work properly, press AUTO button again to the incoming video signal. ...


