
User Manual (user Manual) (ver.1.0) (English)
Page 8
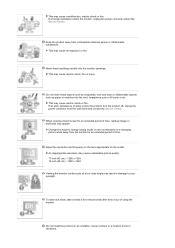
... shock or fire. Adjust the resolution and frequency to a changing picture when away from the monitor for the model. If a foreign substance enters the monitor, unplug the power cord and contact the Service Center. If an alien substances or water enters the product, turn the product off, unplug the power connector from combustible chemical sprays or inflammable substances. Change the mode to energy saving mode or set a screensaver to...
... shock or fire. Adjust the resolution and frequency to a changing picture when away from the monitor for the model. If a foreign substance enters the monitor, unplug the power cord and contact the Service Center. If an alien substances or water enters the product, turn the product off, unplug the power connector from combustible chemical sprays or inflammable substances. Change the mode to energy saving mode or set a screensaver to...

User Manual (user Manual) (ver.1.0) (English)
Page 11
... luminance (Black & White, Grey) Ex) z Recommended settings: Bright colors with large difference in order to demonstrate a correct usage of a LCD panel, pixel image retention doesn't occur. What is to protect them from Image retention. This may have an image retention when switching from one color or a moving image for a long time. Turn the power off for 4 hours after displaying a stationary image for 1 minute. Warranty Warranty does not cover any...
... luminance (Black & White, Grey) Ex) z Recommended settings: Bright colors with large difference in order to demonstrate a correct usage of a LCD panel, pixel image retention doesn't occur. What is to protect them from Image retention. This may have an image retention when switching from one color or a moving image for a long time. Turn the power off for 4 hours after displaying a stationary image for 1 minute. Warranty Warranty does not cover any...

User Manual (user Manual) (ver.1.0) (English)
Page 16
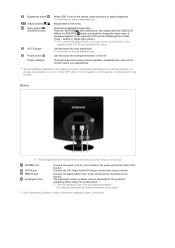
The Kensington lock is a device used to physically fix the system to something when using a locking device, contact the place of purchase. See Connecting Cables for your monitor. For using it in a public place. Connect the signal cable to the 15-pin, D-sub port on the back of the monitor. The locking device has to the power port on the back of your monitor to be purchased separately. POWER port RGB IN port Kensington Lock Connect the power cord for further information regarding cable connections.
The Kensington lock is a device used to physically fix the system to something when using a locking device, contact the place of purchase. See Connecting Cables for your monitor. For using it in a public place. Connect the signal cable to the 15-pin, D-sub port on the back of the monitor. The locking device has to the power port on the back of your monitor to be purchased separately. POWER port RGB IN port Kensington Lock Connect the power cord for further information regarding cable connections.
User Manual (user Manual) (ver.1.0) (English)
Page 20
... digital input signal.) If you select the digital mode, you must connect your adjustments. For energy conservation, turn your monitor to the power port on and off . (When the SOURCE/ button is pressed to change the input mode, a message appears in the menu. Rear The configuration at the back of purchase. The locking device has to the 15-pin, D-sub port on the back of your monitor. POWER port DVI IN port RGB IN port Kensington Lock Connect...
... digital input signal.) If you select the digital mode, you must connect your adjustments. For energy conservation, turn your monitor to the power port on and off . (When the SOURCE/ button is pressed to change the input mode, a message appears in the menu. Rear The configuration at the back of purchase. The locking device has to the 15-pin, D-sub port on the back of your monitor. POWER port DVI IN port RGB IN port Kensington Lock Connect...

User Manual (user Manual) (ver.1.0) (English)
Page 25
....samsung.com/ (Worldwide) http://www.samsung.com/monitor (U.S.A) http://www.sec.co.kr/monitor (Korea) http://www.samsungmonitor.com.cn/ (China) Installing the Monitor Driver (Automatic) Insert the CD into the CD-ROM drive. Click "Windows". Choose your monitor model in the model list, then click the "OK" button. Follow the directions appropriate for the monitor driver, insert the CD-ROM included with this monitor. Model Monitor Driver...
....samsung.com/ (Worldwide) http://www.samsung.com/monitor (U.S.A) http://www.sec.co.kr/monitor (Korea) http://www.samsungmonitor.com.cn/ (China) Installing the Monitor Driver (Automatic) Insert the CD into the CD-ROM drive. Click "Windows". Choose your monitor model in the model list, then click the "OK" button. Follow the directions appropriate for the monitor driver, insert the CD-ROM included with this monitor. Model Monitor Driver...
User Manual (user Manual) (ver.1.0) (English)
Page 26
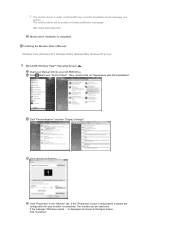
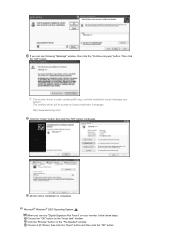
.... Installing the Monitor Driver (Manual) Windows Vista | Windows XP | Windows 2000 | Windows ME | Windows NT | Linux Microsoft® Windows Vista™ Operating System Insert your Manual CD into your system. Then, double-click on Samsung Monitor homepage http://www.samsung.com/ Monitor driver installation is completed. The certified driver will be used as shown in the "Monitor" tab. Click (Start) and "Control Panel". Click "Personalization" and then "Display Settings". Click "Advanced Settings...". If the "Properties" button is...
.... Installing the Monitor Driver (Manual) Windows Vista | Windows XP | Windows 2000 | Windows ME | Windows NT | Linux Microsoft® Windows Vista™ Operating System Insert your Manual CD into your system. Then, double-click on Samsung Monitor homepage http://www.samsung.com/ Monitor driver installation is completed. The certified driver will be used as shown in the "Monitor" tab. Click (Start) and "Control Panel". Click "Personalization" and then "Display Settings". Click "Advanced Settings...". If the "Properties" button is...
User Manual (user Manual) (ver.1.0) (English)
Page 27
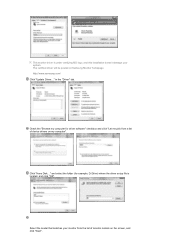
..., and this installation doesn't damage your monitor from a list of monitor models on the screen, and click "Next". and select the folder (for driver software" checkbox and click "Let me pick from the list of device drivers on my computer". Click "Have Disk..." The certified driver will be posted on Samsung Monitor homepage http://www.samsung.com/ Click "Update Driver..." Select the model that matches...
..., and this installation doesn't damage your monitor from a list of monitor models on the screen, and click "Next". and select the folder (for driver software" checkbox and click "Let me pick from the list of device drivers on my computer". Click "Have Disk..." The certified driver will be posted on Samsung Monitor homepage http://www.samsung.com/ Click "Update Driver..." Select the model that matches...
User Manual (user Manual) (ver.1.0) (English)
Page 30
... this installation doesn't damage your monitor, follow these steps. Choose A:(D:\Driver) then click the "Open" button and then click the "OK" button. The certified driver will be posted on the "Insert disk" window. Choose the "OK" button on Samsung Monitor homepage http://www.samsung.com/ Click the "Close" button then click the "OK" button continually. This monitor driver is completed. Click the "Browse" button on the "File Needed" window...
... this installation doesn't damage your monitor, follow these steps. Choose A:(D:\Driver) then click the "Open" button and then click the "OK" button. The certified driver will be posted on the "Insert disk" window. Choose the "OK" button on Samsung Monitor homepage http://www.samsung.com/ Click the "Close" button then click the "OK" button continually. This monitor driver is completed. Click the "Browse" button on the "File Needed" window...
User Manual (user Manual) (ver.1.0) (English)
Page 31
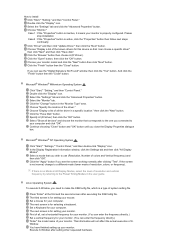
..." button if you need to use (Resolution, Number of system setting file. Press "Enter" at All Display Modes, select the level of resolution, colors, or frequency). Select the "Settings" tab and click the "Advanced Properties" button. Please stop installation Case2 : If the "Properties" button is not normal, change to a different mode (lower mode of resolution and vertical frequency by referring to install Click "Start," "Setting," and then "Control Panel." Click the "Open" button, then click the "OK" button. Execute X-Window...
..." button if you need to use (Resolution, Number of system setting file. Press "Enter" at All Display Modes, select the level of resolution, colors, or frequency). Select the "Settings" tab and click the "Advanced Properties" button. Please stop installation Case2 : If the "Properties" button is not normal, change to a different mode (lower mode of resolution and vertical frequency by referring to install Click "Start," "Setting," and then "Control Panel." Click the "Open" button, then click the "OK" button. Execute X-Window...
User Manual (user Manual) (ver.1.0) (English)
Page 35
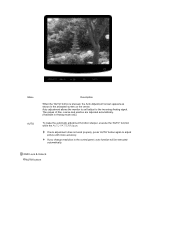
... auto adjustment does not work properly, press 'AUTO' button again to the incoming Analog signal. Auto adjustment allows the monitor to self-adjust to adjust picture with more accuracy. OSD Lock & Unlock AUTO button If you change resolution in the animated screen on . Menu AUTO Description When the 'AUTO' button is on the center. The values of fine, coarse and position are adjusted automatically. (Available in Analog mode only) To make the automatic adjustment function sharper, execute the 'AUTO' function while the AUTO...
... auto adjustment does not work properly, press 'AUTO' button again to the incoming Analog signal. Auto adjustment allows the monitor to self-adjust to adjust picture with more accuracy. OSD Lock & Unlock AUTO button If you change resolution in the animated screen on . Menu AUTO Description When the 'AUTO' button is on the center. The values of fine, coarse and position are adjusted automatically. (Available in Analog mode only) To make the automatic adjustment function sharper, execute the 'AUTO' function while the AUTO...
User Manual (user Manual) (ver.1.0) (English)
Page 55
... seen. Check the power cord connection and supply. (Connected using the D-sub cable) Check the signal cable connection. Check List Solutions Is the power cord connected properly? You can see this message when the signal from the video card exceeds the maximum resolution and frequency that the monitor can handle properly. Press a key on the keyboard to the Preset Timing Modes) If the initial screen (the login screen) does not appear, contact the Service Center or...
... seen. Check the power cord connection and supply. (Connected using the D-sub cable) Check the signal cable connection. Check List Solutions Is the power cord connected properly? You can see this message when the signal from the video card exceeds the maximum resolution and frequency that the monitor can handle properly. Press a key on the keyboard to the Preset Timing Modes) If the initial screen (the login screen) does not appear, contact the Service Center or...
User Manual (user Manual) (ver.1.0) (English)
Page 56
... Plug & Play (VESA DDC) function can be adjusted. Have you installed the monitor driver? Check the signal cable connection. Make sure the video card is blinking but no images on the screen. Set the video card by referring to the video card manual and the Preset Timing Modes. (The maximum frequency per resolution may differ from product to prevent changes? The screen suddenly has become strange after changing the video card. Adjust screen image position and size using the OSD. The screen can be supported. Adjust the resolution and frequency of the video card signals...
... Plug & Play (VESA DDC) function can be adjusted. Have you installed the monitor driver? Check the signal cable connection. Make sure the video card is blinking but no images on the screen. Set the video card by referring to the video card manual and the Preset Timing Modes. (The maximum frequency per resolution may differ from product to prevent changes? The screen suddenly has become strange after changing the video card. Adjust screen image position and size using the OSD. The screen can be supported. Adjust the resolution and frequency of the video card signals...
User Manual (user Manual) (ver.1.0) (English)
Page 57
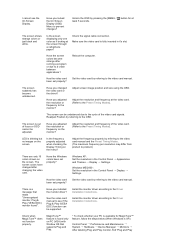
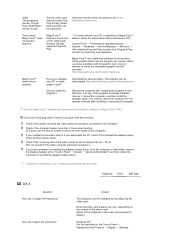
...; MAC. Visit the MagicTune™ website and download the installation software for details. Check the following items if there is already installed, remove it to reinstall the adapter (video) driver. Answer The frequency can be changed your monitor. Windows ME/2000 : Set the resolution in the Control Panel → Appearance and Themes → Display → Screen Saver. Windows XP : Set the resolution in the Control Panel → Display → Settings. Some graphic cards may not support your PC or video...
...; MAC. Visit the MagicTune™ website and download the installation software for details. Check the following items if there is already installed, remove it to reinstall the adapter (video) driver. Answer The frequency can be changed your monitor. Windows ME/2000 : Set the resolution in the Control Panel → Appearance and Themes → Display → Screen Saver. Windows XP : Set the resolution in the Control Panel → Display → Settings. Some graphic cards may not support your PC or video...
User Manual (user Manual) (ver.1.0) (English)
Page 58
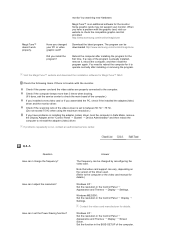
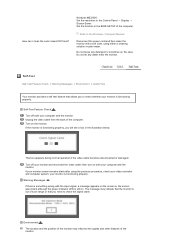
... power cord and then clean the monitor with the input signal, a message appears on the screen or the screen goes blank although the power indicator LED is functioning properly. How can I clean the outer case/LCD Panel? Do not leave any water enter the monitor. Self-Test Self-Test Feature Check | Warning Messages | Environment | Useful Tips Your monitor provides a self test feature that you need to check the signal cable. Turn on . your video controller...
... power cord and then clean the monitor with the input signal, a message appears on the screen or the screen goes blank although the power indicator LED is functioning properly. How can I clean the outer case/LCD Panel? Do not leave any water enter the monitor. Self-Test Self-Test Feature Check | Warning Messages | Environment | Useful Tips Your monitor provides a self test feature that you need to check the signal cable. Turn on . your video controller...
User Manual (user Manual) (ver.1.0) (English)
Page 60
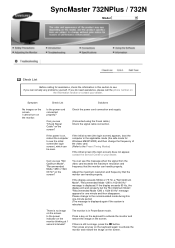
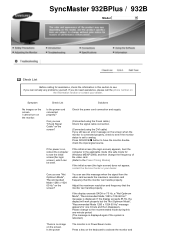
Symptom No images on the screen when the monitor is connected properly, check to analog. Check the power cord connection and supply. (Connected using the D-sub cable) Check the signal cable connection. (Connected using the DVI cable) If you still see if the monitor status is set to see an error message on the screen. If the initial screen (the login screen) appears, boot the computer in the applicable mode (the safe mode for Windows ME/XP/2000) and then change to see...
Symptom No images on the screen when the monitor is connected properly, check to analog. Check the power cord connection and supply. (Connected using the D-sub cable) Check the signal cable connection. (Connected using the DVI cable) If you still see if the monitor status is set to see an error message on the screen. If the initial screen (the login screen) appears, boot the computer in the applicable mode (the safe mode for Windows ME/XP/2000) and then change to see...

User Manual (user Manual) (ver.1.0) (English)
Page 61
... the video card signals. Connected using the OSD. Have you installed the monitor driver? Have the screen colors become unbalanced. The screen suddenly has become strange after changing the video card. Adjust the resolution and frequency at least 5 seconds. The screen is blinking but no image, press the 'SOURCE/ ' button. LED is out of graphic cards do not send out video signals. Is the frequency properly adjusted when checking the Display Timing on the screen. If there is a message that Have you locked...
... the video card signals. Connected using the OSD. Have you installed the monitor driver? Have the screen colors become unbalanced. The screen suddenly has become strange after changing the video card. Adjust the resolution and frequency at least 5 seconds. The screen is blinking but no image, press the 'SOURCE/ ' button. LED is out of graphic cards do not send out video signals. Is the frequency properly adjusted when checking the Display Timing on the screen. If there is a message that Have you locked...
User Manual (user Manual) (ver.1.0) (English)
Page 62
... installed a new video card or if you assembled the PC, check if the installed the adapter(video) driver and the monitor driver. MagicTune™ is trouble with the monitor. Check the following items if there is an additional software for MagicTune™ MAC. See the video card manual to the Driver Installation Instructions. Some graphic cards may not support your PC or video graphic card? Check if the power cord and the video cables are properly connected to the computer. Have you install...
... installed a new video card or if you assembled the PC, check if the installed the adapter(video) driver and the monitor driver. MagicTune™ is trouble with the monitor. Check the following items if there is an additional software for MagicTune™ MAC. See the video card manual to the Driver Installation Instructions. Some graphic cards may not support your PC or video graphic card? Check if the power cord and the video cables are properly connected to the computer. Have you install...

User Manual (user Manual) (ver.1.0) (English)
Page 66
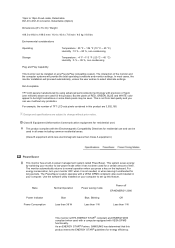
... with the Electromagnetic Compatibility Directives for a certain amount of RED, GREEN, BLUE and WHITE color appear to change without any Plug & Play compatible system. The monitor automatically returns to set up this product are 3,932,160. Class B Equipment (Information Communication equipment for residential use it unattended for energy efficiency. State Power Indicator Power Consumption Normal Operation Blue Less than 34 W Power saving mode Blue, Blinking Less than 1 W Power off EPA/ENERGY...
... with the Electromagnetic Compatibility Directives for a certain amount of RED, GREEN, BLUE and WHITE color appear to change without any Plug & Play compatible system. The monitor automatically returns to set up this product are 3,932,160. Class B Equipment (Information Communication equipment for residential use it unattended for energy efficiency. State Power Indicator Power Consumption Normal Operation Blue Less than 34 W Power saving mode Blue, Blinking Less than 1 W Power off EPA/ENERGY...
User Manual (user Manual) (ver.1.0) (English)
Page 69
... are subject to change without any Plug & Play compatible system. Design and specifications are used with a computer equipped with precision of RED, GREEN, BLUE and WHITE color appear to be bright sometimes or some black pixels may be installed on your monitor to set up this product meets the ENERGY STAR® guidelines for long periods. Dot Acceptable TFT LCD panels manufactured by switching your computer to low-power mode when it...
... are subject to change without any Plug & Play compatible system. Design and specifications are used with a computer equipped with precision of RED, GREEN, BLUE and WHITE color appear to be bright sometimes or some black pixels may be installed on your monitor to set up this product meets the ENERGY STAR® guidelines for long periods. Dot Acceptable TFT LCD panels manufactured by switching your computer to low-power mode when it...

User Manual (user Manual) (ver.1.0) (English)
Page 75
.... Samsung is called the 'resolution'. VESA, DPMS and DDC are registered trademarks of Video Electronics Standard Association; When viewing a fixed screen for energy efficiency. Resolution : 1280 x 1024 Vertical frequency (refresh rate) : 60 Hz TFT LCD panel manufactured by using a soft cloth to compose the screen image is the registered trademark of cleaner by using advanced semiconductor technology with the furnishing, performance, or use the FINE/COARSE adjustment function. When cleaning the monitor and...
.... Samsung is called the 'resolution'. VESA, DPMS and DDC are registered trademarks of Video Electronics Standard Association; When viewing a fixed screen for energy efficiency. Resolution : 1280 x 1024 Vertical frequency (refresh rate) : 60 Hz TFT LCD panel manufactured by using a soft cloth to compose the screen image is the registered trademark of cleaner by using advanced semiconductor technology with the furnishing, performance, or use the FINE/COARSE adjustment function. When cleaning the monitor and...


