
User Manual (user Manual) (ver.1.0) (English)
Page 17
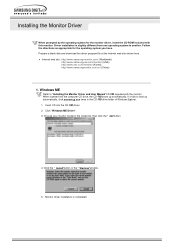
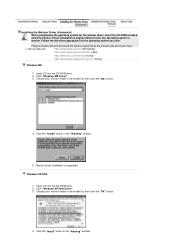
... the operating system you have. Driver installation is completed. Click " Windows ME Driver" .3 Choose your monitor model in the model list, then click the " OK" button. .4 Click the " Install" button in the CD-ROM drive folder of Windows Explorer. 1. If it fails to " Installing the Monitor Driver and User Manual" CD-ROM supplied with this monitor. When inserted into the CD-ROM driver. 2. Windows ME Refer to boot up automatically...
... the operating system you have. Driver installation is completed. Click " Windows ME Driver" .3 Choose your monitor model in the model list, then click the " OK" button. .4 Click the " Install" button in the CD-ROM drive folder of Windows Explorer. 1. If it fails to " Installing the Monitor Driver and User Manual" CD-ROM supplied with this monitor. When inserted into the CD-ROM driver. 2. Windows ME Refer to boot up automatically...
User Manual (user Manual) (ver.1.0) (English)
Page 18
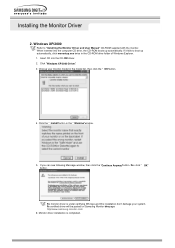
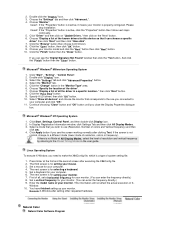
..." window. 5. hT e certified driver will be posted on Samsung Monitor Homepage http://www.samsung-monitor.com/ 6. Click " Windows XP/2000 Driver." .3 Choose your system. hT is monitor driver is completed. If it fails to "Installing the Monitor Driver and User Manual" CD-ROM supplied with the monitor. Monitor driver installation is under certifying MS logo,and this installation don't damage your monitor model in the model list, then click the " OK" button. .4 Click the " Install" button in...
..." window. 5. hT e certified driver will be posted on Samsung Monitor Homepage http://www.samsung-monitor.com/ 6. Click " Windows XP/2000 Driver." .3 Choose your system. hT is monitor driver is completed. If it fails to "Installing the Monitor Driver and User Manual" CD-ROM supplied with the monitor. Monitor driver installation is under certifying MS logo,and this installation don't damage your monitor model in the model list, then click the " OK" button. .4 Click the " Install" button in...
User Manual (user Manual) (ver.1.0) (English)
Page 19
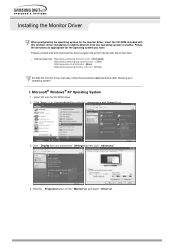
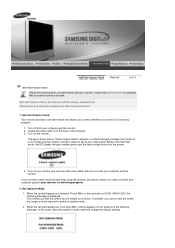
...® Windows® XP Operating System 1. Prepare a blank disk and download the driver program file at the Internet web site shown here. Driver installation is slightly different from one operating system to another. Follow the directions as appropriate for the monitor driver, insert the CD-ROM included with this monitor. Insert CD into the CD-RO M driver. 2. Click " Start" "-->" Control Panel" then...
...® Windows® XP Operating System 1. Prepare a blank disk and download the driver program file at the Internet web site shown here. Driver installation is slightly different from one operating system to another. Follow the directions as appropriate for the monitor driver, insert the CD-ROM included with this monitor. Insert CD into the CD-RO M driver. 2. Click " Start" "-->" Control Panel" then...
User Manual (user Manual) (ver.1.0) (English)
Page 22
... monitor model and click the " Next" button then click " Next" button. 10. Click " Driver" and then click on the " File Needed" window. 3. Click the " Finish" button then the " Close" button. If you can see "Digital Signature Not Found" on your monitor, follow next steps continually. 5. Click the " Change" button in a specific location." Click the " Browse" button then choose A(: D\:Driver). .8 Click the " Open" button, then click " OK" button. .9 Choose your monitor...
... monitor model and click the " Next" button then click " Next" button. 10. Click " Driver" and then click on the " File Needed" window. 3. Click the " Finish" button then the " Close" button. If you can see "Digital Signature Not Found" on your monitor, follow next steps continually. 5. Click the " Change" button in a specific location." Click the " Browse" button then choose A(: D\:Driver). .8 Click the " Open" button, then click " OK" button. .9 Choose your monitor...

User Manual (user Manual) (ver.1.0) (English)
Page 30
... functions are used to adjust monitor functions. TV Screen SOURCE button, MagicBright button, Volume button, Channel button, Menu button, Exit button, Auto button MagicBright Channel, Volume With the OSD screen off . PC Screen 3. Direct-Access Features let you to secure the current settings so that of the computer video card before attempting Manual Adjustment. You need to lock or unlock the controls. Auto Adjustment | OSD Lock/Unlock | Volume | Channel 1. Ensure the clock frequency of the monitor matches that they are available even while the OSD menu is installed for...
... functions are used to adjust monitor functions. TV Screen SOURCE button, MagicBright button, Volume button, Channel button, Menu button, Exit button, Auto button MagicBright Channel, Volume With the OSD screen off . PC Screen 3. Direct-Access Features let you to secure the current settings so that of the computer video card before attempting Manual Adjustment. You need to lock or unlock the controls. Auto Adjustment | OSD Lock/Unlock | Volume | Channel 1. Ensure the clock frequency of the monitor matches that they are available even while the OSD menu is installed for...

User Manual (user Manual) (ver.1.0) (English)
Page 36
... LED power indicator remains green and the figure moves around on both your computer video card. This box also appears during normal operation if the video cable becomes disconnected or damaged. 4. your monitor and reconnect the video cable; Video mode not supported This indicates the display resolution or refresh rate is functioning properly. 2. then turn on the screen. If the vertical frequency is functioning properly. 1. Self-Test Feature Check | Video mode not supported | Display Adapter Driver | Maintenance and Cleaning...
... LED power indicator remains green and the figure moves around on both your computer video card. This box also appears during normal operation if the video cable becomes disconnected or damaged. 4. your monitor and reconnect the video cable; Video mode not supported This indicates the display resolution or refresh rate is functioning properly. 2. then turn on the screen. If the vertical frequency is functioning properly. 1. Self-Test Feature Check | Video mode not supported | Display Adapter Driver | Maintenance and Cleaning...

User Manual (user Manual) (ver.1.0) (English)
Page 37
... cloth. Check if the power cord and the cable are for repair of the computer.) 3. Maintaining the Monitor Case Clean with a soft cloth (cotton flannel) smoothly. If "Default" or a wrong product model is indicated, it does, request an after disconnecting the power cord. For specific issues, contact the relevant computer or video card manufacturers. 1) Click Start --> Settings --> Control Panel --> Display --> Settings --> Advanced --> Adapter --> Update Driver --> Next --> Display a list of the problem, and then contact a service center...
... cloth. Check if the power cord and the cable are for repair of the computer.) 3. Maintaining the Monitor Case Clean with a soft cloth (cotton flannel) smoothly. If "Default" or a wrong product model is indicated, it does, request an after disconnecting the power cord. For specific issues, contact the relevant computer or video card manufacturers. 1) Click Start --> Settings --> Control Panel --> Display --> Settings --> Advanced --> Adapter --> Update Driver --> Next --> Display a list of the problem, and then contact a service center...

User Manual (user Manual) (ver.1.0) (English)
Page 38
... warranty card, the phone number on again after removing all accessories (video extension cable, etc.) z Set resolution and frequency to the monitor screen and their solutions. Connect it again securely.(Refer to Connecting to the Auto Program) 2. If you can remedy any problems yourself. TV signal is not received Solutions z Check if the Display Adapter Driver (VGA Driver) is properly installed. (Refer to Installing Driver) z Check if the signal cable between the computer and the monitor is securely connected...
... warranty card, the phone number on again after removing all accessories (video extension cable, etc.) z Set resolution and frequency to the monitor screen and their solutions. Connect it again securely.(Refer to Connecting to the Auto Program) 2. If you can remedy any problems yourself. TV signal is not received Solutions z Check if the Display Adapter Driver (VGA Driver) is properly installed. (Refer to Installing Driver) z Check if the signal cable between the computer and the monitor is securely connected...

User Manual (user Manual) (ver.1.0) (English)
Page 39
... the Volume) z If the volume is steady green or blinks every 0.5 or 1 seconds The monitor front control buttons do not respond. z Check if the power cord is too low. Solutions z Ensure that the audio cable is using User Mode under the monitor menu and Preset Timing Modes. z The monitor is firmly connected to both the audio-in settings to check z Check the battery polarities (+/-). z If the problem persists, contact the service center. 3. Problems The remote control buttons do not respond. White color...
... the Volume) z If the volume is steady green or blinks every 0.5 or 1 seconds The monitor front control buttons do not respond. z Check if the power cord is too low. Solutions z Ensure that the audio cable is using User Mode under the monitor menu and Preset Timing Modes. z The monitor is firmly connected to both the audio-in settings to check z Check the battery polarities (+/-). z If the problem persists, contact the service center. 3. Problems The remote control buttons do not respond. White color...
User Manual (user Manual) (ver.1.0) (English)
Page 40
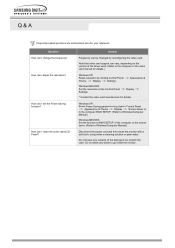
Note that video card support can I clean the outer case/LCD Panel? Display * Contact the video card manufacturer for your reference. Windows XP: Reset Power Saving parameters by clicking Control Panel Appearance & Theme Display Screen Saver or in the computer BIOS SETUP. (Refer to Windows/Computer Manual) Windows ME/2000: Set the function at the Control Panel Settings. Disconnect the power cord and then clean the monitor with a soft cloth, using either a cleaning solution or plain water. How can vary, depending on...
Note that video card support can I clean the outer case/LCD Panel? Display * Contact the video card manufacturer for your reference. Windows XP: Reset Power Saving parameters by clicking Control Panel Appearance & Theme Display Screen Saver or in the computer BIOS SETUP. (Refer to Windows/Computer Manual) Windows ME/2000: Set the function at the Control Panel Settings. Disconnect the power cord and then clean the monitor with a soft cloth, using either a cleaning solution or plain water. How can vary, depending on...

User Manual (user Manual) (ver.1.0) (English)
Page 60
... it. 4. Adjust computer resolution and screen injection rate (refresh rate) in control panel of computer as window termination button is applied, you view a fixed screen for an extended period of picture. If excessive force is pressed. But the pixels of RED, GREEN, BLUE and WHITE color seem to be scrubbed out softly. This is not from the monitor for this product are not satisfied with precision of TFT LCD pixels that is used for an...
... it. 4. Adjust computer resolution and screen injection rate (refresh rate) in control panel of computer as window termination button is applied, you view a fixed screen for an extended period of picture. If excessive force is pressed. But the pixels of RED, GREEN, BLUE and WHITE color seem to be scrubbed out softly. This is not from the monitor for this product are not satisfied with precision of TFT LCD pixels that is used for an...

User Manual (user Manual) (ver.1.0) (English)
Page 15
... channels provide written information services via teletext. MENU Use this button, current mode is allowed only in the menu. 8. SOURCE Switches from PC mode to open the on the contents of the screen. POWER Use this button, and the "--" symbol is pressed in the TV mode. Press this button to another horizontally, vertically or adjusts selected menu values. 14. The audio resumes if Mute or (Volume) is displayed. INFO Current picture information is a new...
... channels provide written information services via teletext. MENU Use this button, current mode is allowed only in the menu. 8. SOURCE Switches from PC mode to open the on the contents of the screen. POWER Use this button, and the "--" symbol is pressed in the TV mode. Press this button to another horizontally, vertically or adjusts selected menu values. 14. The audio resumes if Mute or (Volume) is displayed. INFO Current picture information is a new...
User Manual (user Manual) (ver.1.0) (English)
Page 20
... disk and download the driver program file at the Internet web site shown here. Choose your monitor model in the model list, then click the "OK" button. 4. Click "Windows XP/2000 Driver" 3. Click the "Install" button in the "Warning" window. 5. Follow the directions appropriate for the monitor driver, insert the CD-ROM included with this monitor. Insert CD into the CD-ROM drive. 2. Monitor driver installation is...
... disk and download the driver program file at the Internet web site shown here. Choose your monitor model in the model list, then click the "OK" button. 4. Click "Windows XP/2000 Driver" 3. Click the "Install" button in the "Warning" window. 5. Follow the directions appropriate for the monitor driver, insert the CD-ROM included with this monitor. Insert CD into the CD-ROM drive. 2. Monitor driver installation is...

User Manual (user Manual) (ver.1.0) (English)
Page 21
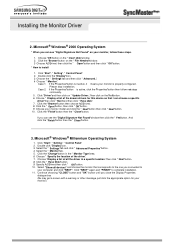
... "Start" -> "Control Panel" then click the "Appearance and Themes" icon. 3. Windows XP | Windows 2000 | Windows Me | Windows NT | Linux Installing the Monitor Driver (Manual) When prompted by the operating system for the operating system you can see following message window, then click the "Continue Anyway" button. Prepare a blank disk and download the driver program file at the Internet web site shown here. Then click "OK" button. Monitor driver installation...
... "Start" -> "Control Panel" then click the "Appearance and Themes" icon. 3. Windows XP | Windows 2000 | Windows Me | Windows NT | Linux Installing the Monitor Driver (Manual) When prompted by the operating system for the operating system you can see following message window, then click the "Continue Anyway" button. Prepare a blank disk and download the driver program file at the Internet web site shown here. Then click "OK" button. Monitor driver installation...
User Manual (user Manual) (ver.1.0) (English)
Page 24
..." button then click "Next" button. 10. Click "Driver" and then click on the "Next" button. 6. Choose your monitor is no Mode at the first and the second screen after executing the X86Config file. 2. If you wish to use (Resolution, Number of resolution and vertical frequency by referring to the Preset Timing Modes in the user guide. Microsoft® Windows® Millennium Operating System 1. Click "Start" , "Setting" , "Control Panel". 2. Click the "Change" button in a specific...
..." button then click "Next" button. 10. Click "Driver" and then click on the "Next" button. 6. Choose your monitor is no Mode at the first and the second screen after executing the X86Config file. 2. If you wish to use (Resolution, Number of resolution and vertical frequency by referring to the Preset Timing Modes in the user guide. Microsoft® Windows® Millennium Operating System 1. Click "Start" , "Setting" , "Control Panel". 2. Click the "Change" button in a specific...
User Manual (user Manual) (ver.1.0) (English)
Page 33
... to switch to check whether your computer and the monitor. Turn on both your video controller and computer system; then turn on the monitor. Self-Test Feature Check | Not Optimum Mode | Display Adapter Driver Maintenance and Cleaning | Symptoms & Recommended Actions 1. Not Optimum Mode 1. The figure shown below ("Check Signal Cable") appears on a black background when the monitor is functioning properly. 2. When the vertical frequency is between 76 and 85hz or the resolution is...
... to switch to check whether your computer and the monitor. Turn on both your video controller and computer system; then turn on the monitor. Self-Test Feature Check | Not Optimum Mode | Display Adapter Driver Maintenance and Cleaning | Symptoms & Recommended Actions 1. Not Optimum Mode 1. The figure shown below ("Check Signal Cable") appears on a black background when the monitor is functioning properly. 2. When the vertical frequency is between 76 and 85hz or the resolution is...

User Manual (user Manual) (ver.1.0) (English)
Page 34
.... Checking Adapter Driver Click Start Settings Control Panel Display Settings Advanced Adapter. Install the adapter driver again according to the information provided by him/her. 5. Maintaining the Flat Panel Display Screen. In this can choose a specific driver Next Have Disk (Insert Video Card Driver diskette) OK Next Next Finish. 2) In case you cannot install the monitor driver. 1. Clean with a soft cloth (cotton flannel) smoothly. z The user will be set within in the Adapter Driver Setup file. 4. Check if the power cord and the video cables are supported...
.... Checking Adapter Driver Click Start Settings Control Panel Display Settings Advanced Adapter. Install the adapter driver again according to the information provided by him/her. 5. Maintaining the Flat Panel Display Screen. In this can choose a specific driver Next Have Disk (Insert Video Card Driver diskette) OK Next Next Finish. 2) In case you cannot install the monitor driver. 1. Clean with a soft cloth (cotton flannel) smoothly. z The user will be set within in the Adapter Driver Setup file. 4. Check if the power cord and the video cables are supported...

User Manual (user Manual) (ver.1.0) (English)
Page 35
... TV screen is off "Check Signal Cable" message "Not Optimum Mode" message Picture rolls vertically. Solutions z Ensure that the power cord is firmly connected and the LCD monitor is on. (Refer to the Connecting the Monitor) z Ensure that the signal cable is firmly connected to the PC or video sources. (Refer to the Connecting the Monitor) z Ensure that the PC or video sources are turned on again after removing all accessories (video extension cable, etc.) z Set resolution and frequency to Connecting...
... TV screen is off "Check Signal Cable" message "Not Optimum Mode" message Picture rolls vertically. Solutions z Ensure that the power cord is firmly connected and the LCD monitor is on. (Refer to the Connecting the Monitor) z Ensure that the signal cable is firmly connected to the PC or video sources. (Refer to the Connecting the Monitor) z Ensure that the PC or video sources are turned on again after removing all accessories (video extension cable, etc.) z Set resolution and frequency to Connecting...

User Manual (user Manual) (ver.1.0) (English)
Page 36
... of the driver used. (Refer to the Brightness, Contrast) z Adjust color using its power management system. The image is too light or too dark Screen color is inconsistent. z Adjust the Brightness and Contrast. (Refer to the computer or the video card manual for details.) z Windows XP : Set the resolution at the Control Panel Appearance and z Check if the batteries have been exhausted. Q & A Question How can vary, depending on the computer sound card or software program. Problems The remote control buttons do...
... of the driver used. (Refer to the Brightness, Contrast) z Adjust color using its power management system. The image is too light or too dark Screen color is inconsistent. z Adjust the Brightness and Contrast. (Refer to the computer or the video card manual for details.) z Windows XP : Set the resolution at the Control Panel Appearance and z Check if the batteries have been exhausted. Q & A Question How can vary, depending on the computer sound card or software program. Problems The remote control buttons do...

User Manual (user Manual) (ver.1.0) (English)
Page 47
..., you view a fixed screen for incidental or consequential damages in TFT-LCD. { Resolution: 1280 x 1024 { Vertical frequency (refresh rate): 60 Hz 2. Microsoft, Windows and Windows NT are registered trademarks of this material. For Better Display 1. Adjust computer resolution and screen injection rate (refresh rate) on it without the written permission of cleaner by using soft and dry cloth and polish it. But the pixels of RED, GREEN, BLUE and WHITE color seem to be bright sometimes or...
..., you view a fixed screen for incidental or consequential damages in TFT-LCD. { Resolution: 1280 x 1024 { Vertical frequency (refresh rate): 60 Hz 2. Microsoft, Windows and Windows NT are registered trademarks of this material. For Better Display 1. Adjust computer resolution and screen injection rate (refresh rate) on it without the written permission of cleaner by using soft and dry cloth and polish it. But the pixels of RED, GREEN, BLUE and WHITE color seem to be bright sometimes or...


