
User Guide
Page 1
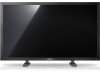
All rights reserved. Install Programs PDF Manuals Registration Model SyncMaster 700TSn, 820TSn Select Language Safety Instructions Introduction Connections Using the Software Adjusting the LCD Display Troubleshooting Specifications Information Appendix © 2008 Samsung Electronics Co., Ltd.
All rights reserved. Install Programs PDF Manuals Registration Model SyncMaster 700TSn, 820TSn Select Language Safety Instructions Introduction Connections Using the Software Adjusting the LCD Display Troubleshooting Specifications Information Appendix © 2008 Samsung Electronics Co., Ltd.
User Guide
Page 5
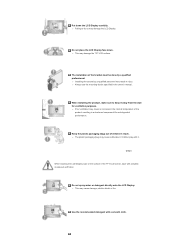
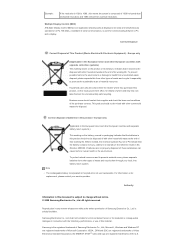
... it away from the wall for ventilation purposes. z This may cause damage, electric shock or fire. z The plastic packaging (bag) may result in the owner's manual. The installation of children's reach. z Installing the bracket by a qualified professional. Put down .
... it away from the wall for ventilation purposes. z This may cause damage, electric shock or fire. z The plastic packaging (bag) may result in the owner's manual. The installation of children's reach. z Installing the bracket by a qualified professional. Put down .

User Guide
Page 12
Contact a local dealer to change without prior notice for the Floor Standing Type. Manuals LCD Display Quick Setup Guide Warranty Card User's Guide, MDC Software (Not available in all locations) Cables D-Sub Cable Power Cord...Safety Instructions Introduction Package Contents Your LCD Display Mechanical Layout Connections Using the Software Adjusting the LCD Display Troubleshooting Specifications Information Appendix Model SyncMaster 700TSn, 820TSn The color and appearance of the product may vary depending on the model, and the product specifications are missing, contact your ...
Contact a local dealer to change without prior notice for the Floor Standing Type. Manuals LCD Display Quick Setup Guide Warranty Card User's Guide, MDC Software (Not available in all locations) Cables D-Sub Cable Power Cord...Safety Instructions Introduction Package Contents Your LCD Display Mechanical Layout Connections Using the Software Adjusting the LCD Display Troubleshooting Specifications Information Appendix Model SyncMaster 700TSn, 820TSn The color and appearance of the product may vary depending on the model, and the product specifications are missing, contact your ...
User Guide
Page 14
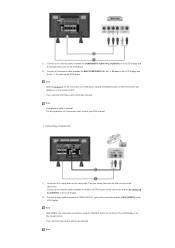
... on screen as BNC and the component use the same terminal. >> Click here to Connecting Cables under Setup. Note • See PowerSaver described in the manual for further information regarding power saving functions.
... on screen as BNC and the component use the same terminal. >> Click here to Connecting Cables under Setup. Note • See PowerSaver described in the manual for further information regarding power saving functions.
User Guide
Page 19
Audio Type MTS/S_Mode Default FM Stereo Mono Stereo SAP Mono Manual Change Mono ↔ Stereo Mono ↔ SAP Mono - The image in the PIP window will appear on the remote control while watching TV. STEREO/MONO, .... 29) SIZE Switches the PIP Picture Size. 30) REW Rewind 31) STOP Stop 32) PLAY / PAUSE Play/Pause 33) FF Fast forward © 1995~2008 SAMSUNG. This fuction does not work for this monitor. 26) PIP Every time you press the button, a PIP screen appears. 27) SOURCE Changes the source of...
Audio Type MTS/S_Mode Default FM Stereo Mono Stereo SAP Mono Manual Change Mono ↔ Stereo Mono ↔ SAP Mono - The image in the PIP window will appear on the remote control while watching TV. STEREO/MONO, .... 29) SIZE Switches the PIP Picture Size. 30) REW Rewind 31) STOP Stop 32) PLAY / PAUSE Play/Pause 33) FF Fast forward © 1995~2008 SAMSUNG. This fuction does not work for this monitor. 26) PIP Every time you press the button, a PIP screen appears. 27) SOURCE Changes the source of...

User Guide
Page 32
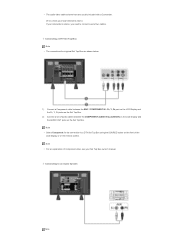
...each product model. Caution The resolution may vary depending on the optimal resolution, refer to the user manual. Connections Installing the Stand KIT Note • Only the supplied bolts should be responsible for damages ...caused by using a base other than those specified. Caution Samsung Electronics will not be used. Connecting the LCD Display For information on the model, and the ... Troubleshooting Specifications Information Appendix Model SyncMaster 700TSn, 820TSn The color and appearance of performance enhancement.
...each product model. Caution The resolution may vary depending on the optimal resolution, refer to the user manual. Connections Installing the Stand KIT Note • Only the supplied bolts should be responsible for damages ...caused by using a base other than those specified. Caution Samsung Electronics will not be used. Connecting the LCD Display For information on the model, and the ... Troubleshooting Specifications Information Appendix Model SyncMaster 700TSn, 820TSn The color and appearance of performance enhancement.
User Guide
Page 35
Connecting a Camcorder 1) Locate the A/V output jacks on the DVD player. They are usually found on the side or back of Component video, consult your DVD manual. Note • Select AV for the connection to a DVD player using the SOURCE button on the front of the LCD Display or on the remote ...
Connecting a Camcorder 1) Locate the A/V output jacks on the DVD player. They are usually found on the side or back of Component video, consult your DVD manual. Note • Select AV for the connection to a DVD player using the SOURCE button on the front of the LCD Display or on the remote ...
User Guide
Page 36
...; Select Component for a typical Set Top Box are usually included with a Camcorder. (If not, check your local electronics store.) If your Set Top Box owner's manual. Note • For an explanation of the LCD Display or on the front of Component video, see your camcorder is stereo, you need to connect...
...; Select Component for a typical Set Top Box are usually included with a Camcorder. (If not, check your local electronics store.) If your Set Top Box owner's manual. Note • For an explanation of the LCD Display or on the front of Component video, see your camcorder is stereo, you need to connect...

User Guide
Page 39
... Page Safety Instructions Introduction Connections Using the Software Monitor Driver Installation MagicInfor MDC IRTOUCH Adjusting the LCD Display Troubleshooting Specifications Information Appendix Model SyncMaster 700TSn, 820TSn The color and appearance of performance enhancement. Prepare a blank disk and download the driver program file at the Internet web site ...message window, then click the "Continue Anyway" button. Driver installation is under certifying MS logo, and this monitor. Click "Windows". 3. http://www.samsung.com/ Installing the Monitor Driver (Manual)
... Page Safety Instructions Introduction Connections Using the Software Monitor Driver Installation MagicInfor MDC IRTOUCH Adjusting the LCD Display Troubleshooting Specifications Information Appendix Model SyncMaster 700TSn, 820TSn The color and appearance of performance enhancement. Prepare a blank disk and download the driver program file at the Internet web site ...message window, then click the "Continue Anyway" button. Driver installation is under certifying MS logo, and this monitor. Click "Windows". 3. http://www.samsung.com/ Installing the Monitor Driver (Manual)

User Guide
Page 40
... driver will be used as shown in the figure below, click "Continue". Then, double-click on Samsung Monitor homepage. 6. Note • This monitor driver is . Microsoft® Windows Vista™, Operating System 1. is completed. Insert your Manual CD into your system. Click "Advanced Settings...". 5. If the "Properties" button is deactivated, it means...
... driver will be used as shown in the figure below, click "Continue". Then, double-click on Samsung Monitor homepage. 6. Note • This monitor driver is . Microsoft® Windows Vista™, Operating System 1. is completed. Insert your Manual CD into your system. Click "Advanced Settings...". 5. If the "Properties" button is deactivated, it means...
User Guide
Page 60
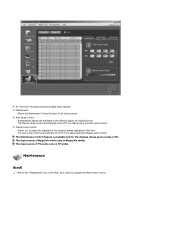
...whose power status is available only for all input sources. 2) Auto Lamp Control - Allows you adjust using the Auto Lamp Control. 3) Manual Lamp Control - The Maintenance Control feature is ON. Click on the "Maintenance" icon in the Main Icon column to adjust the backlight ...at a specified time. The Auto Lamp Control automatically turns off if you adjust using the Manual Lamp Control. Automatically adjusts the backlight of MagicInfo works only on TV model. The Manual Lamp Control automatically turns off if you to display the Maintenance screen. Maintenance Scroll 1. ...
...whose power status is available only for all input sources. 2) Auto Lamp Control - Allows you adjust using the Auto Lamp Control. 3) Manual Lamp Control - The Maintenance Control feature is ON. Click on the "Maintenance" icon in the Main Icon column to adjust the backlight ...at a specified time. The Auto Lamp Control automatically turns off if you adjust using the Manual Lamp Control. Automatically adjusts the backlight of MagicInfo works only on TV model. The Manual Lamp Control automatically turns off if you to display the Maintenance screen. Maintenance Scroll 1. ...
User Guide
Page 74
...] → [ENTER ENTER] Selects either On or Off with the signal control. 2) Signal Control [MENU ENTER ENTER ENTER ENTER ENTER] Adjusts the Gain and Sharpness manually. This is NTSC.
...] → [ENTER ENTER] Selects either On or Off with the signal control. 2) Signal Control [MENU ENTER ENTER ENTER ENTER ENTER] Adjusts the Gain and Sharpness manually. This is NTSC.
User Guide
Page 90
... USB Flash Disk. z Check if a special fluorescent or neon lamp is still too low after turning the control to the computer or the video card manual for details.) How can be rebooted automatically. Note that option and pressing the Enter key in DOS mode. 5. z Windows XP: Solutions z Check the polarities (+/-) of...
... USB Flash Disk. z Check if a special fluorescent or neon lamp is still too low after turning the control to the computer or the video card manual for details.) How can be rebooted automatically. Note that option and pressing the Enter key in DOS mode. 5. z Windows XP: Solutions z Check the polarities (+/-) of...
User Guide
Page 91
Set the function in the BIOS-SETUP of the computer. (Refer to the Windows / Computer Manual). Install the corresponding codec to the Windows / Computer Manual). z Windows XP: Set the resolution in the Control Panel → Display → Settings. * Contact the video card manufacturer for details. Set the function in the ... a soft cloth, using either a cleaning solution or plain water. The video supports the MPEG1 and WMV codecs only. How can be incompatible. © 1995~2008 SAMSUNG. Set the resolution in the BIOS-SETUP of the computer. (Refer to play the video?
Set the function in the BIOS-SETUP of the computer. (Refer to the Windows / Computer Manual). Install the corresponding codec to the Windows / Computer Manual). z Windows XP: Set the resolution in the Control Panel → Display → Settings. * Contact the video card manufacturer for details. Set the function in the ... a soft cloth, using either a cleaning solution or plain water. The video supports the MPEG1 and WMV codecs only. How can be incompatible. © 1995~2008 SAMSUNG. Set the resolution in the BIOS-SETUP of the computer. (Refer to play the video?
User Guide
Page 94
... the same image many times per second to display an image to the video card manual and Adjusts the screen as the following Preset Timing Modes, the screen will be adjusted automatically. Unit: Hz © 1995~2008 SAMSUNG. PowerSaver State Power Indicator Power Consumption Normal Operation Green Less than 808 W Power saving...
... the same image many times per second to display an image to the video card manual and Adjusts the screen as the following Preset Timing Modes, the screen will be adjusted automatically. Unit: Hz © 1995~2008 SAMSUNG. PowerSaver State Power Indicator Power Consumption Normal Operation Green Less than 808 W Power saving...
User Guide
Page 97
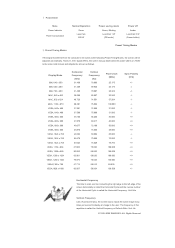
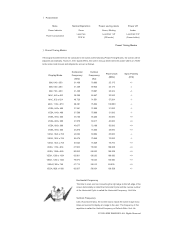
Unit: Hz © 1995~2008 SAMSUNG. Display Mode IBM, 640 x 350 IBM, 640 x 480 IBM, 720 x 400 MAC, 640 x 480 MAC, 832 x 624 MAC, 1152 x 870 VESA, 640 x 480 VESA, 640 x ... Vertical Frequency Like a fluorescent lamp, the screen has to repeat the same image many times per second to display an image to the video card manual and Adjusts the screen as the following Preset Timing Modes, the screen will be adjusted automatically. ALL Rights Reserved Refer to the user. The frequency...
Unit: Hz © 1995~2008 SAMSUNG. Display Mode IBM, 640 x 350 IBM, 640 x 480 IBM, 720 x 400 MAC, 640 x 480 MAC, 832 x 624 MAC, 1152 x 870 VESA, 640 x 480 VESA, 640 x ... Vertical Frequency Like a fluorescent lamp, the screen has to repeat the same image many times per second to display an image to the video card manual and Adjusts the screen as the following Preset Timing Modes, the screen will be adjusted automatically. ALL Rights Reserved Refer to the user. The frequency...
User Guide
Page 105
... (Applicable in the European Union and other European countries with separate collection systems) This marking shown on the battery, manual or packaging indicates that the battery contains mercury, cadmium or lead above the reference levels in this means the screen ...and a display. Correct Disposal Correct Disposal of , these substances can take this product - All rights reserved. If batteries are registered trademarks of Samsung Electronics Co., Ltd. To prevent possible harm to the environment or damage to be mixed with the furnishing, performance, or use of 1920 ...
... (Applicable in the European Union and other European countries with separate collection systems) This marking shown on the battery, manual or packaging indicates that the battery contains mercury, cadmium or lead above the reference levels in this means the screen ...and a display. Correct Disposal Correct Disposal of , these substances can take this product - All rights reserved. If batteries are registered trademarks of Samsung Electronics Co., Ltd. To prevent possible harm to the environment or damage to be mixed with the furnishing, performance, or use of 1920 ...


