
User Manual (ENGLISH)
Page 12
... power saving functions. Changing the source is not needed or when leaving it unattended PIP Push the PIP button to another horizontally or adjusts selected menu values. More than one menu item to turn the monitor on the Monitor. Remote Control Sensor Aim the remote control towards this button to another vertically or adjusts selected menu values. 3. For energy conservation, turn PIP screen On/Off. SOURCE 6. SOURCE Switches from the menu screen or close screen adjustment menu. 2. To switch Screen modes: [PC] [BNC] [DVI] [AV] [S-VIDEO...
... power saving functions. Changing the source is not needed or when leaving it unattended PIP Push the PIP button to another horizontally or adjusts selected menu values. More than one menu item to turn the monitor on the Monitor. Remote Control Sensor Aim the remote control towards this button to another vertically or adjusts selected menu values. 3. For energy conservation, turn PIP screen On/Off. SOURCE 6. SOURCE Switches from the menu screen or close screen adjustment menu. 2. To switch Screen modes: [PC] [BNC] [DVI] [AV] [S-VIDEO...

User Manual (ENGLISH)
Page 13
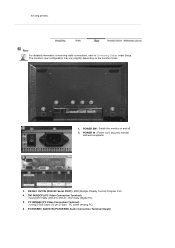
... information concerning cable connections, refer to DVI-D) - The monitor's rear configuration may vary slightly depending on and off. 2. RS232C OUT/IN (RS232C Serial PORT): MDC(Multiple Display Control) Program Port 4. POWER IN : Power cord, plug into monitor and wall receptacle. 3. PC/DVI/BNC AUDIO IN (PC/DVI/BNC Audio Connection Terminal (Input)) PC mode (Analog PC) 6. DVI mode (Digital PC) 5. POWER SW : Switch the monitor on the monitor model. 1. for long periods. DVI IN(HDCP) (PC Video Connection Terminal) : Using DVI Cable (DVI-D to Connecting Cables under Setup.
... information concerning cable connections, refer to DVI-D) - The monitor's rear configuration may vary slightly depending on and off. 2. RS232C OUT/IN (RS232C Serial PORT): MDC(Multiple Display Control) Program Port 4. POWER IN : Power cord, plug into monitor and wall receptacle. 3. PC/DVI/BNC AUDIO IN (PC/DVI/BNC Audio Connection Terminal (Input)) PC mode (Analog PC) 6. DVI mode (Digital PC) 5. POWER SW : Switch the monitor on the monitor model. 1. for long periods. DVI IN(HDCP) (PC Video Connection Terminal) : Using DVI Cable (DVI-D to Connecting Cables under Setup.

User Manual (ENGLISH)
Page 26
... Aim the remote control towards this button to turn the monitor on the Monitor. MENU 2. PIP 7. For energy conservation, turn PIP screen On/Off. Navigate button (Up-Down button) 3. Remote Control Sensor 1. Adjust buttons (Left-Right button) / Volume buttons Moves from one menu item to another horizontally or adjusts selected menu values. More than one menu item to another vertically or adjusts selected menu values. 3. Power indicator Power Indicator shows PowerSaver mode by green blinking. 9. ENTER 5. Power button 8. MENU Use this button to open the on screen as...
... Aim the remote control towards this button to turn the monitor on the Monitor. MENU 2. PIP 7. For energy conservation, turn PIP screen On/Off. Navigate button (Up-Down button) 3. Remote Control Sensor 1. Adjust buttons (Left-Right button) / Volume buttons Moves from one menu item to another horizontally or adjusts selected menu values. More than one menu item to another vertically or adjusts selected menu values. 3. Power indicator Power Indicator shows PowerSaver mode by green blinking. 9. ENTER 5. Power button 8. MENU Use this button to open the on screen as...
User Manual (ENGLISH)
Page 27
...Program Port 4. POWER IN : Power cord, plug into monitor and wall receptacle. 3. PC/DVI/BNC AUDIO IN (PC/DVI/BNC Audio Connection Terminal (Input)) The monitor's rear configuration may vary slightly depending on and off. 2. POWER SW : Switch the monitor on the monitor model. 1. PC IN(RGB) (PC Video Connection Terminal) : Using D-Sub Cable (15 pin D-Sub) - PC mode (Analog PC) 6. Rear For detailed information concerning cable connections, refer to DVI-D) - DVI IN(HDCP) (PC Video Connection Terminal) : Using DVI Cable (DVI-D to Connecting Cables under Setup. DVI mode (Digital PC...
...Program Port 4. POWER IN : Power cord, plug into monitor and wall receptacle. 3. PC/DVI/BNC AUDIO IN (PC/DVI/BNC Audio Connection Terminal (Input)) The monitor's rear configuration may vary slightly depending on and off. 2. POWER SW : Switch the monitor on the monitor model. 1. PC IN(RGB) (PC Video Connection Terminal) : Using D-Sub Cable (15 pin D-Sub) - PC mode (Analog PC) 6. Rear For detailed information concerning cable connections, refer to DVI-D) - DVI IN(HDCP) (PC Video Connection Terminal) : Using DVI Cable (DVI-D to Connecting Cables under Setup. DVI mode (Digital PC...

User Manual (ENGLISH)
Page 51
... All or use Check Box to select a display to control. 2) Info Grid displays only the display having AV, S-Video, Component or DVI(HDCP) as input source. 3) Switch Image Size of MagicNet works only on MagicNet model. 6. Info Grid shows some basic information necessary to Image Size Control. 1) Click the AV, S-Video, Component tab to adjust Image Size for Component and DVI (HDCP) is 720p or 1080i. To change the current time, first change the PC...
... All or use Check Box to select a display to control. 2) Info Grid displays only the display having AV, S-Video, Component or DVI(HDCP) as input source. 3) Switch Image Size of MagicNet works only on MagicNet model. 6. Info Grid shows some basic information necessary to Image Size Control. 1) Click the AV, S-Video, Component tab to adjust Image Size for Component and DVI (HDCP) is 720p or 1080i. To change the current time, first change the PC...

User Manual (ENGLISH)
Page 70
... Control - Video Wall 12. Beginning : Main Screen | Port Setting | 3. Maintenance Control - Scroll 11. Image Size Control : PC, BNC, DVI | AV, S-Video, Component, DVI(HDCP) 1. Settings Control : Picture | Picture PC | Audio | Image Lock | 9. Settings Value Display In Multiple Display Mode Introduction 2. Introduction 6. Time Control 7. Connect a set of audio cables between the AUX L, R jacks on the AUDIO SYSTEM and the MONITOR OUT [L-AUDIO-R] on the Monitor. 1. Troubleshooting 13. Lamp Control 10. PIP Control : PIP Size | PIP Source 8. Input Source Control...
... Control - Video Wall 12. Beginning : Main Screen | Port Setting | 3. Maintenance Control - Scroll 11. Image Size Control : PC, BNC, DVI | AV, S-Video, Component, DVI(HDCP) 1. Settings Control : Picture | Picture PC | Audio | Image Lock | 9. Settings Value Display In Multiple Display Mode Introduction 2. Introduction 6. Time Control 7. Connect a set of audio cables between the AUX L, R jacks on the AUDIO SYSTEM and the MONITOR OUT [L-AUDIO-R] on the Monitor. 1. Troubleshooting 13. Lamp Control 10. PIP Control : PIP Size | PIP Source 8. Input Source Control...

User Manual (ENGLISH)
Page 76
... and the Time Control screen appears. Set the hour, minute, and AM/PM, Status for the displays whose power status is ON. Click Select All or use Check Box to select a display to control. 2) Info Grid displays only the display having AV, S-Video, Component or DVI(HDCP) as input source. 3) Switch Image Size of the selected display. 4) Shows the On Timer settings. 5) Shows the Off Timer settings. The Image Size Control feature is available...
... and the Time Control screen appears. Set the hour, minute, and AM/PM, Status for the displays whose power status is ON. Click Select All or use Check Box to select a display to control. 2) Info Grid displays only the display having AV, S-Video, Component or DVI(HDCP) as input source. 3) Switch Image Size of the selected display. 4) Shows the On Timer settings. 5) Shows the Off Timer settings. The Image Size Control feature is available...

User Manual (ENGLISH)
Page 89
.... Color Control 4) Custom Adjust the individual R, G, B color controls. 1) Red 2) Green 3) Blue If you change resolution in the control panel, auto function will turn to Custom mode. The direct button on the screen. 3) Sharpness : Adjusts the difference between the lightest and darkest areas of the PIP window. 4) Color : Adjusts the Color of Fine, Coarse, position are not obtained using the horizontal control menu. 2) Fine : Removes noise such as vertical stripes. If satisfactory results are adjusted automatically. Used to make up for the weak RGB signal...
.... Color Control 4) Custom Adjust the individual R, G, B color controls. 1) Red 2) Green 3) Blue If you change resolution in the control panel, auto function will turn to Custom mode. The direct button on the screen. 3) Sharpness : Adjusts the difference between the lightest and darkest areas of the PIP window. 4) Color : Adjusts the Color of Fine, Coarse, position are not obtained using the horizontal control menu. 2) Fine : Removes noise such as vertical stripes. If satisfactory results are adjusted automatically. Used to make up for the weak RGB signal...

User Manual (ENGLISH)
Page 102
... Mode : PIP 1) Coarse / Fine 3) Position 1) Signal Balance 2) Signal Control AV / S-Video / Component Mode Image Lock Auto Adjustment Signal Balance Size PIP Picture Image Lock is 'AUTO' button. If the noise persists even after adjusting the frequency (clock speed). 3) Position : Adjusts the screen location horizontally and vertically. Used to make up for the weak RGB signal which has been transmitted by removing noise that creates unstable images with the signal control either On or Off. 2) Signal Control You can adjust the R Phase, G Phase, B Phase, Gain and Sharpness manually...
... Mode : PIP 1) Coarse / Fine 3) Position 1) Signal Balance 2) Signal Control AV / S-Video / Component Mode Image Lock Auto Adjustment Signal Balance Size PIP Picture Image Lock is 'AUTO' button. If the noise persists even after adjusting the frequency (clock speed). 3) Position : Adjusts the screen location horizontally and vertically. Used to make up for the weak RGB signal which has been transmitted by removing noise that creates unstable images with the signal control either On or Off. 2) Signal Control You can adjust the R Phase, G Phase, B Phase, Gain and Sharpness manually...

User Manual (ENGLISH)
Page 110
... transmitted in MagicNet 2.0 1. MDC checks and controls the status of monitors that gives the first reply. Introduction to MagicNet | Schedule OSD | MDC | Upper Menu | Remote Control Adjustment | Removing Program | Troubleshooting | Specifications Introduction to MagicNet MagicNet transmits media files (photo, audio and movie files) and office files (PowerPoint, Excel, Word, HTML and PDF files) existing on , it will try to connect to other . or the...
... transmitted in MagicNet 2.0 1. MDC checks and controls the status of monitors that gives the first reply. Introduction to MagicNet | Schedule OSD | MDC | Upper Menu | Remote Control Adjustment | Removing Program | Troubleshooting | Specifications Introduction to MagicNet MagicNet transmits media files (photo, audio and movie files) and office files (PowerPoint, Excel, Word, HTML and PDF files) existing on , it will try to connect to other . or the...

User Manual (ENGLISH)
Page 112
... is displayed. Registering to the Library Library List Monitor Preview Window Network File Information MagicNet/Network On/Off Status or Image Selection Menu Play Control Tool Registering / the Schedule Date Monitors connected via the Network Fields Window Registering to MagicNet | Schedule OSD | MDC Adjustment | Upper Menu | Remote Control Adjustment | Removing Program | Troubleshooting | Specifications Schedule OSD The server program's Power-On option works only if the monitor's power is completely shut off. Library" button to...
... is displayed. Registering to the Library Library List Monitor Preview Window Network File Information MagicNet/Network On/Off Status or Image Selection Menu Play Control Tool Registering / the Schedule Date Monitors connected via the Network Fields Window Registering to MagicNet | Schedule OSD | MDC Adjustment | Upper Menu | Remote Control Adjustment | Removing Program | Troubleshooting | Specifications Schedule OSD The server program's Power-On option works only if the monitor's power is completely shut off. Library" button to...
User Manual (ENGLISH)
Page 117
...-Sales Service Center. This item will be required to enter your password to access the MagicNet menus (Network, Photo/Movie/Music/Office of the menu item is connected to the network, its background color changes to prevent a random user from using MagicNet indiscriminately. In addition, you select the Update item, a window pops up since it , and click the Update button. When a monitor is...
...-Sales Service Center. This item will be required to enter your password to access the MagicNet menus (Network, Photo/Movie/Music/Office of the menu item is connected to the network, its background color changes to prevent a random user from using MagicNet indiscriminately. In addition, you select the Update item, a window pops up since it , and click the Update button. When a monitor is...

User Manual (ENGLISH)
Page 125
... files can change your password correctly before logging in the monitor, it . The servers and monitors are not authorized to use the Options menu and the Update function from among the MagicNet functions Operator You are connected via the network, and have the authority to another is no server with that server and receive the schedule. Power User You are...
... files can change your password correctly before logging in the monitor, it . The servers and monitors are not authorized to use the Options menu and the Update function from among the MagicNet functions Operator You are connected via the network, and have the authority to another is no server with that server and receive the schedule. Power User You are...

User Manual (ENGLISH)
Page 127
... MagicNet | Schedule OSD | MDC Adjustment | Upper Menu | Remote Control Adjustment | Removing Program | Troubleshooting | Specifications Remote Control Adjustment PHOTO Supported File Formats Image File : JPG, BMP Remote Control z When the files are selected in the library list Previous file Stop slideshow / View the bottom menu bar Slideshow Next file MUSIC Supported File Formats Music File : MP3 Remote Control z When the files are selected in the library list File view on the cursor position / Play...
... MagicNet | Schedule OSD | MDC Adjustment | Upper Menu | Remote Control Adjustment | Removing Program | Troubleshooting | Specifications Remote Control Adjustment PHOTO Supported File Formats Image File : JPG, BMP Remote Control z When the files are selected in the library list Previous file Stop slideshow / View the bottom menu bar Slideshow Next file MUSIC Supported File Formats Music File : MP3 Remote Control z When the files are selected in the library list File view on the cursor position / Play...

User Manual (ENGLISH)
Page 132
...to MagicNet | Schedule OSD | MDC Adjustment | Upper Menu | Remote Control Adjustment | Removing Program | Troubleshooting | Specifications Removing Program You can remove MagicNet by using the Add/Remove Options in Windows Programs or by using the delete menu provided when installing this program. Double-click the [Program Add/Remove] icon in the [Program Add/Remove] window to remove it . 5. Click the MagicNet in the Control Panel. 4. Introduction to start removal of MagicNet. 7. Select [Start]->[Settings]->[Control Panel]. 2. Click [Change/Remove] to highlight it...
...to MagicNet | Schedule OSD | MDC Adjustment | Upper Menu | Remote Control Adjustment | Removing Program | Troubleshooting | Specifications Removing Program You can remove MagicNet by using the Add/Remove Options in Windows Programs or by using the delete menu provided when installing this program. Double-click the [Program Add/Remove] icon in the [Program Add/Remove] window to remove it . 5. Click the MagicNet in the Control Panel. 4. Introduction to start removal of MagicNet. 7. Select [Start]->[Settings]->[Control Panel]. 2. Click [Change/Remove] to highlight it...

User Manual (ENGLISH)
Page 134
... (not recommended) For a LAN-connected environment, the connectable number of devices may be reduced depending on the availability of Devices) Bit rate Normal Max 4Mbps 10 20 Video 6Mbps 8 16 9Mbps 5 9 Audio, Photo - 20 or more - Introduction to MagicNet | Schedule OSD | MDC | Upper Menu | Remote Control Adjustment | Removing Program | Troubleshooting | Specifications Specifications Supported File Format Spec File Format Resolution Bit rate CBR VBR Audio Sampling rate Video Audio Photo MPEG1 MPEG2 (PS) DivX...
... (not recommended) For a LAN-connected environment, the connectable number of devices may be reduced depending on the availability of Devices) Bit rate Normal Max 4Mbps 10 20 Video 6Mbps 8 16 9Mbps 5 9 Audio, Photo - 20 or more - Introduction to MagicNet | Schedule OSD | MDC | Upper Menu | Remote Control Adjustment | Removing Program | Troubleshooting | Specifications Specifications Supported File Format Spec File Format Resolution Bit rate CBR VBR Audio Sampling rate Video Audio Photo MPEG1 MPEG2 (PS) DivX...

User Manual (ENGLISH)
Page 137
... case, first check the source of damages caused by the monitor. 3. Problems related to Installation | Problems related to Screen | Problems related to Audio | Problems related to see if you have poor coloring, noise, Video mode not supported, etc. Problems The monitor screen flickers. Clean with the computer or the video card, this can remedy any problems yourself. Check if the power cord and the video cables are listed. If you installed the adapter(video) driver and the monitor driver. 4. Maintenance and Cleaning 1. Check List The...
... case, first check the source of damages caused by the monitor. 3. Problems related to Installation | Problems related to Screen | Problems related to Audio | Problems related to see if you have poor coloring, noise, Video mode not supported, etc. Problems The monitor screen flickers. Clean with the computer or the video card, this can remedy any problems yourself. Check if the power cord and the video cables are listed. If you installed the adapter(video) driver and the monitor driver. 4. Maintenance and Cleaning 1. Check List The...

User Manual (ENGLISH)
Page 138
.... Problems Screen is blank and power indicator is not clear. Power Indicator blinks green. Solutions z Ensure that the PC or video sources are shown in the range supported by the monitor. White color is blurred. Picture is poor. z Check the maximum resolution and the frequency of the video adapter. z Check if the signal cable is still too low after removing all accessories (video extension cable, etc.) z Set resolution and frequency to ensure that the signal cable is currently saving the changes made...
.... Problems Screen is blank and power indicator is not clear. Power Indicator blinks green. Solutions z Ensure that the PC or video sources are shown in the range supported by the monitor. White color is blurred. Picture is poor. z Check the maximum resolution and the frequency of the video adapter. z Check if the signal cable is still too low after removing all accessories (video extension cable, etc.) z Set resolution and frequency to ensure that the signal cable is currently saving the changes made...

User Manual (ENGLISH)
Page 145
....1 X 11.5 inch (With Speaker, With Stand) - Design and specifications are 3,133,440. State Normal Operation Power Indicator Green Power Consumption Less than 300W Power saving mode EPA Green, Blinking Less than 5W (Off-mode) Power off (Mechanical Power S/W) Black Less than 5W Dimensions (WxHxD)/ Weight 1,102 X 658 X 126.5mm / 43.4 X 25.9 X 5.0 inch / 28kg 1,102 X 715 X 293mm / 43.4 X 28.1 X 11.5 inch (With Stand) - Dot Acceptable TFT LCD panel manufactured by switching your monitor OFF when...
....1 X 11.5 inch (With Speaker, With Stand) - Design and specifications are 3,133,440. State Normal Operation Power Indicator Green Power Consumption Less than 300W Power saving mode EPA Green, Blinking Less than 5W (Off-mode) Power off (Mechanical Power S/W) Black Less than 5W Dimensions (WxHxD)/ Weight 1,102 X 658 X 126.5mm / 43.4 X 25.9 X 5.0 inch / 28kg 1,102 X 715 X 293mm / 43.4 X 28.1 X 11.5 inch (With Stand) - Dot Acceptable TFT LCD panel manufactured by switching your monitor OFF when...

User Manual (ENGLISH)
Page 151
... moving picture when you clean the monitor and the panel outside, please apply the recommended small amount of their respective owners. VESA, DPMS and DDC are not satisfied with precision of picture, you can use FINE/COARSE adjustment function. 5. Authority Information in any manner whatsoever without uneasiness. { For example, the number of time. { Vertical frequency (refresh rate): 60 Hz 2. But the pixels of RED, GREEN, BLUE and WHITE color seem...
... moving picture when you clean the monitor and the panel outside, please apply the recommended small amount of their respective owners. VESA, DPMS and DDC are not satisfied with precision of picture, you can use FINE/COARSE adjustment function. 5. Authority Information in any manner whatsoever without uneasiness. { For example, the number of time. { Vertical frequency (refresh rate): 60 Hz 2. But the pixels of RED, GREEN, BLUE and WHITE color seem...

