
User Manual
Page 3
...result in fire or electric shock. Do not use the provided power cord of a size appropriate to contact an authorized Service Center when installing your monitor. Do not forcefully bend or pull the power plug and do so may result in fire. Do not connect multiple appliances to the same power... outlet. • Otherwise, this may cause serious damage to your monitor in fire. Use only the power cord provided by our company. Connect the power plug to a wall outlet that can be readily operable. • ...
...result in fire or electric shock. Do not use the provided power cord of a size appropriate to contact an authorized Service Center when installing your monitor. Do not forcefully bend or pull the power plug and do so may result in fire. Do not connect multiple appliances to the same power... outlet. • Otherwise, this may cause serious damage to your monitor in fire. Use only the power cord provided by our company. Connect the power plug to a wall outlet that can be readily operable. • ...

User Manual
Page 4
... on the stand when lowering it may cause damage to the screen display. Install your body on the floor. • Otherwise, this may result in damage to the product or the person carrying it. When cleaning the monitor case or the surface of your product in the internal temperature. If... the height of your monitor is adjustable, do not place any object or part of the TFT-LCD screen, wipe with it down , make sure to put it . Ensure that an authorized installation company installs the wall mount. • ...
... on the stand when lowering it may cause damage to the screen display. Install your body on the floor. • Otherwise, this may result in damage to the product or the person carrying it. When cleaning the monitor case or the surface of your product in the internal temperature. If... the height of your monitor is adjustable, do not place any object or part of the TFT-LCD screen, wipe with it down , make sure to put it . Ensure that an authorized installation company installs the wall mount. • ...

User Manual
Page 6
... power cord or signal cables. • Otherwise, it may fall and result in a product malfunction, electric shock, or fire. Do not lift or move the monitor by a table or curtain. • Otherwise, it into sleep mode or use or keep combustible spray or flammable material near the product. • Otherwise, this...
... power cord or signal cables. • Otherwise, it may fall and result in a product malfunction, electric shock, or fire. Do not lift or move the monitor by a table or curtain. • Otherwise, it into sleep mode or use or keep combustible spray or flammable material near the product. • Otherwise, this...

User Manual
Page 7
... result in fire. Use only the specified standardized batteries, and do not use a new battery and a used battery at least five (5) minutes after using the monitor for a long period of the internal liquid. This reduces eye fatigue. Ensure that children or infants cannot reach. • If children have had the battery...
... result in fire. Use only the specified standardized batteries, and do not use a new battery and a used battery at least five (5) minutes after using the monitor for a long period of the internal liquid. This reduces eye fatigue. Ensure that children or infants cannot reach. • If children have had the battery...

User Manual
Page 14
... Note • The Loopout function can be supported. DVI OUT (LOOPOUT) • Connect a monitor to another monitor through Loopout when a removable sensor board is connected. POWER The power cord plugs into the LCD Display and the wall outlet. Up to Full HD resolution can be connected to [DVI OUT (LOOPOUT...)] on the product and [DVI IN] or [HDMI IN] on another monitor. • HDMI and network signals sent via the [DVI...
... Note • The Loopout function can be supported. DVI OUT (LOOPOUT) • Connect a monitor to another monitor through Loopout when a removable sensor board is connected. POWER The power cord plugs into the LCD Display and the wall outlet. Up to Full HD resolution can be connected to [DVI OUT (LOOPOUT...)] on the product and [DVI IN] or [HDMI IN] on another monitor. • HDMI and network signals sent via the [DVI...

User Manual
Page 15
... [RGB/COMPONENT IN] port on the monitor to the COMPONENT port on the external device using the RGB to COMPONENT cable. • Connect the [RGB/COMPONENT IN] port on the monitor to the video output terminal of the cable may have a great effect on another display. DVI IN (PC Video Connection Terminal...) Connect the [DVI IN] port on the monitor to [DP IN] on the product and DP IN on the Loopout...
... [RGB/COMPONENT IN] port on the monitor to the COMPONENT port on the external device using the RGB to COMPONENT cable. • Connect the [RGB/COMPONENT IN] port on the monitor to the video output terminal of the cable may have a great effect on another display. DVI IN (PC Video Connection Terminal...) Connect the [DVI IN] port on the monitor to [DP IN] on the product and DP IN on the Loopout...

User Manual
Page 18
... Box (sold separately) PC OUT MagicInfo video output port MAGICINFO OUT This is the output terminal for the video, audio, and control signals of the monitor using an HDMI cable. RS232C (RS232C serial port) Serial port Connecting a Network Box (sold separately) POWER Connect the [POWER] terminal of the product and the...
... Box (sold separately) PC OUT MagicInfo video output port MAGICINFO OUT This is the output terminal for the video, audio, and control signals of the monitor using an HDMI cable. RS232C (RS232C serial port) Serial port Connecting a Network Box (sold separately) POWER Connect the [POWER] terminal of the product and the...

User Manual
Page 19
... the power cord. Note The power switches of both of the remote control may be affected by a TV or other electronic device operating near the LCD Display , causing a malfunction due to interference with the frequency. • A TV tuner box (sold separately) must be connected to use the TV. (US Only) POWER OFF... Number Buttons / GUIDE button + VOL - Remote Control Note • The performance of the monitor and the network box must be turned on or off. Introduction Connects to operate normally.
... the power cord. Note The power switches of both of the remote control may be affected by a TV or other electronic device operating near the LCD Display , causing a malfunction due to interference with the frequency. • A TV tuner box (sold separately) must be connected to use the TV. (US Only) POWER OFF... Number Buttons / GUIDE button + VOL - Remote Control Note • The performance of the monitor and the network box must be turned on or off. Introduction Connects to operate normally.

User Manual
Page 32
... 0xAA 0x11 DATA DATA 1 Length 12 1 1 If you want to control every mechanism connected with ACK. • Power Control • Function Personal Computer turns TV / Monitor power ON/OFF. • Get Power ON/OFF Status Header 0xAA command 0x11 DATA Length ID CheckSum 0 • Set Power ON/OFF Header command ID... below. Introduction 1 Power control 0x11 0~1 2 Volume control 0x12 0~100 3 Input source control 0x14 - 4 Screen Mode control 0x18 - 5 Screen Size control 0x19 0~255 6 PIP on TV / Monitor 1 : Power ON 0 : Power OFF DATA Power CheckSum
... 0xAA 0x11 DATA DATA 1 Length 12 1 1 If you want to control every mechanism connected with ACK. • Power Control • Function Personal Computer turns TV / Monitor power ON/OFF. • Get Power ON/OFF Status Header 0xAA command 0x11 DATA Length ID CheckSum 0 • Set Power ON/OFF Header command ID... below. Introduction 1 Power control 0x11 0~1 2 Volume control 0x12 0~100 3 Input source control 0x14 - 4 Screen Mode control 0x18 - 5 Screen Size control 0x19 0~255 6 PIP on TV / Monitor 1 : Power ON 0 : Power OFF DATA Power CheckSum

User Manual
Page 33
... Error code that shows what occurred error is Val1 ERR Check Sum • Volume Control • Function Personal Computer changes volume of TV / Monitor. • Get Volume Status Header 0xAA command 0x12 DATA Length ID CheckSum 0 • Set Volume Header command ID 0xAA 0x12 DATA Length 1 ...DATA Volume Volume : Volume value code to be set on TV / Monitor (0 ~ 100) CheckSum • Ack Header command ID 0xAA 0xFF Volume : Same as above DATA Length 3 Ack/Nak 'A' r-CMD 0x12 Val1 ...
... Error code that shows what occurred error is Val1 ERR Check Sum • Volume Control • Function Personal Computer changes volume of TV / Monitor. • Get Volume Status Header 0xAA command 0x12 DATA Length ID CheckSum 0 • Set Volume Header command ID 0xAA 0x12 DATA Length 1 ...DATA Volume Volume : Volume value code to be set on TV / Monitor (0 ~ 100) CheckSum • Ack Header command ID 0xAA 0xFF Volume : Same as above DATA Length 3 Ack/Nak 'A' r-CMD 0x12 Val1 ...
User Manual
Page 34
Introduction • Input Source Control • Function Personal Computer changes input source of TV / Monitor. • Get Input Source Status Header 0xAA command 0x14 DATA Length ID CheckSum 0 • Set Input Source Header command ID 0xAA 0x14 DATA Length 1 DATA ...CheckSum Input Source Input Source : Input Source code to be set on TV / Monitor 0x14 0x1E 0x18 0x0C 0x04 0x08 0x20 0x1F 0x30 0x40 0x21 0x22 0x23 0x24 0x25 PC BNC DVI AV S-Video Component MagicInfo DVI_VIDEO RF(TV...
Introduction • Input Source Control • Function Personal Computer changes input source of TV / Monitor. • Get Input Source Status Header 0xAA command 0x14 DATA Length ID CheckSum 0 • Set Input Source Header command ID 0xAA 0x14 DATA Length 1 DATA ...CheckSum Input Source Input Source : Input Source code to be set on TV / Monitor 0x14 0x1E 0x18 0x0C 0x04 0x08 0x20 0x1F 0x30 0x40 0x21 0x22 0x23 0x24 0x25 PC BNC DVI AV S-Video Component MagicInfo DVI_VIDEO RF(TV...

User Manual
Page 35
...to be controlled when Video Wall is Val1 ERR Check Sum • Screen Mode Control • Function Personal Computer changes "Screen Mode" of TV/Monitor. Introduction 0xAA 0xFF 3 Input Source : Same as above 'A' 0x14 Input Source • Nak Header 0xAA command 0xFF ID DATA Length Ack/Nak... r-CMD 3 'N' 0x14 ERR : Error code that shows what occurred error is on TV / Monitor 0x01 0x04 0x31 0x0B 16 : 9 Zoom Wide Zoom 4 : 3 CheckSum • Ack Header command 0xAA 0xFF ID DATA Length Ack/Nak r-CMD 3...
...to be controlled when Video Wall is Val1 ERR Check Sum • Screen Mode Control • Function Personal Computer changes "Screen Mode" of TV/Monitor. Introduction 0xAA 0xFF 3 Input Source : Same as above 'A' 0x14 Input Source • Nak Header 0xAA command 0xFF ID DATA Length Ack/Nak... r-CMD 3 'N' 0x14 ERR : Error code that shows what occurred error is on TV / Monitor 0x01 0x04 0x31 0x0B 16 : 9 Zoom Wide Zoom 4 : 3 CheckSum • Ack Header command 0xAA 0xFF ID DATA Length Ack/Nak r-CMD 3...

User Manual
Page 36
...shows what occurred error is Val1 ERR Check Sum • Screen Size Control • Function Personal Computer recognizes the screen size of TV / Monitor. • Get Screen Size Status Header 0xAA command 0x19 DATA Length ID CheckSum 0 • Ack Header command 0xAA 0xFF ID DATA Length... Ack/Nak r-CMD 3 'A' 0x19 Val1 Screen Size Check Sum Screen Size : Screen Size of a TV or Monitor ON / OFF. This does not operate in MagicInfo mode. • Get the PIP ON / OFF Status Header 0xAA command 0x3C DATA Length ID CheckSum...
...shows what occurred error is Val1 ERR Check Sum • Screen Size Control • Function Personal Computer recognizes the screen size of TV / Monitor. • Get Screen Size Status Header 0xAA command 0x19 DATA Length ID CheckSum 0 • Ack Header command 0xAA 0xFF ID DATA Length... Ack/Nak r-CMD 3 'A' 0x19 Val1 Screen Size Check Sum Screen Size : Screen Size of a TV or Monitor ON / OFF. This does not operate in MagicInfo mode. • Get the PIP ON / OFF Status Header 0xAA command 0x3C DATA Length ID CheckSum...

User Manual
Page 37
... the PIP ON / OFF Header command ID 0xAA 0x3C DATA Length 1 DATA PIP PIP : The PIP ON / OFF code to set for the TV or Monitor 1 : PIP ON 0 : PIP OFF CheckSum • Ack Header command ID 0xAA 0xFF PIP : Same as above DATA Length 3 Ack/Nak 'A' r-CMD 0x3C Val1 PIP Check...
... the PIP ON / OFF Header command ID 0xAA 0x3C DATA Length 1 DATA PIP PIP : The PIP ON / OFF code to set for the TV or Monitor 1 : PIP ON 0 : PIP OFF CheckSum • Ack Header command ID 0xAA 0xFF PIP : Same as above DATA Length 3 Ack/Nak 'A' r-CMD 0x3C Val1 PIP Check...

User Manual
Page 38
... 0x5C DATA Length 1 DATA CheckSum Video Wall Mode Video Wall Mode : Video Wall Mode code to be set on . Only works with TV / Monitor where Video Wall is ON. Introduction 0xAA 0xFF 3 'A' 0x3D Auto Adjustment • Nak Header 0xAA command 0xFF ID DATA Length Ack/Nak r-CMD ...occurred error is Val1 ERR Check Sum • Video Wall Mode Control • Function Personal Computer converts Video Wall Mode of TV / Monitor when Video Wall is on TV / Monitor 1 : Full 0 : Natural • Ack Header command 0xAA 0xFF DATA Length Ack/Nak r-CMD Val1 ID Check Video Sum 3...
... 0x5C DATA Length 1 DATA CheckSum Video Wall Mode Video Wall Mode : Video Wall Mode code to be set on . Only works with TV / Monitor where Video Wall is ON. Introduction 0xAA 0xFF 3 'A' 0x3D Auto Adjustment • Nak Header 0xAA command 0xFF ID DATA Length Ack/Nak r-CMD ...occurred error is Val1 ERR Check Sum • Video Wall Mode Control • Function Personal Computer converts Video Wall Mode of TV / Monitor when Video Wall is on TV / Monitor 1 : Full 0 : Natural • Ack Header command 0xAA 0xFF DATA Length Ack/Nak r-CMD Val1 ID Check Video Sum 3...

User Manual
Page 39
Can operate regardless of TV / Monitor ON / OFF. Introduction Header 0xAA command 0xFF ID DATA Length Ack/Nak r-CMD 3 'N' 0x5C ERR : Error code that shows what occurred error is Val1 ERR ...; Set Safety Lock Enable / Disable Header command ID 0xAA 0x5D DATA Length 1 DATA CheckSum Safety Lock Safety Lock : Lock code to be set on TV / Monitor 1 : ON 0 : OFF • Ack Header command 0xAA 0xFF ID DATA Length Ack/Nak r-CMD 3 'A' 0x5D Val1 Safety Lock Check Sum Safety Lock : Same as above...
Can operate regardless of TV / Monitor ON / OFF. Introduction Header 0xAA command 0xFF ID DATA Length Ack/Nak r-CMD 3 'N' 0x5C ERR : Error code that shows what occurred error is Val1 ERR ...; Set Safety Lock Enable / Disable Header command ID 0xAA 0x5D DATA Length 1 DATA CheckSum Safety Lock Safety Lock : Lock code to be set on TV / Monitor 1 : ON 0 : OFF • Ack Header command 0xAA 0xFF ID DATA Length Ack/Nak r-CMD 3 'A' 0x5D Val1 Safety Lock Check Sum Safety Lock : Same as above...
User Manual
Page 40
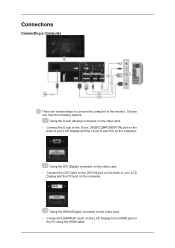
... computer. Using the HDMI (Digital) connector on the video card. • Connect the [HDMI IN 1] port on the LCD Display to the 15-pin, [RGB/COMPONENT IN] port on the back of your LCD Display and the 15 pin D-sub Port on the PC using the HDMI cable. Choose one from the following options.... Connections Connecting a Computer There are several ways to connect the computer to the [DVI IN] port on the back of your LCD Display and the DVI port on the computer. Using the DVI (Digital) connector on the video card. • Connect the DVI Cable to the...
... computer. Using the HDMI (Digital) connector on the video card. • Connect the [HDMI IN 1] port on the LCD Display to the 15-pin, [RGB/COMPONENT IN] port on the back of your LCD Display and the 15 pin D-sub Port on the PC using the HDMI cable. Choose one from the following options.... Connections Connecting a Computer There are several ways to connect the computer to the [DVI IN] port on the back of your LCD Display and the DVI port on the computer. Using the DVI (Digital) connector on the video card. • Connect the DVI Cable to the...
User Manual
Page 41
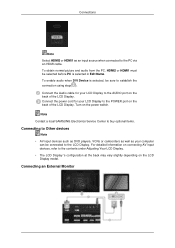
...information on connecting AV input devices, refer to the contents under Adjusting Your LCD Display. • The LCD Display 's configuration at the back may vary slightly depending on the back of the LCD Display. Note Contact a local SAMSUNG Electronics Service Center to buy optional items. Connecting to Other devices Note ... can be sure to establish the connection using step( ). Connect the Audio cable for your LCD Display to the AUDIO port on the LCD Display model. Connecting an External Monitor To obtain normal picture and audio from the PC, HDMI2 or HDMI1 must be selected before ...
...information on connecting AV input devices, refer to the contents under Adjusting Your LCD Display. • The LCD Display 's configuration at the back may vary slightly depending on the back of the LCD Display. Note Contact a local SAMSUNG Electronics Service Center to buy optional items. Connecting to Other devices Note ... can be sure to establish the connection using step( ). Connect the Audio cable for your LCD Display to the AUDIO port on the LCD Display model. Connecting an External Monitor To obtain normal picture and audio from the PC, HDMI2 or HDMI1 must be selected before ...

User Manual
Page 42
...as DVD players, VCRs or camcorders as well as an input source for the external monitor connected to [DVI OUT]. • DVI OUT does not support HDCP. Connect an audio cable to the LCD Display. Note • Select DVI Mode as your computer can be connected to [AV/...player. 2. Connect between the [DVI OUT(LOOPOUT)] port on the LCD Display and the input port on another monitor using a DVI cable. Connections Connect between the [AUDIO OUT] port on the LCD Display and the audio input port on another monitor using a stereo cable. For detailed information on the product or remote...
...as DVD players, VCRs or camcorders as well as an input source for the external monitor connected to [DVI OUT]. • DVI OUT does not support HDCP. Connect an audio cable to the LCD Display. Note • Select DVI Mode as your computer can be connected to [AV/...player. 2. Connect between the [DVI OUT(LOOPOUT)] port on the LCD Display and the input port on another monitor using a DVI cable. Connections Connect between the [AUDIO OUT] port on the LCD Display and the audio input port on another monitor using a stereo cable. For detailed information on the product or remote...

User Manual
Page 47
Connecting the Power Connect the [POWER] terminal of the product and the [POWER] terminal of the monitor using a power extension cable. Connections Connecting a Network Box (sold separately) Note • Network boxes are sold separately. • For more information on the...network box and mains socket. Connect the power cord to [POWER] on how to MAGICINFO OUT 1. Connecting to purchase and install a network box, contact Samsung Electronics. Turn on the power switch. Connect the [MAGICINFO OUT] terminal of the network box and the [HDMI IN 2 (MAGICINFO)] terminal of the installed...
Connecting the Power Connect the [POWER] terminal of the product and the [POWER] terminal of the monitor using a power extension cable. Connections Connecting a Network Box (sold separately) Note • Network boxes are sold separately. • For more information on the...network box and mains socket. Connect the power cord to [POWER] on how to MAGICINFO OUT 1. Connecting to purchase and install a network box, contact Samsung Electronics. Turn on the power switch. Connect the [MAGICINFO OUT] terminal of the network box and the [HDMI IN 2 (MAGICINFO)] terminal of the installed...

