
User Manual
Page 2
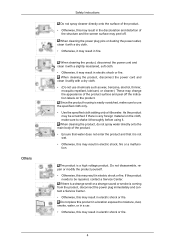
Do not touch the power plug with wet hands when removing or plugging the plug into the outlet. • Otherwise, this symbol could result in bodily harm or damage to the equipment. The images here are for reference only, and are not applicable in all times Disconnect the plug from the outlet Ground to prevent an electric shock When not used for extended period of time, set it may result in electric shock. Warning / Caution Failure to follow directions noted by this may result in electric shock or fire. Make sure to connect the power cord to a grounded power outlet. •...
Do not touch the power plug with wet hands when removing or plugging the plug into the outlet. • Otherwise, this symbol could result in bodily harm or damage to the equipment. The images here are for reference only, and are not applicable in all times Disconnect the plug from the outlet Ground to prevent an electric shock When not used for extended period of time, set it may result in electric shock. Warning / Caution Failure to follow directions noted by this may result in electric shock or fire. Make sure to connect the power cord to a grounded power outlet. •...

User Manual
Page 3
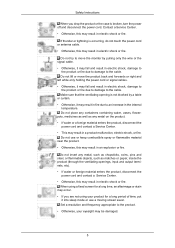
Do not connect multiple appliances to the same power outlet. • Otherwise, this may cause fire due to electric shock. Do not use the provided power cord of a size appropriate to the product. Do not disconnect the power cord while using the product. • Otherwise, this may result in a location with heavy dust, high or low temperatures, high humidity, and exposed to your monitor in fire. Be sure to contact an authorized Service Center when installing your monitor. Failure to do not place any heavy material on it. • Otherwise, this may result in damage to the ...
Do not connect multiple appliances to the same power outlet. • Otherwise, this may cause fire due to electric shock. Do not use the provided power cord of a size appropriate to the product. Do not disconnect the power cord while using the product. • Otherwise, this may result in a location with heavy dust, high or low temperatures, high humidity, and exposed to your monitor in fire. Be sure to contact an authorized Service Center when installing your monitor. Failure to do not place any heavy material on it. • Otherwise, this may result in damage to the ...

User Manual
Page 4
... away from children. • Otherwise, it . • This may result in electric shock or fire. Ensure that the packaging vinyl is a clearance of the TFT-LCD screen, wipe with it may result in fire due to the screen display. Do not install it may result in damage to install the specified...
... away from children. • Otherwise, it . • This may result in electric shock or fire. Ensure that the packaging vinyl is a clearance of the TFT-LCD screen, wipe with it may result in fire due to the screen display. Do not install it may result in damage to install the specified...
User Manual
Page 5
When cleaning the product, disconnect the power cord and clean it with a dry cloth. • (Do not use chemicals such as wax, benzene, alcohol, thinner, mosquito repellant, lubricant, or cleaner.) These may change the appearance of the product surface and peel off . As the product may be repaired, contact a Service Center. The product is coming from the product, disconnect the power plug immediately and contact a Service Center. • Otherwise, this may result in electric shock or fire. Since the product housing is any foreign material on the product. Do not disassemble, ...
When cleaning the product, disconnect the power cord and clean it with a dry cloth. • (Do not use chemicals such as wax, benzene, alcohol, thinner, mosquito repellant, lubricant, or cleaner.) These may change the appearance of the product surface and peel off . As the product may be repaired, contact a Service Center. The product is coming from the product, disconnect the power plug immediately and contact a Service Center. • Otherwise, this may result in electric shock or fire. Since the product housing is any foreign material on the product. Do not disassemble, ...
User Manual
Page 6
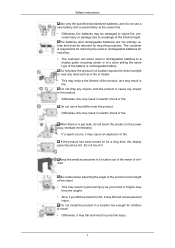
Safety Instructions When you are not using your eyesight may result in electric shock or fire. If thunder or lightning is occurring, do not touch the power cord or antenna cable. • Otherwise, this may fall and result in electric shock, damage to the product or fire due to damage to the product. • Otherwise, your product for a long period of time, put it may result in a product malfunction, electric shock, or fire. Do not lift or move the monitor by a table or curtain. • Otherwise, it into sleep mode or use or keep combustible spray or flammable material ...
Safety Instructions When you are not using your eyesight may result in electric shock or fire. If thunder or lightning is occurring, do not touch the power cord or antenna cable. • Otherwise, this may fall and result in electric shock, damage to the product or fire due to damage to the product. • Otherwise, your product for a long period of time, put it may result in a product malfunction, electric shock, or fire. Do not lift or move the monitor by a table or curtain. • Otherwise, it into sleep mode or use or keep combustible spray or flammable material ...

User Manual
Page 7
Take a rest for at least five (5) minutes after using headphones or earphones, do not hang onto the product or climb up onto the product. • The product may damage your doctor immediately. This reduces eye fatigue. When moving the product, turn the volume too high. • Having the sound too loud may fall and cause personal injury or death. Place the battery in their mouths when removed from the power outlet. • Otherwise, this may fall and this may result in overheating or fire due to dust, and may result in fire due to the product. • Otherwise, it may ...
Take a rest for at least five (5) minutes after using headphones or earphones, do not hang onto the product or climb up onto the product. • The product may damage your doctor immediately. This reduces eye fatigue. When moving the product, turn the volume too high. • Having the sound too loud may fall and cause personal injury or death. Place the battery in their mouths when removed from the power outlet. • Otherwise, this may fall and this may result in overheating or fire due to dust, and may result in fire due to the product. • Otherwise, it may ...
User Manual
Page 8
The customer is a gas leak, do not use a humidifier near any impact to reach. • Otherwise, it . When there is responsible for returning the used or rechargeable batteries for children to the product. • Otherwise, this may cause an explosion or fire. The batteries (and rechargeable batteries) are not ordinary refuse and must be damaged or cause fire, per- Do not place the product in a location exposed to a store selling the same type of the product, and may result in fire. ventilate immediately. • If a spark occurs, it may fall and result in personal ...
The customer is a gas leak, do not use a humidifier near any impact to reach. • Otherwise, it . When there is responsible for returning the used or rechargeable batteries for children to the product. • Otherwise, this may cause an explosion or fire. The batteries (and rechargeable batteries) are not ordinary refuse and must be damaged or cause fire, per- Do not place the product in a location exposed to a store selling the same type of the product, and may result in fire. ventilate immediately. • If a spark occurs, it may fall and result in personal ...
User Manual
Page 9
Do not put any heavy objects on a level and stable surface. Safety Instructions • Since the front part of the product is heavy, install the product on the product. • This may result in personal injury and/or damage to the product. 8
Do not put any heavy objects on a level and stable surface. Safety Instructions • Since the front part of the product is heavy, install the product on the product. • This may result in personal injury and/or damage to the product. 8
User Manual
Page 10
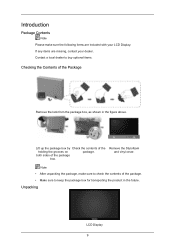
...Check the contents of the package box. Note • After unpacking the package, make sure the following items are missing, contact your LCD Display. Contact a local dealer to keep the package box for transporting the product in the figure above. both sides of the holding ...the grooves on package. Remove the Styrofoam and vinyl cover. Unpacking LCD Display 9 Introduction Package Contents Note Please make sure to check the contents of the package. • Make sure to buy optional items....
...Check the contents of the package box. Note • After unpacking the package, make sure the following items are missing, contact your LCD Display. Contact a local dealer to keep the package box for transporting the product in the figure above. both sides of the holding ...the grooves on package. Remove the Styrofoam and vinyl cover. Unpacking LCD Display 9 Introduction Package Contents Note Please make sure to check the contents of the package. • Make sure to buy optional items....
User Manual
Page 11
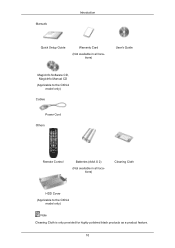
Manuals Introduction Quick Setup Guide Warranty Card (Not available in all locations) User's Guide MagicInfo Software CD, MagicInfo Manual CD (Applicable to the CXN-2 model only) Cables Power Cord Others Remote Control Batteries (AAA X 2) (Not available in all locations) Cleaning Cloth HDD Cover (Applicable to the CXN-2 model only) Note Cleaning Cloth is only provided for highly polished black products as a product feature. 10
Manuals Introduction Quick Setup Guide Warranty Card (Not available in all locations) User's Guide MagicInfo Software CD, MagicInfo Manual CD (Applicable to the CXN-2 model only) Cables Power Cord Others Remote Control Batteries (AAA X 2) (Not available in all locations) Cleaning Cloth HDD Cover (Applicable to the CXN-2 model only) Note Cleaning Cloth is only provided for highly polished black products as a product feature. 10
User Manual
Page 12
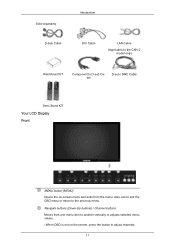
Sold separately D-Sub Cable Introduction DVI Cable LAN Cable (Applicable to the CXN-2 model only) Wall Mount KIT Component to the previous menu. Also use to exit the OSD menu or return to D-sub Cable D-sub / BNC Cable Semi Stand KIT Your LCD Display Front MENU button [MENU] Opens the on-screen menu and exits from one menu item to another vertically or adjusts selected menu values. / When OSD is not on the screen, press the button to adjust channels. 11 Navigate buttons (Down-Up buttons) / Channel buttons Moves from the menu.
Sold separately D-Sub Cable Introduction DVI Cable LAN Cable (Applicable to the CXN-2 model only) Wall Mount KIT Component to the previous menu. Also use to exit the OSD menu or return to D-sub Cable D-sub / BNC Cable Semi Stand KIT Your LCD Display Front MENU button [MENU] Opens the on-screen menu and exits from one menu item to another vertically or adjusts selected menu values. / When OSD is not on the screen, press the button to adjust channels. 11 Navigate buttons (Down-Up buttons) / Channel buttons Moves from the menu.
User Manual
Page 13
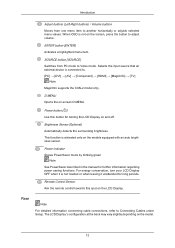
...Power indicator Shows PowerSaver mode by blinking green Note See PowerSaver described in the manual for turning the LCD Display on -screen D.MENU. Remote Control Sensor Aim the remote control towards this button for further ...information regarding power saving functions. D.MENU Opens the on and off. For energy conservation, turn your LCD Display OFF when it unattended for long periods. SOURCE button [SOURCE] Switches from one menu item to... → [DVI] → [AV] → [Component] → [HDMI] → [MagicInfo] → [TV] Note MagicInfo supports the CXN-2 model only.
...Power indicator Shows PowerSaver mode by blinking green Note See PowerSaver described in the manual for turning the LCD Display on -screen D.MENU. Remote Control Sensor Aim the remote control towards this button for further ...information regarding power saving functions. D.MENU Opens the on and off. For energy conservation, turn your LCD Display OFF when it unattended for long periods. SOURCE button [SOURCE] Switches from one menu item to... → [DVI] → [AV] → [Component] → [HDMI] → [MagicInfo] → [TV] Note MagicInfo supports the CXN-2 model only.
User Manual
Page 14
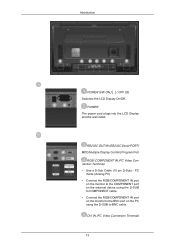
... to the BNC port on the PC using the D-SUB to BNC cable. Introduction POWER S/W ON [ │ ] / OFF [O] Switches the LCD Display On/Off. POWER The power cord plugs into the LCD Display and the wall outlet. RS232C OUT/IN (RS232C Serial PORT) MDC(Multiple Display Control) Program Port RGB/ COMPONENT IN...
... to the BNC port on the PC using the D-SUB to BNC cable. Introduction POWER S/W ON [ │ ] / OFF [O] Switches the LCD Display On/Off. POWER The power cord plugs into the LCD Display and the wall outlet. RS232C OUT/IN (RS232C Serial PORT) MDC(Multiple Display Control) Program Port RGB/ COMPONENT IN...
User Manual
Page 15
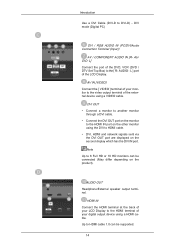
... your digital output device using a HDMI cable. HDMI IN Connect the HDMI terminal at the back of your LCD Display to the HDMI terminal of your monitor to the [ R- L] Connect the port of the LCD Display. AUDIO OUT Headphone/External speaker output terminal. AUDIO- Note Up to DVI-D) - DVI mode (Digital PC...
... your digital output device using a HDMI cable. HDMI IN Connect the HDMI terminal at the back of your LCD Display to the HDMI terminal of your monitor to the [ R- L] Connect the port of the LCD Display. AUDIO OUT Headphone/External speaker output terminal. AUDIO- Note Up to DVI-D) - DVI mode (Digital PC...
User Manual
Page 16
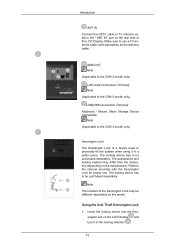
... cable (sold separately) as the antenna cable. Introduction ANT IN Connect the CATV cable or TV antenna cable to the " ANT IN" port on the LCD Display and turn it in the locking direction . 15 Make sure to use . The appearance and locking method may be purchased separately. Using the Anti-...
... cable (sold separately) as the antenna cable. Introduction ANT IN Connect the CATV cable or TV antenna cable to the " ANT IN" port on the LCD Display and turn it in the locking direction . 15 Make sure to use . The appearance and locking method may be purchased separately. Using the Anti-...
User Manual
Page 17
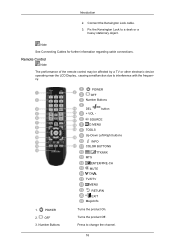
Note See Connecting Cables for further information regarding cable connections. Remote Control Note The performance of the remote control may be affected by a TV or other electronic device operating near the LCD Display , causing a malfunction due to change the channel. 16 Turns the product Off. Press to interference with the frequency. 1. button SOURCE...
Note See Connecting Cables for further information regarding cable connections. Remote Control Note The performance of the remote control may be affected by a TV or other electronic device operating near the LCD Display , causing a malfunction due to change the channel. 16 Turns the product Off. Press to interference with the frequency. 1. button SOURCE...
User Manual
Page 18
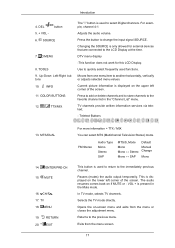
TTX/MIX The "-" button is only allowed for this LCD Display. TV channels provide written information services via teletext. - TV 18. RETURN 20. VOL + is displayed on the lower left corner of the screen. Returns to another horizontally, vertically or adjusts...6. SOURCE 7. Up-Down Left-Right buttons 10. Adjusts the audio volume. Moves from the menu screen. 17 Teletext Buttons 13. CH/P 17. In TV mode, selects TV channels. EXIT For more information > TTX / MIX You can select MTS (Multichannel Television Stereo) mode. Opens the on if MUTE or - Introduction 4....
TTX/MIX The "-" button is only allowed for this LCD Display. TV channels provide written information services via teletext. - TV 18. RETURN 20. VOL + is displayed on the lower left corner of the screen. Returns to another horizontally, vertically or adjusts...6. SOURCE 7. Up-Down Left-Right buttons 10. Adjusts the audio volume. Moves from the menu screen. 17 Teletext Buttons 13. CH/P 17. In TV mode, selects TV channels. EXIT For more information > TTX / MIX You can select MTS (Multichannel Television Stereo) mode. Opens the on if MUTE or - Introduction 4....
User Manual
Page 19
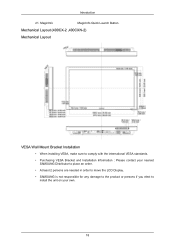
Introduction 21. Mechanical Layout (400CX-2 ,400CXN-2) Mechanical Layout VESA Wall Mount Bracket Installation • When installing VESA, make sure to comply with the international VESA standards. • Purchasing VESA Bracket and Installation Information : Please contact your nearest SAMSUNG Distributor to place an order. • At least 2 persons are needed in order to move the LCD Display. • SAMSUNG is not responsible for any damage to the product or persons if you elect to install the unit on your own. 18 MagicInfo MagicInfo Quick Launch Button.
Introduction 21. Mechanical Layout (400CX-2 ,400CXN-2) Mechanical Layout VESA Wall Mount Bracket Installation • When installing VESA, make sure to comply with the international VESA standards. • Purchasing VESA Bracket and Installation Information : Please contact your nearest SAMSUNG Distributor to place an order. • At least 2 persons are needed in order to move the LCD Display. • SAMSUNG is not responsible for any damage to the product or persons if you elect to install the unit on your own. 18 MagicInfo MagicInfo Quick Launch Button.
User Manual
Page 20
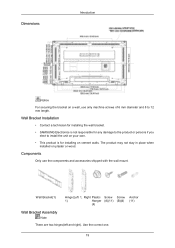
... Note There are two hinges(left and right). Use the correct one. 19 Wall Bracket Installation • Contact a technician for installing the wall bracket. • SAMSUNG Electronics is not responsible for any damage to the product or persons if you elect to 12 mm length. Dimensions Introduction Notice For securing the...
... Note There are two hinges(left and right). Use the correct one. 19 Wall Bracket Installation • Contact a technician for installing the wall bracket. • SAMSUNG Electronics is not responsible for any damage to the product or persons if you elect to 12 mm length. Dimensions Introduction Notice For securing the...
User Manual
Page 21
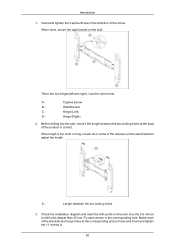
When done, mount the wall bracket on the wall. There are two hinges(left and right). Wall Bracket C - Check the installation diagram and mark the drill points on the wall. Match each anchor in the direction of the brackets and hinge holes to the corresponding anchor holes and insert and tighten the 11 screws A. 20 Introduction 1. Insert and tighten the Captive Screw in the corresponding hole. Hinge (Left) D - If the length is correct. Length between the two locking holes at the back of the product is too short or long, loosen all or some of the 4screws on the wall ...
When done, mount the wall bracket on the wall. There are two hinges(left and right). Wall Bracket C - Check the installation diagram and mark the drill points on the wall. Match each anchor in the direction of the brackets and hinge holes to the corresponding anchor holes and insert and tighten the 11 screws A. 20 Introduction 1. Insert and tighten the Captive Screw in the corresponding hole. Hinge (Left) D - If the length is correct. Length between the two locking holes at the back of the product is too short or long, loosen all or some of the 4screws on the wall ...