User Manual
Page 16
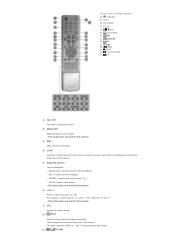
.../MIX VOL + is displayed on both the remote control and the LCD Display except for the Power and LOCK buttons. 5) MagicNet buttons Used for this monitor. 3) MDC MDC Quick Launch Button. 4) LOCK Activates or deactivates all function keys on the lower left corner of the screen. 19. S.MODE 21. PIP 27...
.../MIX VOL + is displayed on both the remote control and the LCD Display except for the Power and LOCK buttons. 5) MagicNet buttons Used for this monitor. 3) MDC MDC Quick Launch Button. 4) LOCK Activates or deactivates all function keys on the lower left corner of the screen. 19. S.MODE 21. PIP 27...
User Manual
Page 17
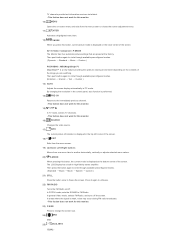
... picture information is displayed at the factory. Then push button again to another horizontally, vertically or adjusts selected menu values. 20) S.MODE When pressing this monitor. 23) P.SIZE Press to freeze the screen. This fuction does not work for this button, the current mode is displayed in PC mode. Then push... → Movie → Custom ) PC/DVI/BNC : M/B (MagicBright™) MagicBright™ is weak, noise may occur during FM radio broadcasts. - AV / S-Video / Component : P.MODE The Monitor has four automatic picture settings that are watching.
... picture information is displayed at the factory. Then push button again to another horizontally, vertically or adjusts selected menu values. 20) S.MODE When pressing this monitor. 23) P.SIZE Press to freeze the screen. This fuction does not work for this button, the current mode is displayed in PC mode. Then push... → Movie → Custom ) PC/DVI/BNC : M/B (MagicBright™) MagicBright™ is weak, noise may occur during FM radio broadcasts. - AV / S-Video / Component : P.MODE The Monitor has four automatic picture settings that are watching.
User Manual
Page 18
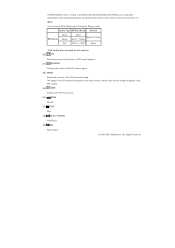
...- The image in the PIP window will appear on the remote control while watching TV. ALL Rights Reserved This fuction does not work for this monitor. 26) PIP Every time you press the button, a PIP screen appears. 27) SO UR CE Changes the source of the PIP window signal. 28) SWAP.... 29) SIZE Switches the PIP Picture Size. 30) REW Rewind 31) STOP Stop 32) PLAY / PAUSE Play/Pause 33) FF Fast forward © 1995~2007 SAMSUNG. Audio Type MTS/S_Mode Default FM Stereo Mono Stereo SAP Mono Manual Change Mono ↔ Stereo Mono ↔ SAP Mono -
...- The image in the PIP window will appear on the remote control while watching TV. ALL Rights Reserved This fuction does not work for this monitor. 26) PIP Every time you press the button, a PIP screen appears. 27) SO UR CE Changes the source of the PIP window signal. 28) SWAP.... 29) SIZE Switches the PIP Picture Size. 30) REW Rewind 31) STOP Stop 32) PLAY / PAUSE Play/Pause 33) FF Fast forward © 1995~2007 SAMSUNG. Audio Type MTS/S_Mode Default FM Stereo Mono Stereo SAP Mono Manual Change Mono ↔ Stereo Mono ↔ SAP Mono -

User Manual
Page 19
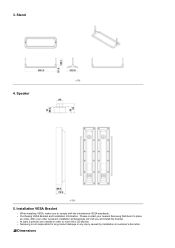
Mechanical Layout 2. Monitor Head Mechanical Layout | Monitor Head | Stand | Speaker | Installation VESA Bracket | Wall Bracket Installation 1.
Mechanical Layout 2. Monitor Head Mechanical Layout | Monitor Head | Stand | Speaker | Installation VESA Bracket | Wall Bracket Installation 1.
User Manual
Page 20
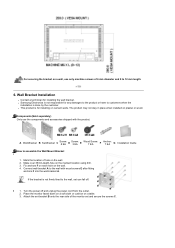
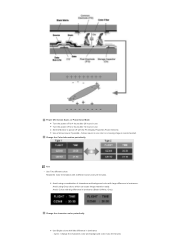
z Purchasing VESA Bracket and Installation Information : Please contact your order is not responsible for any product damage or any injury caused by installation at customer's discretion. Dimensions After your nearest Samsung Distributor to place an order. z At least 2 persons are needed in order to comply with the international VESA standards. z Samsung is placed, installation professionals will visit you and install the bracket. Stand 4. 3. Installation VESA Bracket z When installing VESA, make sure to move the LCD Monitor. Speaker 5.
z Purchasing VESA Bracket and Installation Information : Please contact your order is not responsible for any product damage or any injury caused by installation at customer's discretion. Dimensions After your nearest Samsung Distributor to place an order. z At least 2 persons are needed in order to comply with the international VESA standards. z Samsung is placed, installation professionals will visit you and install the bracket. Stand 4. 3. Installation VESA Bracket z When installing VESA, make sure to move the LCD Monitor. Speaker 5.
User Manual
Page 21
... not stay in place when installed on the marked location using drill. 3. Make over 35mm-depth-hole on plaster or wood. Turn the power off . 2 1. z Samsung Electronics is not responsible for installing on cement walls. A Wall-Bracket B Set-Bracket C Screw: 8 EA D Screw: 3 EA E Wood Screw: 7 EA F Anchor: 7 ...any damages to the product or harm to customers when the installation is not firmly fixed to 12 mm length. 6. Mark the location of the monitor set can fall off and unplug the power cord from the outlet. 2. Connect wall-bracket A to assemble the Wall Mount Bracket 1 1. ...
... not stay in place when installed on the marked location using drill. 3. Make over 35mm-depth-hole on plaster or wood. Turn the power off . 2 1. z Samsung Electronics is not responsible for installing on cement walls. A Wall-Bracket B Set-Bracket C Screw: 8 EA D Screw: 3 EA E Wood Screw: 7 EA F Anchor: 7 ...any damages to the product or harm to customers when the installation is not firmly fixed to 12 mm length. 6. Mark the location of the monitor set can fall off and unplug the power cord from the outlet. 2. Connect wall-bracket A to assemble the Wall Mount Bracket 1 1. ...
User Manual
Page 26
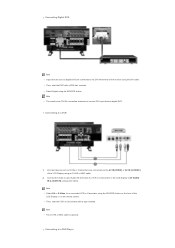
...AUDIO -R] using audio cables. Connecting to connect DVI input devices digital DVD. Note • The S-VHS or BNC cable is optional. Note • The monitor has DVI IN connection terminals to a DVD Player Connecting Digital DVD Note • Input devices such as VCRs or Camcorders are connected to the DVI... IN terminal of the monitor using the DVI cable. • Then, start the VCR or Camcorders with a DVD disc inserted. • Select Digital using the SOURCE button.
...AUDIO -R] using audio cables. Connecting to connect DVI input devices digital DVD. Note • The S-VHS or BNC cable is optional. Note • The monitor has DVI IN connection terminals to a DVD Player Connecting Digital DVD Note • Input devices such as VCRs or Camcorders are connected to the DVI... IN terminal of the monitor using the DVI cable. • Then, start the VCR or Camcorders with a DVD disc inserted. • Select Digital using the SOURCE button.

User Manual
Page 68
Specifications General General General Model Name SyncMaster 320PX LCD Panel Size 32 " Diagonal (80 cm) Display area 697.6845 mm (H) x 392.256 mm (V) Pixel Pitch 0.51075 mm (H) x 0.51075 mm (V) Synchronization Horizontal 30 ~ ...~ 45 °C) Humidity: 5 % ~ 95 %, non-condensing Audio Characteristics Audio Input 1 RCA Jack Red(R) White(L), 0.5 Vrms (-9 dB) Safety Instructions Introduction Connections Using the Software Adjusting the Monitor Troubleshooting Specifications General PowerSaver Preset Timing Modes Information Appendix Select Language Main Page Model SyncMaster...
Specifications General General General Model Name SyncMaster 320PX LCD Panel Size 32 " Diagonal (80 cm) Display area 697.6845 mm (H) x 392.256 mm (V) Pixel Pitch 0.51075 mm (H) x 0.51075 mm (V) Synchronization Horizontal 30 ~ ...~ 45 °C) Humidity: 5 % ~ 95 %, non-condensing Audio Characteristics Audio Input 1 RCA Jack Red(R) White(L), 0.5 Vrms (-9 dB) Safety Instructions Introduction Connections Using the Software Adjusting the Monitor Troubleshooting Specifications General PowerSaver Preset Timing Modes Information Appendix Select Language Main Page Model SyncMaster...
User Manual
Page 69
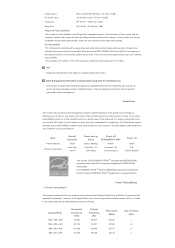
The monitor automatically returns to set up this product meets the ENERGY STAR ® guidelines for energy efficiency. The PowerSaver system operates with precision of time. As an ENERGY STAR ® Partner, SAMSUNG has determined that this feature. Audio Input 2 PC Audio Input RCA Jack Red(R) White(L), ...0.5 Vrms (-9 dB) 3.5 Ø Stereo Jack, 0.5 Vrms (-9 dB) Frequency RF: 80 Hz ~ 15 kHz (at -3 dB) Response A/V: 80 Hz ~ 20 kHz (at -3 dB) Plug and Play Capability This monitor...
The monitor automatically returns to set up this product meets the ENERGY STAR ® guidelines for energy efficiency. The PowerSaver system operates with precision of time. As an ENERGY STAR ® Partner, SAMSUNG has determined that this feature. Audio Input 2 PC Audio Input RCA Jack Red(R) White(L), ...0.5 Vrms (-9 dB) 3.5 Ø Stereo Jack, 0.5 Vrms (-9 dB) Frequency RF: 80 Hz ~ 15 kHz (at -3 dB) Response A/V: 80 Hz ~ 20 kHz (at -3 dB) Plug and Play Capability This monitor...

User Manual
Page 71
... adjustment, use it . Image retention may stain it without prior notice for an extended period of time. When cleaning the monitor and the panel outside, please apply the recommended small amount of cleaner by performing the "auto adjustment function" in display screen...Using the Software Adjusting the LCD Display Troubleshooting Specifications Information For Better Display PRODUCT INFORMATION (Image Retention Free) Appendix Model SyncMaster 320PX The color and appearance of the product may appear. Information For Better Display Adjust the computer resolution and screen inection rate...
... adjustment, use it . Image retention may stain it without prior notice for an extended period of time. When cleaning the monitor and the panel outside, please apply the recommended small amount of cleaner by performing the "auto adjustment function" in display screen...Using the Software Adjusting the LCD Display Troubleshooting Specifications Information For Better Display PRODUCT INFORMATION (Image Retention Free) Appendix Model SyncMaster 320PX The color and appearance of the product may appear. Information For Better Display Adjust the computer resolution and screen inection rate...
User Manual
Page 72
... Mode z Turn the power off for 4 hours after 20 hours in use z Turn the power off for 2 hours after 12 hours in use z Set the Monitor to power off with 2 different colors every 30 minutes. z Use a Screen saver if possible - Cycle : Change the characters color and background color every 30 minutes...
... Mode z Turn the power off for 4 hours after 20 hours in use z Turn the power off for 2 hours after 12 hours in use z Set the Monitor to power off with 2 different colors every 30 minutes. z Use a Screen saver if possible - Cycle : Change the characters color and background color every 30 minutes...

User Manual
Page 73
... Pixel function - Time Interval : 1 ~ 10 hours ( Recommend : 1 ) . Time Period : 10 ~ 50 second ( Recommend : 50 ) z Apply the Screen Bar function - z The best way to protect your monitor from Image retention is to turn Power off, or set your PC, or System to operate a Screen Saver program when you are not using it...
... Pixel function - Time Interval : 1 ~ 10 hours ( Recommend : 1 ) . Time Period : 10 ~ 50 second ( Recommend : 50 ) z Apply the Screen Bar function - z The best way to protect your monitor from Image retention is to turn Power off, or set your PC, or System to operate a Screen Saver program when you are not using it...


