User Manual
Page 6
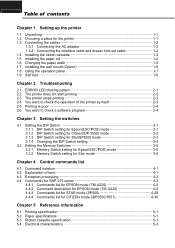
Table of contents Chapter 1 Setting up the printer 1.1 Unpacking 1-1 1.2 Choosing a place for the printer 1-1 1.3 Connecting the cables 1-2 1.3.1 Connecting the AC adaptor 1-2 1.3.2 Connecting the interface cable and drawer kick-out cable 1-2 1.4 Installing the ribbon cassette 1-3 1.5 Installing the paper roll 1-4 1.6 Changing the paper width 1-5 1.7 Installing the wall mount (Option 1-6 1.8 Using the operation panel 1-7 1.9 Self test 1-8 Chapter 2 Troubleshooting 2.1 ERROR LED blinking pattern 2-1 2.2 The printer does not start printing 2-2 2.3 The printer stops printing 2-3 2.4...
Table of contents Chapter 1 Setting up the printer 1.1 Unpacking 1-1 1.2 Choosing a place for the printer 1-1 1.3 Connecting the cables 1-2 1.3.1 Connecting the AC adaptor 1-2 1.3.2 Connecting the interface cable and drawer kick-out cable 1-2 1.4 Installing the ribbon cassette 1-3 1.5 Installing the paper roll 1-4 1.6 Changing the paper width 1-5 1.7 Installing the wall mount (Option 1-6 1.8 Using the operation panel 1-7 1.9 Self test 1-8 Chapter 2 Troubleshooting 2.1 ERROR LED blinking pattern 2-1 2.2 The printer does not start printing 2-2 2.3 The printer stops printing 2-3 2.4...

User Manual
Page 8
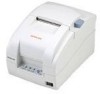
... interface. • Character font (7ⅹ9, 9ⅹ9) is selectable. • The auto cutter uses a circular method with a high-quality blade and a long life (Approximately 1,000,000 cuts). • Paper near end Switch is standard. • A internal AC adaptor. • Front view • Rear view Rear cover Open button DIP Switch cover Power connect Front cover Control panel Power switch Drawer kick-out connect Interface connector NOTES Please be sure to read the instructions in this manual carefully before using your new printer...
... interface. • Character font (7ⅹ9, 9ⅹ9) is selectable. • The auto cutter uses a circular method with a high-quality blade and a long life (Approximately 1,000,000 cuts). • Paper near end Switch is standard. • A internal AC adaptor. • Front view • Rear view Rear cover Open button DIP Switch cover Power connect Front cover Control panel Power switch Drawer kick-out connect Interface connector NOTES Please be sure to read the instructions in this manual carefully before using your new printer...

User Manual
Page 17
... printer s status by software, but not blinking), it means paper end. Install the paper roll.(See "Installing paper roll"(1.5)in the self test printing standby state. CHAPTER 1 Setting up the printer ▌1.8 Using the operation panel Most of the functions of paper or the printer covers are open. FEED button Use this button to feed paper or to start using the printer and before you start self test and for hexadecimal dump mode. (See the instructions "Self test" (1.7) in this chapter for self test.) (See the instructions "Hexadecimal dump...
... printer s status by software, but not blinking), it means paper end. Install the paper roll.(See "Installing paper roll"(1.5)in the self test printing standby state. CHAPTER 1 Setting up the printer ▌1.8 Using the operation panel Most of the functions of paper or the printer covers are open. FEED button Use this button to feed paper or to start using the printer and before you start self test and for hexadecimal dump mode. (See the instructions "Self test" (1.7) in this chapter for self test.) (See the instructions "Hexadecimal dump...
User Manual
Page 18
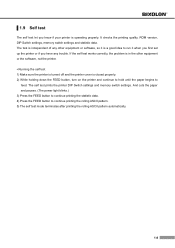
... self test prints the printer DIP Switch settings and memory switch settings. It checks the printing quality, ROM version, DIP Switch settings, memory switch settings and statistic data. The test is independent of any trouble. And cuts the paper and pauses. (The power light blinks.) 3) Press the FEED button to continue printing the statistic data. 4) Press the FEED button to feed. ▌1.9 Self test The self test let you have any other equipment or the software, not the printer. • Running the self test 1) Make sure the printer is turned off and the printer cover...
... self test prints the printer DIP Switch settings and memory switch settings. It checks the printing quality, ROM version, DIP Switch settings, memory switch settings and statistic data. The test is independent of any trouble. And cuts the paper and pauses. (The power light blinks.) 3) Press the FEED button to continue printing the statistic data. 4) Press the FEED button to feed. ▌1.9 Self test The self test let you have any other equipment or the software, not the printer. • Running the self test 1) Make sure the printer is turned off and the printer cover...

User Manual
Page 20
... not work correctly. See "Installing paper roll" (1.5) in the printer. • Errors that are impossible to use. - Make sure that the covers are on . - Wait until the light quits blinking and the printer is on, check the paper roll in Chapter 1 for instruction on , please check the following : - See "Installing paper roll" (1.5) in memory or gate array High voltage error Low voltage error CPU execution error Print head temperature detection circuit error. If the POWER...
... not work correctly. See "Installing paper roll" (1.5) in the printer. • Errors that are impossible to use. - Make sure that the covers are on . - Wait until the light quits blinking and the printer is on, check the paper roll in Chapter 1 for instruction on , please check the following : - See "Installing paper roll" (1.5) in memory or gate array High voltage error Low voltage error CPU execution error Print head temperature detection circuit error. If the POWER...

User Manual
Page 21
... printer's interface settings on . If the self test works properly, check the following: 1) Check the connection at both the printer and the computer. 2) The data transmission settings may be different between the printer and the computer. Also make sure that the printer works properly. To clear paper jam, follow the steps below: 1) Turn off the printer for a paper jam. See the self test instructions in Chapter 1 for instructions on installing or replacing the paper roll. • If the ERROR LED is blinking...
... printer's interface settings on . If the self test works properly, check the following: 1) Check the connection at both the printer and the computer. 2) The data transmission settings may be different between the printer and the computer. Also make sure that the printer works properly. To clear paper jam, follow the steps below: 1) Turn off the printer for a paper jam. See the self test instructions in Chapter 1 for instructions on installing or replacing the paper roll. • If the ERROR LED is blinking...

User Manual
Page 22
The printer prints "Hexadecimal dump" and then all commands and other data in hexadecimal format along with a guide section to help you find specific commands. • To use the hexadecimal dump feature, follow these steps: 1) After you make sure that has no ASCII equivalent.) 5) When the printing finishes, turn off , open the rear cover of ribbon cassette. Hexadecimal Dump To terminate hexadecimal dump Press FEED button three times 1B 21 00...
The printer prints "Hexadecimal dump" and then all commands and other data in hexadecimal format along with a guide section to help you find specific commands. • To use the hexadecimal dump feature, follow these steps: 1) After you make sure that has no ASCII equivalent.) 5) When the printing finishes, turn off , open the rear cover of ribbon cassette. Hexadecimal Dump To terminate hexadecimal dump Press FEED button three times 1B 21 00...

User Manual
Page 25
... NOTICE Change in DIP Switch settings are recognized only when the printer power is turned on again or is reset by using the interface. CHAPTER 3 Setting the switches ▌3.1.3 DIP Switch setting for Star(SP500) mode • DIP Switch 1 Switch 1-1 1-2 1-3 1-4 1-5 1-6 1-7 1-8 Function Emulation Selection (*1) Auto cutter Black/Red Printing ON OFF Refer to the following table Enable Enable Disable Disable Reserved • DIP Switch 2 (RS232C serial interface model) Switch 2-1 2-2 2-3 2-4 2-5 2-6 2-7 2-8 Function Hand shaking Word length Parity check Parity selection Baud...
... NOTICE Change in DIP Switch settings are recognized only when the printer power is turned on again or is reset by using the interface. CHAPTER 3 Setting the switches ▌3.1.3 DIP Switch setting for Star(SP500) mode • DIP Switch 1 Switch 1-1 1-2 1-3 1-4 1-5 1-6 1-7 1-8 Function Emulation Selection (*1) Auto cutter Black/Red Printing ON OFF Refer to the following table Enable Enable Disable Disable Reserved • DIP Switch 2 (RS232C serial interface model) Switch 2-1 2-2 2-3 2-4 2-5 2-6 2-7 2-8 Function Hand shaking Word length Parity check Parity selection Baud...
User Manual
Page 27
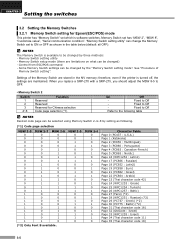
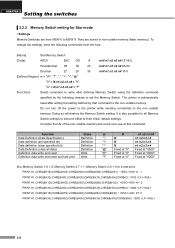
... Switch" set has "MSW 2", "MSW 8", "Customize value", "Serial communication condition". therefore, even if the printer is turned off, the settings are stored in the table below (default: all OFF): NOTES The Memory Switch is software switches. Some Memory Switch settings can be selected using Memory Switch 2-4~8 by setting as shown in the NV memory; When you replace a SRP-270 with a SRP-275, you should adjust the MSW 8-5 to be changed by the "Memory Switch setting mode...
... Switch" set has "MSW 2", "MSW 8", "Customize value", "Serial communication condition". therefore, even if the printer is turned off, the settings are stored in the table below (default: all OFF): NOTES The Memory Switch is software switches. Some Memory Switch settings can be selected using Memory Switch 2-4~8 by setting as shown in the NV memory; When you replace a SRP-270 with a SRP-275, you should adjust the MSW 8-5 to be changed by the "Memory Switch setting mode...

User Manual
Page 28
... is selected, a bit of the "mechanical error" in each status that is transmitted from the printer is changed every time the rear cover is open - The setting of MSW 8-5 and 8-8 can be set by "Memory Switch setup mode". • Customize value Function Paper roll width Selectable value 57.5 mm / 69.5 mm / 76 mm (default value) NOTES These setting can be set by "Memory Switch setup mode." • Serial communication Function baud rate Parity Handshake Data length Selectable...
... is selected, a bit of the "mechanical error" in each status that is transmitted from the printer is changed every time the rear cover is open - The setting of MSW 8-5 and 8-8 can be set by "Memory Switch setup mode". • Customize value Function Paper roll width Selectable value 57.5 mm / 69.5 mm / 76 mm (default value) NOTES These setting can be set by "Memory Switch setup mode." • Serial communication Function baud rate Parity Handshake Data length Selectable...

User Manual
Page 29
... - Data length Receive buffer full release condition (MSW 8-7) Paper roll width (Customize value) Cover open status? 3-7 Serial interface setting Do you want to change cover open status (MSW 8-5) NOTES All new settings will be flashing. • Example of the Memory Switches and instructions. 5) Follow the instructions to start the Memory Switch setup mode. 1) Open the rear cover. 2) Turn the power on while pressing the paper FEED button. 3) Press the FEED button twice while POWER, ERROR, and PAPER OUT LEDs are specified in the Memory Switch setup mode. Cover...
... - Data length Receive buffer full release condition (MSW 8-7) Paper roll width (Customize value) Cover open status? 3-7 Serial interface setting Do you want to change cover open status (MSW 8-5) NOTES All new settings will be flashing. • Example of the Memory Switches and instructions. 5) Follow the instructions to start the Memory Switch setup mode. 1) Open the rear cover. 2) Turn the power on while pressing the paper FEED button. 3) Press the FEED button twice while POWER, ERROR, and PAPER OUT LEDs are specified in the Memory Switch setup mode. Cover...
User Manual
Page 31
... "0" Fixed at "0000" (Ex) Memory Switch 1-8 = 0; To change the settings, send the following classes to set specified bit) Data definition (clear specified bit) Data Definition (clear all Memory Switch settings to become offset to their initial, default settings. Doing so will destroy the Memory Switch setting. It is automatically reset after defining Memory Switch using the definition command specified by that command to the non volatile memory. The printer is also possible for a test print: PRINT...
... "0" Fixed at "0000" (Ex) Memory Switch 1-8 = 0; To change the settings, send the following classes to set specified bit) Data definition (clear specified bit) Data Definition (clear all Memory Switch settings to become offset to their initial, default settings. Doing so will destroy the Memory Switch setting. It is automatically reset after defining Memory Switch using the definition command specified by that command to the non volatile memory. The printer is also possible for a test print: PRINT...
User Manual
Page 33
... setting functions to the head of 12 dot vertical characters (IBM block characters and Chinese characters do not have adornment with 7 × 9 fonts are cancelled if there is a substitute function for ANK characters and block characters. Executes a form feed. After paper fed to cutting position executes partial cut (*3) Paper fed to the following table NOTES (*1) Country Specifications Country Overseas MSW 0-4 = 0 Standard Specifications MSW 0-4 = 1 Chinese Characters (*2) Command Function Selection MSW 0-3 MSW 0-2 Auto cutter model 0 0 0 1 1 0 1 1 Command...
... setting functions to the head of 12 dot vertical characters (IBM block characters and Chinese characters do not have adornment with 7 × 9 fonts are cancelled if there is a substitute function for ANK characters and block characters. Executes a form feed. After paper fed to cutting position executes partial cut (*3) Paper fed to the following table NOTES (*1) Country Specifications Country Overseas MSW 0-4 = 0 Standard Specifications MSW 0-4 = 1 Chinese Characters (*2) Command Function Selection MSW 0-3 MSW 0-2 Auto cutter model 0 0 0 1 1 0 1 1 Command...

User Manual
Page 34
... following table Disabled Enabled Refer to the status. Memory Switch 2 Bit F E D~C B A 9~4 3 2 1~0 Function Reserved How to recover to the status. Reflects the near end switch is sent seven times. (*3) Near end switch Function When an near end switch state to print ready after inserting paper Reserved Printing region width (*1) Paper width selection (*1) Contextual auto-cut paper if a 1/6 inch line feed code is mounted, settings should abide by those shown in the table below. - Hosts that feeds continuously over 7/6 inch...
... following table Disabled Enabled Refer to the status. Memory Switch 2 Bit F E D~C B A 9~4 3 2 1~0 Function Reserved How to recover to the status. Reflects the near end switch is sent seven times. (*3) Near end switch Function When an near end switch state to print ready after inserting paper Reserved Printing region width (*1) Paper width selection (*1) Contextual auto-cut paper if a 1/6 inch line feed code is mounted, settings should abide by those shown in the table below. - Hosts that feeds continuously over 7/6 inch...

User Manual
Page 37
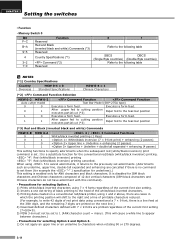
... inch is full. CHAPTER 4 Control commands list ▌4.1 Command notation XXXX [Name] [Format] [Range] [Description] [Notes] [Default] [Reference] The name of length. ASCII indicates the ASCII equivalents. Decimal indicates the decimal equivalents. [ ] k indicates the contents of term Item Description The reception buffer is a buffer that stores the image data to HT) currently in the print buffer. Provides important information on setting and using the printer command...
... inch is full. CHAPTER 4 Control commands list ▌4.1 Command notation XXXX [Name] [Format] [Range] [Description] [Notes] [Default] [Reference] The name of length. ASCII indicates the ASCII equivalents. Decimal indicates the decimal equivalents. [ ] k indicates the contents of term Item Description The reception buffer is a buffer that stores the image data to HT) currently in the print buffer. Provides important information on setting and using the printer command...

User Manual
Page 39
... paper sensor(s) to stop printing Enable/disable panel buttons Print and feed n lines Print and reverse feed n lines Start macro record (For logo) Execute macro (For logo) Partial cut (one point left uncut) Partial cut (one point left uncut) Generate pulse Select print color Select character code table Transmit peripheral device status Transmit paper sensor status Turn upside-down printing mode on/off Print NV bit image Define NV bit image Execute test print Edit NV user memory Enable/disable real-time command User setup commands Transmit printer ID Select cut mode and cut paper Enable/disable...
... paper sensor(s) to stop printing Enable/disable panel buttons Print and feed n lines Print and reverse feed n lines Start macro record (For logo) Execute macro (For logo) Partial cut (one point left uncut) Partial cut (one point left uncut) Generate pulse Select print color Select character code table Transmit peripheral device status Transmit paper sensor status Turn upside-down printing mode on/off Print NV bit image Define NV bit image Execute test print Edit NV user memory Enable/disable real-time command User setup commands Transmit printer ID Select cut mode and cut paper Enable/disable...

User Manual
Page 42
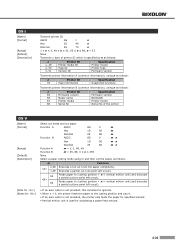
...; n ≤ 255 n = 1 Selects or cancels print modes collectively (emphasized, double-height, double-width, underline) using n as follows in real time: m Connector pin 0 Drawer kick-out connector pin 2 1 Drawer kick-out connector pin 5 The pulse ON time is [t x100 ms] and the OFF time is [t x100 ms] ESC SP [Name] [Format] [Range] [Default] [Description] Set right-side character spacing ASCII ESC SP n Hex 1B 20 n Decimal...
...; n ≤ 255 n = 1 Selects or cancels print modes collectively (emphasized, double-height, double-width, underline) using n as follows in real time: m Connector pin 0 Drawer kick-out connector pin 2 1 Drawer kick-out connector pin 5 The pulse ON time is [t x100 ms] and the OFF time is [t x100 ms] ESC SP [Name] [Format] [Range] [Default] [Description] Set right-side character spacing ASCII ESC SP n Hex 1B 20 n Decimal...

User Manual
Page 57
...-time status (See "DLE EOT" command) 4-21 Printer BUSY is opened . Printer rear cover open during operation: Error that can possibly recover. - Printer rear cover open during operation: Error that automatically recovers. When b = 49, the Memory Switch is set as follows: MSW 8-1 to 640 bytes. When b = 48, the Memory Switch is released when the remaining capacity of the receive buffer goes to OFF. - Reserved: Fixed to OFF (Don't change...
...-time status (See "DLE EOT" command) 4-21 Printer BUSY is opened . Printer rear cover open during operation: Error that can possibly recover. - Printer rear cover open during operation: Error that automatically recovers. When b = 49, the Memory Switch is set as follows: MSW 8-1 to 640 bytes. When b = 48, the Memory Switch is released when the remaining capacity of the receive buffer goes to OFF. - Reserved: Fixed to OFF (Don't change...
User Manual
Page 60
... ID Printer model ID Type ID Version ID Specification Printer model Printer type Firmware version Transmits printer information A (common information), using n as follows: n Printer ID 33 Type information Specification Supported functions Transmits printer information B (common information), using n as follows: n Printer ID 65 Firmware version 66 Maker name 67 Printer model 68 Serial No Specification Firmware version BIXOLON Printer model Serial No of the printer GS V [Name] [Format] [Range] [Default] [Description] [Note for ] [Notes for ] Select cut mode and cut paper...
... ID Printer model ID Type ID Version ID Specification Printer model Printer type Firmware version Transmits printer information A (common information), using n as follows: n Printer ID 33 Type information Specification Supported functions Transmits printer information B (common information), using n as follows: n Printer ID 65 Firmware version 66 Maker name 67 Printer model 68 Serial No Specification Firmware version BIXOLON Printer model Serial No of the printer GS V [Name] [Format] [Range] [Default] [Description] [Note for ] [Notes for ] Select cut mode and cut paper...

User Manual
Page 64
...216 inch line feed pitch (approximate value) Set line feed to n/144 inch line feed pitch Execute n/144 inch paper feed one time Form feed Set page length to n lines Set page length to n inches Feed paper to vertical table position Set vertical tab position Set bottom margin to n lines Cancel bottom margin Set left margin Set right margin Move print position to horizontal tab position Set/cancel horizontal tab position Specify position alignment Specify absolute position Specify relative position Register/delete download characters Set/cancel download characters Standard density bit image Hex...
...216 inch line feed pitch (approximate value) Set line feed to n/144 inch line feed pitch Execute n/144 inch paper feed one time Form feed Set page length to n lines Set page length to n inches Feed paper to vertical table position Set vertical tab position Set bottom margin to n lines Cancel bottom margin Set left margin Set right margin Move print position to horizontal tab position Set/cancel horizontal tab position Specify position alignment Specify absolute position Specify relative position Register/delete download characters Set/cancel download characters Standard density bit image Hex...
