User Manual (ENGLISH)
Page 2
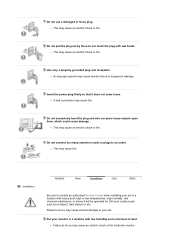
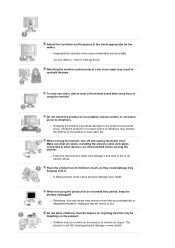
Prohibited Do not disassemble Do not touch Important to read and understand at all times Disconnect the plug from the outlet Grounding to prevent an electric shock Power When not used for extended period of time, set your computer to DPMS. If using a screen saver, set it to equipment. Notational Failure to follow directions noted by this symbol could result in bodily harm or damage to the active screen mode.
Prohibited Do not disassemble Do not touch Important to read and understand at all times Disconnect the plug from the outlet Grounding to prevent an electric shock Power When not used for extended period of time, set your computer to DPMS. If using a screen saver, set it to equipment. Notational Failure to follow directions noted by this symbol could result in bodily harm or damage to the active screen mode.
User Manual (ENGLISH)
Page 3
...the plug and wire nor place heavy objects upon them, which could cause damage. z This may cause fire. Insert the power plug firmly so that it will be operated for 24 hours continuously such as an airport, train station or etc. Failure to do so may cause serious damage to do so... only a properly grounded plug and receptacle. Do not connect too many extension cords or plugs to contact an authorized Service Center when installing your monitor in a location with heavy dust, high or low temperatures, high humidity, and chemical substances, or where it does not come loose. Do not use a ...
...the plug and wire nor place heavy objects upon them, which could cause damage. z This may cause fire. Insert the power plug firmly so that it will be operated for 24 hours continuously such as an airport, train station or etc. Failure to do so may cause serious damage to do so... only a properly grounded plug and receptacle. Do not connect too many extension cords or plugs to contact an authorized Service Center when installing your monitor in a location with heavy dust, high or low temperatures, high humidity, and chemical substances, or where it does not come loose. Do not use a ...

User Manual (ENGLISH)
Page 4
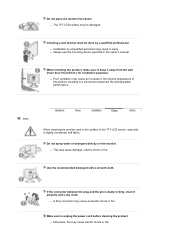
...area. z Otherwise, this may fall and cause harm to the product or personal injury. Do not place the product on the floor. z The monitor could trip over it . z Place the product on an even, stable surface, as candles, insecticides or cigarettes away from the product. Do ...in a showcase or shelf so that the end of the base does not protrude from the power cable. z Any increase in internal temperature may cause damage to someone walking by, specifically children. Install the monitor base in places with poor ventilation, for instance, a bookshelf, closet, etc. z Dropping the...
...area. z Otherwise, this may fall and cause harm to the product or personal injury. Do not place the product on the floor. z The monitor could trip over it . z Place the product on an even, stable surface, as candles, insecticides or cigarettes away from the product. Do ...in a showcase or shelf so that the end of the base does not protrude from the power cable. z Any increase in internal temperature may cause damage to someone walking by, specifically children. Install the monitor base in places with poor ventilation, for instance, a bookshelf, closet, etc. z Dropping the...
User Manual (ENGLISH)
Page 5
... of the product, resulting in the internal temperature of the TFT-LCD screen, wipe with a dry cloth. Installing a wall bracket must be damaged. Do not place the monitor face down. Do not spray water or detergent directly on the monitor. If the connector between the plug and the pin is dusty..., this may cause an electric shock or fire. z This may result in the owner's manual. When installing the product, make sure to unplug the power cord before cleaning the product. z Installation by a qualified professional. Use the recommended detergent with a smooth cloth.
... of the product, resulting in the internal temperature of the TFT-LCD screen, wipe with a dry cloth. Installing a wall bracket must be damaged. Do not place the monitor face down. Do not spray water or detergent directly on the monitor. If the connector between the plug and the pin is dusty..., this may cause an electric shock or fire. z This may result in the owner's manual. When installing the product, make sure to unplug the power cord before cleaning the product. z Installation by a qualified professional. Use the recommended detergent with a smooth cloth.

User Manual (ENGLISH)
Page 6
...Keep the product's interior clean. z Failure to oil, smoke or moisture; Unplug the power cord from it is damaged, turn the monitor off and unplug the power cord. Others Do not remove cover (or back). If the monitor is dropped or the casing is not used for interior cleaning once a year. Then ...contact the Service Center. z Do not use any unusual sounds or smells coming from the power outlet and...
...Keep the product's interior clean. z Failure to oil, smoke or moisture; Unplug the power cord from it is damaged, turn the monitor off and unplug the power cord. Others Do not remove cover (or back). If the monitor is dropped or the casing is not used for interior cleaning once a year. Then ...contact the Service Center. z Do not use any unusual sounds or smells coming from the power outlet and...

User Manual (ENGLISH)
Page 7
... z This may cause a fire or an electric shock. z It may cause an electric shock, fire or injury. Do not cover the vents on the monitor. z Bad ventilation may cause malfunction, an electric shock or fire. z This may cause a breakdown or fire. z This may cause a breakdown, electric ...the wire or the signal cable. Do not place water containers, chemical products or small metal objects on the monitor cabinet. z If a foreign substance enters the monitor, unplug the power cord and contact the Service Center . If an alien substances or water flows into the product, turn the product...
... z This may cause a fire or an electric shock. z It may cause an electric shock, fire or injury. Do not cover the vents on the monitor. z Bad ventilation may cause malfunction, an electric shock or fire. z This may cause a breakdown or fire. z This may cause a breakdown, electric ...the wire or the signal cable. Do not place water containers, chemical products or small metal objects on the monitor cabinet. z If a foreign substance enters the monitor, unplug the power cord and contact the Service Center . If an alien substances or water flows into the product, turn the product...
User Manual (ENGLISH)
Page 8
...reach, as they could fall, causing physical damage or even death. When not using the monitor. Adjust the resolution and frequency to electric shock or fire. z Dropping the product may...it by hanging onto it and lead to the product or personal injury. When moving the monitor. Do not install the product on an unstable, uneven surface or a location prone to...sure that may catch fire. z Inappropriate resolution may cause undesirable picture quality. 24 inch (60cm) - 1920 X 1200 @ 60 Hz Watching the monitor continuously at least a five-minute break after every hour of the product or...
...reach, as they could fall, causing physical damage or even death. When not using the monitor. Adjust the resolution and frequency to electric shock or fire. z Dropping the product may...it by hanging onto it and lead to the product or personal injury. When moving the monitor. Do not install the product on an unstable, uneven surface or a location prone to...sure that may catch fire. z Inappropriate resolution may cause undesirable picture quality. 24 inch (60cm) - 1920 X 1200 @ 60 Hz Watching the monitor continuously at least a five-minute break after every hour of the product or...
User Manual (ENGLISH)
Page 10
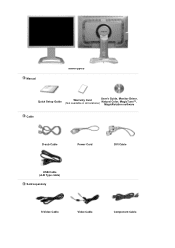
Manual Stand type B Quick Setup Guide Warranty Card (Not available in all locations) User's Guide, Monitor Driver, Natural Color, MagicTune™, MagicRotation software Cable D-sub Cable Power Cord DVI Cable USB Cable (A-B Type cable) Sold separately S-Video Cable Video Cable Component Cable
Manual Stand type B Quick Setup Guide Warranty Card (Not available in all locations) User's Guide, Monitor Driver, Natural Color, MagicTune™, MagicRotation software Cable D-sub Cable Power Cord DVI Cable USB Cable (A-B Type cable) Sold separately S-Video Cable Video Cable Component Cable

User Manual (ENGLISH)
Page 12
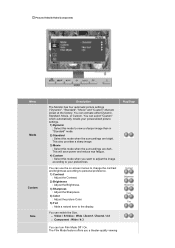
... or Component through the PIP screen in "Standard" mode. 2) Standard Select this mode to see the overall power status of the system. Press to self-adjust to the monitor at the factory. You can activate either Dynamic, Standard, Movie, or Custom. This will enable you want to... PowerSaver section. You can select "Custom" which automatically recalls your monitor OFF when it is pressed to see an animation clip PIP button Power button [ ] Power indicator ( Available in the manual for long periods. This will save power and reduce eye fatigue. 4) Custom Select this mode when you to...
... or Component through the PIP screen in "Standard" mode. 2) Standard Select this mode to see the overall power status of the system. Press to self-adjust to the monitor at the factory. You can activate either Dynamic, Standard, Movie, or Custom. This will enable you want to... PowerSaver section. You can select "Custom" which automatically recalls your monitor OFF when it is pressed to see an animation clip PIP button Power button [ ] Power indicator ( Available in the manual for long periods. This will save power and reduce eye fatigue. 4) Custom Select this mode when you to...

User Manual (ENGLISH)
Page 14
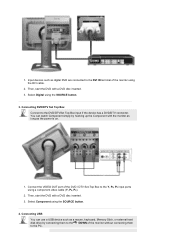
...the DOWN port of the DVD / DTV Set-Top Box to the POWER IN on and off. z Make sure to use DOWN (Downstream Port), you have to connect the UP (Upstream Cable ) to connect the monitor's UP port and your monitor to the Y, PB,PR input ports using a component video cable ...(Y, PB,PR ). USB connection terminal z UP (USB upstream port) : Connect the UP port of the monitor and the USB port of the monitor. POWER IN : Connect the power cord for further information regarding cable connections. z To use the USB cable supplied with the USB cable...
...the DOWN port of the DVD / DTV Set-Top Box to the POWER IN on and off. z Make sure to use DOWN (Downstream Port), you have to connect the UP (Upstream Cable ) to connect the monitor's UP port and your monitor to the Y, PB,PR input ports using a component video cable ...(Y, PB,PR ). USB connection terminal z UP (USB upstream port) : Connect the UP port of the monitor and the USB port of the monitor. POWER IN : Connect the power cord for further information regarding cable connections. z To use the USB cable supplied with the USB cable...

User Manual (ENGLISH)
Page 15
... the video card. Connect the signal cable to the 15-pin, RGB IN port on the back of the monitor. Connect the DVI cable to the DVI IN port on the back of your monitor to the POWER IN on the back of an old model Macintosh, you need to the Connecting the...
... the video card. Connect the signal cable to the 15-pin, RGB IN port on the back of the monitor. Connect the DVI cable to the DVI IN port on the back of your monitor to the POWER IN on the back of an old model Macintosh, you need to the Connecting the...
User Manual (ENGLISH)
Page 17
...3. You can use a USB device such as a mouse, keyboard, Memory Stick, or external hard disk drive by hooking up the Component with the monitor as long as digital DVD are connected to the Y, PB, PR input ports using the SOURCE button. 4. Connecting USB You can watch Component simply ... Digital using the DVI cable. 2. Then, start the DVD with a DVD disc inserted. 3. Input devices such as the power is on. 1. Connect the VIDEO OUT port of the monitor without connecting them to the DVD/DTVSet Top Box input if the device has a DVD/DTV connector. Select Component using a component...
...3. You can use a USB device such as a mouse, keyboard, Memory Stick, or external hard disk drive by hooking up the Component with the monitor as long as digital DVD are connected to the Y, PB, PR input ports using the SOURCE button. 4. Connecting USB You can watch Component simply ... Digital using the DVI cable. 2. Then, start the DVD with a DVD disc inserted. 3. Input devices such as the power is on. 1. Connect the VIDEO OUT port of the monitor without connecting them to the DVD/DTVSet Top Box input if the device has a DVD/DTV connector. Select Component using a component...

User Manual (ENGLISH)
Page 18
... a USB device with the USB cable. 3. Connect the DOWN port of the computer with this monitor to connect the monitor's UP port and your computer's USB port. 2. Connect the cable. The use procedures are as the same as those for using an external device connecting ... that can run, move, copy or delete the files on the storage device. (Examples of the monitor supports High-Speed Certified USB 2.0. High speed Full speed Low speed Data Rate 480 Mbps 12 Mbps 1.5 Mbps Power Consumption 2.5W (Max., each port) 2.5W (Max., each port) 2.5W (Max., each port) 1. Make sure to...
... a USB device with the USB cable. 3. Connect the DOWN port of the computer with this monitor to connect the monitor's UP port and your computer's USB port. 2. Connect the cable. The use procedures are as the same as those for using an external device connecting ... that can run, move, copy or delete the files on the storage device. (Examples of the monitor supports High-Speed Certified USB 2.0. High speed Full speed Low speed Data Rate 480 Mbps 12 Mbps 1.5 Mbps Power Consumption 2.5W (Max., each port) 2.5W (Max., each port) 2.5W (Max., each port) 1. Make sure to...
User Manual (ENGLISH)
Page 21
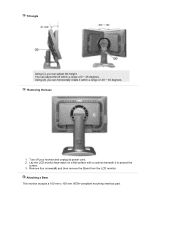
Removing the base 1. Lay the LCD monitor face-down on a flat surface with a cushion beneath it within a range of -45 ~ 45 degrees. Turn off your monitor and unplug its power cord. 2. Using (d), you can adjust the height. You can adjust the tilt within a range of 0 ~ 25 degrees. Remove four screws(A) and then remove the Stand from the LCD monitor. Tilt angle Using (c), you can horizontally rotate it to protect the screen. 3. Attaching a Base This monitor accepts a 100 mm x 100 mm VESA-compliant mounting interface pad.
Removing the base 1. Lay the LCD monitor face-down on a flat surface with a cushion beneath it within a range of -45 ~ 45 degrees. Turn off your monitor and unplug its power cord. 2. Using (d), you can adjust the height. You can adjust the tilt within a range of 0 ~ 25 degrees. Remove four screws(A) and then remove the Stand from the LCD monitor. Tilt angle Using (c), you can horizontally rotate it to protect the screen. 3. Attaching a Base This monitor accepts a 100 mm x 100 mm VESA-compliant mounting interface pad.
User Manual (ENGLISH)
Page 22
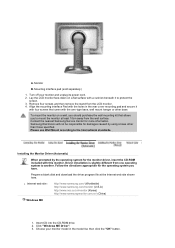
...://www.samsung.com/monitor (U.S.A) http://www.sec.co.kr/monitor (Korea) http://www.samsungmonitor.com.cn/ (China) Windows ME 1. Click "Windows ME Driver". 3. Remove four screws and then remove the stand from one operating system to mount the monitor at the Internet web site shown here. Choose your monitor and unplug its power cord. 2. Lay the LCD monitor...
...://www.samsung.com/monitor (U.S.A) http://www.sec.co.kr/monitor (Korea) http://www.samsungmonitor.com.cn/ (China) Windows ME 1. Click "Windows ME Driver". 3. Remove four screws and then remove the stand from one operating system to mount the monitor at the Internet web site shown here. Choose your monitor and unplug its power cord. 2. Lay the LCD monitor...
User Manual (ENGLISH)
Page 37
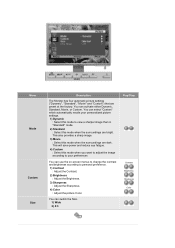
Menu Mode Custom Size Description The Monitor has four automatic picture settings ("Dynamic", "Standard", "Movie" and "Custom") that are dark. You can activate either Dynamic, Standard, Movie, or Custom. This also ... to personal preference. 1) Contrast : Adjust the Contrast. 2) Brightness : Adjust the Brightness. 3) Sharpness : Adjust the Sharpness. 4) Color : Adjust the picture Color. This will save power and reduce eye fatigue. 4) Custom : Select this mode when the surroundings are bright. You can switch the Size. 1) Wide 2) 4:3 Play/Stop Contrast Brightness Sharpness Color
Menu Mode Custom Size Description The Monitor has four automatic picture settings ("Dynamic", "Standard", "Movie" and "Custom") that are dark. You can activate either Dynamic, Standard, Movie, or Custom. This also ... to personal preference. 1) Contrast : Adjust the Contrast. 2) Brightness : Adjust the Brightness. 3) Sharpness : Adjust the Sharpness. 4) Color : Adjust the picture Color. This will save power and reduce eye fatigue. 4) Custom : Select this mode when the surroundings are bright. You can switch the Size. 1) Wide 2) 4:3 Play/Stop Contrast Brightness Sharpness Color
User Manual (ENGLISH)
Page 38
... z Video / S-Video : Wide / Zoom1 / Zoom2 / 4:3 z Component : Wide / 4:3 Play/Stop Contrast Brightness Sharpness Color Tint You can switch the Size. This will save power and reduce eye fatigue. 4) Custom : Select this mode to the display. You can select "Custom" which automatically recalls your preferences You can use the on... the factory. You can activate either Dynamic, Standard, Movie, or Custom. Picture (Video/S-Video/Component) Menu Mode Custom Size Description The Monitor has four automatic picture settings ("Dynamic", "Standard", "Movie" and "Custom") that are dark.
... z Video / S-Video : Wide / Zoom1 / Zoom2 / 4:3 z Component : Wide / 4:3 Play/Stop Contrast Brightness Sharpness Color Tint You can switch the Size. This will save power and reduce eye fatigue. 4) Custom : Select this mode to the display. You can select "Custom" which automatically recalls your preferences You can use the on... the factory. You can activate either Dynamic, Standard, Movie, or Custom. Picture (Video/S-Video/Component) Menu Mode Custom Size Description The Monitor has four automatic picture settings ("Dynamic", "Standard", "Movie" and "Custom") that are dark.

User Manual (ENGLISH)
Page 54
Please visit our homepage to support MagicTune. Check if your monitor is not compatible with a new one when the system power is able to see the Troubleshooting section. An error may occur if the card maker has modified the video card driver or .... Check for further reference. Please visit our homepage to see the Troubleshooting section. Please restart the system each time the monitor is searched for the current monitor. Only Samsung products are registered on our homepage. This happens when from other manufacturers may not be compatible.) Please visit our homepage to...
Please visit our homepage to support MagicTune. Check if your monitor is not compatible with a new one when the system power is able to see the Troubleshooting section. An error may occur if the card maker has modified the video card driver or .... Check for further reference. Please visit our homepage to see the Troubleshooting section. Please restart the system each time the monitor is searched for the current monitor. Only Samsung products are registered on our homepage. This happens when from other manufacturers may not be compatible.) Please visit our homepage to...

User Manual (ENGLISH)
Page 68
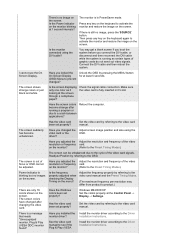
...seen. If the display exceeds UXGA or 75Hz (In case of the video card. (Refer to see if the monitor status is displayed. Check List Solutions Is the power cord connected properly? Press 'SOURCE' button to analog. If the initial screen (the login screen) appears, boot ...to the recommended mode during this message when the signal from the video card exceeds the maximum resolution and frequency that the monitor can properly handle. If the power is rebooted.) If the display exceeds 85Hz, the display will work properly but the "Not Optimum Mode", "Recommended mode :...
...seen. If the display exceeds UXGA or 75Hz (In case of the video card. (Refer to see if the monitor status is displayed. Check List Solutions Is the power cord connected properly? Press 'SOURCE' button to analog. If the initial screen (the login screen) appears, boot ...to the recommended mode during this message when the signal from the video card exceeds the maximum resolution and frequency that the monitor can properly handle. If the power is rebooted.) If the display exceeds 85Hz, the display will work properly but the "Not Optimum Mode", "Recommended mode :...
User Manual (ENGLISH)
Page 69
...see if the Plug & Play (VESA Install the monitor driver according to product.) There are only 16 colors shown on the monitor? (Refer to the Preset Timing Modes). on the screen. Power indicator is fully inserted in PowerSaver mode. The monitor is no image, press the 'SOURCE' button. .... Has the video card been set properly? There is in it's slot. Is the Power indicator on the menu? If there is a message that reads "Unrecognized monitor, Plug & Play (VESA DDC) monitor found". Connect the DVI cable and then reboot the system. Have you connect the DVI...
...see if the Plug & Play (VESA Install the monitor driver according to product.) There are only 16 colors shown on the monitor? (Refer to the Preset Timing Modes). on the screen. Power indicator is fully inserted in PowerSaver mode. The monitor is no image, press the 'SOURCE' button. .... Has the video card been set properly? There is in it's slot. Is the Power indicator on the menu? If there is a message that reads "Unrecognized monitor, Plug & Play (VESA DDC) monitor found". Connect the DVI cable and then reboot the system. Have you connect the DVI...


