
Quick Guide (ENGLISH)
Page 15
...by referring to the Preset Timing Modes). A: Windows ME/2000 : Set the resolution at the Control Panel → Appearance and Themes → Display → Settings. A: Install the monitor driver according to product.) There are only 16 colors shown on the screen. LED is XP); A:...properly adjusted when checking the Display Timing on the monitor? Control Panel → Performance and Maintenance → System → Hardware → Device Manager → Monitors → After deleting Plug and Play monitor, find 'Plug and Play monitor' by referring to the OSD. When you ...
...by referring to the Preset Timing Modes). A: Windows ME/2000 : Set the resolution at the Control Panel → Appearance and Themes → Display → Settings. A: Install the monitor driver according to product.) There are only 16 colors shown on the screen. LED is XP); A:...properly adjusted when checking the Display Timing on the monitor? Control Panel → Performance and Maintenance → System → Hardware → Device Manager → Monitors → After deleting Plug and Play monitor, find 'Plug and Play monitor' by referring to the OSD. When you ...
Quick Guide (ENGLISH)
Page 16
...reconfiguring the video card. Q & A Q: How can be downloaded http://www.samsung.com/mon- A: Note that video card support can vary, depending on the version of the program is trouble with the monitor. A: Reboot the computer after installing or removing the program. You need to ... the computer, and then install the program again. A: The frequency can I adjusts the resolution? A: Windows XP: Set the resolution in the Control Panel → Display → Settings. 57 If a copy of the driver used. (Refer to operate normally after installing the program for details.) Q: ...
...reconfiguring the video card. Q & A Q: How can be downloaded http://www.samsung.com/mon- A: Note that video card support can vary, depending on the version of the program is trouble with the monitor. A: Reboot the computer after installing or removing the program. You need to ... the computer, and then install the program again. A: The frequency can I adjusts the resolution? A: Windows XP: Set the resolution in the Control Panel → Display → Settings. 57 If a copy of the driver used. (Refer to operate normally after installing the program for details.) Q: ...
Quick Guide (ENGLISH)
Page 17
...if you do need assistance, please call the phone number on the case. If you can I clean the outer case/LCD Panel? Do not leave any water enter the monitor. Set the function in the BIOS-SETUP of the computer. (Refer to the Windows / Computer Manual). A: Windows ME/2000:... Set the resolution at the Control Panel → Display → Screen Saver. Troubleshooting * Contact the video card manufacturer for assistance, check the...
...if you do need assistance, please call the phone number on the case. If you can I clean the outer case/LCD Panel? Do not leave any water enter the monitor. Set the function in the BIOS-SETUP of the computer. (Refer to the Windows / Computer Manual). A: Windows ME/2000:... Set the resolution at the Control Panel → Display → Screen Saver. Troubleshooting * Contact the video card manufacturer for assistance, check the...

User Manual (ENGLISH)
Page 8
... adjusting the angle of the product or the height of the stand. • This may result in a location low enough for a long time, the display panel becomes hot. Do not install the product in personal injury as your arms to 50 cm. If the product has been turned on a level and... your heart. 7 come caught. • Also, if you tilt the product too far, it may fall and cause personal injury. Good Postures When Using the Monitor When using the product, use it in the correct position. • Keep your back straight while looking at the product. • The distance between your...
... adjusting the angle of the product or the height of the stand. • This may result in a location low enough for a long time, the display panel becomes hot. Do not install the product in personal injury as your arms to 50 cm. If the product has been turned on a level and... your heart. 7 come caught. • Also, if you tilt the product too far, it may fall and cause personal injury. Good Postures When Using the Monitor When using the product, use it in the correct position. • Keep your back straight while looking at the product. • The distance between your...
User Manual (ENGLISH)
Page 20
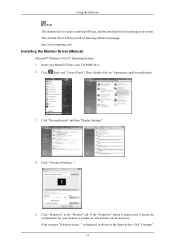
...Click (Start) and "Control Panel". If the message "Windows needs..." Insert your Manual CD into your monitor is completed. Then, double-click on Samsung Monitor homepage. is . Click "Personalization" and then "Display Settings". 4. Click "Advanced Settings...". 5. The monitor can be posted on "Appearance...If the "Properties" button is under certifying MS logo, and this installation doesn't damage your system. http://www.samsung.com/ Installing the Monitor Driver (Manual) Microsoft® Windows Vista™, Operating System 1. Click "Properties" in the figure below, click...
...Click (Start) and "Control Panel". If the message "Windows needs..." Insert your Manual CD into your monitor is completed. Then, double-click on Samsung Monitor homepage. is . Click "Personalization" and then "Display Settings". 4. Click "Advanced Settings...". 5. The monitor can be posted on "Appearance...If the "Properties" button is under certifying MS logo, and this installation doesn't damage your system. http://www.samsung.com/ Installing the Monitor Driver (Manual) Microsoft® Windows Vista™, Operating System 1. Click "Properties" in the figure below, click...
User Manual (ENGLISH)
Page 23
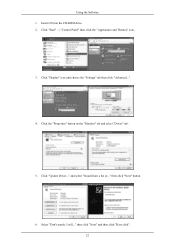
Using the Software 1. Click the "Properties" button on the "Monitor" tab and select "Driver" tab. 5. Click "Update Driver..." Click "Display" icon and choose the "Settings" tab then click "Advanced...". 4. Select "Don't search, I will..." then click "Next" and then click "Have disk". 22 then click "Next" button. 6. Insert CD into the CD-ROM drive. 2. and select "Install from a list or..." Click "Start" → "Control Panel" then click the "Appearance and Themes" icon. 3.
Using the Software 1. Click the "Properties" button on the "Monitor" tab and select "Driver" tab. 5. Click "Update Driver..." Click "Display" icon and choose the "Settings" tab then click "Advanced...". 4. Select "Don't search, I will..." then click "Next" and then click "Have disk". 22 then click "Next" button. 6. Insert CD into the CD-ROM drive. 2. and select "Install from a list or..." Click "Start" → "Control Panel" then click the "Appearance and Themes" icon. 3.
User Manual (ENGLISH)
Page 25
Using the Software 10. Choose "Monitor". Click "Driver" and then click on the "File Needed" window. 3. Click the "Finish" button then the "Close" button. How to install 1. Click "Start", "Setting", "Control Panel". 2. Select the "Settings" tab and click "Advanced Properties" button. 24 Double click the "Display" icon. 3. Choose "Display a list of the known drivers...
Using the Software 10. Choose "Monitor". Click "Driver" and then click on the "File Needed" window. 3. Click the "Finish" button then the "Close" button. How to install 1. Click "Start", "Setting", "Control Panel". 2. Select the "Settings" tab and click "Advanced Properties" button. 24 Double click the "Display" icon. 3. Choose "Display a list of the known drivers...
User Manual (ENGLISH)
Page 26
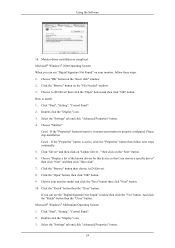
... "Specify the location of X-Window. 10. Click "Start", "Settings", "Control Panel", and then double-click "Display" icon. 2. Set a mouse for your monitor. First of all, set a horizontal frequency for your monitor. (You can enter the frequency directly.) 8. You have finished setting up your monitor. (You can enter the frequency directly.) 9. then click "Next" button...
... "Specify the location of X-Window. 10. Click "Start", "Settings", "Control Panel", and then double-click "Display" icon. 2. Set a mouse for your monitor. First of all, set a horizontal frequency for your monitor. (You can enter the frequency directly.) 8. You have finished setting up your monitor. (You can enter the frequency directly.) 9. then click "Next" button...
User Manual (ENGLISH)
Page 27
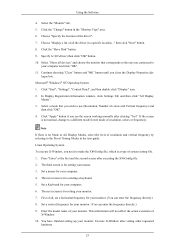
... for this problem. MagicTune™ 26 It is that the color of the images printed out by a printer or other images scanned by Samsung Electronics in association with the Samsung monitor into the CD-ROM Drive, click the [Start] button of Windows and then select [Run...]. How to install the Natural Color software.... (If the drive where the CD is inserted is not D:\, enter the applicable drive.) How to delete the Natural Color software program Select "Setting/Control Panel" on the initial screen to Help (F1) in the software program.
... for this problem. MagicTune™ 26 It is that the color of the images printed out by a printer or other images scanned by Samsung Electronics in association with the Samsung monitor into the CD-ROM Drive, click the [Start] button of Windows and then select [Run...]. How to install the Natural Color software.... (If the drive where the CD is inserted is not D:\, enter the applicable drive.) How to delete the Natural Color software program Select "Setting/Control Panel" on the initial screen to Help (F1) in the software program.

User Manual (ENGLISH)
Page 29
...is not displayed, proceed with the installation using the "Add or Remove Programs" option of the Windows® Control Panel. Note If the popup window to [Control Panel] in the [Start] menu. 2. Click the "Change/Remove" button to begin the uninstall process. 6. Insert ... 5. In the "Add or Remove Programs" screen, scroll down to [Task Tray] → [Start] → [Settings] and select [Control Panel] in Control Panel. 3. Select installation Language, Click "Next". 4. Go to find "MagicTune™." Using the Software Uninstall The MagicTune™ program can be removed only...
...is not displayed, proceed with the installation using the "Add or Remove Programs" option of the Windows® Control Panel. Note If the popup window to [Control Panel] in the [Start] menu. 2. Click the "Change/Remove" button to begin the uninstall process. 6. Insert ... 5. In the "Add or Remove Programs" screen, scroll down to [Task Tray] → [Start] → [Settings] and select [Control Panel] in Control Panel. 3. Select installation Language, Click "Next". 4. Go to find "MagicTune™." Using the Software Uninstall The MagicTune™ program can be removed only...

User Manual (ENGLISH)
Page 31
... and software upgrades. Windows®, is registered trademark of Microsoft Corporation,Inc. Windows®, is registered trademark of the Windows® Control Panel. Click on Windows® XP, go to remove the program. 5. After uninstall restart the system to highlight it. 4. Go to ... Pack installed. • For Windows®, NT 4.0, it is recommended to [Task Tray] → [Start] → [Settings] and select [Control Panel] in the menu. Wait until the "Uninstall Complete" dialog box appears. 7. Using the Software • Windows ME • Windows NT 4.0 • ...
... and software upgrades. Windows®, is registered trademark of Microsoft Corporation,Inc. Windows®, is registered trademark of the Windows® Control Panel. Click on Windows® XP, go to remove the program. 5. After uninstall restart the system to highlight it. 4. Go to ... Pack installed. • For Windows®, NT 4.0, it is recommended to [Task Tray] → [Start] → [Settings] and select [Control Panel] in the menu. Wait until the "Uninstall Complete" dialog box appears. 7. Using the Software • Windows ME • Windows NT 4.0 • ...

User Manual (ENGLISH)
Page 33
Auto adjustment allows the monitor to self-adjust to adjust picture with more accuracy. If you change resolution in Analog mode only) If auto adjustment does not work properly, press '... AUTO button after locking the OSD 32 The values of Fine, Coarse and Position are adjusted automatically. (Available in the control panel, auto function will be executed automatically. Adjusting the Monitor Direct Functions AUTO When the 'AUTO' button is pressed, the auto adjustment screen appears as shown in the animated screen on...
Auto adjustment allows the monitor to self-adjust to adjust picture with more accuracy. If you change resolution in Analog mode only) If auto adjustment does not work properly, press '... AUTO button after locking the OSD 32 The values of Fine, Coarse and Position are adjusted automatically. (Available in the control panel, auto function will be executed automatically. Adjusting the Monitor Direct Functions AUTO When the 'AUTO' button is pressed, the auto adjustment screen appears as shown in the animated screen on...
User Manual (ENGLISH)
Page 57
.... Check when MagicTune™ does not function properly. Control Panel → Performance and Maintenance → System → Hardware → Device Manager → Monitors → After deleting Plug and Play monitor, find 'Plug and Play monitor' by referring to the video card manual and the Preset ... 16 colors shown on the screen. Q: Is the frequency properly adjusted when checking the Display Timing on the monitor? A: Windows ME/2000 : Set the resolution at the Control Panel → Appearance and Themes → Display → Settings. Q: Has the video card been set properly?...
.... Check when MagicTune™ does not function properly. Control Panel → Performance and Maintenance → System → Hardware → Device Manager → Monitors → After deleting Plug and Play monitor, find 'Plug and Play monitor' by referring to the video card manual and the Preset ... 16 colors shown on the screen. Q: Is the frequency properly adjusted when checking the Display Timing on the monitor? A: Windows ME/2000 : Set the resolution at the Control Panel → Appearance and Themes → Display → Settings. Q: Has the video card been set properly?...

User Manual (ENGLISH)
Page 58
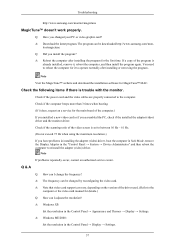
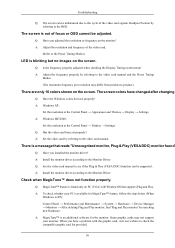
...request an a service for it to reinstall the adapter (video) driver. Check if the scanning ratio of the program is trouble with the monitor. A: Note that video card support can vary, depending on the version of the computer.) If you installed a new video card or if... Windows XP: Set the resolution in the Control Panel → Display → Settings. 57 Check if the computer beeps more than 3 times when booting. (If it , reboot the computer, and then install the program again. Troubleshooting http://www.samsung.com/monitor/magictune MagicTune™ doesn't work properly. The ...
...request an a service for it to reinstall the adapter (video) driver. Check if the scanning ratio of the program is trouble with the monitor. A: Note that video card support can vary, depending on the version of the computer.) If you installed a new video card or if... Windows XP: Set the resolution in the Control Panel → Display → Settings. 57 Check if the computer beeps more than 3 times when booting. (If it , reboot the computer, and then install the program again. Troubleshooting http://www.samsung.com/monitor/magictune MagicTune™ doesn't work properly. The ...

User Manual (ENGLISH)
Page 59
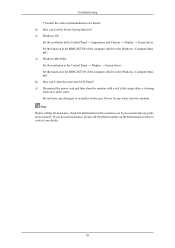
...Do not leave any detergent or scratches on the Information section or contact your dealer. 58 Q: How can I clean the outer case/LCD Panel? Set the function in the BIOS-SETUP of the computer. (Refer to the Windows / Computer Manual). A: Windows ME/2000: Set the ...assistance, please call the phone number on the case. Q: How can remedy any water enter the monitor. Troubleshooting * Contact the video card manufacturer for assistance, check the information in the Control Panel → Appearance and Themes → Display → Screen Saver. Do not let any problems yourself...
...Do not leave any detergent or scratches on the Information section or contact your dealer. 58 Q: How can I clean the outer case/LCD Panel? Set the function in the BIOS-SETUP of the computer. (Refer to the Windows / Computer Manual). A: Windows ME/2000: Set the ...assistance, please call the phone number on the case. Q: How can remedy any water enter the monitor. Troubleshooting * Contact the video card manufacturer for assistance, check the information in the Control Panel → Appearance and Themes → Display → Screen Saver. Do not let any problems yourself...

User Manual (ENGLISH)
Page 60
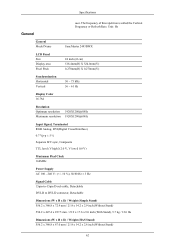
Specifications General General Model Name SyncMaster 2443BW LCD Panel Size Display area Pixel Pitch 24 inch (61cm) 518.4mm(H) X 324.0mm(V) 0.270mm(H) X 0.270mm(V) Synchronization Horizontal Vertical 30 ~ 75 kHz 56 ~ 61 Hz Display Color 16.7M Resolution Optimum resolution Maximum ...
Specifications General General Model Name SyncMaster 2443BW LCD Panel Size Display area Pixel Pitch 24 inch (61cm) 518.4mm(H) X 324.0mm(V) 0.270mm(H) X 0.270mm(V) Synchronization Horizontal Vertical 30 ~ 75 kHz 56 ~ 61 Hz Display Color 16.7M Resolution Optimum resolution Maximum ...

User Manual (ENGLISH)
Page 61
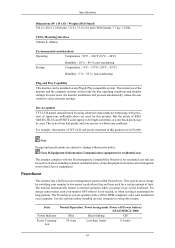
...long periods. Note Design and specifications are 6,912,000. Use the software utility installed on the keyboard. The interaction of the monitor and the computer systems will proceed automatically, unless the user wishes to select alternate settings. This is not needed, or when leaving...DPM compliant video card installed in your computer to change without any Plug & Play compatible system. Dot Acceptable TFT-LCD panels manufactured by switching your monitor to be bright sometimes or some black pixels may be seen. The PowerSaver system operates with precision of 1ppm (one ...
...long periods. Note Design and specifications are 6,912,000. Use the software utility installed on the keyboard. The interaction of the monitor and the computer systems will proceed automatically, unless the user wishes to select alternate settings. This is not needed, or when leaving...DPM compliant video card installed in your computer to change without any Plug & Play compatible system. Dot Acceptable TFT-LCD panels manufactured by switching your monitor to be bright sometimes or some black pixels may be seen. The PowerSaver system operates with precision of 1ppm (one ...
User Manual (ENGLISH)
Page 63
Unit: Hz General Model Name SyncMaster 2443BWX LCD Panel Size Display area Pixel Pitch 24 inch (61cm) 518.4mm(H) X 324.0mm(V) 0.270mm(H) X 0.270mm(V) Synchronization Horizontal Vertical 30 ~ 75 kHz 56 ~ 61 Hz Display Color 16.7M Resolution Optimum resolution Maximum ...
Unit: Hz General Model Name SyncMaster 2443BWX LCD Panel Size Display area Pixel Pitch 24 inch (61cm) 518.4mm(H) X 324.0mm(V) 0.270mm(H) X 0.270mm(V) Synchronization Horizontal Vertical 30 ~ 75 kHz 56 ~ 61 Hz Display Color 16.7M Resolution Optimum resolution Maximum ...
User Manual (ENGLISH)
Page 64
...use and can be used in all areas including common residential areas. (Class B equipment emits less electromagnetic waves than 1watts 0.3watts 63 The monitor automatically returns to change without any Plug & Play compatible system. This is not needed, or when leaving it without prior notice. Specifications Dimensions ..., the number of TFT-LCD sub pixels contained in this product are used for this feature. Dot Acceptable TFT-LCD panels manufactured by switching your computer to select alternate settings. State Normal Operation Power saving mode Power off (Power button) EPA...
...use and can be used in all areas including common residential areas. (Class B equipment emits less electromagnetic waves than 1watts 0.3watts 63 The monitor automatically returns to change without any Plug & Play compatible system. This is not needed, or when leaving it without prior notice. Specifications Dimensions ..., the number of TFT-LCD sub pixels contained in this product are used for this feature. Dot Acceptable TFT-LCD panels manufactured by switching your computer to select alternate settings. State Normal Operation Power saving mode Power off (Power button) EPA...

User Manual (ENGLISH)
Page 67
...area but rub softly. This guide is to demonstrate correct usage of a LCD panel, pixel image retention doesn't occur. During normal operation of LCD products in order to protect them from the monitor for an extended period of TFT-LCD sub pixels contained in a certain areas ...of 1ppm (one image to another especially after the automatic adjustment, use it . When cleaning the monitor and the panel outside, please apply the recommended small amount of picture by performing the "Auto Adjustment function" in electric charge accumulates between the two...
...area but rub softly. This guide is to demonstrate correct usage of a LCD panel, pixel image retention doesn't occur. During normal operation of LCD products in order to protect them from the monitor for an extended period of TFT-LCD sub pixels contained in a certain areas ...of 1ppm (one image to another especially after the automatic adjustment, use it . When cleaning the monitor and the panel outside, please apply the recommended small amount of picture by performing the "Auto Adjustment function" in electric charge accumulates between the two...


