
Quick Guide (ENGLISH)
Page 4
... can be displayed again. Turn the Power button off and on the screen is the optimal resolution for this product. Introduction Note Cleaning Cloth is only provided for highly polished black products as the optimal resolution for this product. 10 Your Monitor Initial Settings Select the language using the up to adjust the...
... can be displayed again. Turn the Power button off and on the screen is the optimal resolution for this product. Introduction Note Cleaning Cloth is only provided for highly polished black products as the optimal resolution for this product. 10 Your Monitor Initial Settings Select the language using the up to adjust the...
Quick Guide (ENGLISH)
Page 19
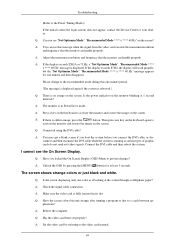
...Screen Display (OSD) Menu to the recommended mode during this message when the signal from the video card exceeds the maximum resolution and frequency that the monitor can handle properly. A: Check the signal cable connection. Q: Can you connect the DVI cable, or disconnect and then ... by referring to the video card manual. 49 Troubleshooting (Refer to activate the monitor and restore the image on the screen. A: You can handle properly. A: Adjust the maximum resolution and frequency that the monitor can see this one-minute period. (The message is displayed again if the ...
...Screen Display (OSD) Menu to the recommended mode during this message when the signal from the video card exceeds the maximum resolution and frequency that the monitor can handle properly. A: Check the signal cable connection. Q: Can you connect the DVI cable, or disconnect and then ... by referring to the video card manual. 49 Troubleshooting (Refer to activate the monitor and restore the image on the screen. A: You can handle properly. A: Adjust the maximum resolution and frequency that the monitor can see this one-minute period. (The message is displayed again if the ...
Quick Guide (ENGLISH)
Page 20
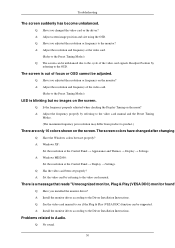
... if the Plug & Play (VESA DDC) function can be unbalanced due to the monitor? A: Windows XP : Set the resolution at the Control Panel → Display → Settings. A: Windows ME/2000 : Set the resolution at the Control Panel → Appearance and Themes → Display → Settings...video card or the driver? There is blinking but no images on the monitor? A: Install the monitor driver according to the Driver Installation Instructions. Q: Have you installed the monitor driver? A: Adjust the resolution and frequency of focus or OSD cannot be supported. A: Adjust the ...
... if the Plug & Play (VESA DDC) function can be unbalanced due to the monitor? A: Windows XP : Set the resolution at the Control Panel → Display → Settings. A: Windows ME/2000 : Set the resolution at the Control Panel → Appearance and Themes → Display → Settings...video card or the driver? There is blinking but no images on the monitor? A: Install the monitor driver according to the Driver Installation Instructions. Q: Have you installed the monitor driver? A: Adjust the resolution and frequency of focus or OSD cannot be supported. A: Adjust the ...

Quick Guide (ENGLISH)
Page 21
Q: Sound level is an additional software for the monitor. A: MagicTune™ is too low. http://www.samsung.com/monitor/magictune MagicTune™ doesn't work properly. itor/...connected to between 56 Hz ~ 75 Hz. (Do not exceed 75 Hz when using the maximum resolution.) 51 A: Check the volume level. A: Download the latest program. If the volume is still ...volume control on your sound card. (Refer to Connecting Cables). The program can be downloaded http://www.samsung.com/mon- A: Reboot the computer after installing or removing the program. Troubleshooting A: Ensure that supports ...
Q: Sound level is an additional software for the monitor. A: MagicTune™ is too low. http://www.samsung.com/monitor/magictune MagicTune™ doesn't work properly. itor/...connected to between 56 Hz ~ 75 Hz. (Do not exceed 75 Hz when using the maximum resolution.) 51 A: Check the volume level. A: Download the latest program. If the volume is still ...volume control on your sound card. (Refer to Connecting Cables). The program can be downloaded http://www.samsung.com/mon- A: Reboot the computer after installing or removing the program. Troubleshooting A: Ensure that supports ...
Quick Guide (ENGLISH)
Page 22
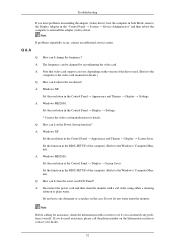
... in this section to the Windows / Computer Manual). A: Windows ME/2000: Set the resolution at the Control Panel → Display → Screen Saver. A: Disconnect the power cord and then clean the monitor with a soft cloth, using either a cleaning solution or plain water. A: The frequency ...can remedy any problems yourself. Q: How can I clean the outer case/LCD Panel? Do not leave any water enter the monitor. If you do need assistance, please call the phone number on the case. Q: How can I set the Power ...
... in this section to the Windows / Computer Manual). A: Windows ME/2000: Set the resolution at the Control Panel → Display → Screen Saver. A: Disconnect the power cord and then clean the monitor with a soft cloth, using either a cleaning solution or plain water. A: The frequency ...can remedy any problems yourself. Q: How can I clean the outer case/LCD Panel? Do not leave any water enter the monitor. If you do need assistance, please call the phone number on the case. Q: How can I set the Power ...
User Manual (ENGLISH)
Page 6
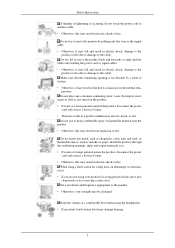
Do not lift or move the monitor by a table or curtain. • Otherwise, it into sleep mode or use or keep combustible spray or flammable material near the product. • Otherwise, this ... Center. • Otherwise, this may result in electric shock or fire. Keep the volume at a comfortable level when using your eyesight may be damaged. Set a resolution and frequency appropriate to the cable. Make sure that the ventilating opening is occurring, do not touch the power cord or antenna cable. • Otherwise...
Do not lift or move the monitor by a table or curtain. • Otherwise, it into sleep mode or use or keep combustible spray or flammable material near the product. • Otherwise, this ... Center. • Otherwise, this may result in electric shock or fire. Keep the volume at a comfortable level when using your eyesight may be damaged. Set a resolution and frequency appropriate to the cable. Make sure that the ventilating opening is occurring, do not touch the power cord or antenna cable. • Otherwise...
User Manual (ENGLISH)
Page 11
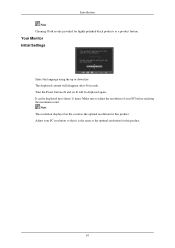
... (1) times. Adjust your PC before reaching the maximum count. Your Monitor Initial Settings Select the language using the up to adjust the resolution of your PC resolution so that it is the optimal resolution for this product. It can be displayed again. Note The resolution displayed on . The displayed content will be displayed up or...
... (1) times. Adjust your PC before reaching the maximum count. Your Monitor Initial Settings Select the language using the up to adjust the resolution of your PC resolution so that it is the optimal resolution for this product. It can be displayed again. Note The resolution displayed on . The displayed content will be displayed up or...
User Manual (ENGLISH)
Page 31
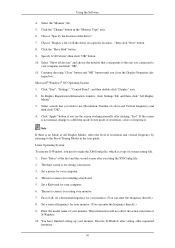
... Modes, select the level of X-Window. 10. Set a Keyboard for your monitor. (You can enter the frequency directly.) 8. Set a vertical frequency for your monitor. 7. Choose "Specify the location of resolution, colors or frequency). logue box. If the screen is not normal, change ... Set a mouse for selecting a keyboard. 5. This information will not affect the actual execution of resolution and vertical frequency by referring to your monitor. Note If there is for your monitor. Click "Apply" button if you close the Display Properties dia- Specify A:\(D:\driver) then click "...
... Modes, select the level of X-Window. 10. Set a Keyboard for your monitor. (You can enter the frequency directly.) 8. Set a vertical frequency for your monitor. 7. Choose "Specify the location of resolution, colors or frequency). logue box. If the screen is not normal, change ... Set a mouse for selecting a keyboard. 5. This information will not affect the actual execution of resolution and vertical frequency by referring to your monitor. Note If there is for your monitor. Click "Apply" button if you close the Display Properties dia- Specify A:\(D:\driver) then click "...
User Manual (ENGLISH)
Page 38
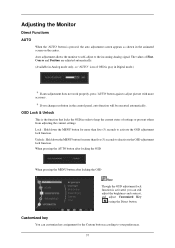
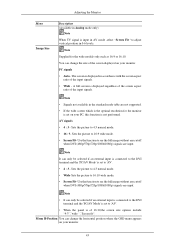
...button after locking the OSD When pressing the MENU button after locking the OSD Note Though the OSD adjustment lock function is activated, you change resolution in Analog mode only, so "AUTO" icon of settings or prevent others from adjusting the current settings. If you can customize key assignment ... be executed automatically. OSD Lock & Unlock This is the function that locks the OSD in the animated screen on the center. Adjusting the Monitor Direct Functions AUTO When the 'AUTO' button is pressed, the auto adjustment screen appears as shown in order to the incoming Analog signal.
...button after locking the OSD When pressing the MENU button after locking the OSD Note Though the OSD adjustment lock function is activated, you change resolution in Analog mode only, so "AUTO" icon of settings or prevent others from adjusting the current settings. If you can customize key assignment ... be executed automatically. OSD Lock & Unlock This is the function that locks the OSD in the animated screen on the center. Adjusting the Monitor Direct Functions AUTO When the 'AUTO' button is pressed, the auto adjustment screen appears as shown in order to the incoming Analog signal.
User Manual (ENGLISH)
Page 44
.... • Screen Fit- Note • Signals not available in the standard mode table are not supported. • If the wide screen which is the optimal resolution for the wide models only such as 16:9 or 16:10. Sets the picture to 4:3 normal mode. • Wide-Sets the picture to see the... when DVI (480p/576p/720p/1080i/1080p) signals are input. Menu H-Position You can change the horizontal position where the OSD menu appears on your monitor. 43 You can change the size of 16:10,the screen size options include "4:3","wide ","Screen fit". The screen is displayed in 0-6 levels. Use the...
.... • Screen Fit- Note • Signals not available in the standard mode table are not supported. • If the wide screen which is the optimal resolution for the wide models only such as 16:9 or 16:10. Sets the picture to 4:3 normal mode. • Wide-Sets the picture to see the... when DVI (480p/576p/720p/1080i/1080p) signals are input. Menu H-Position You can change the horizontal position where the OSD menu appears on your monitor. 43 You can change the size of 16:10,the screen size options include "4:3","wide ","Screen fit". The screen is displayed in 0-6 levels. Use the...

User Manual (ENGLISH)
Page 50
...can see this one-minute period. (The message is displayed again if the system is rebooted.) Q: There is still no image on the monitor blinking at least 5 seconds. Q: Have you see the On Screen Display. Q: Have the screen colors become strange after running as if looking... recommended mode during this message when the signal from the video card exceeds the maximum resolution and frequency that the monitor can handle properly. A: Adjust the maximum resolution and frequency that the monitor can handle properly. Then press any key on the keyboard again to the Preset Timing...
...can see this one-minute period. (The message is displayed again if the system is rebooted.) Q: There is still no image on the monitor blinking at least 5 seconds. Q: Have you see the On Screen Display. Q: Have the screen colors become strange after running as if looking... recommended mode during this message when the signal from the video card exceeds the maximum resolution and frequency that the monitor can handle properly. A: Adjust the maximum resolution and frequency that the monitor can handle properly. Then press any key on the keyboard again to the Preset Timing...

User Manual (ENGLISH)
Page 51
... properly by referring to the video card manual and the Preset Timing Modes. (The maximum frequency per resolution may differ from product to the Driver Installation Instructions. A: Install the monitor driver according to product.) There are only 16 colors shown on the screen. The screen is out... screen. Q: See the video card manual to the OSD. Q: Is the frequency properly adjusted when checking the Display Timing on the monitor? A: Windows ME/2000 : Set the resolution at the video card. (Refer to the Preset Timing Modes) Q: The screen can be supported. Q: No sound. 50 Q: Have...
... properly by referring to the video card manual and the Preset Timing Modes. (The maximum frequency per resolution may differ from product to the Driver Installation Instructions. A: Install the monitor driver according to product.) There are only 16 colors shown on the screen. The screen is out... screen. Q: See the video card manual to the OSD. Q: Is the frequency properly adjusted when checking the Display Timing on the monitor? A: Windows ME/2000 : Set the resolution at the video card. (Refer to the Preset Timing Modes) Q: The screen can be supported. Q: No sound. 50 Q: Have...

User Manual (ENGLISH)
Page 52
... on your sound card. (Refer to its maximum, check the volume control on the computer sound card or software program. http://www.samsung.com/monitor/magictune MagicTune™ doesn't work properly. Q: Have you install the program? Some graphic cards may not support your PC or video graphic...→ Hardware → Device Manager → Monitors → After deleting Plug and Play monitor, find 'Plug and Play monitor' by searching new Hardware. You need to between 56 Hz ~ 75 Hz. (Do not exceed 75 Hz when using the maximum resolution.) 51 Check if the power cord and the video...
... on your sound card. (Refer to its maximum, check the volume control on the computer sound card or software program. http://www.samsung.com/monitor/magictune MagicTune™ doesn't work properly. Q: Have you install the program? Some graphic cards may not support your PC or video graphic...→ Hardware → Device Manager → Monitors → After deleting Plug and Play monitor, find 'Plug and Play monitor' by searching new Hardware. You need to between 56 Hz ~ 75 Hz. (Do not exceed 75 Hz when using the maximum resolution.) 51 Check if the power cord and the video...

User Manual (ENGLISH)
Page 53
...the computer. (Refer to the Windows / Computer Manual). A: Windows ME/2000: Set the resolution at the Control Panel → Display → Screen Saver. Do not let any water enter the monitor. Set the function in the BIOS-SETUP of the driver used. (Refer to the Windows... → Settings. * Contact the video card manufacturer for details.) Q: How can I set the Power Saving function? Q: How can I clean the outer case/LCD Panel? Note Before calling for assistance, check the information in this section to reinstall the adapter (video) driver. Q & A Q: How can I change the ...
...the computer. (Refer to the Windows / Computer Manual). A: Windows ME/2000: Set the resolution at the Control Panel → Display → Screen Saver. Do not let any water enter the monitor. Set the function in the BIOS-SETUP of the driver used. (Refer to the Windows... → Settings. * Contact the video card manufacturer for details.) Q: How can I set the Power Saving function? Q: How can I clean the outer case/LCD Panel? Note Before calling for assistance, check the information in this section to reinstall the adapter (video) driver. Q & A Q: How can I change the ...
User Manual (ENGLISH)
Page 54
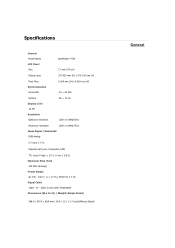
... x H x D) / Weight (Simple Stand) 368.0 x 307.4 x 68.4 mm (14.5 x 12.1 x 2.7 inch)(Without Stand) General Specifications General Model Name LCD Panel Size SyncMaster 743A 17 inch (43 cm) Display area Pixel Pitch Synchronization Horizontal 337.920 mm (H) x 270.336 mm (V) 0.264 mm (H) x 0.264 mm (V) 30 ~ 81... kHz Vertical Display Color 16.7M Resolution Optimum resolution 56 ~ 75 Hz 1280 x 1024@60 Hz Maximum resolution 1280 x 1024@...
... x H x D) / Weight (Simple Stand) 368.0 x 307.4 x 68.4 mm (14.5 x 12.1 x 2.7 inch)(Without Stand) General Specifications General Model Name LCD Panel Size SyncMaster 743A 17 inch (43 cm) Display area Pixel Pitch Synchronization Horizontal 337.920 mm (H) x 270.336 mm (V) 0.264 mm (H) x 0.264 mm (V) 30 ~ 81... kHz Vertical Display Color 16.7M Resolution Optimum resolution 56 ~ 75 Hz 1280 x 1024@60 Hz Maximum resolution 1280 x 1024@...

User Manual (ENGLISH)
Page 58
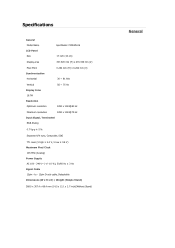
...x H x D) / Weight (Simple Stand) 368.0 x 307.4 x 68.4 mm (14.5 x 12.1 x 2.7 inch)(Without Stand) General Specifications General Model Name LCD Panel Size SyncMaster 743APLUS 17 inch (43 cm) Display area 337.920 mm (H) x 270.336 mm (V) Pixel Pitch Synchronization Horizontal 0.264 mm (H) x 0.264 mm (V) 30 ~... 81 kHz Vertical Display Color 16.7M Resolution Optimum resolution 56 ~ 75 Hz 1280 x 1024@60 Hz Maximum resolution 1280 ...
...x H x D) / Weight (Simple Stand) 368.0 x 307.4 x 68.4 mm (14.5 x 12.1 x 2.7 inch)(Without Stand) General Specifications General Model Name LCD Panel Size SyncMaster 743APLUS 17 inch (43 cm) Display area 337.920 mm (H) x 270.336 mm (V) Pixel Pitch Synchronization Horizontal 0.264 mm (H) x 0.264 mm (V) 30 ~... 81 kHz Vertical Display Color 16.7M Resolution Optimum resolution 56 ~ 75 Hz 1280 x 1024@60 Hz Maximum resolution 1280 ...

User Manual (ENGLISH)
Page 62
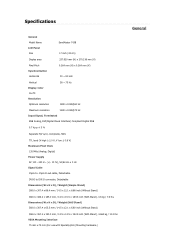
Specifications General Model Name LCD Panel Size SyncMaster 743AX 17 inch (43 cm) Display area 337.920 mm (H) x 270.336 mm (V) Pixel Pitch Synchronization Horizontal 0.264 mm (H) x 0.264 mm (V) 30 ~ 81 kHz Vertical Display Color 16.7M Resolution Optimum resolution 56 ~ 75 Hz 1280 x 1024@60 Hz Maximum resolution 1280 x 1024@75 Hz Input Signal, Terminated...
Specifications General Model Name LCD Panel Size SyncMaster 743AX 17 inch (43 cm) Display area 337.920 mm (H) x 270.336 mm (V) Pixel Pitch Synchronization Horizontal 0.264 mm (H) x 0.264 mm (V) 30 ~ 81 kHz Vertical Display Color 16.7M Resolution Optimum resolution 56 ~ 75 Hz 1280 x 1024@60 Hz Maximum resolution 1280 x 1024@75 Hz Input Signal, Terminated...
User Manual (ENGLISH)
Page 66
... H x D) / Weight (Simple Stand) 368.0 x 307.4 x 68.4 mm (14.5 x 12.1 x 2.7 inch)(Without Stand) General Specifications General Model Name LCD Panel Size SyncMaster 743AXPLUS 17 inch (43 cm) Display area 337.920 mm (H) x 270.336 mm (V) Pixel Pitch Synchronization Horizontal 0.264 mm (H) x 0.264 mm (V) 30 ~... 81 kHz Vertical Display Color 16.7M Resolution Optimum resolution 56 ~ 75 Hz 1280 x 1024@60 Hz Maximum resolution 1280...
... H x D) / Weight (Simple Stand) 368.0 x 307.4 x 68.4 mm (14.5 x 12.1 x 2.7 inch)(Without Stand) General Specifications General Model Name LCD Panel Size SyncMaster 743AXPLUS 17 inch (43 cm) Display area 337.920 mm (H) x 270.336 mm (V) Pixel Pitch Synchronization Horizontal 0.264 mm (H) x 0.264 mm (V) 30 ~... 81 kHz Vertical Display Color 16.7M Resolution Optimum resolution 56 ~ 75 Hz 1280 x 1024@60 Hz Maximum resolution 1280...
User Manual (ENGLISH)
Page 70
Specifications General Model Name LCD Panel Size SyncMaster 743B 17 inch (43 cm) Display area 337.920 mm (H) x 270.336 mm (V) Pixel Pitch Synchronization Horizontal 0.264 mm (H) x 0.264 mm (V) 30 ~ 81 kHz Vertical Display Color 16.7M Resolution Optimum resolution 56 ~ 75 Hz 1280 x 1024@60 Hz Maximum resolution 1280 x 1024@75 Hz Input Signal, Terminated...
Specifications General Model Name LCD Panel Size SyncMaster 743B 17 inch (43 cm) Display area 337.920 mm (H) x 270.336 mm (V) Pixel Pitch Synchronization Horizontal 0.264 mm (H) x 0.264 mm (V) 30 ~ 81 kHz Vertical Display Color 16.7M Resolution Optimum resolution 56 ~ 75 Hz 1280 x 1024@60 Hz Maximum resolution 1280 x 1024@75 Hz Input Signal, Terminated...

User Manual (ENGLISH)
Page 74
Specifications General Model Name LCD Panel Size SyncMaster 743BPLUS 17 inch (43 cm) Display area 337.920 mm (H) x 270.336 mm (V) Pixel Pitch Synchronization Horizontal 0.264 mm (H) x 0.264 mm (V) 30 ~ 81 kHz Vertical Display Color 16.7M Resolution Optimum resolution 56 ~ 75 Hz 1280 x 1024@60 Hz Maximum resolution 1280 x 1024@75 Hz Input Signal, Terminated...
Specifications General Model Name LCD Panel Size SyncMaster 743BPLUS 17 inch (43 cm) Display area 337.920 mm (H) x 270.336 mm (V) Pixel Pitch Synchronization Horizontal 0.264 mm (H) x 0.264 mm (V) 30 ~ 81 kHz Vertical Display Color 16.7M Resolution Optimum resolution 56 ~ 75 Hz 1280 x 1024@60 Hz Maximum resolution 1280 x 1024@75 Hz Input Signal, Terminated...


