
User Manual (user Manual) (ver.1.0) (English)
Page 2
.... Adjust computer resolution and screen injection rate (refresh rate) in TFT-LCD. • Resolution: 1920 x 1200 • Vertical frequency (refresh rate): 60 Hz 2. This is not from bad quality and you can have an uneven quality of picture in the screen if the best quality of computer as window termination button is not provided in control panel of picture is pressed. If there's still noise after automatic adjustment, use of their respective owners. Environmental...
.... Adjust computer resolution and screen injection rate (refresh rate) in TFT-LCD. • Resolution: 1920 x 1200 • Vertical frequency (refresh rate): 60 Hz 2. This is not from bad quality and you can have an uneven quality of picture in the screen if the best quality of computer as window termination button is not provided in control panel of picture is pressed. If there's still noise after automatic adjustment, use of their respective owners. Environmental...
User Manual (user Manual) (ver.1.0) (English)
Page 3
... 30 Display Modes 31 Changing the Base 33 Removing the base 33 Attaching the base 34 Maintenance of Contents Safety Instructions 2 Unpacking your Monitor 3 Setting up Your LCD Monitor 4 Setting up an Ergonomic Workstation 4 Monitor Location 4 Workstation Height 4 Viewing Angle 4 Kensington Security Slot 4 Connecting Your LCD Monitor 5 Plug and Play 6 Installing the Video Driver 6 Self-Test Feature Check (STFC 6 Getting Help 7 Warm-up Time 7 Adjusting Your LCD Monitor 8 User Controls 8 Automatic Save 9 Direct Access Features 10 OSD Lock/Unlock 10 On Screen Display (OSD...
... 30 Display Modes 31 Changing the Base 33 Removing the base 33 Attaching the base 34 Maintenance of Contents Safety Instructions 2 Unpacking your Monitor 3 Setting up Your LCD Monitor 4 Setting up an Ergonomic Workstation 4 Monitor Location 4 Workstation Height 4 Viewing Angle 4 Kensington Security Slot 4 Connecting Your LCD Monitor 5 Plug and Play 6 Installing the Video Driver 6 Self-Test Feature Check (STFC 6 Getting Help 7 Warm-up Time 7 Adjusting Your LCD Monitor 8 User Controls 8 Automatic Save 9 Direct Access Features 10 OSD Lock/Unlock 10 On Screen Display (OSD...

User Manual (user Manual) (ver.1.0) (English)
Page 4
... Safety Instructions 1 Before connecting the AC power cord to the DC adapter outlet, make sure the voltage designation of the DC adapter corresponds to the local electrical supply. 2 Never insert anything to rest on the power cord, and keep the cord away from areas where people can cause problems. Don't use your LCD monitor in direct sunlight, and keep it away from heaters, stoves, fireplaces, and other sources...
... Safety Instructions 1 Before connecting the AC power cord to the DC adapter outlet, make sure the voltage designation of the DC adapter corresponds to the local electrical supply. 2 Never insert anything to rest on the power cord, and keep the cord away from areas where people can cause problems. Don't use your LCD monitor in direct sunlight, and keep it away from heaters, stoves, fireplaces, and other sources...
User Manual (user Manual) (ver.1.0) (English)
Page 6
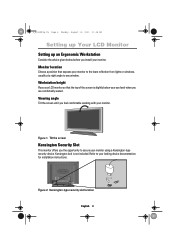
... AM Setting up Your LCD Monitor Setting up an Ergonomic Workstation Consider the advice given below your eye level when you install your monitor. Workstation height Place your LCD monitor so that exposes your monitor to the least reflection from lights or windows, usually at a right angle to your locking device documentation for installation instructions. Refer to any window. Monitor location Choose a position that the top of the screen...
... AM Setting up Your LCD Monitor Setting up an Ergonomic Workstation Consider the advice given below your eye level when you install your monitor. Workstation height Place your LCD monitor so that exposes your monitor to the least reflection from lights or windows, usually at a right angle to your locking device documentation for installation instructions. Refer to any window. Monitor location Choose a position that the top of the screen...
User Manual (user Manual) (ver.1.0) (English)
Page 7
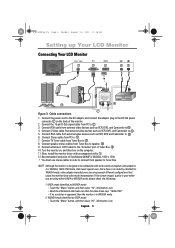
... use stereo cables in WUXGA mode. 2. Connect antenna or CATV cable to be compatible with accompanied utility CD. 12. NOTE: Although the monitor is WUXGA, 1920x1200 mode, that needs special care. WUXGA mode identified as WUXGA mode - Touch the "Menu" button, and then select "Hz", information, icon. English 5 Connect RCA cable from PC to 7 . 7. Connect the power cord to the DC adaptor and connect the adaptor plug to 4 . 4. Turn the monitor on, and then turn...
... use stereo cables in WUXGA mode. 2. Connect antenna or CATV cable to be compatible with accompanied utility CD. 12. NOTE: Although the monitor is WUXGA, 1920x1200 mode, that needs special care. WUXGA mode identified as WUXGA mode - Touch the "Menu" button, and then select "Hz", information, icon. English 5 Connect RCA cable from PC to 7 . 7. Connect the power cord to the DC adaptor and connect the adaptor plug to 4 . 4. Turn the monitor on, and then turn...
User Manual (user Manual) (ver.1.0) (English)
Page 8
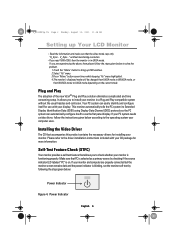
... computer uses. If your display. 4_E240MP3p.fm Page 6 Monday, August 13, 2001 11:08 AM Setting up OSD window. 2.Select "Hz" menu. 3.Press "Menu" button seven times while keeping "Hz" menu highlighted. 4.The monitor's displayed mode will be changed from UXGA mode to WUXGA mode, or from WUXGA mode to check whether your PC system needs a video driver, follow the instructions given below : Power Indicator Figure 4. without mentioning resolution. -If you to the driver installation instructions included...
... computer uses. If your display. 4_E240MP3p.fm Page 6 Monday, August 13, 2001 11:08 AM Setting up OSD window. 2.Select "Hz" menu. 3.Press "Menu" button seven times while keeping "Hz" menu highlighted. 4.The monitor's displayed mode will be changed from UXGA mode to WUXGA mode, or from WUXGA mode to check whether your PC system needs a video driver, follow the instructions given below : Power Indicator Figure 4. without mentioning resolution. -If you to the driver installation instructions included...
User Manual (user Manual) (ver.1.0) (English)
Page 9
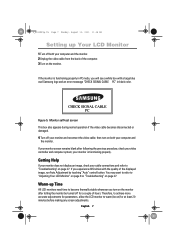
... the video cable; Getting Help If your monitor does not display an image, check your monitor is functioning properly in PC mode, you experience difficulties with a large blue oval Samsung logo and an error messsage "CHECK SIGNAL CABLE PC" in black color. Therefore, to achieve more accurate adjustments for a couple of the computer. 3 Turn on the monitor. Warm-up Your LCD Monitor 1 Turn off for parameters, allow the LCD monitor to "Adjusting Your LCD Monitor" on page 8 or "Troubleshooting...
... the video cable; Getting Help If your monitor does not display an image, check your monitor is functioning properly in PC mode, you experience difficulties with a large blue oval Samsung logo and an error messsage "CHECK SIGNAL CABLE PC" in black color. Therefore, to achieve more accurate adjustments for a couple of the computer. 3 Turn on the monitor. Warm-up Your LCD Monitor 1 Turn off for parameters, allow the LCD monitor to "Adjusting Your LCD Monitor" on page 8 or "Troubleshooting...
User Manual (user Manual) (ver.1.0) (English)
Page 10
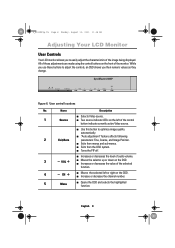
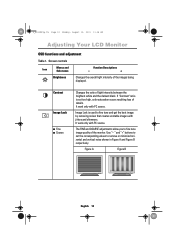
... they change. English 8 While you use these adjustments are made using the control buttons on the OSD. I "Auto adjustment" feature affects following 2 Exit/Auto parameters: Fine, Coarse, and Image Position. Figure 6. I Two source indicator LEDs on the left or right on the front of the image being displayed. I Turns the PIP off. 4_E240MP3p.fm Page 8 Monday, August 13, 2001 11:08 AM Adjusting Your LCD Monitor User Controls Your LCD monitor allows you to optimize image quality...
... they change. English 8 While you use these adjustments are made using the control buttons on the OSD. I "Auto adjustment" feature affects following 2 Exit/Auto parameters: Fine, Coarse, and Image Position. Figure 6. I Two source indicator LEDs on the left or right on the front of the image being displayed. I Turns the PIP off. 4_E240MP3p.fm Page 8 Monday, August 13, 2001 11:08 AM Adjusting Your LCD Monitor User Controls Your LCD monitor allows you to optimize image quality...
User Manual (user Manual) (ver.1.0) (English)
Page 12
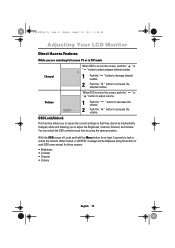
You can unlock the OSD controls at least 5 seconds to lock or unlock the controls. Volume 1 Push the " " button to decrease the volume. 2 Push the " " button to increase the volume. With the OSD screen off, push and hold the Menu button for these screens : • Brightness • Contrast • Channel • Volume English 10 message will be inadvertently changed, while still allowing you are watching full screen TV or in PIP mode Channel When...
You can unlock the OSD controls at least 5 seconds to lock or unlock the controls. Volume 1 Push the " " button to decrease the volume. 2 Push the " " button to increase the volume. With the OSD screen off, push and hold the Menu button for these screens : • Brightness • Contrast • Channel • Volume English 10 message will be inadvertently changed, while still allowing you are watching full screen TV or in PIP mode Channel When...
User Manual (user Manual) (ver.1.0) (English)
Page 14
... "+" buttons to remove or minimize horizontal and vertical noise shown in Figure A and Figure B respectively. Screen controls Icon Menus and Sub-menus Function Descriptions - + Brightness Changes the overall light intensity of light intensity between the brightest white and the darkest black. The FINE and COARSE adjustments allow you to fine tune and get the best image by removing noises that creates unstable images with PC source. Image Lock is set...
... "+" buttons to remove or minimize horizontal and vertical noise shown in Figure A and Figure B respectively. Screen controls Icon Menus and Sub-menus Function Descriptions - + Brightness Changes the overall light intensity of light intensity between the brightest white and the darkest black. The FINE and COARSE adjustments allow you to fine tune and get the best image by removing noises that creates unstable images with PC source. Image Lock is set...
User Manual (user Manual) (ver.1.0) (English)
Page 16
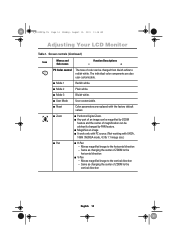
... of ZOOM to redish white. Same as changing the center of magnification can be magnified by PAN feature. The individual color components are replaced with UXGA , 1080i ,WUXGA mode, 4:3 & 1:1 image size.) I Pan I It work only with PC source. (Not working with the factory default values. 4_E240MP3p.fm Page 14 Monday, August 13, 2001 11:08 AM Adjusting Your LCD Monitor Table 1.
... of ZOOM to redish white. Same as changing the center of magnification can be magnified by PAN feature. The individual color components are replaced with UXGA , 1080i ,WUXGA mode, 4:3 & 1:1 image size.) I Pan I It work only with PC source. (Not working with the factory default values. 4_E240MP3p.fm Page 14 Monday, August 13, 2001 11:08 AM Adjusting Your LCD Monitor Table 1.
User Manual (user Manual) (ver.1.0) (English)
Page 19
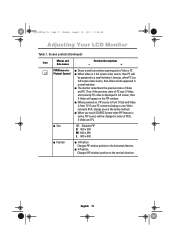
...(Picture-inPicture) Control I Size I Position I The monitor remembers the previous state of RCA, S-Video and TV. I When you touch SOURCE button when PIP feature is from D-Sub and Video is active, PIP source will appear in a small window. Likewise, when PC is displayed in full screen, then S-Video will be appeared in the PIP window. I When powered on Video or PC. English 17 If your PC connects Analog or your Video connects RCA, change source...
...(Picture-inPicture) Control I Size I Position I The monitor remembers the previous state of RCA, S-Video and TV. I When you touch SOURCE button when PIP feature is from D-Sub and Video is active, PIP source will appear in a small window. Likewise, when PC is displayed in full screen, then S-Video will be appeared in the PIP window. I When powered on Video or PC. English 17 If your PC connects Analog or your Video connects RCA, change source...
User Manual (user Manual) (ver.1.0) (English)
Page 22
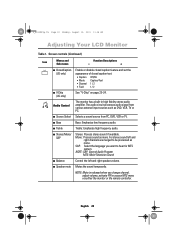
I Stereo/Mono/ SAP Stereo: Process stereo sound if available. I Bass Bass: Emphasize low frequency audio. SAP: Select the language you change channel, adjust volume, activate PIP or access MTS menu via either the monitor or the remote controller. NOTE: Mute is released when you want to be processed as mono. English 20 Screen controls (Continued ) Icon Menus and Sub-menus Function Descriptions - + I ClosedCaption (US only...
I Stereo/Mono/ SAP Stereo: Process stereo sound if available. I Bass Bass: Emphasize low frequency audio. SAP: Select the language you change channel, adjust volume, activate PIP or access MTS menu via either the monitor or the remote controller. NOTE: Mute is released when you want to be processed as mono. English 20 Screen controls (Continued ) Icon Menus and Sub-menus Function Descriptions - + I ClosedCaption (US only...
User Manual (user Manual) (ver.1.0) (English)
Page 28
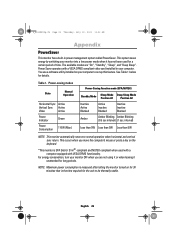
... computer to set up this feature. Power-saving modes State Normal Operation Horizontal Sync Active Vertical Sync Active Video Active Power Indicator Green Power Consumption 110W (Max.) Power-Saving Function mode (EPA/NUTEK) Standby Mode Sleep Mode Position A1 Deep Sleep Mode Position A2 Inactive Active Blanked Active Inactive Blanked Inactive Inactive Blanked Amber Amber Blinking Amber Blinking (0.5 sec interval) (1 sec. You use a software utility installed on for 30 minuites that is measured after letting the monitor turned on...
... computer to set up this feature. Power-saving modes State Normal Operation Horizontal Sync Active Vertical Sync Active Video Active Power Indicator Green Power Consumption 110W (Max.) Power-Saving Function mode (EPA/NUTEK) Standby Mode Sleep Mode Position A1 Deep Sleep Mode Position A2 Inactive Active Blanked Active Inactive Blanked Inactive Inactive Blanked Amber Amber Blinking Amber Blinking (0.5 sec interval) (1 sec. You use a software utility installed on for 30 minuites that is measured after letting the monitor turned on...
User Manual (user Manual) (ver.1.0) (English)
Page 29
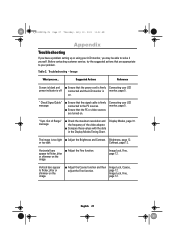
... your LCD power indicator is off connected and the LCD monitor is too light I Ensure that the power cord is firmly Connecting your problem. Connecting your LCD monitor, you may be able to solve it yourself. I Check the maximum resolution and the frequency of Range" message I Adjust the Coarse function and then adjust the Fine function. Out of the video adaptor. Suggested Actions Reference Screen is blank and I Adjust the Brightness and Contrast. Image Lock...
... your LCD power indicator is off connected and the LCD monitor is too light I Ensure that the power cord is firmly Connecting your problem. Connecting your LCD monitor, you may be able to solve it yourself. I Check the maximum resolution and the frequency of Range" message I Adjust the Coarse function and then adjust the Fine function. Out of the video adaptor. Suggested Actions Reference Screen is blank and I Adjust the Brightness and Contrast. Image Lock...
User Manual (user Manual) (ver.1.0) (English)
Page 30
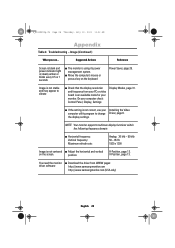
... Installing the Video computer utility program to vibrate I Download the driver from your monitor. You need the monitor I Check that the display resolution and frequency from WWW pages: driver software http://www.samsung-monitor.com http://www.samsungmonitor.com (USA only) English 28 Troubleshooting - I Move the computer's mouse or press a key on the screen. the display settings. V-Position, page 13. I If the setting is not correct, use your computer check: Control Panel, Display, Settings Display Modes, page 31. NOTE: Your monitor supports...
... Installing the Video computer utility program to vibrate I Download the driver from your monitor. You need the monitor I Check that the display resolution and frequency from WWW pages: driver software http://www.samsung-monitor.com http://www.samsungmonitor.com (USA only) English 28 Troubleshooting - I Move the computer's mouse or press a key on the screen. the display settings. V-Position, page 13. I If the setting is not correct, use your computer check: Control Panel, Display, Settings Display Modes, page 31. NOTE: Your monitor supports...
User Manual (user Manual) (ver.1.0) (English)
Page 31
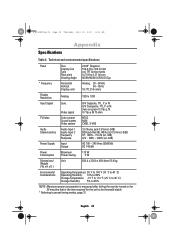
...fications Panel Size Display Size Type Pixel pitch Viewing Angle 24.06" Diagonal 518.4 (H) x 324 (V) mm a-si TFT Active matrix 0.27 (H) x 0.27 (V) mm 80/80/80/80 (L/R/U/D):Typ. * Frequency Horizontal Vertical Display color Analog: 30 ~ 90 kHz 50 ~ 85 Hz 16,777,216 colors Display Resolution Analog 1920 x 1200 Input Signal Sync. English 29 or N. Sync-on-green 0.3 Vp-p, N. 0.7 Vp-p @ 75 ohm TV.Video Color system Sound system Video system NTSC M/N CVBS, S-VHS Audio Characteristics Audio Input 1 Audio Input 2 Frequency Response 3.5 Stereo...
...fications Panel Size Display Size Type Pixel pitch Viewing Angle 24.06" Diagonal 518.4 (H) x 324 (V) mm a-si TFT Active matrix 0.27 (H) x 0.27 (V) mm 80/80/80/80 (L/R/U/D):Typ. * Frequency Horizontal Vertical Display color Analog: 30 ~ 90 kHz 50 ~ 85 Hz 16,777,216 colors Display Resolution Analog 1920 x 1200 Input Signal Sync. English 29 or N. Sync-on-green 0.3 Vp-p, N. 0.7 Vp-p @ 75 ohm TV.Video Color system Sound system Video system NTSC M/N CVBS, S-VHS Audio Characteristics Audio Input 1 Audio Input 2 Frequency Response 3.5 Stereo...
User Manual (user Manual) (ver.1.0) (English)
Page 36
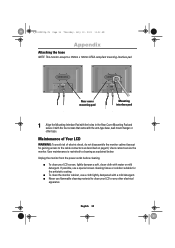
... or mild detergent. Users cannot service the monitor. I To clean the monitor cabinet, use a special screen cleaning tissue or solution suitable for gaining access to the cable connectors as explained below: Unplug the monitor from the power outlet before cleaning. User maintenance is restricted to clean your LCD screen, lightly dampen a soft, clean cloth with the arm-type base, wall mount hanger or other electrical apparatus. If possible, use a cloth lightly dampened with a mild...
... or mild detergent. Users cannot service the monitor. I To clean the monitor cabinet, use a special screen cleaning tissue or solution suitable for gaining access to the cable connectors as explained below: Unplug the monitor from the power outlet before cleaning. User maintenance is restricted to clean your LCD screen, lightly dampen a soft, clean cloth with the arm-type base, wall mount hanger or other electrical apparatus. If possible, use a cloth lightly dampened with a mild...
User Manual (user Manual) (ver.1.0) (English)
Page 37
... A Audio Control 18 Auto 8 Automatic Save 9 B Brightness 12 C Cable connections 5 Coarse 12 Color Control 13 Contrast 12 D DC adapter 3 Display Modes 31 E Exit 8 F Fine 12 Function icons 11 H H-pan 15 H-position 13 I Image effect 15 Image lock 12 Image size 14 Information 20 Installation CD 3 K Kensington security slot 4 M Menu 8 Monitor self-test screen 7 Index O OSD Control 17 OSD Lock/Unlock 10 On Screen Display 11 P Pan 15 PBP 17 PIP 16 Position 16 Power Indicator 6 Power Saver 26 R Remote Controller 3 S Safety Instructions 2 Self-Test Feature Check 6 Size 16 Source 8 Speaker...
... A Audio Control 18 Auto 8 Automatic Save 9 B Brightness 12 C Cable connections 5 Coarse 12 Color Control 13 Contrast 12 D DC adapter 3 Display Modes 31 E Exit 8 F Fine 12 Function icons 11 H H-pan 15 H-position 13 I Image effect 15 Image lock 12 Image size 14 Information 20 Installation CD 3 K Kensington security slot 4 M Menu 8 Monitor self-test screen 7 Index O OSD Control 17 OSD Lock/Unlock 10 On Screen Display 11 P Pan 15 PBP 17 PIP 16 Position 16 Power Indicator 6 Power Saver 26 R Remote Controller 3 S Safety Instructions 2 Self-Test Feature Check 6 Size 16 Source 8 Speaker...
User Manual (user Manual) (ver.1.0) (English)
Page 38
... power supply cord with IEC320 style terminations. It may not cause harmful interference, and (2) this monitor is equal to maintain FCC compliance for product compliance: SAMSUNG ELECTRONICS CO., LTD America QA Lab of the FCC Rules. Product Safety. However, there is available from that the ampere rating of ICES-003. For 240 Volt applications use shielded signal interface cables...
... power supply cord with IEC320 style terminations. It may not cause harmful interference, and (2) this monitor is equal to maintain FCC compliance for product compliance: SAMSUNG ELECTRONICS CO., LTD America QA Lab of the FCC Rules. Product Safety. However, there is available from that the ampere rating of ICES-003. For 240 Volt applications use shielded signal interface cables...


