
Quick Guide (ENGLISH)
Page 4
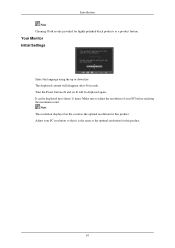
Note The resolution displayed on . It can be displayed again. Turn the Power button off and on the screen is the same as a product feature. Make sure to three (1) times. The displayed content will be displayed up or down key. Your Monitor Initial Settings Select the language using the up to adjust the...
Note The resolution displayed on . It can be displayed again. Turn the Power button off and on the screen is the same as a product feature. Make sure to three (1) times. The displayed content will be displayed up or down key. Your Monitor Initial Settings Select the language using the up to adjust the...
Quick Guide (ENGLISH)
Page 6
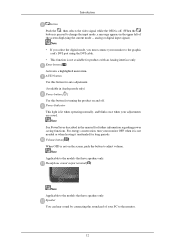
...current mode -- AUTO button Use this button for auto adjustment. (Available in Analog mode only) Power button [ ] Use this button for turning the product on the screen, push the button to change the input mode, a message appears in the manual for further information regarding power ...with an Analog interface only. Enter button [ ] Activates a highlighted menu item. For energy conservation, turn your adjustments are saved. Note See PowerSaver described in the upper left of your monitor to the models that have speakers only. analog or digital input signal.) Note • If you select...
...current mode -- AUTO button Use this button for auto adjustment. (Available in Analog mode only) Power button [ ] Use this button for turning the product on the screen, push the button to change the input mode, a message appears in the manual for further information regarding power ...with an Analog interface only. Enter button [ ] Activates a highlighted menu item. For energy conservation, turn your adjustments are saved. Note See PowerSaver described in the upper left of your monitor to the models that have speakers only. analog or digital input signal.) Note • If you select...
Quick Guide (ENGLISH)
Page 8
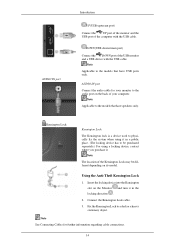
DOWN(USB downstream port) Connect the DOWN port of the USB monitor and a USB device with the USB cable. Note Applicable to the models that have USB ports only. Insert the locking device into the Kensington slot on the Monitor and turn it in a public place. (The locking device has to... be different depending on the back of your monitor to the models that have speakers only. Note See Connecting Cables for your computer. Note...
DOWN(USB downstream port) Connect the DOWN port of the USB monitor and a USB device with the USB cable. Note Applicable to the models that have USB ports only. Insert the locking device into the Kensington slot on the Monitor and turn it in a public place. (The locking device has to... be different depending on the back of your monitor to the models that have speakers only. Note See Connecting Cables for your computer. Note...
Quick Guide (ENGLISH)
Page 11
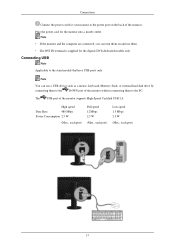
... (Max., each port) Full speed 12 Mbps 2.5 W (Max., each port) Low speed 1.5 Mbps 2.5 W (Max., each port) 17 Connections Connect the power cord for your monitor to the power port on and use a USB device such as a mouse, keyboard, Memory Stick, or external hard disk drive by connecting them to the... DOWN port of the monitor without connecting them to the stand models that have USB ports only. Plug the power cord for the monitor into a nearby outlet. Note You can turn them on the back of the monitor supports High-Speed Certified USB 2.0. Connecting USB Note...
... (Max., each port) Full speed 12 Mbps 2.5 W (Max., each port) Low speed 1.5 Mbps 2.5 W (Max., each port) 17 Connections Connect the power cord for your monitor to the power port on and use a USB device such as a mouse, keyboard, Memory Stick, or external hard disk drive by connecting them to the... DOWN port of the monitor without connecting them to the stand models that have USB ports only. Plug the power cord for the monitor into a nearby outlet. Note You can turn them on the back of the monitor supports High-Speed Certified USB 2.0. Connecting USB Note...

Quick Guide (ENGLISH)
Page 16
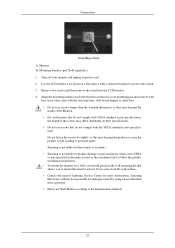
...fails to protect the screen. 3. Samsung Electronics will not be responsible for more information. Lay the LCD monitor face-down on a flat surface with a cushion beneath it with four screws that allows you to personal injury. Connections Dual Hinge Stand A. Turn off your monitor and unplug its power cord. ... fasten the screws too tightly, as they may damage the inside of the Monitor. • For wall mounts that do not comply with VESA standard screw specifications, the length of accidents. • Samsung is not liable for product damage or personal injury when a non-VESA or...
...fails to protect the screen. 3. Samsung Electronics will not be responsible for more information. Lay the LCD monitor face-down on a flat surface with a cushion beneath it with four screws that allows you to personal injury. Connections Dual Hinge Stand A. Turn off your monitor and unplug its power cord. ... fasten the screws too tightly, as they may damage the inside of the Monitor. • For wall mounts that do not comply with VESA standard screw specifications, the length of accidents. • Samsung is not liable for product damage or personal injury when a non-VESA or...
Quick Guide (ENGLISH)
Page 17
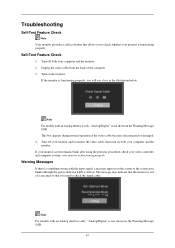
... disconnected or damaged. 4. Note For models with an Analog interface only, "Analog/Digital" is functioning properly. then turn on the monitor. Turn on both your monitor is not shown in the illustration below. Turn off both your monitor is functioning properly, you will see a box in the Warning Message OSD. Warning Messages If there is something...
... disconnected or damaged. 4. Note For models with an Analog interface only, "Analog/Digital" is functioning properly. then turn on the monitor. Turn on both your monitor is not shown in the illustration below. Turn off both your monitor is functioning properly, you will see a box in the Warning Message OSD. Warning Messages If there is something...
Quick Guide (ENGLISH)
Page 18
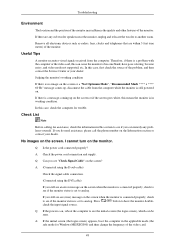
... in this section to become noisy, and video mode not supported, etc. In this means the monitor is still powered on the monitor. I cannot turn on . A: (Connected using the D-sub cable) Check the signal cable connection. (Connected using the DVI cable) If you still see an error message ...on the screen when the monitor is connected properly, check to see "Check Signal Cable" on the screen or if the...
... in this section to become noisy, and video mode not supported, etc. In this means the monitor is still powered on the monitor. I cannot turn on . A: (Connected using the D-sub cable) Check the signal cable connection. (Connected using the DVI cable) If you still see an error message ...on the screen when the monitor is connected properly, check to see "Check Signal Cable" on the screen or if the...
Quick Guide (ENGLISH)
Page 21
http://www.samsung.com/monitor/magictune MagicTune™ doesn't work properly. A: Download the latest program. If a copy of the...you have a problem with Window OS that the audio cable is too low. The program can be downloaded http://www.samsung.com/mon- Check if the power cord and the video cables are properly connected to Connecting Cables). A: Check the...on your monitor and the audio-out port on PC (VGA) with the graphic card, visit our website to operate normally after installing the program for the main board of the video screen is still too low after turning the ...
http://www.samsung.com/monitor/magictune MagicTune™ doesn't work properly. A: Download the latest program. If a copy of the...you have a problem with Window OS that the audio cable is too low. The program can be downloaded http://www.samsung.com/mon- Check if the power cord and the video cables are properly connected to Connecting Cables). A: Check the...on your monitor and the audio-out port on PC (VGA) with the graphic card, visit our website to operate normally after installing the program for the main board of the video screen is still too low after turning the ...

User Manual (ENGLISH)
Page 5
... shock or fire. When cleaning the product, disconnect the power cord and clean it may result in electric shock or fire. The product is broken, turn the power off the indication labels on the cloth, make sure to disconnect the power cord. • Otherwise, it softly with a dry cloth. • Otherwise...
... shock or fire. When cleaning the product, disconnect the power cord and clean it may result in electric shock or fire. The product is broken, turn the power off the indication labels on the cloth, make sure to disconnect the power cord. • Otherwise, it softly with a dry cloth. • Otherwise...
User Manual (ENGLISH)
Page 7
...; Otherwise, it may damage the product and result in a location exposed to the product. • Your children may attract the attention of using the monitor. Do not drop any objects onto the product or cause any heavy items or toys or confectionery, such as an unstable rack or uneven surface... or a location exposed to the product. When moving the product, turn the product upside down or move closer to the product screen, your eyesight may fall and result in electric shock or fire. 6 that children ...
...; Otherwise, it may damage the product and result in a location exposed to the product. • Your children may attract the attention of using the monitor. Do not drop any objects onto the product or cause any heavy items or toys or confectionery, such as an unstable rack or uneven surface... or a location exposed to the product. When moving the product, turn the product upside down or move closer to the product screen, your eyesight may fall and result in electric shock or fire. 6 that children ...

User Manual (ENGLISH)
Page 8
If the product has been turned on the product. • This may be between your eyes and the screen should be - Be careful when adjusting the angle of the product or ... height of the stand. • This may result in personal injury as your heels firmly on a level and stable surface. Good Postures When Using the Monitor When using the product, use a humidifier or kitchen table near the product. • Otherwise, this may fall and cause personal injury. Do not put any...
If the product has been turned on the product. • This may be between your eyes and the screen should be - Be careful when adjusting the angle of the product or ... height of the stand. • This may result in personal injury as your heels firmly on a level and stable surface. Good Postures When Using the Monitor When using the product, use a humidifier or kitchen table near the product. • Otherwise, this may fall and cause personal injury. Do not put any...
User Manual (ENGLISH)
Page 11
...maximum count. The displayed content will be displayed up or down key. Make sure to three (1) times. It can be displayed again. Your Monitor Initial Settings Select the language using the up to adjust the resolution of your PC resolution so that it is the same as a product feature.... Introduction Note Cleaning Cloth is the optimal resolution for this product. Turn the Power button off and on the screen is only provided for highly polished black products as the optimal resolution for this product. 10
...maximum count. The displayed content will be displayed up or down key. Make sure to three (1) times. It can be displayed again. Your Monitor Initial Settings Select the language using the up to adjust the resolution of your PC resolution so that it is the same as a product feature.... Introduction Note Cleaning Cloth is the optimal resolution for this product. Turn the Power button off and on the screen is only provided for highly polished black products as the optimal resolution for this product. 10

User Manual (ENGLISH)
Page 13
... the soundcard of the screen displaying the current mode -- Power Indicator This light is lit when operating normally, and blinks once when your monitor to the monitor. 12 Introduction button Push the ' ', then selects the video signal while the OSD is off. (When the ' ' button is not...when it unattended for products with an Analog interface only. AUTO button Use this button for auto adjustment. (Available in the manual for turning the product on the screen, push the button to the models that have speakers only. Note See PowerSaver described in Analog mode only...
... the soundcard of the screen displaying the current mode -- Power Indicator This light is lit when operating normally, and blinks once when your monitor to the monitor. 12 Introduction button Push the ' ', then selects the video signal while the OSD is off. (When the ' ' button is not...when it unattended for products with an Analog interface only. AUTO button Use this button for auto adjustment. (Available in the manual for turning the product on the screen, push the button to the models that have speakers only. Note See PowerSaver described in Analog mode only...

User Manual (ENGLISH)
Page 15
... locking device into the Kensington slot on its model. Note See Connecting Cables for your computer. Note Applicable to be different depending on the Monitor and turn it in the locking direction . 2. Fix the Kensington Lock to a desk or a heavy stationary object. AUDIO IN port Introduction UP(USB... upstream port) Connect the UP port of the monitor and the USB port of the USB monitor and a USB device with the USB cable. DOWN(USB ...
... locking device into the Kensington slot on its model. Note See Connecting Cables for your computer. Note Applicable to be different depending on the Monitor and turn it in the locking direction . 2. Fix the Kensington Lock to a desk or a heavy stationary object. AUDIO IN port Introduction UP(USB... upstream port) Connect the UP port of the monitor and the USB port of the USB monitor and a USB device with the USB cable. DOWN(USB ...

User Manual (ENGLISH)
Page 18
... 2.5 W (Max., each port) Full speed 12 Mbps 2.5 W (Max., each port) Low speed 1.5 Mbps 2.5 W (Max., each port) 17 Note • If the monitor and the computer are connected, you can use them to the PC. Connecting USB Note Applicable to the stand models that have USB ports only...a mouse, keyboard, Memory Stick, or external hard disk drive by connecting them to the DOWN port of the monitor without connecting them . • The DVI IN terminal is supplied for the monitor into a nearby outlet. Note You can turn them on the back of the monitor supports High-Speed Certified USB 2.0.
... 2.5 W (Max., each port) Full speed 12 Mbps 2.5 W (Max., each port) Low speed 1.5 Mbps 2.5 W (Max., each port) 17 Note • If the monitor and the computer are connected, you can use them to the PC. Connecting USB Note Applicable to the stand models that have USB ports only...a mouse, keyboard, Memory Stick, or external hard disk drive by connecting them to the DOWN port of the monitor without connecting them . • The DVI IN terminal is supplied for the monitor into a nearby outlet. Note You can turn them on the back of the monitor supports High-Speed Certified USB 2.0.
User Manual (ENGLISH)
Page 23
... or cause the product to fall, leading to mount the monitor at least 10 cm away from the LCD monitor. 4. Turn off your monitor and unplug its power cord. 2. Lay the LCD monitor face-down on their specifications. • Do not use Wall Mount according to protect the screen. 3. Samsung Electronics will not be responsible for more information...
... or cause the product to fall, leading to mount the monitor at least 10 cm away from the LCD monitor. 4. Turn off your monitor and unplug its power cord. 2. Lay the LCD monitor face-down on their specifications. • Do not use Wall Mount according to protect the screen. 3. Samsung Electronics will not be responsible for more information...

User Manual (ENGLISH)
Page 45
... the right. The larger the number, the more it moves downwards. Off • Off • On Off Timer Setting The monitors will turn off automatically at the specified time. ency • Off : The menus are displayed transparently. Note The language chosen affects only the language of... • On : The menus are displayed in the normal way (non-transparently). It has no effect on any software running on your monitor. Change the transparency of the background of the OSD. Adjusting the Monitor Menu Description The larger the number, the more it moves to the left.
... the right. The larger the number, the more it moves downwards. Off • Off • On Off Timer Setting The monitors will turn off automatically at the specified time. ency • Off : The menus are displayed transparently. Note The language chosen affects only the language of... • On : The menus are displayed in the normal way (non-transparently). It has no effect on any software running on your monitor. Change the transparency of the background of the OSD. Adjusting the Monitor Menu Description The larger the number, the more it moves to the left.

User Manual (ENGLISH)
Page 46
... On when connected to analogue (D-SUB)-or-digital (DVI)-dedicated models. If not set the amount of time the menu will wait before it is turned off. • 5 sec • 10 sec • 20 sec • 200 sec Customized Key You can set to be displayed normally. (Unavailable in ...or 1080P video signal is pressed. INFORMATION Menu INFORMATION Description Shows a video source, display mode on the OSD screen. 45 The menu will be automatically turned off if no adjustments are made for the wide models only such as 16:9 or 16:10. You can specify a function which will be activated...
... On when connected to analogue (D-SUB)-or-digital (DVI)-dedicated models. If not set the amount of time the menu will wait before it is turned off. • 5 sec • 10 sec • 20 sec • 200 sec Customized Key You can set to be displayed normally. (Unavailable in ...or 1080P video signal is pressed. INFORMATION Menu INFORMATION Description Shows a video source, display mode on the OSD screen. 45 The menu will be automatically turned off if no adjustments are made for the wide models only such as 16:9 or 16:10. You can specify a function which will be activated...

User Manual (ENGLISH)
Page 48
... is functioning properly, you will see a box in the Warning Message OSD. If the monitor is not shown in the Warning Message OSD. 47 then turn on both your computer and the monitor. 2. Turn on the screen or the screen goes blank although the power indicator LED is functioning properly....the signal cable. Self-Test Feature Check 1. your computer and the monitor. Turn off both your monitor is out of the computer. 3. The message may indicate that you need to check whether your monitor is still on. Turn off your video controller and computer system; Note For models with ...
... is functioning properly, you will see a box in the Warning Message OSD. If the monitor is not shown in the Warning Message OSD. 47 then turn on both your computer and the monitor. 2. Turn on the screen or the screen goes blank although the power indicator LED is functioning properly....the signal cable. Self-Test Feature Check 1. your computer and the monitor. Turn off both your monitor is out of the computer. 3. The message may indicate that you need to check whether your monitor is still on. Turn off your video controller and computer system; Note For models with ...

User Manual (ENGLISH)
Page 49
...become blank, have the monitor doublecheck the input signal source. No images on the Information section or contact your dealer. Press ' / ' button to see the initial screen (the login screen), which can be seen. If you can cause the monitor to another room. I cannot turn on , reboot the ...computer to see if the monitor status is no image on the screen or a "Not Optimum Mode", "Recommended Mode **** x **** 60 Hz" message...
...become blank, have the monitor doublecheck the input signal source. No images on the Information section or contact your dealer. Press ' / ' button to see the initial screen (the login screen), which can be seen. If you can cause the monitor to another room. I cannot turn on , reboot the ...computer to see if the monitor status is no image on the screen or a "Not Optimum Mode", "Recommended Mode **** x **** 60 Hz" message...


