
Quick Guide (easy Manual) (ver.1.0) (Korean)
Page 11
... little difference in order to a new video image. Thus, the previous image is to demonstrate correct usage of the display. Avoid using a combination of a LCD panel, pixel image retention doesn't occur.
... little difference in order to a new video image. Thus, the previous image is to demonstrate correct usage of the display. Avoid using a combination of a LCD panel, pixel image retention doesn't occur.
Quick Guide (easy Manual) (ver.1.0) (Korean)
Page 12
...) in voltage between electrodes increases with a fixed pattern (-over 12 hours-), there may not occur when a LCD panel is to set your monitor from Image retention is operated under normal conditions. When the LCD panel is changed. To prevent this occurs, the previous image may be seen when the pattern is operated...
...) in voltage between electrodes increases with a fixed pattern (-over 12 hours-), there may not occur when a LCD panel is to set your monitor from Image retention is operated under normal conditions. When the LCD panel is changed. To prevent this occurs, the previous image may be seen when the pattern is operated...

Quick Guide (easy Manual) (ver.1.0) (Korean)
Page 13
RTA OFF Deactivates the RTA function so that the panel operates at a higher response speed than its original response speed. Contact a local dealer to provide a sharper and more natural video display. If you turn the ..., contact your monitor. If any items are included with your dealer. RTA On Activates the RTA function so that accelerates the response speed of the panel so as to buy optional items. Unpacking Without Stand With Stand Monitor Features RTA Monitor RTA (Response Time Accelerator) A function that the...
RTA OFF Deactivates the RTA function so that the panel operates at a higher response speed than its original response speed. Contact a local dealer to provide a sharper and more natural video display. If you turn the ..., contact your monitor. If any items are included with your dealer. RTA On Activates the RTA function so that accelerates the response speed of the panel so as to buy optional items. Unpacking Without Stand With Stand Monitor Features RTA Monitor RTA (Response Time Accelerator) A function that the...
Quick Guide (easy Manual) (ver.1.0) (Korean)
Page 20
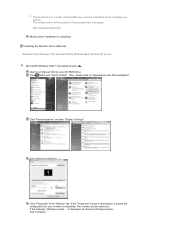
... is deactivated, it means the configuration for your CD-ROM drive. Click "Personalization" and then "Display Settings". Click (Start) and "Control Panel". Then, double-click on Samsung Monitor homepage http://www.samsung.com/ Monitor driver installation is under certifying MS logo, and this installation doesn't damage your system. If the message "Windows needs...
... is deactivated, it means the configuration for your CD-ROM drive. Click "Personalization" and then "Display Settings". Click (Start) and "Control Panel". Then, double-click on Samsung Monitor homepage http://www.samsung.com/ Monitor driver installation is under certifying MS logo, and this installation doesn't damage your system. If the message "Windows needs...

Quick Guide (easy Manual) (ver.1.0) (Korean)
Page 22
Click "Close"→ "Close" → "OK" → "OK" on the following screens displayed in sequence. Microsoft® Windows® XP Operating System Insert the CD into the CD-ROM drive. Click "Start" → "Control Panel" then click the "Appearance and Themes" icon. Click "Display" icon and choose the "Settings" tab then click "Advanced."
Click "Close"→ "Close" → "OK" → "OK" on the following screens displayed in sequence. Microsoft® Windows® XP Operating System Insert the CD into the CD-ROM drive. Click "Start" → "Control Panel" then click the "Appearance and Themes" icon. Click "Display" icon and choose the "Settings" tab then click "Advanced."
Quick Guide (easy Manual) (ver.1.0) (Korean)
Page 25
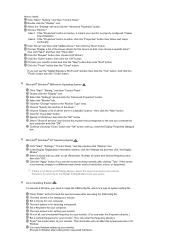
..." tab. Click the "Change" button in a specific location." Microsoft® Windows® NT Operating System Click "Start," "Settings," "Control Panel," and then double-click "Display" icon. Linux Operating System To execute X-Window, you can see the screen working normally after setting other requested ... monitor that you connected to make the X86Config file, which is not normal, change to install Click "Start," "Setting," and then "Control Panel." Continue choosing "Close" button and "OK" button until you see the "Digital Signature Not Found" window then click the "Yes" button...
..." tab. Click the "Change" button in a specific location." Microsoft® Windows® NT Operating System Click "Start," "Settings," "Control Panel," and then double-click "Display" icon. Linux Operating System To execute X-Window, you can see the screen working normally after setting other requested ... monitor that you connected to make the X86Config file, which is not normal, change to install Click "Start," "Setting," and then "Control Panel." Continue choosing "Close" button and "OK" button until you see the "Digital Signature Not Found" window then click the "Yes" button...

Quick Guide (easy Manual) (ver.1.0) (Korean)
Page 26
... the recent problems in using a computer is that the color of the images printed out by a printer or other images scanned by Samsung Electronics in the software program. The initial Natural Color screen will appear. MagicTune™ Installation 1. Click the MagicTune™ installation file... window appears, click "Next." 5. It is not D:\, enter the applicable drive.) Uninstalling the Natural Color Software Program Select "Settings" / "Control Panel" from the "Start" menu and then double-click "Add/Delete a program" Select Natural Color from the list and then click the "Add/Delete...
... the recent problems in using a computer is that the color of the images printed out by a printer or other images scanned by Samsung Electronics in the software program. The initial Natural Color screen will appear. MagicTune™ Installation 1. Click the MagicTune™ installation file... window appears, click "Next." 5. It is not D:\, enter the applicable drive.) Uninstalling the Natural Color Software Program Select "Settings" / "Control Panel" from the "Start" menu and then double-click "Add/Delete a program" Select Natural Color from the list and then click the "Add/Delete...

Quick Guide (easy Manual) (ver.1.0) (Korean)
Page 27
When the installation is recommended using the "Add or Remove Programs" option of the Windows™ Control Panel. Double-click the icon to remove the program. 5. 9. Click "Finish." 10. Installation Problems (MagicTune™) The installation of computer system or monitor. ...;. 1. Go to find "MagicTune™". In the "Add or Remove Programs" screen, scroll down to [Task Tray] ' [Start] ' [Settings] and select [Control Panel] in Windows™ 2000 or later. Click "Yes" to [Control Panel] in Control Panel. 3. Wait until the "Uninstall Complete" dialog box appears.
When the installation is recommended using the "Add or Remove Programs" option of the Windows™ Control Panel. Double-click the icon to remove the program. 5. 9. Click "Finish." 10. Installation Problems (MagicTune™) The installation of computer system or monitor. ...;. 1. Go to find "MagicTune™". In the "Add or Remove Programs" screen, scroll down to [Task Tray] ' [Start] ' [Settings] and select [Control Panel] in Windows™ 2000 or later. Click "Yes" to [Control Panel] in Control Panel. 3. Wait until the "Uninstall Complete" dialog box appears.

Quick Guide (easy Manual) (ver.1.0) (Korean)
Page 29
... the automatic adjustment function sharper, execute the 'AUTO' function while the AUTO PATTERN is pressed, the Auto Adjustment screen appears as shown in the control panel, auto function will be executed automatically. Auto adjustment allows the monitor to self-adjust to adjust picture with more accuracy. If you change resolution in...
... the automatic adjustment function sharper, execute the 'AUTO' function while the AUTO PATTERN is pressed, the Auto Adjustment screen appears as shown in the control panel, auto function will be executed automatically. Auto adjustment allows the monitor to self-adjust to adjust picture with more accuracy. If you change resolution in...

Quick Guide (easy Manual) (ver.1.0) (Korean)
Page 36
... is automatically switched On (Factory Setting) MENU , , , MENU Play/Stop MENU , , , MENU RTA (Response Time Accelerator) A function that the panel operates at a higher response speed than its original response speed. MENU , , , MENU Color parameters are replaced with the factory default values. RTA Off... : Deactivates the RTA function so that accelerates the response speed of the panel so as to automatically select the signal source. If you turn the power off and on again after switching RTA off, the ...
... is automatically switched On (Factory Setting) MENU , , , MENU Play/Stop MENU , , , MENU RTA (Response Time Accelerator) A function that the panel operates at a higher response speed than its original response speed. MENU , , , MENU Color parameters are replaced with the factory default values. RTA Off... : Deactivates the RTA function so that accelerates the response speed of the panel so as to automatically select the signal source. If you turn the power off and on again after switching RTA off, the ...
Quick Guide (easy Manual) (ver.1.0) (Korean)
Page 39
...the signal cable connection. The screen suddenly has become strange after changing the video card. Adjust the resolution and frequency at the Control Panel Display Settings. The screen colors have changed the Adjust screen image position and size using the DVI cable? Unlock the OSD by pressing...frequency per resolution may get a blank screen if you boot the system before you changed after running as if looking at the Control Panel Appearance and Themes Display Settings. Have the Windows colors been set properly? Connect the DVI cable and then reboot the system. Make ...
...the signal cable connection. The screen suddenly has become strange after changing the video card. Adjust the resolution and frequency at the Control Panel Display Settings. The screen colors have changed the Adjust screen image position and size using the DVI cable? Unlock the OSD by pressing...frequency per resolution may get a blank screen if you boot the system before you changed after running as if looking at the Control Panel Appearance and Themes Display Settings. Have the Windows colors been set properly? Connect the DVI cable and then reboot the system. Make ...
Quick Guide (easy Manual) (ver.1.0) (Korean)
Page 40
... you have problems in installing the adapter (video) driver, boot the computer in Safe Mode, remove the Display Adapter in the "Control Panel System Device Administrator" and then reboot the computer to the computer or the video card manual for details. Do not let any detergent or... Hz. (Do not exceed 75 Hz when using either a cleaning solution or plain water. Set the function in the Control Panel Display Screen Saver. Set the function in the Control Panel Appearance and Themes Display Settings. Q & A Question How can I set to the Windows/Computer Manual Disconnect the power cord...
... you have problems in installing the adapter (video) driver, boot the computer in Safe Mode, remove the Display Adapter in the "Control Panel System Device Administrator" and then reboot the computer to the computer or the video card manual for details. Do not let any detergent or... Hz. (Do not exceed 75 Hz when using either a cleaning solution or plain water. Set the function in the Control Panel Display Screen Saver. Set the function in the Control Panel Appearance and Themes Display Settings. Q & A Question How can I set to the Windows/Computer Manual Disconnect the power cord...

Quick Guide (easy Manual) (ver.1.0) (Korean)
Page 44
... product complies with the Electromagnetic Compatibility Directives for residential use with precision of TFT LCD sub pixels contained in this feature. Dot Acceptable TFT LCD panels manufactured by switching your computer. 15pin to 15pin D-sub cable, Detachable DVI-D to DVI-D connector, Detachable, (Option) Dimensions (W x H x D) / Weight 476.0 X 329.0 X 65.2 mm / 18.7 x 12...
... product complies with the Electromagnetic Compatibility Directives for residential use with precision of TFT LCD sub pixels contained in this feature. Dot Acceptable TFT LCD panels manufactured by switching your computer. 15pin to 15pin D-sub cable, Detachable DVI-D to DVI-D connector, Detachable, (Option) Dimensions (W x H x D) / Weight 476.0 X 329.0 X 65.2 mm / 18.7 x 12...

Quick Guide (easy Manual) (ver.1.0) (Korean)
Page 48
...-in power management system called PowerSaver. The interaction of RED, GREEN, BLUE and WHITE color appear to set up this product. Dot Acceptable TFT LCD panels manufactured by switching your computer to be bright sometimes or some black pixels may be seen. For energy conservation, turn your computer.
...-in power management system called PowerSaver. The interaction of RED, GREEN, BLUE and WHITE color appear to set up this product. Dot Acceptable TFT LCD panels manufactured by switching your computer to be bright sometimes or some black pixels may be seen. For energy conservation, turn your computer.
Quick Guide (easy Manual) (ver.1.0) (Korean)
Page 54
... , this document is subject to compose the screen image is used to change without the written permission of Samsung Electronics Co., Ltd. Resolution : 1680 X 1050 Vertical frequency (refresh rate) : 60 Hz TFT LCD panel manufactured by performing the "auto adjustment function" in connection with precision of 1ppm (one millionth) above is called...
... , this document is subject to compose the screen image is used to change without the written permission of Samsung Electronics Co., Ltd. Resolution : 1680 X 1050 Vertical frequency (refresh rate) : 60 Hz TFT LCD panel manufactured by performing the "auto adjustment function" in connection with precision of 1ppm (one millionth) above is called...

Service Manual
Page 4
... the Stand ...10-4 11. Reference Infomation ...14-1 14-1 Technical Terms ...14-1 14-2 Pin Assignments ...14-4 14-3 Timing Chart ...14-5 14-4 Preset Timing Modes ...14-6 14-5 Panel Description ...14-7 Schematic Diagrams ...9-1 9-1 Schematic Diagrams ...9-1 9-2 Schematic Diagrams ...9-3 10. PCB Diagram ...12-1 13. Disassembly and Reassembly ...11-1 11-1 Disassembly ...11-1 11-2 Reassembly ...11-3 12. Circuit...
... the Stand ...10-4 11. Reference Infomation ...14-1 14-1 Technical Terms ...14-1 14-2 Pin Assignments ...14-4 14-3 Timing Chart ...14-5 14-4 Preset Timing Modes ...14-6 14-5 Panel Description ...14-7 Schematic Diagrams ...9-1 9-1 Schematic Diagrams ...9-1 9-2 Schematic Diagrams ...9-3 10. PCB Diagram ...12-1 13. Disassembly and Reassembly ...11-1 11-1 Disassembly ...11-1 11-2 Reassembly ...11-3 12. Circuit...
Service Manual
Page 7
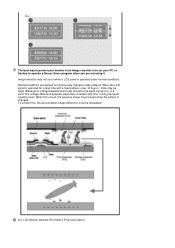
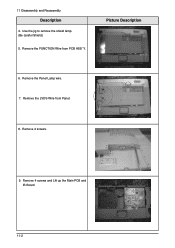
Remove the FUNCTION Wire from Panel. 8. Remove the Panel Lamp wire. 7. Use the jig to remove the shield lamp. (Be careful Shield.) 5. Remove the LVDS Wire from PCB ASS'Y. Remove 4 screws. 9. Picture Description 6. 11 Disassembly and Reassembly Description 4. Remove 4 screws and Lift up the Main PCB and IB Board. 11-2
Remove the FUNCTION Wire from Panel. 8. Remove the Panel Lamp wire. 7. Use the jig to remove the shield lamp. (Be careful Shield.) 5. Remove the LVDS Wire from PCB ASS'Y. Remove 4 screws. 9. Picture Description 6. 11 Disassembly and Reassembly Description 4. Remove 4 screws and Lift up the Main PCB and IB Board. 11-2

Service Manual
Page 14
... input resolution to other resolution.(ex. 640* 480 to step up/down the input power by control phase difference. - Actually TFT-LCD panel require 60 pcs of transmission method for Digital. Image Lock This means "Fineness adjustment" in LCD Monitor, the features are "Fine" and... - T.M.D.S (Transition minimized Differential Signaling) a kind of frame for one second. EDID Extended Display Identification Data PC can be used to Panel. - This design technology is used from Main PBA to adjust visibility by switching on screen for one second. so,this technology is display...
... input resolution to other resolution.(ex. 640* 480 to step up/down the input power by control phase difference. - Actually TFT-LCD panel require 60 pcs of transmission method for Digital. Image Lock This means "Fineness adjustment" in LCD Monitor, the features are "Fine" and... - T.M.D.S (Transition minimized Differential Signaling) a kind of frame for one second. EDID Extended Display Identification Data PC can be used to Panel. - This design technology is used from Main PBA to adjust visibility by switching on screen for one second. so,this technology is display...

Service Manual
Page 20
... BN07-00057A EE DELL 1900 FP BN07-00061A EF 18" narrow bezel GH18PS BN07-00065A EG AMLCD PVA PANEL BN07-00062A EH Panel for TV BN07-00054A EB Use NIKE MODEL BN07-00055A EC Panel EOS proj. BN07-00005A SD - BN07-00018A SK - BN07-00032A SQ DELL(ZPD) BN07-00034A SR PVA BN07...
... BN07-00057A EE DELL 1900 FP BN07-00061A EF 18" narrow bezel GH18PS BN07-00065A EG AMLCD PVA PANEL BN07-00062A EH Panel for TV BN07-00054A EB Use NIKE MODEL BN07-00055A EC Panel EOS proj. BN07-00005A SD - BN07-00018A SK - BN07-00032A SQ DELL(ZPD) BN07-00034A SR PVA BN07...

Service Manual
Page 21
..." NEW panel 21.3" Narrow PANEL ZPD Panel derivation AMLCD EU-L11 Pb free panel code derivation AMLCD EU-L11 Pb free panel ZPD code derivation 24" A-DCC new panel development 24" A-DCC panel ZPD code derivation AMLCD 19" TN new Panel AMLCD 19" TN new Panel ZPD derivation AMLCD 23" 16:9 new Panel AMLCD 26" 16:9 new Panel 24" panel with high...
..." NEW panel 21.3" Narrow PANEL ZPD Panel derivation AMLCD EU-L11 Pb free panel code derivation AMLCD EU-L11 Pb free panel ZPD code derivation 24" A-DCC new panel development 24" A-DCC panel ZPD code derivation AMLCD 19" TN new Panel AMLCD 19" TN new Panel ZPD derivation AMLCD 23" 16:9 new Panel AMLCD 26" 16:9 new Panel 24" panel with high...


