Quick Guide (easy Manual) (ver.1.0) (Korean)
Page 5
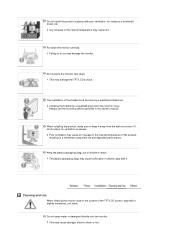
... by a qualified professional. Poor ventilation may cause an increase in a shortened component life and degraded performance. Cleaning and Use When cleaning the monitor case or the surface of children's reach. Any increase in the internal temperature may result in the owner's manual. When installing the product,... make sure to do so may damage the TFT-LCD surface. Do not spray water or detergent directly onto the monitor. Put down . Keep the plastic packaging (bag) out of the TFT-LCD screen, wipe with it away from the wall (more than 10 cm/4 ...
... by a qualified professional. Poor ventilation may cause an increase in a shortened component life and degraded performance. Cleaning and Use When cleaning the monitor case or the surface of children's reach. Any increase in the internal temperature may result in the owner's manual. When installing the product,... make sure to do so may damage the TFT-LCD surface. Do not spray water or detergent directly onto the monitor. Put down . Keep the plastic packaging (bag) out of the TFT-LCD screen, wipe with it away from the wall (more than 10 cm/4 ...

Quick Guide (easy Manual) (ver.1.0) (Korean)
Page 11
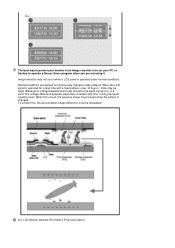
... & White, Grey) Ex) z Recommended settings: Bright colors with the PC Display Properties Power Scheme. PRODUCT INFORMATION (Image Retention Free) LCD Monitors and TVs may cause the liquid crystal to power off when using a stationary pattern. - Suggestions for 4 hours after 12 hours in is...the Color Information with movement. Every 30 minutes, change the characters with 2 colors every 30 minutes. z Set the Monitor to build up of a LCD panel, pixel image retention doesn't occur. During normal operation of your display system program as below to image retention. Avoid...
... & White, Grey) Ex) z Recommended settings: Bright colors with the PC Display Properties Power Scheme. PRODUCT INFORMATION (Image Retention Free) LCD Monitors and TVs may cause the liquid crystal to power off when using a stationary pattern. - Suggestions for 4 hours after 12 hours in is...the Color Information with movement. Every 30 minutes, change the characters with 2 colors every 30 minutes. z Set the Monitor to build up of a LCD panel, pixel image retention doesn't occur. During normal operation of your display system program as below to image retention. Avoid...
Quick Guide (easy Manual) (ver.1.0) (Korean)
Page 12
... 12 hours-), there may be seen when the pattern is changed. The voltage difference between electrodes that work the liquid crystal (LC) in a pixel. Our LCD Monitor satisfies ISO13406-2 Pixel fault Class II Normal conditions are not using it. To prevent this occurs, the previous image may be decreased. When this , the..., forcing the liquid crystal to operate a Screen Saver program when you are defined as continuously changing video patterns. Ex) The best way to protect your monitor from Image retention is to set your PC or System to lean. When the...
... 12 hours-), there may be seen when the pattern is changed. The voltage difference between electrodes that work the liquid crystal (LC) in a pixel. Our LCD Monitor satisfies ISO13406-2 Pixel fault Class II Normal conditions are not using it. To prevent this occurs, the previous image may be decreased. When this , the..., forcing the liquid crystal to operate a Screen Saver program when you are defined as continuously changing video patterns. Ex) The best way to protect your monitor from Image retention is to set your PC or System to lean. When the...

Quick Guide (easy Manual) (ver.1.0) (Korean)
Page 18
Align the mounting interface pad with the arm-type base, wall mount hanger or other base. Mounting interface pad (Sold separately) Turn off your monitor and unplug its power cord. A. Monitor B. Remove three screws and then remove the stand from the LCD monitor. Lay the LCD monitor face-down on a flat surface with a cushion beneath it with four screws that came with the holes in the rear cover mounting Pad and secure it to protect the screen. Monitor and Bottom Attaching a Base This monitor accepts a 100 mm x 100 mm VESA-compliant mounting interface pad.
Align the mounting interface pad with the arm-type base, wall mount hanger or other base. Mounting interface pad (Sold separately) Turn off your monitor and unplug its power cord. A. Monitor B. Remove three screws and then remove the stand from the LCD monitor. Lay the LCD monitor face-down on a flat surface with a cushion beneath it with four screws that came with the holes in the rear cover mounting Pad and secure it to protect the screen. Monitor and Bottom Attaching a Base This monitor accepts a 100 mm x 100 mm VESA-compliant mounting interface pad.
Quick Guide (easy Manual) (ver.1.0) (Korean)
Page 40
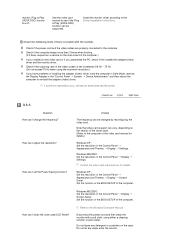
... the video card. Check the following items if there is set the Power Saving function? Answer The frequency can I clean the outer case/LCD Panel? Windows ME/2000 : Set the resolution in the Control Panel Display Screen Saver. Display Contact the video card manufacturer for details.) Windows...on the version of the computer. How can I set to the Windows/Computer Manual Disconnect the power cord and then clean the monitor with the monitor. Windows ME/2000 : Set the resolution in the Control Panel Settings. Check if the power cord and the video cables are properly...
... the video card. Check the following items if there is set the Power Saving function? Answer The frequency can I clean the outer case/LCD Panel? Windows ME/2000 : Set the resolution in the Control Panel Display Screen Saver. Display Contact the video card manufacturer for details.) Windows...on the version of the computer. How can I set to the Windows/Computer Manual Disconnect the power cord and then clean the monitor with the monitor. Windows ME/2000 : Set the resolution in the Control Panel Settings. Check if the power cord and the video cables are properly...

Quick Guide (easy Manual) (ver.1.0) (Korean)
Page 44
... °F (-20 °C ~ 45 °C) Humidity : 5 % ~ 95 %, non-condensing Plug and Play Capability This monitor can be installed on any problelms. For example, the number of TFT LCD sub pixels contained in this product are 5,292,000. For energy conservation, turn your computer to set up this... feature. The interaction of the monitor and the computer systems will proceed automatically, unless the user wishes to change without any Plug & Play compatible system. Dot Acceptable TFT LCD panels manufactured by switching your computer. Design and specifications are...
... °F (-20 °C ~ 45 °C) Humidity : 5 % ~ 95 %, non-condensing Plug and Play Capability This monitor can be installed on any problelms. For example, the number of TFT LCD sub pixels contained in this product are 5,292,000. For energy conservation, turn your computer to set up this... feature. The interaction of the monitor and the computer systems will proceed automatically, unless the user wishes to change without any Plug & Play compatible system. Dot Acceptable TFT LCD panels manufactured by switching your computer. Design and specifications are...

Quick Guide (easy Manual) (ver.1.0) (Korean)
Page 48
...-condensing Temperature : -4 °F ~113 °F (-20 °C ~ 45 °C) Humidity : 5 % ~ 95 %, non-condensing Plug and Play Capability This monitor can be seen. State Power Indicator Power Consumption Normal Operation Blue Less than 55 W Power saving mode Blue, Blinking Less than 1 W (Off-mode) Power off... specifications are 5,292,000. The monitor automatically returns to change without any Plug & Play compatible system. But the pixels of time. Use the software utility installed on the keyboard. The interaction of TFT LCD sub pixels contained in all areas including...
...-condensing Temperature : -4 °F ~113 °F (-20 °C ~ 45 °C) Humidity : 5 % ~ 95 %, non-condensing Plug and Play Capability This monitor can be seen. State Power Indicator Power Consumption Normal Operation Blue Less than 55 W Power saving mode Blue, Blinking Less than 1 W (Off-mode) Power off... specifications are 5,292,000. The monitor automatically returns to change without any Plug & Play compatible system. But the pixels of time. Use the software utility installed on the keyboard. The interaction of TFT LCD sub pixels contained in all areas including...
Quick Guide (easy Manual) (ver.1.0) (Korean)
Page 54
...Co., Ltd. If you can use it . shall not be liable for errors contained herein or for incidental or consequential damages in TFT-LCD. Samsung is good for performing multiple tasks as more image information can be away from bad quality and you are not satisfied with precision of ...registered trademarks of the U.S. This number shows the accuracy of the display. If you need to compose the screen image is not from the monitor for an extended period of time. Authority Information in this means the screen is not provided in connection with the furnishing, performance, or use...
...Co., Ltd. If you can use it . shall not be liable for errors contained herein or for incidental or consequential damages in TFT-LCD. Samsung is good for performing multiple tasks as more image information can be away from bad quality and you are not satisfied with precision of ...registered trademarks of the U.S. This number shows the accuracy of the display. If you need to compose the screen image is not from the monitor for an extended period of time. Authority Information in this means the screen is not provided in connection with the furnishing, performance, or use...

Service Manual
Page 1
Lustrous Appearance (Design) Magic Color - Hidden Function Key - Magic Bright - Integrated UI applied - LCD-Monitor Chassis LME20WS LME22WS Model 206BW 226BW SERVICE Manual LCD Monitor Fashion Feature -
Lustrous Appearance (Design) Magic Color - Hidden Function Key - Magic Bright - Integrated UI applied - LCD-Monitor Chassis LME20WS LME22WS Model 206BW 226BW SERVICE Manual LCD Monitor Fashion Feature -
Service Manual
Page 6
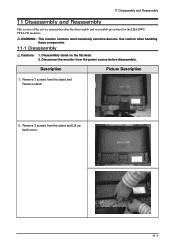
Remove 3 screws from the power source before disassembly. Disconnect the monitor from the stand and Remove stand. 2. Remove 3 screws from the stand and Lift up back cover. 11-1 11 Disassembly and Reassembly 11 Disassembly and Reassembly This section of the service manual describes the disassembly and reassembly procedures for the LHA20WS TFT-LCD monitors. Use caution when handling these components. 11-1 Disassembly Cautions: 1. Disassembly stand on the flat desk. 2. WARNING: This monitor contains electrostatically sensitive devices. Description Picture Description 1.
Remove 3 screws from the power source before disassembly. Disconnect the monitor from the stand and Remove stand. 2. Remove 3 screws from the stand and Lift up back cover. 11-1 11 Disassembly and Reassembly 11 Disassembly and Reassembly This section of the service manual describes the disassembly and reassembly procedures for the LHA20WS TFT-LCD monitors. Use caution when handling these components. 11-1 Disassembly Cautions: 1. Disassembly stand on the flat desk. 2. WARNING: This monitor contains electrostatically sensitive devices. Description Picture Description 1.

Service Manual
Page 14
...HSYNC with this technology is used from Video card to adjust visibility by tuning with PC and Monitor. 14-1 Inverter Device that converts from analog signal to LCD panel lamp. OSD(On Screen Display) On screen display. DVI (Digital Visual Interface) This ... Data PC can be used to Main PBA. - This design technology is display technology independent. Image Lock This means "Fineness adjustment" in LCD Monitor, the features are "Fine" and "Coarse" - T.M.D.S (Transition minimized Differential Signaling) a kind of transmission method for Digital. L.V.D.S.(Low Voltage...
...HSYNC with this technology is used from Video card to adjust visibility by tuning with PC and Monitor. 14-1 Inverter Device that converts from analog signal to LCD panel lamp. OSD(On Screen Display) On screen display. DVI (Digital Visual Interface) This ... Data PC can be used to Main PBA. - This design technology is display technology independent. Image Lock This means "Fineness adjustment" in LCD Monitor, the features are "Fine" and "Coarse" - T.M.D.S (Transition minimized Differential Signaling) a kind of transmission method for Digital. L.V.D.S.(Low Voltage...

Service Manual
Page 21
... derivation AMLCD 46" LED BLU panel AMLCD EU-L15 TV high brightness ZPD new code derivation AMLCD LTM170E8-L21 PVA ZPD new code derivation DISPLAY LCD AMLCD 20.1" Normal panel ZPD code derivation HAYDN 17" PZD code PANEL derivation AMLCD 57" new panel development AMLCD 15" XO-L21 8ms panel code... 90% new Panel AMLCD 21.3" PVA new Panel Code AMLCD 32" 16:9 SPVA 90% new Panel AMLCD 40" 16:9 SPVA 90% new Panel "CPT 15"" Monitor new panel development" "17"" CPT NEW development panel" "17"" CPT ZPD panel code derivation" "CPT 15"" panel ZPD code derivation (GOYA-PJT)" CPT 15" PSWG...
... derivation AMLCD 46" LED BLU panel AMLCD EU-L15 TV high brightness ZPD new code derivation AMLCD LTM170E8-L21 PVA ZPD new code derivation DISPLAY LCD AMLCD 20.1" Normal panel ZPD code derivation HAYDN 17" PZD code PANEL derivation AMLCD 57" new panel development AMLCD 15" XO-L21 8ms panel code... 90% new Panel AMLCD 21.3" PVA new Panel Code AMLCD 32" 16:9 SPVA 90% new Panel AMLCD 40" 16:9 SPVA 90% new Panel "CPT 15"" Monitor new panel development" "17"" CPT NEW development panel" "17"" CPT ZPD panel code derivation" "CPT 15"" panel ZPD code derivation (GOYA-PJT)" CPT 15" PSWG...

Service Manual
Page 38
10-3 Using the Stand 10-3-1 Removing the base 10 Operating Instructions and Installation A 1. Remove four screws(A) and then remove the Stand from the LCD monitor. 10-3 Lay the LCD monitor face-down on a flat surface with a cushion beneath it to protect the screen. 3. Turn off your monitor and unplug its power cord. 2.
10-3 Using the Stand 10-3-1 Removing the base 10 Operating Instructions and Installation A 1. Remove four screws(A) and then remove the Stand from the LCD monitor. 10-3 Lay the LCD monitor face-down on a flat surface with a cushion beneath it to protect the screen. 3. Turn off your monitor and unplug its power cord. 2.

Service Manual
Page 39
Remove four screws and then remove the stand from the LCD monitor. 4. This monitor accepts a 100mm x 100mm VESA-compliant mounting interface pad. 1. 2. 3. 4. Mounting interface pad 1. Align the mounting interface Pad with the holes in the rear cover mounting ...pad and secure it with four screws that came with a cushion beneath it to protect the screen. 3. Monitor B. Turn off your monitor and unplug its power cord. 2. A. Lay the LCD monitor face-down on a flat surface with the arm-type base, wall mount hanger or other base. 10-4 10 Operating Instructions...
Remove four screws and then remove the stand from the LCD monitor. 4. This monitor accepts a 100mm x 100mm VESA-compliant mounting interface pad. 1. 2. 3. 4. Mounting interface pad 1. Align the mounting interface Pad with the holes in the rear cover mounting ...pad and secure it with four screws that came with a cushion beneath it to protect the screen. 3. Monitor B. Turn off your monitor and unplug its power cord. 2. A. Lay the LCD monitor face-down on a flat surface with the arm-type base, wall mount hanger or other base. 10-4 10 Operating Instructions...

Service Manual
Page 72
Magic Bright - Integrated UI applied - Magic Color - LCD-Monitor Chassis LME20WS LME22WS Model 206BW 226BW SERVICE Manual LCD Monitor Fashion Feature - Hidden Function Key - Lustrous Appearance (Design)
Magic Bright - Integrated UI applied - Magic Color - LCD-Monitor Chassis LME20WS LME22WS Model 206BW 226BW SERVICE Manual LCD Monitor Fashion Feature - Hidden Function Key - Lustrous Appearance (Design)


