
Quick Guide (easy Manual) (ver.1.0) (English)
Page 7
..., chemical products or small metal objects on the monitor cabinet. Keep the product away from the outlet during storms or lightening or if it is damaged, turn the monitor off and unplug the power cord. Never insert anything metallic into the monitor openings. Then contact the Service Center. z This may... cause a breakdown, electric shock or fire due to damage to move the monitor right or left by pulling only the ...
..., chemical products or small metal objects on the monitor cabinet. Keep the product away from the outlet during storms or lightening or if it is damaged, turn the monitor off and unplug the power cord. Never insert anything metallic into the monitor openings. Then contact the Service Center. z This may... cause a breakdown, electric shock or fire due to damage to move the monitor right or left by pulling only the ...

Quick Guide (easy Manual) (ver.1.0) (English)
Page 10
... may not be comfortable to the previous menu. D-Sub Cable Sold separately Power Cord Front DVI Cable Set-Bracket Screws (4 EA) MENU button [ ] MagicBright button [] Opens the OSD menu. Also use to exit the OSD menu or return to your taste. You can easily select one of the image you are...
... may not be comfortable to the previous menu. D-Sub Cable Sold separately Power Cord Front DVI Cable Set-Bracket Screws (4 EA) MENU button [ ] MagicBright button [] Opens the OSD menu. Also use to exit the OSD menu or return to your taste. You can easily select one of the image you are...

Quick Guide (easy Manual) (ver.1.0) (English)
Page 20
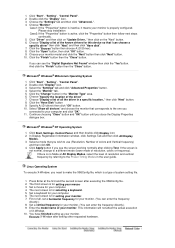
...system.The certified driver will be posted on Samsung Monitor homepage. Choose "OK" button on the "File Needed" window. 3. Choose A:(D:\Driver) then click the "Open" button and then click "OK" button. http://www.samsung.com/ 9. Monitor driver installation is under certified MS logo,and... this installation doesn't damage your monitor, follow these steps. 1. Microsoft® Windows® 2000 Operating...
...system.The certified driver will be posted on Samsung Monitor homepage. Choose "OK" button on the "File Needed" window. 3. Choose A:(D:\Driver) then click the "Open" button and then click "OK" button. http://www.samsung.com/ 9. Monitor driver installation is under certified MS logo,and... this installation doesn't damage your monitor, follow these steps. 1. Microsoft® Windows® 2000 Operating...
Quick Guide (easy Manual) (ver.1.0) (English)
Page 21
...Display icon. 2. If the screen is for setting your computer and click "OK". 11. The third screen is not normal, change to your monitor. 7. Set a mouse for your computer. 4. Set a keyboard for your computer. 6. First of resolution, colors or frequency). If you connected ...Enter the model name of the driver". 7. Double click the "Display" Icon. 3. Choose the "Settings" tab and then click "Advanced..". 4. Click the "Open" button, then click "OK" button. 9. And click the "Finish" button then the "Close" button. Microsoft® Windows® Millennium Operating System 1....
...Display icon. 2. If the screen is for setting your computer and click "OK". 11. The third screen is not normal, change to your monitor. 7. Set a mouse for your computer. 4. Set a keyboard for your computer. 6. First of resolution, colors or frequency). If you connected ...Enter the model name of the driver". 7. Double click the "Display" Icon. 3. Choose the "Settings" tab and then click "Advanced..". 4. Click the "Open" button, then click "OK" button. 9. And click the "Finish" button then the "Close" button. Microsoft® Windows® Millennium Operating System 1....

Quick Guide (easy Manual) (ver.1.0) (English)
Page 23
1. [ MENU] Use this button for open the on-screen menu and exits from the menu screen or closes screen adjustment menu. 2. [ ] These buttons allow you to adjust items in the menu. 3. [ ] Press this button to activate a highlighted menu item. 4. [AUTO] Press this button to self-adjust to the incoming Analog signal. (Available in Analog mode only) The values of fine,coarse and position are adjusted automatically. AUTO
1. [ MENU] Use this button for open the on-screen menu and exits from the menu screen or closes screen adjustment menu. 2. [ ] These buttons allow you to adjust items in the menu. 3. [ ] Press this button to activate a highlighted menu item. 4. [AUTO] Press this button to self-adjust to the incoming Analog signal. (Available in Analog mode only) The values of fine,coarse and position are adjusted automatically. AUTO

Quick Guide (easy Manual) (ver.1.0) (English)
Page 41
...User Name Shows the user name that is register in [Options] ' [Basic Settings]. The User Manual opens within a basic browser window. Help Visit the MagicTune™ website or click to open the Help files (User Manual) if you can configure MagicTune™ using the following options. Asset ID...Definition Shows the Asset ID and the version number of MagicTune™. Option Tab Definition You can use the server to control the Client monitor. (Server program should be installed to use will have an "V" in PC. Preferences in use the Help feature. Server IP Write ...
...User Name Shows the user name that is register in [Options] ' [Basic Settings]. The User Manual opens within a basic browser window. Help Visit the MagicTune™ website or click to open the Help files (User Manual) if you can configure MagicTune™ using the following options. Asset ID...Definition Shows the Asset ID and the version number of MagicTune™. Option Tab Definition You can use the server to control the Client monitor. (Server program should be installed to use will have an "V" in PC. Preferences in use the Help feature. Server IP Write ...

Service Manual
Page 6
... engineers, the pre-configured values may not be comfortable to your eyes depending on the screen, push the button to the previous menu. 2. Menu button Opens the OSD menu. You can easily select one of six settings by simply pressing MagicBright control buttons. 1) Custom Although the values are carefully chosen by...
... engineers, the pre-configured values may not be comfortable to your eyes depending on the screen, push the button to the previous menu. 2. Menu button Opens the OSD menu. You can easily select one of six settings by simply pressing MagicBright control buttons. 1) Custom Although the values are carefully chosen by...
Service Manual
Page 12
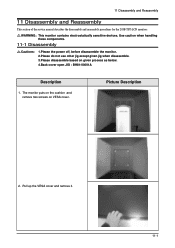
... jig except given jig when disassemble. 3.Please disassemble based on VESA cover. The monitor puts on the cushion and remove two screws on given process as below. 4.Back cover open JIG : BH81-00001A Description 1. Pull up the VESA cover and remove it. 11...-1 Picture Description 2. 11 Disassembly and Reassembly 11 Disassembly and Reassembly This section of the service manual describes the disassembly and reassembly procedures for the 203B TFT-LCD monitors. WARNING: This monitor contains...
... jig except given jig when disassemble. 3.Please disassemble based on VESA cover. The monitor puts on the cushion and remove two screws on given process as below. 4.Back cover open JIG : BH81-00001A Description 1. Pull up the VESA cover and remove it. 11...-1 Picture Description 2. 11 Disassembly and Reassembly 11 Disassembly and Reassembly This section of the service manual describes the disassembly and reassembly procedures for the 203B TFT-LCD monitors. WARNING: This monitor contains...


