
User Manual (ENGLISH)
Page 2
Main Page Safety Instructions Notational Power Installation Cleaning Other Introduction Unpacking Front Rear Setup Connecting the Monitor Installing the Monitor Driver Automatic Manual Installing VESA compliant mounting On-Screen Display Troubleshooting Check List Q & A Self-Test Feature Check Specifications General Specifications PowerSaver Preset Timing Modes Information Service Terms Regulatory Natural Color For Better Display Authority
Main Page Safety Instructions Notational Power Installation Cleaning Other Introduction Unpacking Front Rear Setup Connecting the Monitor Installing the Monitor Driver Automatic Manual Installing VESA compliant mounting On-Screen Display Troubleshooting Check List Q & A Self-Test Feature Check Specifications General Specifications PowerSaver Preset Timing Modes Information Service Terms Regulatory Natural Color For Better Display Authority
User Manual (ENGLISH)
Page 5
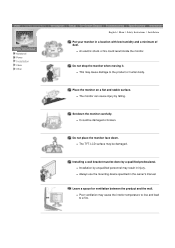
... in a location with low humidity and a minimum of dust. Notational Power Installation Clean Other English > Main > Safety Instructions > Installation Put your monitor in the owner's manual. z It could result inside the monitor. z The monitor can cause injury by unqualified personnel may be done by a qualified professional. z Installation by falling.
... in a location with low humidity and a minimum of dust. Notational Power Installation Clean Other English > Main > Safety Instructions > Installation Put your monitor in the owner's manual. z It could result inside the monitor. z The monitor can cause injury by unqualified personnel may be done by a qualified professional. z Installation by falling.

User Manual (ENGLISH)
Page 13
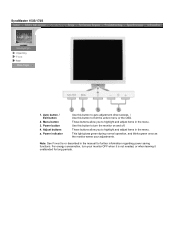
... Exit the active menu or the OSD. Power button 4. These buttons allow you to highlight and adjust items in the menu. SyncMaster 153V/173V/152V/172V/193V/192V Unpacking Front Rear 1. Menu button 3. These buttons allow you to highlight and adjust items in the menu. Note: See PowerSaver described in the...
... Exit the active menu or the OSD. Power button 4. These buttons allow you to highlight and adjust items in the menu. SyncMaster 153V/173V/152V/172V/193V/192V Unpacking Front Rear 1. Menu button 3. These buttons allow you to highlight and adjust items in the menu. Note: See PowerSaver described in the...
User Manual (ENGLISH)
Page 14
... / Exit button 2. These buttons allow you to highlight and adjust items in the menu. These buttons allow you to highlight and adjust items in the manual for long periods.
... / Exit button 2. These buttons allow you to highlight and adjust items in the menu. These buttons allow you to highlight and adjust items in the manual for long periods.

User Manual (ENGLISH)
Page 15
... monitor OFF when it unattended for your monitor to highlight and adjust items in the menu. or + button to highlight and adjust items in the manual for further information regarding power saving functions. PC sound connection Connect the audio cable for long periods. Headphone connection terminal Note: See PowerSaver described in...
... monitor OFF when it unattended for your monitor to highlight and adjust items in the menu. or + button to highlight and adjust items in the manual for further information regarding power saving functions. PC sound connection Connect the audio cable for long periods. Headphone connection terminal Note: See PowerSaver described in...

User Manual (ENGLISH)
Page 34
... in it's slot. Is the power indicator on the monitor. Have you locked the On Screen Unlock the OSD by referring to the video card manual. The screen shows strange colors or just black and white. The screen suddenly has become strange after running a program or due to the Preset Timing...
... in it's slot. Is the power indicator on the monitor. Have you locked the On Screen Unlock the OSD by referring to the video card manual. The screen shows strange colors or just black and white. The screen suddenly has become strange after running a program or due to the Preset Timing...

User Manual (ENGLISH)
Page 35
... message that reads "Unrecognized monitor, Plug & Play (VESA DDC) monitor found". Adjust the frequency properly by referring to the video card manual and the Preset Timing Modes. (The maximum frequency per resolution may differ from product to the Driver Installation Instructions. Have the Windows colors been...Set the video card by referring to the Preset Timing Modes). There is trouble with the monitor. 1. See the video card manual to the video card manual. The screen can be adjusted. Adjust the resolution and frequency of the video card. (Refer to the cycle of the computer...
... message that reads "Unrecognized monitor, Plug & Play (VESA DDC) monitor found". Adjust the frequency properly by referring to the video card manual and the Preset Timing Modes. (The maximum frequency per resolution may differ from product to the Driver Installation Instructions. Have the Windows colors been...Set the video card by referring to the Preset Timing Modes). There is trouble with the monitor. 1. See the video card manual to the video card manual. The screen can be adjusted. Adjust the resolution and frequency of the video card. (Refer to the cycle of the computer...

User Manual (ENGLISH)
Page 36
....) Windows ME/XP/2000 : Set the resolution at BIOS-SETUP of the detergent nor scratch the case. Do not leave any water to Windows/Computer Manual). Note that video card support can I set the Power Saving function? How can I adjust the resolution? How can I change the frequency? Disconnect the power cord...
....) Windows ME/XP/2000 : Set the resolution at BIOS-SETUP of the detergent nor scratch the case. Do not leave any water to Windows/Computer Manual). Note that video card support can I set the Power Saving function? How can I adjust the resolution? How can I change the frequency? Disconnect the power cord...
User Manual (ENGLISH)
Page 64
Refer to the video card manual and adjust the screen as the following Preset Timing Modes, the screen will be adjusted automatically. IBM, 640 x 480 31,469 59,940 25,175 -/- ...
Refer to the video card manual and adjust the screen as the following Preset Timing Modes, the screen will be adjusted automatically. IBM, 640 x 480 31,469 59,940 25,175 -/- ...
User Manual (ENGLISH)
Page 65
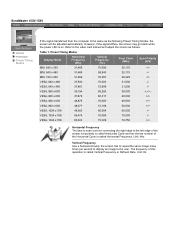
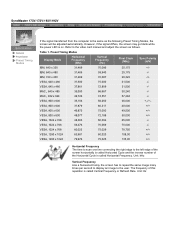
Refer to the video card manual and adjust the screen as the following Preset Timing Modes, the screen will be adjusted automatically. VESA, 800 x 600 35,156 56,250 36,000 +,-/+,- ... right edge to the user. IBM, 640 x 480 31,469 59,940 25,175 -/- MAC,, 832 x 624 49,726 74,551 57,284 -/- SyncMaster 173V/172V/193V/192V General PowerSaver Preset Timing Modes If the signal transferred from the computer is the same as follows. Table 1. VESA, 800 x 600 37,879...
Refer to the video card manual and adjust the screen as the following Preset Timing Modes, the screen will be adjusted automatically. VESA, 800 x 600 35,156 56,250 36,000 +,-/+,- ... right edge to the user. IBM, 640 x 480 31,469 59,940 25,175 -/- MAC,, 832 x 624 49,726 74,551 57,284 -/- SyncMaster 173V/172V/193V/192V General PowerSaver Preset Timing Modes If the signal transferred from the computer is the same as follows. Table 1. VESA, 800 x 600 37,879...
User Manual (ENGLISH)
Page 66
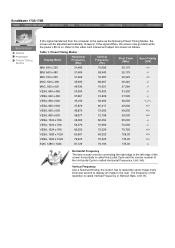
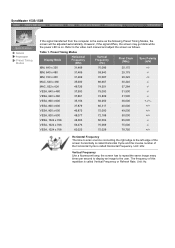
... the screen horizontally is called Horizontal Cycle and the inverse number of this repetition is called Horizontal Frequency. Unit: Hz Refer to the video card manual and adjust the screen as the following Preset Timing Modes, the screen will be adjusted automatically. Table 1. Horizontal Frequency The time to scan one line...
... the screen horizontally is called Horizontal Cycle and the inverse number of this repetition is called Horizontal Frequency. Unit: Hz Refer to the video card manual and adjust the screen as the following Preset Timing Modes, the screen will be adjusted automatically. Table 1. Horizontal Frequency The time to scan one line...
User Manual (ENGLISH)
Page 67
Refer to the video card manual and adjust the screen as the following Preset Timing Modes, the screen will be adjusted automatically. Preset Timing Modes Display Mode Horizontal Frequency (kHz) Vertical ...
Refer to the video card manual and adjust the screen as the following Preset Timing Modes, the screen will be adjusted automatically. Preset Timing Modes Display Mode Horizontal Frequency (kHz) Vertical ...

User Manual (ENGLISH)
Page 73
... on the standard of Information Technology Equipment z EN61000-3-2:1995+A1/A2:1998 - If this is a Class B product based on the environment and to the instruction manual. Your choice has provided you with these directives implies conformity to the following European Norms: z EN55022:1998+A1:2000 - Cet appareil Numérique de...
... on the standard of Information Technology Equipment z EN61000-3-2:1995+A1/A2:1998 - If this is a Class B product based on the environment and to the instruction manual. Your choice has provided you with these directives implies conformity to the following European Norms: z EN55022:1998+A1:2000 - Cet appareil Numérique de...
User Manual (ENGLISH)
Page 78
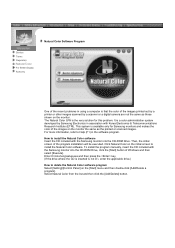
... and then select [Execute]. The Natural Color S/W is the very solution for Samsung monitors and makes the color of the images on the monitor. Then, the initial screen of the program installation will be executed. To install the program manually, insert the CD included with Korea Electronics & Telecommunications Research Institute (ETRI). Service...
... and then select [Execute]. The Natural Color S/W is the very solution for Samsung monitors and makes the color of the images on the monitor. Then, the initial screen of the program installation will be executed. To install the program manually, insert the CD included with Korea Electronics & Telecommunications Research Institute (ETRI). Service...
User Manual (SPANISH)
Page 61
... Written Eco-document acompanying the products Congratulations! European Notice(Europe Only) Products with the CE marking comply with these directives implies conformity to the instruction manual. Why do we have just purchased a TCO'95 approved and labelled product! Voltage Fluctuations PCT Notice VCCI This is used near a radio or television receiver...
... Written Eco-document acompanying the products Congratulations! European Notice(Europe Only) Products with the CE marking comply with these directives implies conformity to the instruction manual. Why do we have just purchased a TCO'95 approved and labelled product! Voltage Fluctuations PCT Notice VCCI This is used near a radio or television receiver...

User Manual (ENGLISH)
Page 2
Main Page Safety Instructions Notational Power Installation Cleaning Other Introduction Unpacking Front Rear Setup Connecting Your Monitor Installing the Monitor Driver Automatic Manual Installing VESA compliant mounting On-Screen Display Troubleshooting Check List Q & A Self-Test Feature Check Specifications General Specifications PowerSaver Preset Display Modes Information Service Terms Regulatory Natural Color For Better Display Authority
Main Page Safety Instructions Notational Power Installation Cleaning Other Introduction Unpacking Front Rear Setup Connecting Your Monitor Installing the Monitor Driver Automatic Manual Installing VESA compliant mounting On-Screen Display Troubleshooting Check List Q & A Self-Test Feature Check Specifications General Specifications PowerSaver Preset Display Modes Information Service Terms Regulatory Natural Color For Better Display Authority
User Manual (ENGLISH)
Page 14
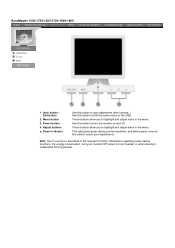
... 2. Adjust buttons a. These buttons allow you to highlight and adjust items in the menu. These buttons allow you to highlight and adjust items in the manual for long periods. Power button 4. Use this button to turn your adjustments. Power indicator Use this button to auto adjustment direct access. / Use this button... to Exit the active menu or the OSD. Note: See PowerSaver described in the menu. Menu button 3. SyncMaster 153V/173V/152V/172V/193V/192V Unpacking Front Rear 1.
... 2. Adjust buttons a. These buttons allow you to highlight and adjust items in the menu. These buttons allow you to highlight and adjust items in the manual for long periods. Power button 4. Use this button to turn your adjustments. Power indicator Use this button to auto adjustment direct access. / Use this button... to Exit the active menu or the OSD. Note: See PowerSaver described in the menu. Menu button 3. SyncMaster 153V/173V/152V/172V/193V/192V Unpacking Front Rear 1.

User Manual (ENGLISH)
Page 15
... 1. Menu button 3. For energy conservation, turn the monitor on and off. Adjust buttons a. Power button 4. Use this button to highlight and adjust items in the manual for long periods. These buttons allow you to Exit the active menu or the OSD. Auto button / Exit button 2. Power indicator Use this button to...
... 1. Menu button 3. For energy conservation, turn the monitor on and off. Adjust buttons a. Power button 4. Use this button to highlight and adjust items in the manual for long periods. These buttons allow you to Exit the active menu or the OSD. Auto button / Exit button 2. Power indicator Use this button to...

User Manual (ENGLISH)
Page 16
Auto button / Exit button Use this button to auto adjustment direct access. / Use this button to highlight and adjust items in the manual for further information regarding power saving functions. b. c. SyncMaster 153B/173B Unpacking Front Rear 1. When OSD is not needed, or when leaving it is not on ...
Auto button / Exit button Use this button to auto adjustment direct access. / Use this button to highlight and adjust items in the manual for further information regarding power saving functions. b. c. SyncMaster 153B/173B Unpacking Front Rear 1. When OSD is not needed, or when leaving it is not on ...

User Manual (ENGLISH)
Page 35
.... The screen shows strange colors or just black and white. The screen suddenly has become strange after running a program or due to the video card manual. There is on the monitor blinking at least 5 seconds. Is the screen displaying only one color as if looking at the screen through a cellophane paper...
.... The screen shows strange colors or just black and white. The screen suddenly has become strange after running a program or due to the video card manual. There is on the monitor blinking at least 5 seconds. Is the screen displaying only one color as if looking at the screen through a cellophane paper...


