

User Manual (user Manual) (ver.1.0) (English)
Page 1
SyncMaster150MB SyncMaster170MB TFT-LCD Monitor Owner's Instructions
SyncMaster150MB SyncMaster170MB TFT-LCD Monitor Owner's Instructions
User Manual (user Manual) (ver.1.0) (English)
Page 3
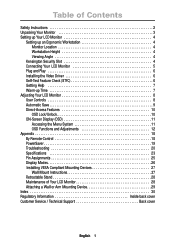
... Fran•ais English Table of Contents Safety Instructions 2 Unpacking Your Monitor 3 Setting up Your LCD Monitor 4 Setting up an Ergonomic Workstation 4 Monitor Location 4 Workstation Height 4 Viewing Angle 4 Kensington Security Slot 4 Connecting Your LCD Monitor 5 Plug and Play 6 Installing the Video Driver 6 Self-Test ... 26 Installing VESA Compliant Mounting Devices 27 Wall Mount Instructions 27 Retractable Stand 28 Maintenance of Your LCD Monitor 28 Attaching a Wall or Arm Mounting Device 29 Index 30 Regulatory Information Inside back cover Customer Service / Technical ...
... Fran•ais English Table of Contents Safety Instructions 2 Unpacking Your Monitor 3 Setting up Your LCD Monitor 4 Setting up an Ergonomic Workstation 4 Monitor Location 4 Workstation Height 4 Viewing Angle 4 Kensington Security Slot 4 Connecting Your LCD Monitor 5 Plug and Play 6 Installing the Video Driver 6 Self-Test ... 26 Installing VESA Compliant Mounting Devices 27 Wall Mount Instructions 27 Retractable Stand 28 Maintenance of Your LCD Monitor 28 Attaching a Wall or Arm Mounting Device 29 Index 30 Regulatory Information Inside back cover Customer Service / Technical ...

User Manual (user Manual) (ver.1.0) (English)
Page 4
...). REFER SERVICING TO QUALIFIED SERVICE PERSONNEL. Do not allow anything metallic into the cabinet openings of the liquid crystal display (LCD) monitor; If you put the LCD monitor in a bookcase or some other soft surface. Doing so may block the ventilation openings in kitchens, near an easily accessible AC ... to rain or use it near water (in the bottom of the cabinet. these openings should open the case of the LCD monitor. 4 Never use your LCD monitor from the AC outlet before any unusual sounds or smells coming from it - Only a qualified technician should not be ...
...). REFER SERVICING TO QUALIFIED SERVICE PERSONNEL. Do not allow anything metallic into the cabinet openings of the liquid crystal display (LCD) monitor; If you put the LCD monitor in a bookcase or some other soft surface. Doing so may block the ventilation openings in kitchens, near an easily accessible AC ... to rain or use it near water (in the bottom of the cabinet. these openings should open the case of the LCD monitor. 4 Never use your LCD monitor from the AC outlet before any unusual sounds or smells coming from it - Only a qualified technician should not be ...
User Manual (user Manual) (ver.1.0) (English)
Page 5
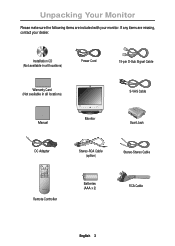
Installation CD (Not available in all locations) Power Cord 15-pin D-Sub Signal Cable Warranty Card (Not available in all locations) Manual PC V1 V2 TV Source PIP Exit Menu SyncMaster 150MB VOL Monitor S-VHS Cable Scart Jack DC Adapter Stereo-RCA Cable (option) Stereo-Stereo Cable Remote Controller Batteries (AAA x 2) RCA Cable English 3 If any items are included with your dealer. Unpacking Your Monitor Please make sure the following items are missing, contact your monitor.
Installation CD (Not available in all locations) Power Cord 15-pin D-Sub Signal Cable Warranty Card (Not available in all locations) Manual PC V1 V2 TV Source PIP Exit Menu SyncMaster 150MB VOL Monitor S-VHS Cable Scart Jack DC Adapter Stereo-RCA Cable (option) Stereo-Stereo Cable Remote Controller Batteries (AAA x 2) RCA Cable English 3 If any items are included with your dealer. Unpacking Your Monitor Please make sure the following items are missing, contact your monitor.

User Manual (user Manual) (ver.1.0) (English)
Page 6
... up an Ergonomic Workstation Consider the advice given below your monitor. Viewing angle Tilt the screen until you the opportunity to secure your monitor. Tilt the screen Kensington Security Slot This monitor offers you feel comfortable working with your monitor using a Kensington-type security device. Monitor location Choose a position that the top of the screen...
... up an Ergonomic Workstation Consider the advice given below your monitor. Viewing angle Tilt the screen until you the opportunity to secure your monitor. Tilt the screen Kensington Security Slot This monitor offers you feel comfortable working with your monitor using a Kensington-type security device. Monitor location Choose a position that the top of the screen...

User Manual (user Manual) (ver.1.0) (English)
Page 7
Cable connections 1 Connect the power cord to the DC adapter and connect the adapter jack to the DC12V power port on the back of your monitor. 2 Connect the signal cable to the video port on your computer. 3 Connect the RCA cable or S-VHS cable to your DVD, VCR or ... 6 Connect your headphone to the Headphone-out port. 7 Turn on both your computer and the monitor. 8 If necessary, install the video driver for the monitor. (See "Installing the video driver" on page 6) 9 After your monitor has been fully installed successfully, run Auto-Adjustment. (See page12) * For SyncMaster 150MP/170MP only ...
Cable connections 1 Connect the power cord to the DC adapter and connect the adapter jack to the DC12V power port on the back of your monitor. 2 Connect the signal cable to the video port on your computer. 3 Connect the RCA cable or S-VHS cable to your DVD, VCR or ... 6 Connect your headphone to the Headphone-out port. 7 Turn on both your computer and the monitor. 8 If necessary, install the video driver for the monitor. (See "Installing the video driver" on page 6) 9 After your monitor has been fully installed successfully, run Auto-Adjustment. (See page12) * For SyncMaster 150MP/170MP only ...

User Manual (user Manual) (ver.1.0) (English)
Page 8
... a self-test feature that PC is selected as a primary source by following the steps given below according to the operating system your monitor. Please refer to use with your CD package for installing your computer uses. Power Indicator 1 Turn off both your PC system needs a... drivers for more information. English 6 Your PC system can automatically configure itself for use the flat panel display. If your computer and the monitor. 2 Unplug the video cable from the back of the new VESA® Plug and Play solution eliminates complicated and time consuming setup. Make...
... a self-test feature that PC is selected as a primary source by following the steps given below according to the operating system your monitor. Please refer to use with your CD package for installing your computer uses. Power Indicator 1 Turn off both your PC system needs a... drivers for more information. English 6 Your PC system can automatically configure itself for use the flat panel display. If your computer and the monitor. 2 Unplug the video cable from the back of the new VESA® Plug and Play solution eliminates complicated and time consuming setup. Make...
User Manual (user Manual) (ver.1.0) (English)
Page 9
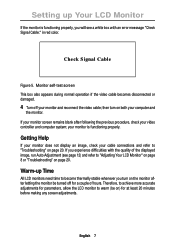
...display an image, check your cable connections and refer to "Adjusting Your LCD Monitor" on page 8 or "Troubleshooting" on the monitor after following the previous procedure, check your computer and the monitor. your monitor and reconnect the video cable; If you will see page 12) and ...Troubleshooting" on both your video controller and computer system; Check Signal Cable Figure 5. English 7 in red color. If your monitor screen remains blank after letting the monitor be on) for a couple of the displayed image, run Auto Adjustment (see a white box with the quality of hours...
...display an image, check your cable connections and refer to "Adjusting Your LCD Monitor" on page 8 or "Troubleshooting" on the monitor after following the previous procedure, check your computer and the monitor. your monitor and reconnect the video cable; If you will see page 12) and ...Troubleshooting" on both your video controller and computer system; Check Signal Cable Figure 5. English 7 in red color. If your monitor screen remains blank after letting the monitor be on) for a couple of the displayed image, run Auto Adjustment (see a white box with the quality of hours...

User Manual (user Manual) (ver.1.0) (English)
Page 10
.... PC V1 V2 PIP Source PIP Exit Menu VOL * 17" : SyncMaster 170MB Figure 6. Name 1 Source 2 PIP 3 Exit 4 Menu 5 Power Description n Selects Video source. n Four source indicator LEDs on the left of the monitor. -Green : Normal Operation. -Amber : Power Saving Mode or Disconnected Signal ...being displayed. n PIP off . n Turns ON/OFF the monitor. User control locations No. n Exits from the OSD system. While you to Fullscreen video. Adjusting Your LCD Monitor User Controls Your LCD monitor allows you use these adjustments are made using the control buttons ...
.... PC V1 V2 PIP Source PIP Exit Menu VOL * 17" : SyncMaster 170MB Figure 6. Name 1 Source 2 PIP 3 Exit 4 Menu 5 Power Description n Selects Video source. n Four source indicator LEDs on the left of the monitor. -Green : Normal Operation. -Amber : Power Saving Mode or Disconnected Signal ...being displayed. n PIP off . n Turns ON/OFF the monitor. User control locations No. n Exits from the OSD system. While you to Fullscreen video. Adjusting Your LCD Monitor User Controls Your LCD monitor allows you use these adjustments are made using the control buttons ...

User Manual (user Manual) (ver.1.0) (English)
Page 11
... 9- factory preset modes listed in Table 7 on the OSD. Name Description 6 n Moves the selector up or down on page 26 respectively. SyncMaster 150MB and SyncMaster 170MB have made. English 9 VOL + n Increases or decreases the level of the selected 7 function. - In addition to remain active for about 3 seconds without pressing other buttons...
... 9- factory preset modes listed in Table 7 on the OSD. Name Description 6 n Moves the selector up or down on page 26 respectively. SyncMaster 150MB and SyncMaster 170MB have made. English 9 VOL + n Increases or decreases the level of the selected 7 function. - In addition to remain active for about 3 seconds without pressing other buttons...

User Manual (user Manual) (ver.1.0) (English)
Page 12
... any time by using the same procedure. You can unlock the OSD controls at least 5 seconds to lock or unlock the controls. Adjusting Your LCD Monitor Direct-Access Features While you to adjust the Brightness, Contrast and Volume.
... any time by using the same procedure. You can unlock the OSD controls at least 5 seconds to lock or unlock the controls. Adjusting Your LCD Monitor Direct-Access Features While you to adjust the Brightness, Contrast and Volume.
User Manual (user Manual) (ver.1.0) (English)
Page 13
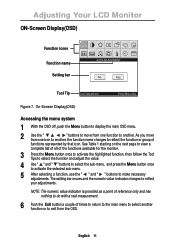
... the Menu button to display the main OSD menu. 2 Use the " " buttons to move from one function to another. Adjusting Your LCD Monitor ON-Screen Display(OSD) Function icons Function name Setting bar AUTO CC AUTO ADJUSTMENT Tool Tip Auto Adjustment Press Menu Key Figure 7. NOTE: The ...as a point of reference only and has nothing to do with a real measurement. 6 Push the Exit button a couple of the functions available for the monitor. 3 Press the Menu button once to activate the highlighted function, then follow the Tool Tips to select the function and adjust the value. 4 Use ...
... the Menu button to display the main OSD menu. 2 Use the " " buttons to move from one function to another. Adjusting Your LCD Monitor ON-Screen Display(OSD) Function icons Function name Setting bar AUTO CC AUTO ADJUSTMENT Tool Tip Auto Adjustment Press Menu Key Figure 7. NOTE: The ...as a point of reference only and has nothing to do with a real measurement. 6 Push the Exit button a couple of the functions available for the monitor. 3 Press the Menu button once to activate the highlighted function, then follow the Tool Tips to select the function and adjust the value. 4 Use ...

User Manual (user Manual) (ver.1.0) (English)
Page 14
... functions and adjustments Table 1. Screen controls Icon Menus and Sub-menus Function Descriptions Auto Adjustment AUTO Contrast "Auto adjustment" allows the monitor to self-adjust to fine tune and get the best image by removing noises that creates unstable images with jitters and shimmers. Brightness PC ...
... functions and adjustments Table 1. Screen controls Icon Menus and Sub-menus Function Descriptions Auto Adjustment AUTO Contrast "Auto adjustment" allows the monitor to self-adjust to fine tune and get the best image by removing noises that creates unstable images with jitters and shimmers. Brightness PC ...

User Manual (user Manual) (ver.1.0) (English)
Page 15
...are not obtained using the Fine adjustment, use the Coarse adjustment and then use Fine again. This function may change the width of your monitor to fine tune the image quality of the image. V-Position PC V1 V2 TV Source PIP Exit Menu SyncMaster 150MB VOL PC ... screen. Use the H-Position menu to remove any noise. If satisfactory results are replaced with the factory default values. Adjusting Your LCD Monitor Table 1. Screen controls (Continued) Icon Menus and Sub-menus Function Descriptions n Fine n Coarse The Fine and Coarse adjustments allow you to your ...
...are not obtained using the Fine adjustment, use the Coarse adjustment and then use Fine again. This function may change the width of your monitor to fine tune the image quality of the image. V-Position PC V1 V2 TV Source PIP Exit Menu SyncMaster 150MB VOL PC ... screen. Use the H-Position menu to remove any noise. If satisfactory results are replaced with the factory default values. Adjusting Your LCD Monitor Table 1. Screen controls (Continued) Icon Menus and Sub-menus Function Descriptions n Fine n Coarse The Fine and Coarse adjustments allow you to your ...

User Manual (user Manual) (ver.1.0) (English)
Page 16
... factory default values. Plain white. Bluish white. Color parameters are also user customizable. When external A/V devices such as VCR or DVD are connected to the monitor, PIP allows you to watch video from redish white to bluish white. Enable or disable closed caption text.. • On/Off • Caption/Text •...
... factory default values. Plain white. Bluish white. Color parameters are also user customizable. When external A/V devices such as VCR or DVD are connected to the monitor, PIP allows you to watch video from redish white to bluish white. Enable or disable closed caption text.. • On/Off • Caption/Text •...
User Manual (user Manual) (ver.1.0) (English)
Page 17
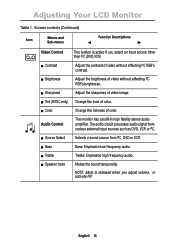
...processes audio signal from PC, DVD or VCR. n Tint (NTSC only) Change the tone of video without affecting PC RGB's contrast. Audio Control The monitor has a built-in high fidelity stereo audio amplifier. n Treble Treble: Emphasize high frequency audio. NOTE: Mute is active if you adjust... volume, or activate PIP. n Brightness Adjust the brightness of color. English 15 Adjusting Your LCD Monitor Table 1. n Source Select Selects a sound source from various external input sources such as DVD, VCR or PC.
...processes audio signal from PC, DVD or VCR. n Tint (NTSC only) Change the tone of video without affecting PC RGB's contrast. Audio Control The monitor has a built-in high fidelity stereo audio amplifier. n Treble Treble: Emphasize high frequency audio. NOTE: Mute is active if you adjust... volume, or activate PIP. n Brightness Adjust the brightness of color. English 15 Adjusting Your LCD Monitor Table 1. n Source Select Selects a sound source from various external input sources such as DVD, VCR or PC.
User Manual (user Manual) (ver.1.0) (English)
Page 18
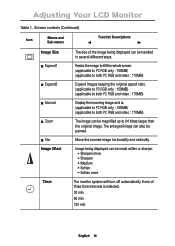
...and vertically. Image being displayed can be made softer or sharper. • Sharpen more • Sharpen • Medium • Soften • Soften more The monitor system will turn off automatically if one of the image being displayed can be handled in several different ways. The enlarged image can be panned... images keeping the original aspect ratio. (applicable to PC RGB only : 150MB) (applicable to both PC RGB and video : 170MB) Display the incoming image as it is selected. 30 min. 60 min. 120 min. Screen controls (Continued) Icon Menus and Sub-menus Function ...
...and vertically. Image being displayed can be made softer or sharper. • Sharpen more • Sharpen • Medium • Soften • Soften more The monitor system will turn off automatically if one of the image being displayed can be handled in several different ways. The enlarged image can be panned... images keeping the original aspect ratio. (applicable to PC RGB only : 150MB) (applicable to both PC RGB and video : 170MB) Display the incoming image as it is selected. 30 min. 60 min. 120 min. Screen controls (Continued) Icon Menus and Sub-menus Function ...
User Manual (user Manual) (ver.1.0) (English)
Page 19
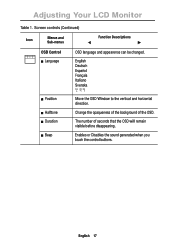
The number of the OSD. Change the opaqueness of the background of seconds that the OSD will remain visible before disappearing. Enables or Disables the sound generated when you touch the control buttons. Screen controls (Continued) Icon Menus and Sub-menus Function Descriptions OSD Control n Language OSD language and appearence can be changed. English Deutsch Español Français Italiano Svenska n Position n Halftone n Duration n Beep Move the OSD Window to the vertical and horizontal direction. Adjusting Your LCD Monitor Table 1. English 17
The number of the OSD. Change the opaqueness of the background of seconds that the OSD will remain visible before disappearing. Enables or Disables the sound generated when you touch the control buttons. Screen controls (Continued) Icon Menus and Sub-menus Function Descriptions OSD Control n Language OSD language and appearence can be changed. English Deutsch Español Français Italiano Svenska n Position n Halftone n Duration n Beep Move the OSD Window to the vertical and horizontal direction. Adjusting Your LCD Monitor Table 1. English 17
User Manual (user Manual) (ver.1.0) (English)
Page 21
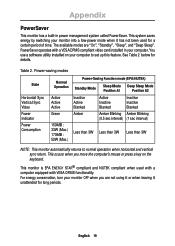
... equipped with a VESA DPMS compliant video card installed in power management system called PowerSaver. PowerSaver operates with VESA DPMS functionality. This monitor is EPA ENERGY STAR® compliant and NUTEK compliant when used for a certain period of time. Power-saving modes State Horizontal ...Sync Vertical Sync Video Power Indicator Power Consumption Normal Operation Active Active Active Green 150MB : 33W (Max.) 170MB : 52W (Max.) Power-Saving Function mode (EPA/NUTEK) Standby Mode Sleep Mode Deep Sleep Mode Position A1 Position A2 Inactive ...
... equipped with a VESA DPMS compliant video card installed in power management system called PowerSaver. PowerSaver operates with VESA DPMS functionality. This monitor is EPA ENERGY STAR® compliant and NUTEK compliant when used for a certain period of time. Power-saving modes State Horizontal ...Sync Vertical Sync Video Power Indicator Power Consumption Normal Operation Active Active Active Green 150MB : 33W (Max.) 170MB : 52W (Max.) Power-Saving Function mode (EPA/NUTEK) Standby Mode Sleep Mode Deep Sleep Mode Position A1 Position A2 Inactive ...

User Manual (user Manual) (ver.1.0) (English)
Page 22
... that the signal cable is firmly connected to flicker, jitter or shimmer on . Troubleshooting - Connecting your LCD monitor, page 5. Connecting your LCD monitor, page 5. Image What you may be able to n Adjust the Coarse function and flicker, jitter or then adjust the... it yourself. Horizontal bars appear n Adjust the Fine function. Appendix Troubleshooting If you have a problem setting up or using your LCD monitor, you see... Out of Range" message n Check the maximum resolution and the frequency of the video adaptor. n Ensure that the power...
... that the signal cable is firmly connected to flicker, jitter or shimmer on . Troubleshooting - Connecting your LCD monitor, page 5. Connecting your LCD monitor, page 5. Image What you may be able to n Adjust the Coarse function and flicker, jitter or then adjust the... it yourself. Horizontal bars appear n Adjust the Fine function. Appendix Troubleshooting If you have a problem setting up or using your LCD monitor, you see... Out of Range" message n Check the maximum resolution and the frequency of the video adaptor. n Ensure that the power...


