
User Manual (user Manual) (ver.1.0) (English)
Page 3
... Slot 4 Connecting Your LCD Monitor 5 Plug and Play 6 Installing the Video Driver 6 Self-Test Feature Check (STFC 6 Getting Help 7 Warm-up Time 7 Adjusting Your LCD Monitor 8 User Controls 8 Automatic Save 9 Direct-Access Features 10 OSD Lock/Unlock 10 ON-Screen Display (OSD 11 Accessing the Menu System 11 OSD Functions and Adjustments 12 Appendix 18 By Remote-Control 18 PowerSaver 19 Troubleshooting 20 Specifications 23 Pin Assignments 25 Display Modes 26 Installing VESA Compliant Mounting Devices 27 Wall Mount Instructions 27 Retractable Stand 28...
... Slot 4 Connecting Your LCD Monitor 5 Plug and Play 6 Installing the Video Driver 6 Self-Test Feature Check (STFC 6 Getting Help 7 Warm-up Time 7 Adjusting Your LCD Monitor 8 User Controls 8 Automatic Save 9 Direct-Access Features 10 OSD Lock/Unlock 10 ON-Screen Display (OSD 11 Accessing the Menu System 11 OSD Functions and Adjustments 12 Appendix 18 By Remote-Control 18 PowerSaver 19 Troubleshooting 20 Specifications 23 Pin Assignments 25 Display Modes 26 Installing VESA Compliant Mounting Devices 27 Wall Mount Instructions 27 Retractable Stand 28...

User Manual (user Manual) (ver.1.0) (English)
Page 4
... or covered. NO USER-SERVICEABLE PARTS INSIDE. To prevent overheating, these may damage the panel. 10 Locate your LCD monitor near an easily accessible AC outlet. 11 If your LCD monitor if the power cord has been damaged. English 2 Only...LCD monitor to the local electrical supply. 2 Never insert anything to rest on a bed, sofa, rug, or other enclosed space, be damaged if dropped, hit or scratched. these openings should open the case of the LCD monitor. 4 Never use your LCD monitor from it - Safety Instructions 1 Before connecting the AC power cord to the DC adapter outlet, make...
... or covered. NO USER-SERVICEABLE PARTS INSIDE. To prevent overheating, these may damage the panel. 10 Locate your LCD monitor near an easily accessible AC outlet. 11 If your LCD monitor if the power cord has been damaged. English 2 Only...LCD monitor to the local electrical supply. 2 Never insert anything to rest on a bed, sofa, rug, or other enclosed space, be damaged if dropped, hit or scratched. these openings should open the case of the LCD monitor. 4 Never use your LCD monitor from it - Safety Instructions 1 Before connecting the AC power cord to the DC adapter outlet, make...

User Manual (user Manual) (ver.1.0) (English)
Page 6
... for installation instructions. Figure 1. Tilt the screen Kensington Security Slot This monitor offers you the opportunity to secure your monitor. Viewing angle Tilt the screen until you feel comfortable working with your monitor using a Kensington-type security device. Kensington lock is slightly below before you install your monitor. Refer to your monitor to the least reflection from lights or windows, usually at a right angle to get the best viewing angle adjustment. Monitor...
... for installation instructions. Figure 1. Tilt the screen Kensington Security Slot This monitor offers you the opportunity to secure your monitor. Viewing angle Tilt the screen until you feel comfortable working with your monitor using a Kensington-type security device. Kensington lock is slightly below before you install your monitor. Refer to your monitor to the least reflection from lights or windows, usually at a right angle to get the best viewing angle adjustment. Monitor...

User Manual (user Manual) (ver.1.0) (English)
Page 7
Setting up Your LCD Monitor Connecting Your LCD Monitor Figure 3. Cable connections 1 Connect the power cord to the DC adapter and connect the adapter jack to the DC12V power port on the back of your monitor. 2 Connect the signal cable to the video port on your computer. 3 Connect the RCA cable or S-VHS cable to your DVD, VCR or camcoder. 4 Connect the audio sources(computer, DVD, VCR or Camcoder) to proper Audio input ports(Ain(L), Ain(R) or Ain(stereo)). 5 Connect your external audio system...
Setting up Your LCD Monitor Connecting Your LCD Monitor Figure 3. Cable connections 1 Connect the power cord to the DC adapter and connect the adapter jack to the DC12V power port on the back of your monitor. 2 Connect the signal cable to the video port on your computer. 3 Connect the RCA cable or S-VHS cable to your DVD, VCR or camcoder. 4 Connect the audio sources(computer, DVD, VCR or Camcoder) to proper Audio input ports(Ain(L), Ain(R) or Ain(stereo)). 5 Connect your external audio system...

User Manual (user Manual) (ver.1.0) (English)
Page 8
... your monitor and computer are properly connected but the monitor screen remains dark and the power indicator is blinking, run the monitor self-test by checking if the source indicator LED labeled "PC" is on the monitor. If your computer uses. It allows you to the driver installation instructions included with your computer and the monitor. 2 Unplug the video cable from the back of the new VESA® Plug and...
... your monitor and computer are properly connected but the monitor screen remains dark and the power indicator is blinking, run the monitor self-test by checking if the source indicator LED labeled "PC" is on the monitor. If your computer uses. It allows you to the driver installation instructions included with your computer and the monitor. 2 Unplug the video cable from the back of the new VESA® Plug and...
User Manual (user Manual) (ver.1.0) (English)
Page 9
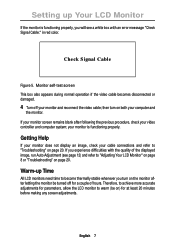
... monitor be on page 20. in red color. Monitor self-test screen This box also appears during normal operation if the video cable becomes disconnected or damaged. 4 Turn off for a couple of the displayed image, run Auto Adjustment (see a white box with the quality of hours. Warm-up Your LCD Monitor If the monitor is functioning properly. Check Signal Cable Figure 5. English 7 If your monitor and reconnect the video cable; Setting up Time All LCD monitors need...
... monitor be on page 20. in red color. Monitor self-test screen This box also appears during normal operation if the video cable becomes disconnected or damaged. 4 Turn off for a couple of the displayed image, run Auto Adjustment (see a white box with the quality of hours. Warm-up Your LCD Monitor If the monitor is functioning properly. Check Signal Cable Figure 5. English 7 If your monitor and reconnect the video cable; Setting up Time All LCD monitors need...

User Manual (user Manual) (ver.1.0) (English)
Page 10
... 4 Menu 5 Power Description n Selects Video source. n Exits from the OSD system. n Four source indicator LEDs on -screen menu shows you their numeric values as they change. n Indicates the status of the image being displayed. English 8 Adjusting Your LCD Monitor User Controls Your LCD monitor allows you to easily adjust the characteristics of the monitor. -Green : Normal Operation. -Amber : Power Saving Mode or Disconnected Signal Cable. All of these buttons to Fullscreen video. PC V1 V2 PIP Source PIP Exit Menu VOL * 17" : SyncMaster 170MB...
... 4 Menu 5 Power Description n Selects Video source. n Exits from the OSD system. n Four source indicator LEDs on -screen menu shows you their numeric values as they change. n Indicates the status of the image being displayed. English 8 Adjusting Your LCD Monitor User Controls Your LCD monitor allows you to easily adjust the characteristics of the monitor. -Green : Normal Operation. -Amber : Power Saving Mode or Disconnected Signal Cable. All of these buttons to Fullscreen video. PC V1 V2 PIP Source PIP Exit Menu VOL * 17" : SyncMaster 170MB...

User Manual (user Manual) (ver.1.0) (English)
Page 12
... LCD Monitor Direct-Access Features While you to adjust the Brightness, Contrast and Volume. OSD Lock/Unlock This function allows you to secure the current settings so that they cannot be displayed along the bottom of each OSD menu except for at any time by using the same procedure. message will be inadvertently changed, while still allowing you are watching full screen TV or in PIP mode Volume...
... LCD Monitor Direct-Access Features While you to adjust the Brightness, Contrast and Volume. OSD Lock/Unlock This function allows you to secure the current settings so that they cannot be displayed along the bottom of each OSD menu except for at any time by using the same procedure. message will be inadvertently changed, while still allowing you are watching full screen TV or in PIP mode Volume...

User Manual (user Manual) (ver.1.0) (English)
Page 14
... Auto Adjustment AUTO Contrast "Auto adjustment" allows the monitor to self-adjust to fine tune and get the best image by removing noises that creates unstable images with jitters and shimmers. Adjusting Your LCD Monitor OSD functions and adjustments Table 1. English 12 The values of fine, coarse and position are adjusted automatically. Brightness PC V1 V2 TV Source PIP Exit Menu SyncMaster 150MB VOL PC V1 V2 TV Source PIP Exit Menu SyncMaster 150MB VOL Image Lock...
... Auto Adjustment AUTO Contrast "Auto adjustment" allows the monitor to self-adjust to fine tune and get the best image by removing noises that creates unstable images with jitters and shimmers. Adjusting Your LCD Monitor OSD functions and adjustments Table 1. English 12 The values of fine, coarse and position are adjusted automatically. Brightness PC V1 V2 TV Source PIP Exit Menu SyncMaster 150MB VOL PC V1 V2 TV Source PIP Exit Menu SyncMaster 150MB VOL Image Lock...

User Manual (user Manual) (ver.1.0) (English)
Page 15
Image lock and position parameters are not obtained using the Fine adjustment, use the Coarse adjustment and then use Fine again. Use the " " and " " buttons to center the image on the screen. If satisfactory results are replaced with the factory default values. Adjusting Your LCD Monitor Table 1. Use the H-Position menu to remove any noise. This function may change the width of your preference. V-Position PC V1 V2 TV Source PIP Exit Menu SyncMaster 150MB VOL PC V1...
Image lock and position parameters are not obtained using the Fine adjustment, use the Coarse adjustment and then use Fine again. Use the " " and " " buttons to center the image on the screen. If satisfactory results are replaced with the factory default values. Adjusting Your LCD Monitor Table 1. Use the H-Position menu to remove any noise. This function may change the width of your preference. V-Position PC V1 V2 TV Source PIP Exit Menu SyncMaster 150MB VOL PC V1...

User Manual (user Manual) (ver.1.0) (English)
Page 16
... are connected to the monitor, PIP allows you to bluish white. Color parameters are also user customizable. Plain white. Change PIP window position. User customizable. Enable or disable closed caption text.. • On/Off • Caption/Text • Channel 1/2 • Field 1/2 • Box/Shadow English 14 Resize PIP window. Screen controls (Continued) Icon Menus and Sub-menus Function Descriptions Color n Mode1 n Mode2 n Mode3 n User Mode 1 n User Mode 2 n Reset PIP(Picture-inPicture) n Size n Position n Closed...
... are connected to the monitor, PIP allows you to bluish white. Color parameters are also user customizable. Plain white. Change PIP window position. User customizable. Enable or disable closed caption text.. • On/Off • Caption/Text • Channel 1/2 • Field 1/2 • Box/Shadow English 14 Resize PIP window. Screen controls (Continued) Icon Menus and Sub-menus Function Descriptions Color n Mode1 n Mode2 n Mode3 n User Mode 1 n User Mode 2 n Reset PIP(Picture-inPicture) n Size n Position n Closed...
User Manual (user Manual) (ver.1.0) (English)
Page 17
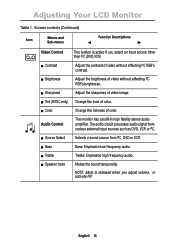
...;er. n Bass Bass: Emphasize low frequency audio. n Speaker mute Mutes the sound temporarily. Screen controls (Continued) Icon Menus and Sub-menus Function Descriptions Video Control This funtion is released when you select an input source other than PC.(DVD,VCR) n Contrast Adjust the contrast of video without affecting PC RGB's brightness. n Brightness Adjust the brightness of color. n Color Change the richness of video without affecting PC RGB's contrast. English 15 Adjusting Your LCD Monitor Table 1. n Treble Treble: Emphasize high...
...;er. n Bass Bass: Emphasize low frequency audio. n Speaker mute Mutes the sound temporarily. Screen controls (Continued) Icon Menus and Sub-menus Function Descriptions Video Control This funtion is released when you select an input source other than PC.(DVD,VCR) n Contrast Adjust the contrast of video without affecting PC RGB's brightness. n Brightness Adjust the brightness of color. n Color Change the richness of video without affecting PC RGB's contrast. English 15 Adjusting Your LCD Monitor Table 1. n Treble Treble: Emphasize high...
User Manual (user Manual) (ver.1.0) (English)
Page 18
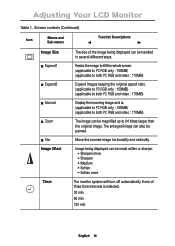
... image. Adjusting Your LCD Monitor Table 1. Resize the image to fill the whole screen. (applicable to PC RGB only : 150MB) (applicable to both PC RGB and video : 170MB) Expand images keeping the original aspect ratio. (applicable to PC RGB only : 150MB) (applicable to both PC RGB and video : 170MB) Display the incoming image as it is selected. 30 min. 60 min. 120 min. Move the zoomed image horizontally and vertically. Image...
... image. Adjusting Your LCD Monitor Table 1. Resize the image to fill the whole screen. (applicable to PC RGB only : 150MB) (applicable to both PC RGB and video : 170MB) Expand images keeping the original aspect ratio. (applicable to PC RGB only : 150MB) (applicable to both PC RGB and video : 170MB) Display the incoming image as it is selected. 30 min. 60 min. 120 min. Move the zoomed image horizontally and vertically. Image...
User Manual (user Manual) (ver.1.0) (English)
Page 21
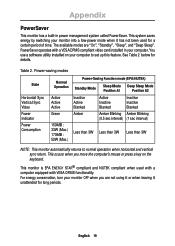
... used with a computer equipped with a VESA DPMS compliant video card installed in power management system called PowerSaver. See Table 2 below for a certain period of time. Power-saving modes State Horizontal Sync Vertical Sync Video Power Indicator Power Consumption Normal Operation Active Active Active Green 150MB : 33W (Max.) 170MB : 52W (Max.) Power-Saving Function mode (EPA/NUTEK) Standby Mode Sleep Mode Deep Sleep Mode Position A1 Position A2 Inactive Active Blanked Amber Active Inactive Blanked Inactive Inactive Blanked Amber Blinking...
... used with a computer equipped with a VESA DPMS compliant video card installed in power management system called PowerSaver. See Table 2 below for a certain period of time. Power-saving modes State Horizontal Sync Vertical Sync Video Power Indicator Power Consumption Normal Operation Active Active Active Green 150MB : 33W (Max.) 170MB : 52W (Max.) Power-Saving Function mode (EPA/NUTEK) Standby Mode Sleep Mode Deep Sleep Mode Position A1 Position A2 Inactive Active Blanked Amber Active Inactive Blanked Inactive Inactive Blanked Amber Blinking...

User Manual (user Manual) (ver.1.0) (English)
Page 22
... a problem setting up or using your LCD monitor, page 5. Troubleshooting - Suggested Actions Reference Screen is blank and power indicator is off n Ensure that are turned on . Connecting your problem. n Ensure that the signal cable is firmly connected to your LCD monitor, page 5. Out of Range" message n Check the maximum resolution and the frequency of the video adaptor. Display Modes, page 26. Image What you see... The image is on . Brightness, page 12. shimmer on the image Image Lock...
... a problem setting up or using your LCD monitor, page 5. Troubleshooting - Suggested Actions Reference Screen is blank and power indicator is off n Ensure that are turned on . Connecting your problem. n Ensure that the signal cable is firmly connected to your LCD monitor, page 5. Out of Range" message n Check the maximum resolution and the frequency of the video adaptor. Display Modes, page 26. Image What you see... The image is on . Brightness, page 12. shimmer on the image Image Lock...

User Manual (user Manual) (ver.1.0) (English)
Page 23
... keyboard Power Saver, page 19. Image is not correct, use Installing the Video Driver, your computer check: Control Panel, Display, Settings Display Modes, page 26. On your computer utility program to vibrate n Check that the display resolution and frequency from WWW pages: http://samsungelectronics.com/ support/downloads/monitor/ index.html English 21 n If the setting is not stable and may appear to page 6. NOTE: Your monitor supports multiscan display functions within the following frequency domain: n Horizontal frequency: n Vertical frequency: n Maximum refresh rate...
... keyboard Power Saver, page 19. Image is not correct, use Installing the Video Driver, your computer check: Control Panel, Display, Settings Display Modes, page 26. On your computer utility program to vibrate n Check that the display resolution and frequency from WWW pages: http://samsungelectronics.com/ support/downloads/monitor/ index.html English 21 n If the setting is not stable and may appear to page 6. NOTE: Your monitor supports multiscan display functions within the following frequency domain: n Horizontal frequency: n Vertical frequency: n Maximum refresh rate...
User Manual (user Manual) (ver.1.0) (English)
Page 25
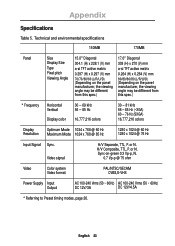
..., P. Appendix Specifications Table 5. Sync-on the panel manufacturer, the viewing angle may be different from this spec.) * Frequency Horizontal Vertical Display color 30 - 69 kHz 56 - 85 Hz 16,777,216 colors 30 - 81 kHz 56 - 85 Hz (~XGA) 60 - 76 Hz (SXGA) 16,777,216 colors Display Resolution Optimum Mode 1024 x 768 @ 60 Hz Maximum Mode 1024 x 768 @ 85 Hz 1280 x 1024...
..., P. Appendix Specifications Table 5. Sync-on the panel manufacturer, the viewing angle may be different from this spec.) * Frequency Horizontal Vertical Display color 30 - 69 kHz 56 - 85 Hz 16,777,216 colors 30 - 81 kHz 56 - 85 Hz (~XGA) 60 - 76 Hz (SXGA) 16,777,216 colors Display Resolution Optimum Mode 1024 x 768 @ 60 Hz Maximum Mode 1024 x 768 @ 85 Hz 1280 x 1024...
User Manual (user Manual) (ver.1.0) (English)
Page 29
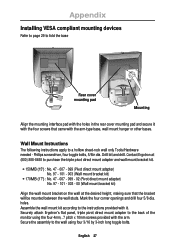
...-rock wall only Tools/Hardware needed - English 27 Appendix Installing VESA compliant mounting devices Refer to page 29 to the instructions provided with it with the four screws that the bracket will be mounted between the wall studs. holes. Drill bit and drill. Assemble the wall mount kit according to fold the base Rear cover mounting pad Mounting Align the mounting interface pad with the arm-type base, wall mount hanger...
...-rock wall only Tools/Hardware needed - English 27 Appendix Installing VESA compliant mounting devices Refer to page 29 to the instructions provided with it with the four screws that the bracket will be mounted between the wall studs. holes. Drill bit and drill. Assemble the wall mount kit according to fold the base Rear cover mounting pad Mounting Align the mounting interface pad with the arm-type base, wall mount hanger...
User Manual (user Manual) (ver.1.0) (English)
Page 32
... Installation CD 3 K Kensington security slot 4 L Language 17 M Menu 8 Index O ON-Screen Display 11 OSD Lock/Unlock 10 OSD Control 17 P Pan 16 Pin Assignments 25 PIP 8, 14 Plug and Play 6 Power 8 Power Indicator 6 Power-saving modes 19 R Remote Controller 3, 18 Reset 13 S S-VHS Cable 3 Safety Instructions 2 Scart Jack 3 Screen controls 12 Self-test feature check 6 Sharpness 15 Size 14 Source 8, 15 Speaker mute 15 Stereo-RCA Cable 3 T Tilt the screen 4 Timer 16 Treble 15 Troubleshooting 20 U User control locations 8 User mode 14 V Video Control 15 VOL 9 Volume 10 V-position...
... Installation CD 3 K Kensington security slot 4 L Language 17 M Menu 8 Index O ON-Screen Display 11 OSD Lock/Unlock 10 OSD Control 17 P Pan 16 Pin Assignments 25 PIP 8, 14 Plug and Play 6 Power 8 Power Indicator 6 Power-saving modes 19 R Remote Controller 3, 18 Reset 13 S S-VHS Cable 3 Safety Instructions 2 Scart Jack 3 Screen controls 12 Self-test feature check 6 Sharpness 15 Size 14 Source 8, 15 Speaker mute 15 Stereo-RCA Cable 3 T Tilt the screen 4 Timer 16 Treble 15 Troubleshooting 20 U User control locations 8 User mode 14 V Video Control 15 VOL 9 Volume 10 V-position...

User Manual (user Manual) (ver.1.0) (English)
Page 33
... the equipment. For 120 Volt applications, use shielded signal interface cables to maintain FCC compliance for connection to any interference received, including interference that interference will not occur in a particular installation. Regulatory Information Portuguese Italiano Español Deutsch Français English FCC Information User Instructions The Federal Communications Commission Radio Frequency Interference Statement includes the following warning...
... the equipment. For 120 Volt applications, use shielded signal interface cables to maintain FCC compliance for connection to any interference received, including interference that interference will not occur in a particular installation. Regulatory Information Portuguese Italiano Español Deutsch Français English FCC Information User Instructions The Federal Communications Commission Radio Frequency Interference Statement includes the following warning...


