
User Manual (ENGLISH)
Page 2
... Safety Instructions Notational Power Installation Cleaning Other Introduction Unpacking Front Rear Remote Control Setup Connecting Your Monitor Connecting to a Computer Connecting to Other Devices Installing the Monitor Driver Automatic Manual Installing a VESA Base Using the FOLD button Installing a VESA Base Adjusting Your LCD Monitor User Controls User control buttons Direct-Access Features On-Screen Display OSD Functions Screen Adjustment Animation Clips Troubleshooting Check before Calling for Service Problems and Solutions Q & A Specifications General Specifications PowerSaver Preset...
... Safety Instructions Notational Power Installation Cleaning Other Introduction Unpacking Front Rear Remote Control Setup Connecting Your Monitor Connecting to a Computer Connecting to Other Devices Installing the Monitor Driver Automatic Manual Installing a VESA Base Using the FOLD button Installing a VESA Base Adjusting Your LCD Monitor User Controls User control buttons Direct-Access Features On-Screen Display OSD Functions Screen Adjustment Animation Clips Troubleshooting Check before Calling for Service Problems and Solutions Q & A Specifications General Specifications PowerSaver Preset...
User Manual (ENGLISH)
Page 11
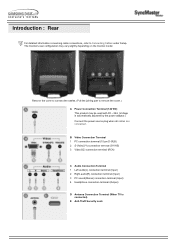
... Video(V2) connection terminal (RCA) C Audio Connection Terminal 1 Left audio(L) connection terminal (Input) 2 Right audio(R) connection terminal (Input) 3 PC sound(Stereo) connection terminal (Input) 4 Headphone connection terminal (Output) D Antenna Connection Terminal (When TV is automatically adjusted by the power adaptor.) Connect the power source plug when all cables are connected. The monitor's rear configuration may be used with 90 ~ 264. (Voltage is connected) E Anti-Theft Security Lock Remove the cover to connect the cables. (Pull the joining part to Connecting Cables under Setup...
... Video(V2) connection terminal (RCA) C Audio Connection Terminal 1 Left audio(L) connection terminal (Input) 2 Right audio(R) connection terminal (Input) 3 PC sound(Stereo) connection terminal (Input) 4 Headphone connection terminal (Output) D Antenna Connection Terminal (When TV is automatically adjusted by the power adaptor.) Connect the power source plug when all cables are connected. The monitor's rear configuration may be used with 90 ~ 264. (Voltage is connected) E Anti-Theft Security Lock Remove the cover to connect the cables. (Pull the joining part to Connecting Cables under Setup...
User Manual (ENGLISH)
Page 13
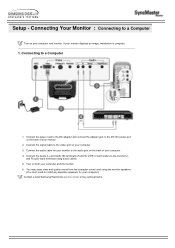
... sound card using audio cables. 5. Connecting Your Monitor : Connecting to buy optional items. Connect the power cord to the DC adapter and connect the adapter jack to the video port on the back of a DVD, VCR or Camcorders to a Computer 1. Connect the signal cable to the DC14V power port on both your computer. 3. Turn on the back of your monitor displays an image, installation is complete. 1. Setup - Connecting to the monitor's L and R audio input terminals using the monitor speakers. (You don't need to install any separate speakers...
... sound card using audio cables. 5. Connecting Your Monitor : Connecting to buy optional items. Connect the power cord to the DC adapter and connect the adapter jack to the video port on the back of a DVD, VCR or Camcorders to a Computer 1. Connect the signal cable to the DC14V power port on both your computer. 3. Turn on the back of your monitor displays an image, installation is complete. 1. Setup - Connecting to the monitor's L and R audio input terminals using the monitor speakers. (You don't need to install any separate speakers...
User Manual (ENGLISH)
Page 15
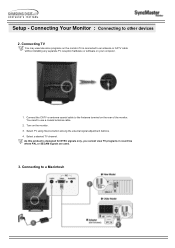
... of the monitor. Select TV using Source button among the external signal adjustment buttons. 4. Select a desired TV channel. Setup - Turn on your computer. 1. Connect the CATV or antenna coaxial cable to use a coaxial antenna cable. 2. Connecting to other devices 2. Connecting Your Monitor : Connecting to a Macintosh As this product is connected to an antenna or CATV cable without installing any separate TV reception hardware or software on the monitor. 3. Connecting TV You may view television...
... of the monitor. Select TV using Source button among the external signal adjustment buttons. 4. Select a desired TV channel. Setup - Turn on your computer. 1. Connect the CATV or antenna coaxial cable to use a coaxial antenna cable. 2. Connecting to other devices 2. Connecting Your Monitor : Connecting to a Macintosh As this product is connected to an antenna or CATV cable without installing any separate TV reception hardware or software on the monitor. 3. Connecting TV You may view television...

User Manual (ENGLISH)
Page 17
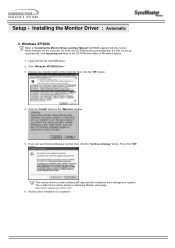
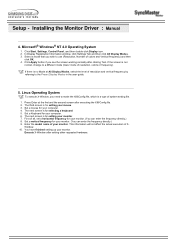
... boot up automatically. Monitor driver installation is slightly different from one operating system to "Installing the Monitor Driver and User Manual" CD-ROM supplied with this monitor. Setup - Windows ME Refer to another. When inserted into the CD-ROM driver. 2. Choose your monitor model in the "Warning" window. 5. Follow the directions as appropriate for the monitor driver, insert the CD-ROM included with the monitor. Installing the Monitor Driver : Automatic When prompted...
... boot up automatically. Monitor driver installation is slightly different from one operating system to "Installing the Monitor Driver and User Manual" CD-ROM supplied with this monitor. Setup - Windows ME Refer to another. When inserted into the CD-ROM driver. 2. Choose your monitor model in the "Warning" window. 5. Follow the directions as appropriate for the monitor driver, insert the CD-ROM included with the monitor. Installing the Monitor Driver : Automatic When prompted...
User Manual (ENGLISH)
Page 18
... CD-ROM driver. 2. Choose your system. The certified driver will be posted on Samsung Monitor Homepage http://www.samsung-monitor.com/ 6. Click the "Install" button in the model list, then click the "OK" button. 4. If you can see following Message window, then click the "Continue Anyway" button. If it fails to "Installing the Monitor Driver and User Manual" CD-ROM supplied with the monitor. This monitor driver is completed. Installing the Monitor Driver : Automatic...
... CD-ROM driver. 2. Choose your system. The certified driver will be posted on Samsung Monitor Homepage http://www.samsung-monitor.com/ 6. Click the "Install" button in the model list, then click the "OK" button. 4. If you can see following Message window, then click the "Continue Anyway" button. If it fails to "Installing the Monitor Driver and User Manual" CD-ROM supplied with the monitor. This monitor driver is completed. Installing the Monitor Driver : Automatic...
User Manual (ENGLISH)
Page 19
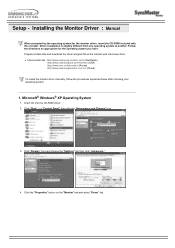
... "Properties" button on the "Monitor" tab and select "Driver" tab. Installing the Monitor Driver : Manual When prompted by the operating system for the operating system you have. Click "Start" -> "Control Panel" then click the "Appearance and Themes" Icon. 3. Follow the directions as appropriate for the monitor driver, insert the CD-ROM included with this monitor. Microsoft® Windows® XP Operating System 1. Setup - Driver installation is slightly...
... "Properties" button on the "Monitor" tab and select "Driver" tab. Installing the Monitor Driver : Manual When prompted by the operating system for the operating system you have. Click "Start" -> "Control Panel" then click the "Appearance and Themes" Icon. 3. Follow the directions as appropriate for the monitor driver, insert the CD-ROM included with this monitor. Microsoft® Windows® XP Operating System 1. Setup - Driver installation is slightly...
User Manual (ENGLISH)
Page 20
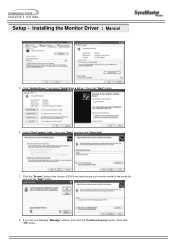
If you can see following "Message" window, then click the "Continue Anyway" button. and select "Install from a list or.." Click the "Browse" button then choose A:(D:\Driver) and choose your monitor model in the model list and click the "Next" button. 8. Setup - Select "Don't search ,I will.." then click "Next" and then click "Have disk". 7. then click "Next" button. 6. Click "Update Driver.." Then click "OK" button. Installing the Monitor Driver : Manual 5.
If you can see following "Message" window, then click the "Continue Anyway" button. and select "Install from a list or.." Click the "Browse" button then choose A:(D:\Driver) and choose your monitor model in the model list and click the "Next" button. 8. Setup - Select "Don't search ,I will.." then click "Next" and then click "Have disk". 7. then click "Next" button. 6. Click "Update Driver.." Then click "OK" button. Installing the Monitor Driver : Manual 5.

User Manual (ENGLISH)
Page 21
The certified driver will be posted on Samsung Monitor Homepage http://www.samsung-monitor.com/ 9. Monitor driver installation is under certifying MS logo,and this installation don't damage your system. Setup - Click the "Close" button then click "OK" button continually. 10. Installing the Monitor Driver : Manual This monitor driver is completed.
The certified driver will be posted on Samsung Monitor Homepage http://www.samsung-monitor.com/ 9. Monitor driver installation is under certifying MS logo,and this installation don't damage your system. Setup - Click the "Close" button then click "OK" button continually. 10. Installing the Monitor Driver : Manual This monitor driver is completed.
User Manual (ENGLISH)
Page 22
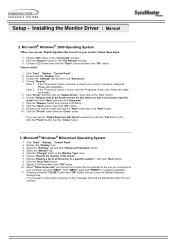
... this device so that corresponds to the one you can choose a specific driver" then click "Next" and then click "Have disk". 7. Choose "Display a list of the driver". 7. Select "Show all the driver in the "Monitor Type" area. 6. Click "Driver" and then click on the "File Needed" window. 3. Double click "Display" icon. 3. Click the "Change" button in a specific location.." then click "Next" button. 8. Click "Start" , "Setting" , "Control Panel". 2. Setup - Installing the Monitor Driver : Manual 2.
... this device so that corresponds to the one you can choose a specific driver" then click "Next" and then click "Have disk". 7. Choose "Display a list of the driver". 7. Select "Show all the driver in the "Monitor Type" area. 6. Click "Driver" and then click on the "File Needed" window. 3. Double click "Display" icon. 3. Click the "Change" button in a specific location.." then click "Next" button. 8. Click "Start" , "Setting" , "Control Panel". 2. Setup - Installing the Monitor Driver : Manual 2.
User Manual (ENGLISH)
Page 23
Installing the Monitor Driver : Manual 4. In Display Registration Information window, click Settings Tab and then click All Display Modes. 3. If there is for your mouse. 3. Linux Operating System To execute X-Window, you need to make the X86Config file, which is not normal, change to the Preset Display Modes in the user guide. 5. Set a vertical frequency for your monitor. If the screen is a type of all, set a horizontal frequency for setting your monitor. (You can enter the frequency directly.) 9. Window. 10...
Installing the Monitor Driver : Manual 4. In Display Registration Information window, click Settings Tab and then click All Display Modes. 3. If there is for your mouse. 3. Linux Operating System To execute X-Window, you need to make the X86Config file, which is not normal, change to the Preset Display Modes in the user guide. 5. Set a vertical frequency for your monitor. If the screen is a type of all, set a horizontal frequency for setting your monitor. (You can enter the frequency directly.) 9. Window. 10...
User Manual (ENGLISH)
Page 30
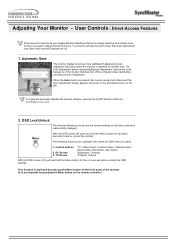
...button Brightness, Contrast Channel, Volume With the OSD screen off, push and hold the Menu button for at least 5 seconds to adjust monitor functions. Adjusting Your Monitor - Try Auto Adjustment before carrying out Auto Adjustment. Ensure the clock frequency of the computer video card before attempting Manual Adjustment. With the OSD screen off . 1. User Controls : Direct-Access Features Direct-Access Features let you to unlock the OSD settings. OSD Lock/Unlock This function allows you display Monitor Adjustment Menu by Auto Adjustment functions when the monitor is installed...
...button Brightness, Contrast Channel, Volume With the OSD screen off, push and hold the Menu button for at least 5 seconds to adjust monitor functions. Adjusting Your Monitor - Try Auto Adjustment before carrying out Auto Adjustment. Ensure the clock frequency of the computer video card before attempting Manual Adjustment. With the OSD screen off . 1. User Controls : Direct-Access Features Direct-Access Features let you to unlock the OSD settings. OSD Lock/Unlock This function allows you display Monitor Adjustment Menu by Auto Adjustment functions when the monitor is installed...
User Manual (ENGLISH)
Page 33
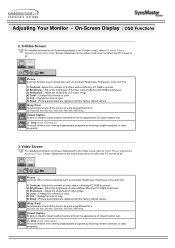
... such as Contrast, Brightness, Sharpness, Color and Tint. 1) Contrast : Adjust the contrast of video without affecting PC RGB's contrast. 2) Brightness : Adjust the brightness of video without affecting PC RGB's brightness. 3) Sharpness : Adjust the sharpness of S-Video image. 4) Color : Change the richness of color. 5) Tint : Change the tone of color. 6) Reset : Picture parameters are replaced with the factory default values. Adjusting Your Monitor - Screen Adjustment in the S-Video mode, refer to Video Screen Adjustment Animation Clips. Picture Controls Video screen properties...
... such as Contrast, Brightness, Sharpness, Color and Tint. 1) Contrast : Adjust the contrast of video without affecting PC RGB's contrast. 2) Brightness : Adjust the brightness of video without affecting PC RGB's brightness. 3) Sharpness : Adjust the sharpness of S-Video image. 4) Color : Change the richness of color. 5) Tint : Change the tone of color. 6) Reset : Picture parameters are replaced with the factory default values. Adjusting Your Monitor - Screen Adjustment in the S-Video mode, refer to Video Screen Adjustment Animation Clips. Picture Controls Video screen properties...
User Manual (ENGLISH)
Page 36
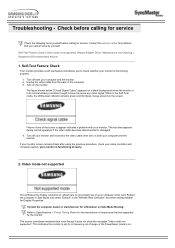
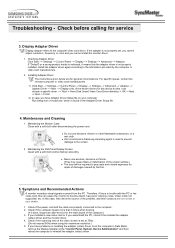
... video cable; Turn off your computer video card. This indicates the monitor is functioning properly. 2. Failure of any video signal: While in the "Refresh Rate Unknown" box while setting Adapter for the resolutions or frequencies that are supported by yourself. Contact the service center for information on the monitor. Self-Test Feature Check | Video mode not supported | Display Adapter Driver | Maintenance and Cleaning | Symptoms & Recommended Actions 1. If your monitor screen remains blank after using the previous procedure, check your monitor...
... video cable; Turn off your computer video card. This indicates the monitor is functioning properly. 2. Failure of any video signal: While in the "Refresh Rate Unknown" box while setting Adapter for the resolutions or frequencies that are supported by yourself. Contact the service center for information on the monitor. Self-Test Feature Check | Video mode not supported | Display Adapter Driver | Maintenance and Cleaning | Symptoms & Recommended Actions 1. If your monitor screen remains blank after using the previous procedure, check your monitor...
User Manual (ENGLISH)
Page 37
... or video card manufacturers. 1) Click Start --> Settings --> Control Panel --> Display --> Settings --> Advanced --> Adapter --> Update Driver --> Next --> Display a list of the video screen is found in Safe Mode, remove the Display Adapter at 75Hz. (Do not exceed 60Hz when using the maximum resolution.) 5. Check if the power cord and the cable are for the main board of the problem, and then contact a service center or your computer: Run Setup.exe or Install.exe, which is set , you cannot adjust resolution, frequency or color and you assembled...
... or video card manufacturers. 1) Click Start --> Settings --> Control Panel --> Display --> Settings --> Advanced --> Adapter --> Update Driver --> Next --> Display a list of the video screen is found in Safe Mode, remove the Display Adapter at 75Hz. (Do not exceed 60Hz when using the maximum resolution.) 5. Check if the power cord and the cable are for the main board of the problem, and then contact a service center or your computer: Run Setup.exe or Install.exe, which is set , you cannot adjust resolution, frequency or color and you assembled...
User Manual (ENGLISH)
Page 38
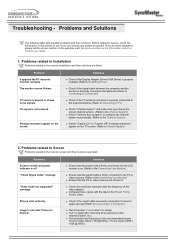
... recommended ranges. 15 inch model (1024 x 768 @ 60Hz), 17 inch model (1280 x 1024 @ 60Hz) z Turn on the TV screen. (Refer to see if you can remedy any problems yourself. The monitor screen flickers. Solutions z Check if the Display Adapter Driver (VGA Driver) is properly installed. (Refer to Installing Driver) z Check if the signal cable between the computer and the monitor is securely connected and tightened. (Refer to Connecting to a Computer) z Check if the TV antenna connector is securely connected...
... recommended ranges. 15 inch model (1024 x 768 @ 60Hz), 17 inch model (1280 x 1024 @ 60Hz) z Turn on the TV screen. (Refer to see if you can remedy any problems yourself. The monitor screen flickers. Solutions z Check if the Display Adapter Driver (VGA Driver) is properly installed. (Refer to Installing Driver) z Check if the signal cable between the computer and the monitor is securely connected and tightened. (Refer to Connecting to a Computer) z Check if the TV antenna connector is securely connected...
User Manual (ENGLISH)
Page 39
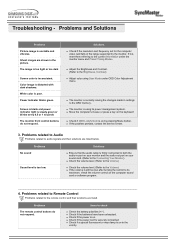
... z Check if OSD Lock/Unlock is on by the monitor. Problems No sound Sound level is securely connected. z Check if the power cord is too low. Solutions z Check if the resolution and frequency set for the computer video card falls in port on your monitor and the audio-out port on . z The monitor is using User Mode under the monitor menu and Preset Timing Modes. Items to its power management system. Troubleshooting - z The monitor is currently saving the changes made in the vicinity. Ghost images...
... z Check if OSD Lock/Unlock is on by the monitor. Problems No sound Sound level is securely connected. z Check if the power cord is too low. Solutions z Check if the resolution and frequency set for the computer video card falls in port on your monitor and the audio-out port on . z The monitor is using User Mode under the monitor menu and Preset Timing Modes. Items to its power management system. Troubleshooting - z The monitor is currently saving the changes made in the vicinity. Ghost images...

User Manual (ENGLISH)
Page 40
... case/LCD Panel? How can be changed by clicking Control Panel Theme Display Settings. Answer Frequency can I change the frequency? Display * Contact the video card manufacturer for your reference. Windows XP: Reset Power Saving parameters by clicking Control Panel Appearance & Theme Display Screen Saver or in the computer BIOS SETUP. (Refer to Windows/Computer Manual). Q & A Frequently asked questions are summarized here for details. Troubleshooting - Note that video card support can I adjust the resolution? Disconnect the power cord and then clean the monitor...
... case/LCD Panel? How can be changed by clicking Control Panel Theme Display Settings. Answer Frequency can I change the frequency? Display * Contact the video card manufacturer for your reference. Windows XP: Reset Power Saving parameters by clicking Control Panel Appearance & Theme Display Screen Saver or in the computer BIOS SETUP. (Refer to Windows/Computer Manual). Q & A Frequently asked questions are summarized here for details. Troubleshooting - Note that video card support can I adjust the resolution? Disconnect the power cord and then clean the monitor...
User Manual (ENGLISH)
Page 43
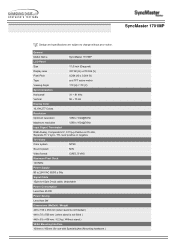
... SyncMaster 1701MP LCD Panel Size 17,0 inch (Diagonal) Display area 337.92 (H) x 270.336 (V) Pixel Pitch 0,264 (H) x 0,264 (V) Type a-si TFT active matrix Viewing Angle 170 (H) / 170 (V) Synchronization Horizontal 31 ~ 81 kHz Vertical 56 ~ 75 Hz Display Color 16,194,277 Colors Resolution Optimum resolution 1280 x 1024@60Hz Maximum resolution 1280 x 1024@76Hz Input Signal, Terminated RGB Analog, Composite H/V, 0.7Vp-p Positive at 75 ohm, Separate H / V sync, TTL level positive or negative TV / Video Color system NTSC Sound system M/N Video...
... SyncMaster 1701MP LCD Panel Size 17,0 inch (Diagonal) Display area 337.92 (H) x 270.336 (V) Pixel Pitch 0,264 (H) x 0,264 (V) Type a-si TFT active matrix Viewing Angle 170 (H) / 170 (V) Synchronization Horizontal 31 ~ 81 kHz Vertical 56 ~ 75 Hz Display Color 16,194,277 Colors Resolution Optimum resolution 1280 x 1024@60Hz Maximum resolution 1280 x 1024@76Hz Input Signal, Terminated RGB Analog, Composite H/V, 0.7Vp-p Positive at 75 ohm, Separate H / V sync, TTL level positive or negative TV / Video Color system NTSC Sound system M/N Video...
User Manual (ENGLISH)
Page 59
... of picture. When you clean the monitor and the panel outside, please apply the recommended small amount of cleaner by executing "auto adjustment function" in control panel of computer as window termination button is appeared as described below to be forced but to enjoy the best quality of time. Adjust computer resolution and screen injection rate (refresh rate) in display screen that is pressed. SyncMaster 1501MP { For example, the number of TFT LCD pixels...
... of picture. When you clean the monitor and the panel outside, please apply the recommended small amount of cleaner by executing "auto adjustment function" in control panel of computer as window termination button is appeared as described below to be forced but to enjoy the best quality of time. Adjust computer resolution and screen injection rate (refresh rate) in display screen that is pressed. SyncMaster 1501MP { For example, the number of TFT LCD pixels...


