User Manual (user Manual) (English)
Page 2
Automatic - Manual Installing VESA compliant mounting User's Manual On-Screen Display Troubleshooting Check List Q & A Self-Test Feature Check Specifications General Specifications PowerSaver Preset Display Modes Information Service Terms Regulatory Natural Color For Better Display Authority Index Main Page Safety Instructions Notational Power Installation Cleaning Other Introduction Unpacking Front Rear Setup Connecting Your Monitor Installing the Monitor Driver -
Automatic - Manual Installing VESA compliant mounting User's Manual On-Screen Display Troubleshooting Check List Q & A Self-Test Feature Check Specifications General Specifications PowerSaver Preset Display Modes Information Service Terms Regulatory Natural Color For Better Display Authority Index Main Page Safety Instructions Notational Power Installation Cleaning Other Introduction Unpacking Front Rear Setup Connecting Your Monitor Installing the Monitor Driver -
User Manual (user Manual) (English)
Page 18
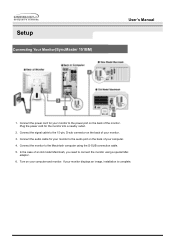
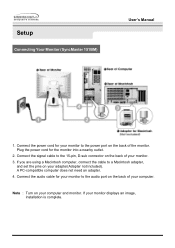
... model Macintosh, you need to the audio port on the back of the monitor. In the case of your monitor displays an image, installation is complete. Connect the audio cable for the monitor into a nearby outlet. 2. If your monitor. 3. Plug the power cord for your monitor to connect the monitor using the D-SUB connection cable. 5. Turn on the back of your computer. 4. Setup Connecting Your Monitor(SyncMaster 151BM) User's Manual 1. Connect the monitor to the power port on your monitor to the Macintosh computer using a special Mac...
... model Macintosh, you need to the audio port on the back of the monitor. In the case of your monitor displays an image, installation is complete. Connect the audio cable for the monitor into a nearby outlet. 2. If your monitor. 3. Plug the power cord for your monitor to connect the monitor using the D-SUB connection cable. 5. Turn on the back of your computer. 4. Setup Connecting Your Monitor(SyncMaster 151BM) User's Manual 1. Connect the monitor to the power port on your monitor to the Macintosh computer using a special Mac...
User Manual (user Manual) (English)
Page 22
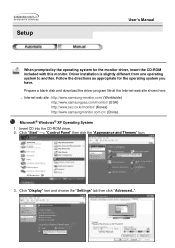
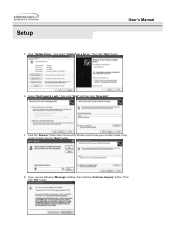
... disk and download the driver program file at the Internet web site shown here. ? Click "Display" icon and choose the "Settings" tab then click "Advanced..". Setup User's Manual When prompted by the operating system for the operating system you have. Follow the directions as appropriate for the monitor driver, insert the CD-ROM included with this monitor. Click "Start" -> "Control Panel" then click...
... disk and download the driver program file at the Internet web site shown here. ? Click "Display" icon and choose the "Settings" tab then click "Advanced..". Setup User's Manual When prompted by the operating system for the operating system you have. Follow the directions as appropriate for the monitor driver, insert the CD-ROM included with this monitor. Click "Start" -> "Control Panel" then click...
User Manual (user Manual) (English)
Page 23
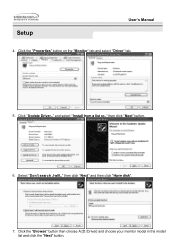
Click "Update Driver.." and select "Install from a list or.." then click "Next" button. 6. Select "Don't search ,I will.." Setup User's Manual 4. then click "Next" and then click "Have disk". 7. Click the "Properties" button on the "Monitor" tab and select "Driver" tab. 5. Click the "Browse" button then choose A:(D:\Driver) and choose your monitor model in the model list and click the "Next" button.
Click "Update Driver.." and select "Install from a list or.." then click "Next" button. 6. Select "Don't search ,I will.." Setup User's Manual 4. then click "Next" and then click "Have disk". 7. Click the "Properties" button on the "Monitor" tab and select "Driver" tab. 5. Click the "Browse" button then choose A:(D:\Driver) and choose your monitor model in the model list and click the "Next" button.
User Manual (user Manual) (English)
Page 25
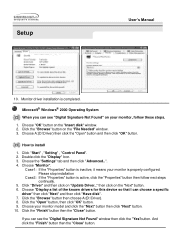
... a specific driver" then click "Next" and then click "Have disk". 7. If you can see the "Digital Signature Not Found" window then click the "Yes"button. Choose "Monitor". Choose A:(D:\Driver) then click the "Open" button and then click "OK" button. Click "Start" , "Setting" , "Control Panel". 2. Click "Driver" and then click on "Update Driver.." Choose your monitor is inactive, it means your monitor model and click the "Next" button then click "Next" button. 10. Setup User's Manual...
... a specific driver" then click "Next" and then click "Have disk". 7. If you can see the "Digital Signature Not Found" window then click the "Yes"button. Choose "Monitor". Choose A:(D:\Driver) then click the "Open" button and then click "OK" button. Click "Start" , "Setting" , "Control Panel". 2. Click "Driver" and then click on "Update Driver.." Choose your monitor is inactive, it means your monitor model and click the "Next" button then click "Next" button. 10. Setup User's Manual...

User Manual (user Manual) (English)
Page 27
... monitor. The third screen is a type of colors and Vertical frequency) and then click OK. 4. First of resolution, colors or frequency). Linux Operating System To execute X-Window, you need to a different mode (lower mode of all, set a horizontal frequency for selecting a keyboard. 5. Press Enter at the first and the second screen after setting other requested hardware. Execute X-Window after executing the X86Config file. 2. Click Start, Settings, Control Panel, and then double-click Display...
... monitor. The third screen is a type of colors and Vertical frequency) and then click OK. 4. First of resolution, colors or frequency). Linux Operating System To execute X-Window, you need to a different mode (lower mode of all, set a horizontal frequency for selecting a keyboard. 5. Press Enter at the first and the second screen after setting other requested hardware. Execute X-Window after executing the X86Config file. 2. Click Start, Settings, Control Panel, and then double-click Display...
User Manual (user Manual) (English)
Page 34
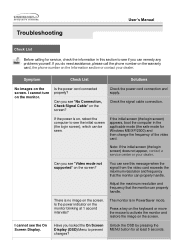
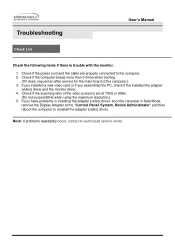
... any problems yourself. Is the power cord connected properly? Have you do need assistance, please call the phone number on the warranty card, the phone number on the monitor. Unlock the OSD by pressing the MENU button for service, check the information in this message when the signal from the video card exceeds the maximum resolution and frequency that the monitor can properly handle. Symptom Check List Solutions No images on the monitor blinking at...
... any problems yourself. Is the power cord connected properly? Have you do need assistance, please call the phone number on the warranty card, the phone number on the monitor. Unlock the OSD by pressing the MENU button for service, check the information in this message when the signal from the video card exceeds the maximum resolution and frequency that the monitor can properly handle. Symptom Check List Solutions No images on the monitor blinking at...
User Manual (user Manual) (English)
Page 35
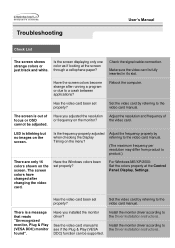
... differ from product to see if the Plug & Play (VESA DDC) function can be adjusted. Have you adjusted the resolution or frequency on the screen. Is the screen displaying only one color as if looking at the Control Panel, Display, Settings. Have you installed the monitor driver? Troubleshooting User's Manual Check List The screen shows strange colors or just black and white. LED is out of the video card. Install the monitor driver according to the Driver Installation Instructions. Has the video card been set properly? Check the signal cable connection.
... differ from product to see if the Plug & Play (VESA DDC) function can be adjusted. Have you adjusted the resolution or frequency on the screen. Is the screen displaying only one color as if looking at the Control Panel, Display, Settings. Have you installed the monitor driver? Troubleshooting User's Manual Check List The screen shows strange colors or just black and white. LED is out of the video card. Install the monitor driver according to the Driver Installation Instructions. Has the video card been set properly? Check the signal cable connection.
User Manual (user Manual) (English)
Page 36
Check if the power cord and the cable are properly connected to reinstall the adapter (video) driver. Note: If problems repeatedly occur, contact an authorized service center. Check if the scanning ratio of the computer.) 3. If you assembled the PC, check if the installed the adapter (video) driver and the monitor driver. 4. If you installed a new video card or if you have problems in installing the adapter (video) driver, boot the computer in Safe Mode, remove the Display Adapter at 75Hz or...
Check if the power cord and the cable are properly connected to reinstall the adapter (video) driver. Note: If problems repeatedly occur, contact an authorized service center. Check if the scanning ratio of the computer.) 3. If you assembled the PC, check if the installed the adapter (video) driver and the monitor driver. 4. If you installed a new video card or if you have problems in installing the adapter (video) driver, boot the computer in Safe Mode, remove the Display Adapter at 75Hz or...
User Manual (user Manual) (English)
Page 38
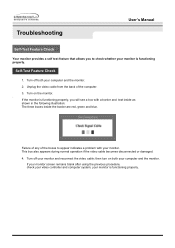
... the video cable from the back of the boxes to check whether your computer and the monitor. 2. If the monitor is functioning properly, you to appear indicates a problem with a border and text inside as shown in the following illustration: The three boxes inside the border are red, green and blue. Failure of any of the computer. 3. Self-Test Feature Check 1. Turn...
... the video cable from the back of the boxes to check whether your computer and the monitor. 2. If the monitor is functioning properly, you to appear indicates a problem with a border and text inside as shown in the following illustration: The three boxes inside the border are red, green and blue. Failure of any of the computer. 3. Self-Test Feature Check 1. Turn...

User Manual (user Manual) (English)
Page 63
But the pixels of RED, GREEN, BLUE and WHITE color seem to be scrubbed out softly. For example, the number of TFT LCD pixels that is appeared as described below to be seen. This is not from the monitor for an extended period of time. Resolution: 1024 x 768 Vertical frequency (refresh rate): 60 Hz 2 TFT LCD panel manufactured by using advanced semiconductor technology with the quality of picture, you clean the monitor and the...
But the pixels of RED, GREEN, BLUE and WHITE color seem to be scrubbed out softly. For example, the number of TFT LCD pixels that is appeared as described below to be seen. This is not from the monitor for an extended period of time. Resolution: 1024 x 768 Vertical frequency (refresh rate): 60 Hz 2 TFT LCD panel manufactured by using advanced semiconductor technology with the quality of picture, you clean the monitor and the...

User Manual (user Manual) (ver.1.0) (English)
Page 2
Automatic - Manual Installing VESA compliant mounting User's Manual On-Screen Display Troubleshooting Check List Q & A Self-Test Feature Check Specifications General Specifications PowerSaver Preset Display Modes Information Service Terms Regulatory Natural Color For Better Display Authority Index Main Page Safety Instructions Notational Power Installation Cleaning Other Introduction Unpacking Front Rear Setup Connecting Your Monitor Installing the Monitor Driver -
Automatic - Manual Installing VESA compliant mounting User's Manual On-Screen Display Troubleshooting Check List Q & A Self-Test Feature Check Specifications General Specifications PowerSaver Preset Display Modes Information Service Terms Regulatory Natural Color For Better Display Authority Index Main Page Safety Instructions Notational Power Installation Cleaning Other Introduction Unpacking Front Rear Setup Connecting Your Monitor Installing the Monitor Driver -
User Manual (user Manual) (ver.1.0) (English)
Page 15
... audio cable for your monitor to the power port on the back of the monitor. Plug the power cord for your monitor to the audio port on your monitor. 3. A PC-compatible computer does not need an adapter. 4. Connect the signal cable to a Macintosh adapter, and set the pins on your monitor displays an image, installation is complete. Connect the power cord for the monitor into a nearby outlet. 2. Setup Connecting Your Monitor (SyncMaster 151BM) User's Manual 1. If you are using a Macintosh computer, connect the cable to the 15-pin, D-sub connector...
... audio cable for your monitor to the power port on the back of the monitor. Plug the power cord for your monitor to the audio port on your monitor. 3. A PC-compatible computer does not need an adapter. 4. Connect the signal cable to a Macintosh adapter, and set the pins on your monitor displays an image, installation is complete. Connect the power cord for the monitor into a nearby outlet. 2. Setup Connecting Your Monitor (SyncMaster 151BM) User's Manual 1. If you are using a Macintosh computer, connect the cable to the 15-pin, D-sub connector...

User Manual (user Manual) (ver.1.0) (English)
Page 18
.../ (China) Microsoft® Windows® XP Operating System 1. Click "Display" icon and choose the "Settings" tab then click "Advanced..". 4. Click "Start" -> "Control Panel" then click the "Appearance and Themes" Icon. 3. Prepare a blank disk and download the driver program file at the Internet web site shown here. Click the "Properties" button on the "Monitor" tab and select "Driver" tab. Setup User's Manual When prompted by...
.../ (China) Microsoft® Windows® XP Operating System 1. Click "Display" icon and choose the "Settings" tab then click "Advanced..". 4. Click "Start" -> "Control Panel" then click the "Appearance and Themes" Icon. 3. Prepare a blank disk and download the driver program file at the Internet web site shown here. Click the "Properties" button on the "Monitor" tab and select "Driver" tab. Setup User's Manual When prompted by...
User Manual (user Manual) (ver.1.0) (English)
Page 19
Click the "Browse" button then choose A:(D:\Driver) and choose your monitor model in the model list and click the "Next" button. 8. If you can see following "Message" window, then click the "Continue Anyway" button. then click "Next" and then click "Have disk". 7. Then click "OK" button. Select "Don't search ,I will.." Click "Update Driver.." Setup User's Manual 5. and select "Install from a list or.." then click "Next" button. 6.
Click the "Browse" button then choose A:(D:\Driver) and choose your monitor model in the model list and click the "Next" button. 8. If you can see following "Message" window, then click the "Continue Anyway" button. then click "Next" and then click "Have disk". 7. Then click "OK" button. Select "Don't search ,I will.." Click "Update Driver.." Setup User's Manual 5. and select "Install from a list or.." then click "Next" button. 6.

User Manual (user Manual) (ver.1.0) (English)
Page 20
... "Insert disk" window. 2. Click the "Open" button, then click "OK" button. 9. If you can see "Digital Signature Not Found" on Samsung Monitor Homepage http://www.samsung-monitor.com/. 9. Microsoft® Windows® 2000 Operating System When you can see the "Digital Signature Not Found" window then click the "Yes"button. How to install 1. then click on "Update Driver.." Click the "Browse" button then choose A:(D:\Driver). 8. Click "Start" , "Setting" , "Control Panel". 2. Case1: If...
... "Insert disk" window. 2. Click the "Open" button, then click "OK" button. 9. If you can see "Digital Signature Not Found" on Samsung Monitor Homepage http://www.samsung-monitor.com/. 9. Microsoft® Windows® 2000 Operating System When you can see the "Digital Signature Not Found" window then click the "Yes"button. How to install 1. then click on "Update Driver.." Click the "Browse" button then choose A:(D:\Driver). 8. Click "Start" , "Setting" , "Control Panel". 2. Case1: If...
User Manual (user Manual) (ver.1.0) (English)
Page 37
...video card manual and the Preset Display Modes. (The maximum frequency per resolution may differ from product to product.) There are only 16 colors shown on the screen. Troubleshooting User's Manual Check List Symptom Check List LED is a message that reads "Unrecognized monitor, Plug & Play (VESA DDC) monitor found". Solutions Adjust the frequency properly by the video card. The screen colors have changed after changing the video card. Have you installed the monitor driver? For Windows 98(95): Set the colors properly at the Control Panel, Display, Settings. Set the video card...
...video card manual and the Preset Display Modes. (The maximum frequency per resolution may differ from product to product.) There are only 16 colors shown on the screen. Troubleshooting User's Manual Check List Symptom Check List LED is a message that reads "Unrecognized monitor, Plug & Play (VESA DDC) monitor found". Solutions Adjust the frequency properly by the video card. The screen colors have changed after changing the video card. Have you installed the monitor driver? For Windows 98(95): Set the colors properly at the Control Panel, Display, Settings. Set the video card...

User Manual (user Manual) (ver.1.0) (English)
Page 38
... exceed 60Hz when using the maximum resolution.) 5. Note: If problems repeatedly occur, contact an authorized service center. Check if the scanning ratio of the computer.) 3. Check if the power cord and the cable are properly connected to reinstall the adapter (video) driver. If you assembled the PC, check if the installed the adapter(video) driver and the monitor driver. 4. Troubleshooting User's Manual Check List Check the following items if there is set at the "Control Panel, System, Device Administrator...
... exceed 60Hz when using the maximum resolution.) 5. Note: If problems repeatedly occur, contact an authorized service center. Check if the scanning ratio of the computer.) 3. Check if the power cord and the cable are properly connected to reinstall the adapter (video) driver. If you assembled the PC, check if the installed the adapter(video) driver and the monitor driver. 4. Troubleshooting User's Manual Check List Check the following items if there is set at the "Control Panel, System, Device Administrator...
User Manual (user Manual) (ver.1.0) (English)
Page 39
... resolution at BIOS-SETUP of the detergent nor scratch the case. Windows 3.1: Change the resolution and the colors using either a cleaning solution or plain water. Windows 3.1: Set the function using the VGA Utility provided by reconfiguring the video card. How can I change the frequency? Answer Frequency can be changed by the video card. Do not leave any water to Windows/Computer Manual). Troubleshooting User's Manual Q&A Question How can I adjust the resolution? Windows 95/98: Set the function at the Control Panel, Display, Settings...
... resolution at BIOS-SETUP of the detergent nor scratch the case. Windows 3.1: Change the resolution and the colors using either a cleaning solution or plain water. Windows 3.1: Set the function using the VGA Utility provided by reconfiguring the video card. How can I change the frequency? Answer Frequency can be changed by the video card. Do not leave any water to Windows/Computer Manual). Troubleshooting User's Manual Q&A Question How can I adjust the resolution? Windows 95/98: Set the function at the Control Panel, Display, Settings...

User Manual (user Manual) (ver.1.0) (English)
Page 61
Information User's Manual For Better Display 1 Adjust computer resolution and screen injection rate (refresh rate) in control panel of computer as window termination button is pressed. Resolution: 1024 x 768 Vertical frequency (refresh rate): 60 Hz 2 TFT LCD panel manufactured by using soft and dry cloth and polish it. This is not from bad quality and you can have a stain on it without uneasiness. Let LCD area not to be forced but to be bright sometimes...
Information User's Manual For Better Display 1 Adjust computer resolution and screen injection rate (refresh rate) in control panel of computer as window termination button is pressed. Resolution: 1024 x 768 Vertical frequency (refresh rate): 60 Hz 2 TFT LCD panel manufactured by using soft and dry cloth and polish it. This is not from bad quality and you can have a stain on it without uneasiness. Let LCD area not to be forced but to be bright sometimes...


