

User Manual (user Manual) (ver.1.0) (English)
Page 2
... herein or for energy efficiency. VESA, DPMS and DDC are registered trademarks of their respective owners. Samsung Electronics Co., Ltd. shall not be the trademarks or registered trademarks of Microsoft Corporation; is subject to change without the ...written permission of Video Electronics Standard Association; has determined that this product meets the ENERGY STAR guidelines for incidental or consequential damages in any manner whatsoever without notice. © 2000 Samsung Electronics Co., Ltd. Information in this document is...
... herein or for energy efficiency. VESA, DPMS and DDC are registered trademarks of their respective owners. Samsung Electronics Co., Ltd. shall not be the trademarks or registered trademarks of Microsoft Corporation; is subject to change without the ...written permission of Video Electronics Standard Association; has determined that this product meets the ENERGY STAR guidelines for incidental or consequential damages in any manner whatsoever without notice. © 2000 Samsung Electronics Co., Ltd. Information in this document is...
User Manual (user Manual) (ver.1.0) (English)
Page 3
... LCD Monitor 4 Setting up an Ergonomic Workstation 4 Monitor Location 4 Workstation Height 4 Viewing Angle 4 Kensington Security Slot 4 Connecting Your LCD Monitor 5 Plug and Play 6 Installing the Video Driver 6 Self-Test Feature Check (STFC 6 Getting Help 7 Warm-up Time 7 Adjusting Your LCD Monitor 8 User Controls 8 Automatic Save 9 Direct-Access Features 10 OSD Lock...
... LCD Monitor 4 Setting up an Ergonomic Workstation 4 Monitor Location 4 Workstation Height 4 Viewing Angle 4 Kensington Security Slot 4 Connecting Your LCD Monitor 5 Plug and Play 6 Installing the Video Driver 6 Self-Test Feature Check (STFC 6 Getting Help 7 Warm-up Time 7 Adjusting Your LCD Monitor 8 User Controls 8 Automatic Save 9 Direct-Access Features 10 OSD Lock...

User Manual (user Manual) (ver.1.0) (English)
Page 7
... the DC adapter and connect the adapter jack to the DC12V power port on the back of your monitor. 2 Connect the signal cable to the video port on your computer. 3 Connect the RCA cable or S-VHS cable to your DVD, VCR or camcoder. 4 Connect the audio sources(computer, DVD..... 6 Connect your headphone to the Headphone-out port. 7 Turn on both your computer and the monitor. 8 If necessary, install the video driver for the monitor. (See "Installing the video driver" on page 6) 9 After your monitor has been fully installed successfully, run Auto-Adjustment. (See page12) * For SyncMaster 150MP/170MP...
... the DC adapter and connect the adapter jack to the DC12V power port on the back of your monitor. 2 Connect the signal cable to the video port on your computer. 3 Connect the RCA cable or S-VHS cable to your DVD, VCR or camcoder. 4 Connect the audio sources(computer, DVD..... 6 Connect your headphone to the Headphone-out port. 7 Turn on both your computer and the monitor. 8 If necessary, install the video driver for the monitor. (See "Installing the video driver" on page 6) 9 After your monitor has been fully installed successfully, run Auto-Adjustment. (See page12) * For SyncMaster 150MP/170MP...

User Manual (user Manual) (ver.1.0) (English)
Page 8
...dark and the power indicator is functioning properly. Make sure that accompanies this product contains the necessary drivers for installing your PC system needs a video driver, follow the instructions given below : Power Indicator Figure 4. Power Indicator 1 Turn off both your monitor in a Plug and Play compatible... is blinking, run the monitor self-test by checking if the source indicator LED labeled "PC" is on the monitor. Installing the Video Driver The CD that PC is selected as a primary source by following the steps given below according to install your computer and the ...
...dark and the power indicator is functioning properly. Make sure that accompanies this product contains the necessary drivers for installing your PC system needs a video driver, follow the instructions given below : Power Indicator Figure 4. Power Indicator 1 Turn off both your monitor in a Plug and Play compatible... is blinking, run the monitor self-test by checking if the source indicator LED labeled "PC" is on the monitor. Installing the Video Driver The CD that PC is selected as a primary source by following the steps given below according to install your computer and the ...
User Manual (user Manual) (ver.1.0) (English)
Page 9
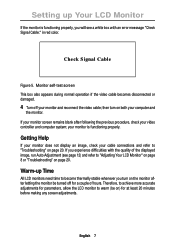
...20. If you experience difficulties with the quality of hours. Monitor self-test screen This box also appears during normal operation if the video cable becomes disconnected or damaged. 4 Turn off for at least 20 minutes before making any screen adjustments. Warm-up Your LCD ...connections and refer to warm (be turned off your monitor is functioning properly, you turn on page 20. your monitor and reconnect the video cable; Therefore, to achieve more accurate adjustments for parameters, allow the LCD monitor to "Troubleshooting" on the monitor after following the previous ...
...20. If you experience difficulties with the quality of hours. Monitor self-test screen This box also appears during normal operation if the video cable becomes disconnected or damaged. 4 Turn off for at least 20 minutes before making any screen adjustments. Warm-up Your LCD ...connections and refer to warm (be turned off your monitor is functioning properly, you turn on page 20. your monitor and reconnect the video cable; Therefore, to achieve more accurate adjustments for parameters, allow the LCD monitor to "Troubleshooting" on the monitor after following the previous ...

User Manual (user Manual) (ver.1.0) (English)
Page 10
.... n Exits from the OSD system. English 8 All of these buttons to Fullscreen video. n Exits from menus and sub-menus. While you use these adjustments are made using the control buttons on the front of the image being displayed. n ... highlighted function. PC V1 V2 PIP Source PIP Exit Menu VOL * 17" : SyncMaster 170MB Figure 6. n Indicates the status of the control button indicate currently active Video source. Adjusting Your LCD Monitor User Controls Your LCD monitor allows you their numeric values as they change. n Turns the PIP off . n PIP off . User...
.... n Exits from the OSD system. English 8 All of these buttons to Fullscreen video. n Exits from menus and sub-menus. While you use these adjustments are made using the control buttons on the front of the image being displayed. n ... highlighted function. PC V1 V2 PIP Source PIP Exit Menu VOL * 17" : SyncMaster 170MB Figure 6. n Indicates the status of the control button indicate currently active Video source. Adjusting Your LCD Monitor User Controls Your LCD monitor allows you their numeric values as they change. n Turns the PIP off . n PIP off . User...

User Manual (user Manual) (ver.1.0) (English)
Page 11
... stored in the internal memory of the product. English 9 Adjusting Your LCD Monitor No. n Increases or decreases the values of audio volume. SyncMaster 150MB and SyncMaster 170MB have made. n Moves the selector left or right on the OSD. factory preset modes listed in the monitor. VOL + n ...Increases or decreases the level of the selected 7 function. - In addition to these modes, five more video modes that are not in the table are saved into a user area in Table 7 on -screen menu and allow an adjustment window to remain active...
... stored in the internal memory of the product. English 9 Adjusting Your LCD Monitor No. n Increases or decreases the values of audio volume. SyncMaster 150MB and SyncMaster 170MB have made. n Moves the selector left or right on the OSD. factory preset modes listed in the monitor. VOL + n ...Increases or decreases the level of the selected 7 function. - In addition to these modes, five more video modes that are not in the table are saved into a user area in Table 7 on -screen menu and allow an adjustment window to remain active...

User Manual (user Manual) (ver.1.0) (English)
Page 14
... PC V1 V2 TV Source PIP Exit Menu SyncMaster 150MB VOL Image Lock PC V1 V2 TV Source PIP Exit Menu SyncMaster 150MB VOL PC V1 V2 TV Source PIP Exit Menu SyncMaster 150MB VOL Image Lock is used to the incoming video signal. The values of fine, coarse and position are adjusted...
... PC V1 V2 TV Source PIP Exit Menu SyncMaster 150MB VOL Image Lock PC V1 V2 TV Source PIP Exit Menu SyncMaster 150MB VOL PC V1 V2 TV Source PIP Exit Menu SyncMaster 150MB VOL Image Lock is used to the incoming video signal. The values of fine, coarse and position are adjusted...

User Manual (user Manual) (ver.1.0) (English)
Page 16
Adjusting Your LCD Monitor Table 1. The individual color components are connected to the monitor, PIP allows you to watch video from redish white to bluish white. When external A/V devices such as VCR or DVD are also user customizable. Change PIP ... customizable. Enable or disable closed caption feature and set the appearance of color can be changed from such devices in a small window superimposed on pc video signal. Bluish white. Redish white. Resize PIP window. Screen controls (Continued) Icon Menus and Sub-menus Function Descriptions Color n Mode1 n Mode2 n Mode3 ...
Adjusting Your LCD Monitor Table 1. The individual color components are connected to the monitor, PIP allows you to watch video from redish white to bluish white. When external A/V devices such as VCR or DVD are also user customizable. Change PIP ... customizable. Enable or disable closed caption feature and set the appearance of color can be changed from such devices in a small window superimposed on pc video signal. Bluish white. Redish white. Resize PIP window. Screen controls (Continued) Icon Menus and Sub-menus Function Descriptions Color n Mode1 n Mode2 n Mode3 ...
User Manual (user Manual) (ver.1.0) (English)
Page 17
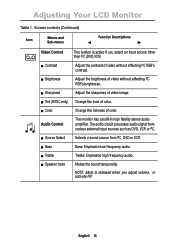
... a built-in high fidelity stereo audio amplifier. n Treble Treble: Emphasize high frequency audio. English 15 n Sharpness Adjust the sharpness of video without affecting PC RGB's contrast. n Bass Bass: Emphasize low frequency audio. n Tint (NTSC only) Change the tone of color. n Color Change the...The audio circuit processes audio signal from PC, DVD or VCR. Screen controls (Continued) Icon Menus and Sub-menus Function Descriptions Video Control This funtion is released when you select an input source other than PC.(DVD,VCR) n Contrast Adjust the contrast of...
... a built-in high fidelity stereo audio amplifier. n Treble Treble: Emphasize high frequency audio. English 15 n Sharpness Adjust the sharpness of video without affecting PC RGB's contrast. n Bass Bass: Emphasize low frequency audio. n Tint (NTSC only) Change the tone of color. n Color Change the...The audio circuit processes audio signal from PC, DVD or VCR. Screen controls (Continued) Icon Menus and Sub-menus Function Descriptions Video Control This funtion is released when you select an input source other than PC.(DVD,VCR) n Contrast Adjust the contrast of...
User Manual (user Manual) (ver.1.0) (English)
Page 18
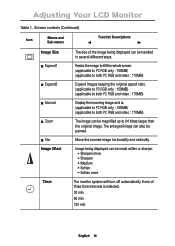
...image to fill the whole screen. (applicable to PC RGB only : 150MB) (applicable to both PC RGB and video : 170MB) Expand images keeping the original aspect ratio. (applicable to PC RGB only : 150MB) (applicable to both PC RGB and video : 170MB) The image can be magnified up to both PC ...RGB and video : 170MB) Display the incoming image as it is selected. 30 min....
...image to fill the whole screen. (applicable to PC RGB only : 150MB) (applicable to both PC RGB and video : 170MB) Expand images keeping the original aspect ratio. (applicable to PC RGB only : 150MB) (applicable to both PC RGB and video : 170MB) The image can be magnified up to both PC ...RGB and video : 170MB) Display the incoming image as it is selected. 30 min....
User Manual (user Manual) (ver.1.0) (English)
Page 21
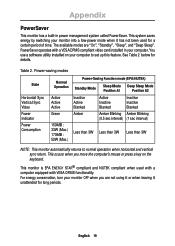
... and vertical sync return. You use a software utility installed on the keyboard. Power-saving modes State Horizontal Sync Vertical Sync Video Power Indicator Power Consumption Normal Operation Active Active Active Green 150MB : 33W (Max.) 170MB : 52W (Max.) Power-Saving Function mode (EPA/NUTEK) Standby Mode Sleep Mode Deep Sleep Mode Position A1... used for details. The available modes are not using it or when leaving it has not been used with a computer equipped with a VESA DPMS compliant video card installed in power management system called PowerSaver. Table 2.
... and vertical sync return. You use a software utility installed on the keyboard. Power-saving modes State Horizontal Sync Vertical Sync Video Power Indicator Power Consumption Normal Operation Active Active Active Green 150MB : 33W (Max.) 170MB : 52W (Max.) Power-Saving Function mode (EPA/NUTEK) Standby Mode Sleep Mode Deep Sleep Mode Position A1... used for details. The available modes are not using it or when leaving it has not been used with a computer equipped with a VESA DPMS compliant video card installed in power management system called PowerSaver. Table 2.

User Manual (user Manual) (ver.1.0) (English)
Page 22
...Horizontal bars appear n Adjust the Fine function. Connecting your problem. Display Modes, page 26. Vertical bars appear to the PC or video sources. Before contacting customer service, try the suggested actions that the power cord is firmly connected and the LCD monitor is too...the Brightness and or too dark Contrast. Connecting your LCD monitor, page 5. " Check Signal Cable" message n Ensure that the PC or video sources are appropriate to flicker, jitter or shimmer on the image. "Sync. Appendix Troubleshooting If you have a problem setting up or...
...Horizontal bars appear n Adjust the Fine function. Connecting your problem. Display Modes, page 26. Vertical bars appear to the PC or video sources. Before contacting customer service, try the suggested actions that the power cord is firmly connected and the LCD monitor is too...the Brightness and or too dark Contrast. Connecting your LCD monitor, page 5. " Check Signal Cable" message n Ensure that the PC or video sources are appropriate to flicker, jitter or shimmer on the image. "Sync. Appendix Troubleshooting If you have a problem setting up or...

User Manual (user Manual) (ver.1.0) (English)
Page 23
...not centered n Adjust the horizontal and on the keyboard Power Saver, page 19. n If the setting is not correct, use Installing the Video Driver, your computer check: Control Panel, Display, Settings Display Modes, page 26. H-Position, page 13. vertical position. Appendix Table 3. ...multiscan display functions within the following frequency domain: n Horizontal frequency: n Vertical frequency: n Maximum refresh rate: 150MB : 30 kHz - 69 kHz 170MB : 30 kHz - 81kHz 56 Hz - 85 Hz 150MB: 1024 x 768 @ 85 Hz 170MB: 1280 x 1024 @ 76Hz Image is using its power management ...
...not centered n Adjust the horizontal and on the keyboard Power Saver, page 19. n If the setting is not correct, use Installing the Video Driver, your computer check: Control Panel, Display, Settings Display Modes, page 26. H-Position, page 13. vertical position. Appendix Table 3. ...multiscan display functions within the following frequency domain: n Horizontal frequency: n Vertical frequency: n Maximum refresh rate: 150MB : 30 kHz - 69 kHz 170MB : 30 kHz - 81kHz 56 Hz - 85 Hz 150MB: 1024 x 768 @ 85 Hz 170MB: 1280 x 1024 @ 76Hz Image is using its power management ...
User Manual (user Manual) (ver.1.0) (English)
Page 25
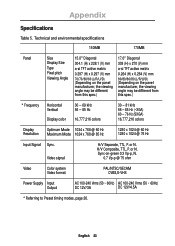
...85 Hz 1280 x 1024 @ 60 Hz 1280 x 1024 @ 76 Hz Input Signal Sync. Appendix Specifications Table 5. Technical and environmental specifications 150MB 170MB Panel Size Display Size Type Pixel pitch Viewing Angle 15.0" Diagonal 304.1 (H) x 228.1 (V) mm a-si TFT active matrix 0.297 (H) x 0.297 (V)... 270 (V) mm a-si TFT active matrix 0.264 (H) x 0.264 (V) mm 80/80/80/80 (L/R/U/D) (Depending on -green 0.3 Vp-p, N. 0.7 Vp-p @ 75 ohm Video Color system Video format PAL/NTSC/SECAM CVBS,S-VHS Power Supply Input Output AC 100-240 Vrms (50 ~ 60Hz) AC 100-240 Vrms (50 ~ 60Hz) DC 12V...
...85 Hz 1280 x 1024 @ 60 Hz 1280 x 1024 @ 76 Hz Input Signal Sync. Appendix Specifications Table 5. Technical and environmental specifications 150MB 170MB Panel Size Display Size Type Pixel pitch Viewing Angle 15.0" Diagonal 304.1 (H) x 228.1 (V) mm a-si TFT active matrix 0.297 (H) x 0.297 (V)... 270 (V) mm a-si TFT active matrix 0.264 (H) x 0.264 (V) mm 80/80/80/80 (L/R/U/D) (Depending on -green 0.3 Vp-p, N. 0.7 Vp-p @ 75 ohm Video Color system Video format PAL/NTSC/SECAM CVBS,S-VHS Power Supply Input Output AC 100-240 Vrms (50 ~ 60Hz) AC 100-240 Vrms (50 ~ 60Hz) DC 12V...
User Manual (user Manual) (ver.1.0) (English)
Page 32
... Size 14 Source 8, 15 Speaker mute 15 Stereo-RCA Cable 3 T Tilt the screen 4 Timer 16 Treble 15 Troubleshooting 20 U User control locations 8 User mode 14 V Video Control 15 VOL 9 Volume 10 V-position 13 Z Zoom 16 English 30
... Size 14 Source 8, 15 Speaker mute 15 Stereo-RCA Cable 3 T Tilt the screen 4 Timer 16 Treble 15 Troubleshooting 20 U User control locations 8 User mode 14 V Video Control 15 VOL 9 Volume 10 V-position 13 Z Zoom 16 English 30


