User Manual (ENGLISH)
Page 2
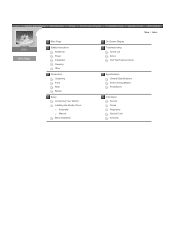
Main Page Safety Instructions Notational Power Installation Cleaning Other Introduction Unpacking Front Rear Bottom Setup Connecting Your Monitor Installing the Monitor Driver Automatic Manual Base Installation On-Screen Display Troubleshooting Check List Q & A Self-Test Feature Check Main > Index Specifications General Specifications Preset Timing Modes PowerSaver Information Service Terms Regulatory Natural Color Authority
Main Page Safety Instructions Notational Power Installation Cleaning Other Introduction Unpacking Front Rear Bottom Setup Connecting Your Monitor Installing the Monitor Driver Automatic Manual Base Installation On-Screen Display Troubleshooting Check List Q & A Self-Test Feature Check Main > Index Specifications General Specifications Preset Timing Modes PowerSaver Information Service Terms Regulatory Natural Color Authority

User Manual (ENGLISH)
Page 6
... not set a glass of alcohol-based solvents, which can buy a recommended detergent at any small metal objects on the monitor. Use the recommended detergent with a slightly moistened, soft fabric. z A dirty connector can prevent the coated CRT from being damaged or the monitor cabinet from being dissolved, cracked or discolored. Notational Power Installation Clean Other Main > Safety Instructions > Clean When cleaning the monitor case or...
... not set a glass of alcohol-based solvents, which can buy a recommended detergent at any small metal objects on the monitor. Use the recommended detergent with a slightly moistened, soft fabric. z A dirty connector can prevent the coated CRT from being damaged or the monitor cabinet from being dissolved, cracked or discolored. Notational Power Installation Clean Other Main > Safety Instructions > Clean When cleaning the monitor case or...

User Manual (ENGLISH)
Page 7
...Power Installation Clean Other Main > Safety Instructions > Other Do not remove cover(or back). Do not place any unusual sounds or smells coming from it immediately and contact an authorized dealer or service. z This may cause an electric shock, fire or injury. in particular, if there are any heavy objects on the wire or the signal cable.... z This may cause a breakdown, electric shock or a fire due to damage to move the monitor right or left by pulling on the monitor. No user serviceable parts inside. Do not move the monitor by pulling only the ...
...Power Installation Clean Other Main > Safety Instructions > Other Do not remove cover(or back). Do not place any unusual sounds or smells coming from it immediately and contact an authorized dealer or service. z This may cause an electric shock, fire or injury. in particular, if there are any heavy objects on the wire or the signal cable.... z This may cause a breakdown, electric shock or a fire due to damage to move the monitor right or left by pulling on the monitor. No user serviceable parts inside. Do not move the monitor by pulling only the ...

User Manual (ENGLISH)
Page 10
... menu. Power button You can see the frequency (user control mode) used by the user, the polarity of the operational signals, the default frequency (default mode) set when you to turn your adjustments. Use this button to Exit the active menu or the OSD. Use this button to open the OSD and activate a highlighted menu item. For energy conservation, turn the monitor on and off. Information button 2. Exit button 3. Power indicator 6. This light glows green during normal operation, and blinks green once as the monitor saves your monitor...
... menu. Power button You can see the frequency (user control mode) used by the user, the polarity of the operational signals, the default frequency (default mode) set when you to turn your adjustments. Use this button to Exit the active menu or the OSD. Use this button to open the OSD and activate a highlighted menu item. For energy conservation, turn the monitor on and off. Information button 2. Exit button 3. Power indicator 6. This light glows green during normal operation, and blinks green once as the monitor saves your monitor...
User Manual (ENGLISH)
Page 13
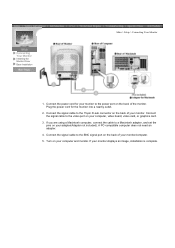
...monitor. Connecting Your Monitor Installing the Monitor Driver Base Installation Main > Setup > Connecting Your Monitor 1. Plug the power cord for your monitor to the video port on the back of your computer, video board, video card, or graphics card. 3. Connect the signal cable to the power port on your monitor displays an image, installation is complete. If you are using a Macintosh computer, connect the cable to the BNC signal port on your monitor/computer. 5. A PC-compatible computer does not need an adapter. 4. Connect the signal cable to a Macintosh adapter, and set...
...monitor. Connecting Your Monitor Installing the Monitor Driver Base Installation Main > Setup > Connecting Your Monitor 1. Plug the power cord for your monitor to the video port on the back of your computer, video board, video card, or graphics card. 3. Connect the signal cable to the power port on your monitor displays an image, installation is complete. If you are using a Macintosh computer, connect the cable to the BNC signal port on your monitor/computer. 5. A PC-compatible computer does not need an adapter. 4. Connect the signal cable to a Macintosh adapter, and set...
User Manual (ENGLISH)
Page 14
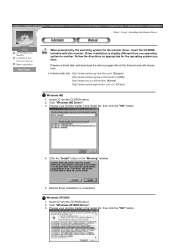
... the "OK" button. 4. Driver installation is completed. z Internet web site : http://www.samsung-monitor.com/ (Europe) http://www.samsungusa.com/monitor/ (USA) http://www.sec.co.kr/monitor/ (Korea) http://www.samsungmonitor.com.cn/ (China) Windows ME 1. Monitor driver installation is slightly different from one operating system to another. Insert CD into the CD-ROM driver. 2. Main > Setup > Installing the Monitor Driver Connecting Your Monitor Installing the Monitor Driver Base Installation When prompted...
... the "OK" button. 4. Driver installation is completed. z Internet web site : http://www.samsung-monitor.com/ (Europe) http://www.samsungusa.com/monitor/ (USA) http://www.sec.co.kr/monitor/ (Korea) http://www.samsungmonitor.com.cn/ (China) Windows ME 1. Monitor driver installation is slightly different from one operating system to another. Insert CD into the CD-ROM driver. 2. Main > Setup > Installing the Monitor Driver Connecting Your Monitor Installing the Monitor Driver Base Installation When prompted...
User Manual (ENGLISH)
Page 16
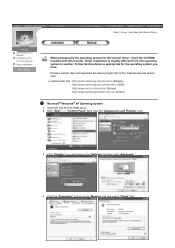
..." button on the "Monitor" tab and select "Driver" tab. Prepare a blank disk and download the driver program file at the Internet web site shown here. Click "Display" icon and choose the "Settings" tab then click "Advanced..". 4. Click "Start" -> "Control Panel" then click the "Appearance and Themes" Icon. 3. Driver installation is slightly different from one operating system to another. Main > Setup > Installing the Monitor Driver Connecting Your Monitor Installing the Monitor Driver Base Installation...
..." button on the "Monitor" tab and select "Driver" tab. Prepare a blank disk and download the driver program file at the Internet web site shown here. Click "Display" icon and choose the "Settings" tab then click "Advanced..". 4. Click "Start" -> "Control Panel" then click the "Appearance and Themes" Icon. 3. Driver installation is slightly different from one operating system to another. Main > Setup > Installing the Monitor Driver Connecting Your Monitor Installing the Monitor Driver Base Installation...
User Manual (ENGLISH)
Page 17
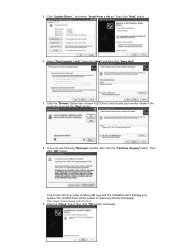
... "Message" window, then click the "Continue Anyway" button. then click "Next" and then click "Have disk". 7. Click the "Browse" button then choose A:(D:\Driver) and choose your system.The certified driver will .." Click "Update Driver.." and select "Install from a list or.." Select "Don't search ,I will be posted on Samsung Monitor Homepage http://www.samsungusa.com/monitor/. 9. Then click "OK" button. This monitor driver is under...
... "Message" window, then click the "Continue Anyway" button. then click "Next" and then click "Have disk". 7. Click the "Browse" button then choose A:(D:\Driver) and choose your system.The certified driver will .." Click "Update Driver.." and select "Install from a list or.." Select "Don't search ,I will be posted on Samsung Monitor Homepage http://www.samsungusa.com/monitor/. 9. Then click "OK" button. This monitor driver is under...

User Manual (ENGLISH)
Page 18
... Operating System When you close the Display Properties dialogue box. Click "Start" , "Setting" , "Control Panel". 2. then click on "Update Driver.." Double click "Display" icon. 3. 10. Click the "Finish" button then the "Close" button. Click the "Have Disk" button 9. Click the "Browse" button on the "Insert disk" window. 2. Choose "Monitor". Click "Start" , "Setting" , "Control Panel". 2. then click "Next" button. 8. Click the "Open" button, then click "OK" button. 9. Choose your computer and click "OK...
... Operating System When you close the Display Properties dialogue box. Click "Start" , "Setting" , "Control Panel". 2. then click on "Update Driver.." Double click "Display" icon. 3. 10. Click the "Finish" button then the "Close" button. Click the "Have Disk" button 9. Click the "Browse" button on the "Insert disk" window. 2. Choose "Monitor". Click "Start" , "Setting" , "Control Panel". 2. then click "Next" button. 8. Click the "Open" button, then click "OK" button. 9. Choose your computer and click "OK...

User Manual (ENGLISH)
Page 19
... Apply button if you wish to use (Resolution, Number of resolution and vertical frequency by referring to a different mode (lower mode of resolution, colors or frequency). In Display Registration Information window, click Settings Tab and then click All Display Modes. 3. Select a mode that you see the screen working normally after clicking Test. Click Start, Settings, Control Panel, and then double-click Display icon. 2. If the screen is no Mode at All Display Modes, select the level of colors and Vertical frequency) and...
... Apply button if you wish to use (Resolution, Number of resolution and vertical frequency by referring to a different mode (lower mode of resolution, colors or frequency). In Display Registration Information window, click Settings Tab and then click All Display Modes. 3. Select a mode that you see the screen working normally after clicking Test. Click Start, Settings, Control Panel, and then double-click Display icon. 2. If the screen is no Mode at All Display Modes, select the level of colors and Vertical frequency) and...
User Manual (ENGLISH)
Page 21
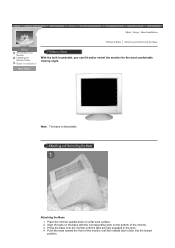
... the most comfortable viewing angle. Push the base toward the front of the monitor. 3. Note: The base is detachable. Align the tabs on the base with the corresponding slots on a flat work surface. 2. Press the base onto the monitor until the release latch clicks into the locked position. Attaching the Base 1. Main > Setup > Base Installation Tilt/Swivel Base | Attaching and Removing the Base Connecting Your Monitor Installing the Monitor Driver Base Installation With the built-in...
... the most comfortable viewing angle. Push the base toward the front of the monitor. 3. Note: The base is detachable. Align the tabs on the base with the corresponding slots on a flat work surface. 2. Press the base onto the monitor until the release latch clicks into the locked position. Attaching the Base 1. Main > Setup > Base Installation Tilt/Swivel Base | Attaching and Removing the Base Connecting Your Monitor Installing the Monitor Driver Base Installation With the built-in...

User Manual (ENGLISH)
Page 37
... products such as a power adapter, speaker or a high voltage wire near by pressing the MENU button for at least 10 seconds. If the initial screen (the login screen) appears, boot the computer in the applicable mode (the safe mode for service, check the information in Interlace Mode. (Interlace Mode: Vertical frequency 43Hz, 87Hz(i), etc) The signal from the video card exceeds the maximum resolution and frequency of the monitor. Unlock the OSD by ?
... products such as a power adapter, speaker or a high voltage wire near by pressing the MENU button for at least 10 seconds. If the initial screen (the login screen) appears, boot the computer in the applicable mode (the safe mode for service, check the information in Interlace Mode. (Interlace Mode: Vertical frequency 43Hz, 87Hz(i), etc) The signal from the video card exceeds the maximum resolution and frequency of the monitor. Unlock the OSD by ?
User Manual (ENGLISH)
Page 38
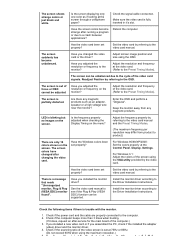
... strange colors or just black and white. Have you adjusted the resolution or frequency to see if the Plug & Play (VESA DDC) function can be adjusted. See the video card manual to the monitor? Install the monitor driver according to the Preset Timing Modes). Check the signal cable connection. Adjust the resolution and frequency of the video screen is fully inserted in it does, request an after changing the video card. LED is trouble with the monitor. 1. Make sure the video card is set properly? For Windows...
... strange colors or just black and white. Have you adjusted the resolution or frequency to see if the Plug & Play (VESA DDC) function can be adjusted. See the video card manual to the monitor? Install the monitor driver according to the Preset Timing Modes). Check the signal cable connection. Adjust the resolution and frequency of the video screen is fully inserted in it does, request an after changing the video card. LED is trouble with the monitor. 1. Make sure the video card is set properly? For Windows...
User Manual (ENGLISH)
Page 40
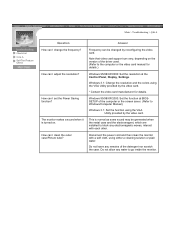
... computer or the video card manual for details. Main > Troubleshooting > Q & A Check List Q & A Self-Test Feature Check Question How can I adjust the resolution? Windows 3.1: Change the resolution and the colors using the VGA Utility provided by the video card. This is turned on the version of the driver used. (Refer to Windows/Computer Manual). Windows 3.1: Set the function using either a cleaning solution or plain water. Disconnect the power cord and then clean the monitor with each other. The monitor makes a sound when it...
... computer or the video card manual for details. Main > Troubleshooting > Q & A Check List Q & A Self-Test Feature Check Question How can I adjust the resolution? Windows 3.1: Change the resolution and the colors using the VGA Utility provided by the video card. This is turned on the version of the driver used. (Refer to Windows/Computer Manual). Windows 3.1: Set the function using either a cleaning solution or plain water. Disconnect the power cord and then clean the monitor with each other. The monitor makes a sound when it...

User Manual (ENGLISH)
Page 41
Turn off your monitor and reconnect the video cable; Failure of any of scan range or that allows you need to check the signal cable. your monitor works normally, the following screen appears. The location and the position of the monitor may indicate that the monitor is out of the boxes to appear indicates a problem with the input signal, a message appears on the screen or the screen goes blank although the power indicator...
Turn off your monitor and reconnect the video cable; Failure of any of scan range or that allows you need to check the signal cable. your monitor works normally, the following screen appears. The location and the position of the monitor may indicate that the monitor is out of the boxes to appear indicates a problem with the input signal, a message appears on the screen or the screen goes blank although the power indicator...
User Manual (ENGLISH)
Page 43
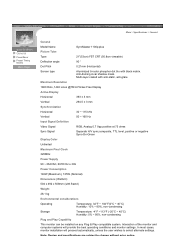
... the user wishes to change without prior notice Multi-layer coated with anti-static, anti-glare Maximum Resolution 1800 Dots, 1440 Lines @76Hz Flicker-Free Display Active Display Horizontal 393 ± 3 mm Vertical 294.5 ± 3 mm Synchronization Horizontal 30 ~ 115 kHz Vertical 50 ~ 160 Hz Input Signal Definition Video Signal RGB, Analog 0.7 Vpp positive at 75 ohms Sync Signal Separate H/V sync,composite, TTL level, positive or negative Sync-On-Green Display Color Unlimited Maximum Pixel Clock 320MHz Power Supply...
... the user wishes to change without prior notice Multi-layer coated with anti-static, anti-glare Maximum Resolution 1800 Dots, 1440 Lines @76Hz Flicker-Free Display Active Display Horizontal 393 ± 3 mm Vertical 294.5 ± 3 mm Synchronization Horizontal 30 ~ 115 kHz Vertical 50 ~ 160 Hz Input Signal Definition Video Signal RGB, Analog 0.7 Vpp positive at 75 ohms Sync Signal Separate H/V sync,composite, TTL level, positive or negative Sync-On-Green Display Color Unlimited Maximum Pixel Clock 320MHz Power Supply...

User Manual (ENGLISH)
Page 45
... Green Green, Blinking Power Consumption 125W(Nominal) 140W(Maximum) Less than 2W This monitor is not needed, or when leaving it has not been used with a computer equipped with a VESA DPMS compliant video card installed in power management system called PowerSaver. The monitor automatically returns to set up this product meets the ENERGY STAR® guidelines for long periods. General PowerSaver Preset Timing Modes Main > Specifications...
... Green Green, Blinking Power Consumption 125W(Nominal) 140W(Maximum) Less than 2W This monitor is not needed, or when leaving it has not been used with a computer equipped with a VESA DPMS compliant video card installed in power management system called PowerSaver. The monitor automatically returns to set up this product meets the ENERGY STAR® guidelines for long periods. General PowerSaver Preset Timing Modes Main > Specifications...

User Manual (ENGLISH)
Page 50
... 'resolution'. High resolution is called Horizontal Frequency. Horizontal Frequency The time to scan one line connecting the right edge to compose the screen image is good for the Plug & Play function. Resolution The number of horizontal and vertical dots used to the left edge of the screen can be detected. To avoid this means the screen is used in TVs. The Non-Interlace method is composed of red, green and blue...
... 'resolution'. High resolution is called Horizontal Frequency. Horizontal Frequency The time to scan one line connecting the right edge to compose the screen image is good for the Plug & Play function. Resolution The number of horizontal and vertical dots used to the left edge of the screen can be detected. To avoid this means the screen is used in TVs. The Non-Interlace method is composed of red, green and blue...

User Manual (ENGLISH)
Page 51
...with the limits for a Class B digital device, pursuant to Part 15 of the FCC Rules. Main > Information > Regulatory Service Terms Regulatory Natural Color Authority FCC Information User Instructions The Federal Communications Commission Radio Frequency Interference Statement includes the following warning: ...15P type (tandem blades) plug cap. However, there is connected. This equipment generates, uses, and can be suitable for the product. z Connect the equipment into an outlet on , the user is a detachable power supply cord with the instructions, may find the booklet called...
...with the limits for a Class B digital device, pursuant to Part 15 of the FCC Rules. Main > Information > Regulatory Service Terms Regulatory Natural Color Authority FCC Information User Instructions The Federal Communications Commission Radio Frequency Interference Statement includes the following warning: ...15P type (tandem blades) plug cap. However, there is connected. This equipment generates, uses, and can be suitable for the product. z Connect the equipment into an outlet on , the user is a detachable power supply cord with the instructions, may find the booklet called...

User Manual (SPANISH)
Page 52
... the instructions, may cause harmful interference to radio communications. For 120 Volt applications, use only UL Listed Detachable power supply cord with IEC320 style terminations. These limits are designed to Identify and Resolve Radio/TV Interference Problems helpful. z Connect the equipment into an outlet on , the user is a detachable power supply cord with NEMA configuration 6-15P type (tandem blades) plug cap. Warning User must...
... the instructions, may cause harmful interference to radio communications. For 120 Volt applications, use only UL Listed Detachable power supply cord with IEC320 style terminations. These limits are designed to Identify and Resolve Radio/TV Interference Problems helpful. z Connect the equipment into an outlet on , the user is a detachable power supply cord with NEMA configuration 6-15P type (tandem blades) plug cap. Warning User must...


