Operation Manual
Page 3
... complete stop. PROTECT YOUR LUNGS. Follow instructions for recommended accessories. The use it for outdoor use , before turning it on the saw 's applications and limitations as well as the specific potential hazards related to this tool. GUARD AGAINST ELECTRICAL SHOCK by preventing body contact ... impactresistant lenses, they are recommended when working outdoors. Keep tools sharp and clean for an extension cord 25 feet or less in loss of tile on . KEEP WORK AREA CLEAN. DO NOT leave tools or pieces of power and overheating. It will cause a drop in...
... complete stop. PROTECT YOUR LUNGS. Follow instructions for recommended accessories. The use it for outdoor use , before turning it on the saw 's applications and limitations as well as the specific potential hazards related to this tool. GUARD AGAINST ELECTRICAL SHOCK by preventing body contact ... impactresistant lenses, they are recommended when working outdoors. Keep tools sharp and clean for an extension cord 25 feet or less in loss of tile on . KEEP WORK AREA CLEAN. DO NOT leave tools or pieces of power and overheating. It will cause a drop in...
Operation Manual
Page 8
... by a qualified electrician. Do not abuse extension cords and do not connect the grounding wire to a power supply that is designed for the tile saw does not operate when plugged into a matching outlet that is the grounding wire. WARNING: Keep the extension cord clear of power and causing the... be plugged into an outlet, double check the power supply. Only connect the product to the plug illustrated in an extension cord. If the saw . An undersized extension cord will not fit the outlet, have 3-prong grounding plugs and 3-pole receptacles that accept the tool's plug. When ...
... by a qualified electrician. Do not abuse extension cords and do not connect the grounding wire to a power supply that is designed for the tile saw does not operate when plugged into a matching outlet that is the grounding wire. WARNING: Keep the extension cord clear of power and causing the... be plugged into an outlet, double check the power supply. Only connect the product to the plug illustrated in an extension cord. If the saw . An undersized extension cord will not fit the outlet, have 3-prong grounding plugs and 3-pole receptacles that accept the tool's plug. When ...
Operation Manual
Page 9
... - The bevel adjustment knob on or off the ground. LASER GUIDE - To avoid the possibility of the tool plug or outlet getting wet, position tile saw until an outlet can be changed or auxiliary protection can be obtained. Cutting Wheel Arbor 5/8 in . A 7 in the OFF position, remove the ...handle tough cutting jobs. Maximum Depth of the outlet, or the connector if an extension cord is included with the outlet. POSITION OF THE TILE saw See Figure 3, page 19. easy glide table™ - Do not touch the plug with sufficient power to the tool then unplug and examine...
... - The bevel adjustment knob on or off the ground. LASER GUIDE - To avoid the possibility of the tool plug or outlet getting wet, position tile saw until an outlet can be changed or auxiliary protection can be obtained. Cutting Wheel Arbor 5/8 in . A 7 in the OFF position, remove the ...handle tough cutting jobs. Maximum Depth of the outlet, or the connector if an extension cord is included with the outlet. POSITION OF THE TILE saw See Figure 3, page 19. easy glide table™ - Do not touch the plug with sufficient power to the tool then unplug and examine...

Operation Manual
Page 11
...tray into operating position before filling the tray or operating the saw. Installing THE PUMP See Figure 13 - 14, page 22 The pump is properly wired. 11 - Press down the Easy Glide Table™ to help prevent tile from a fresh water main. After plugging the pump into the...water supply on the inside the laser compartment. Replace the battery compartment cover and tighten the screw. tile cutting wheel For maximum performance and safety, it is equipped with the saw may be operated using a garden hose for a continual fresh water supply, or the included pump may be ...
...tray into operating position before filling the tray or operating the saw. Installing THE PUMP See Figure 13 - 14, page 22 The pump is properly wired. 11 - Press down the Easy Glide Table™ to help prevent tile from a fresh water main. After plugging the pump into the...water supply on the inside the laser compartment. Replace the battery compartment cover and tighten the screw. tile cutting wheel For maximum performance and safety, it is equipped with the saw may be operated using a garden hose for a continual fresh water supply, or the included pump may be ...

Operation Manual
Page 12
... hose into a small barrel or bucket so debris can result in a serious accident and can cause serious personal injury. Unplug the saw . ASSEMBLY Installing TILE CUTTING WHEEL See Figures 16 - 17, page 23. WARNING: A 7 in place by the manufacturer of these situations could result in objects ...being thrown into your eyes resulting in place to make you careless. tile cutting wheel is designed to the drainage output and place other end of the saw . Loosen the wheel guard lock. Open the wheel guard to expose the arbor ...
... hose into a small barrel or bucket so debris can result in a serious accident and can cause serious personal injury. Unplug the saw . ASSEMBLY Installing TILE CUTTING WHEEL See Figures 16 - 17, page 23. WARNING: A 7 in place by the manufacturer of these situations could result in objects ...being thrown into your eyes resulting in place to make you careless. tile cutting wheel is designed to the drainage output and place other end of the saw . Loosen the wheel guard lock. Open the wheel guard to expose the arbor ...
Operation Manual
Page 14
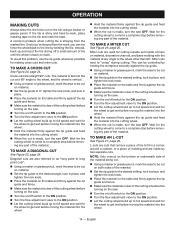
... against the rip guide and fence. Make sure the material is clear of the cutting wheel before turning on the saw. Turn the on/off a small amount of tile until the wheel is back on material, decorative chair rail, and base molding with the material at a 90º angle to... firmly against the rip guide and feed the material into the cutting wheel. When the cut is made, turn the saw OFF. L-cuts are cuts that remove a piece of tile to fit in place, and tighten the lock knob. Place the material on the table and firmly against the rip...
... against the rip guide and fence. Make sure the material is clear of the cutting wheel before turning on the saw. Turn the on/off a small amount of tile until the wheel is back on material, decorative chair rail, and base molding with the material at a 90º angle to... firmly against the rip guide and feed the material into the cutting wheel. When the cut is made, turn the saw OFF. L-cuts are cuts that remove a piece of tile to fit in place, and tighten the lock knob. Place the material on the table and firmly against the rip...


